Tuesday, May 2, 2023

Unlock the Power of Google Chrome: How to Use It as a Text Editor

Google Chrome
Are you looking for a lightweight and versatile text editor that won't take up valuable space on your computer? 

Look no further than Google Chrome! 

While it's primarily known as a web browser, Chrome can also function as a powerful text editor, complete with formatting tools. 

Whether you're a developer, writer, or just looking for a simple way to edit text files, this guide has got you covered.

Here's how to do it.
  • Open a new tab in Chrome
  • Enter data:text/html, <html contenteditable> in the addressbar.
  • Start typing!
Note:  You can bookmark the page for when you next need a text editor.

Google Chrome as Text Editor
fig.1 Google Chrome as a Text Editor

If you want to keep the text or prevent its loss if you close the tab, be sure to save it.  

Here's how:
  • Press CTRL+S.
  • Select location, 
  • Enter filename 
  • Select Save As Type - Webpage Single File or Webpage Complete.
  • Click Save
Note: The file will be saved as an html file that can be reopened by Chrome or other web brosers (and for that matter, Microsoft Word).

Please LIKE and SHARE OneCoolTip.com!

READ MORE

OneCoolTip.com
Cool Tech Tips for a Cooler Life!


#GoogleChrome #TextEditor #WebDevelopment #Productivity #TechTips #SyntaxHighlighting #WebDesign #ContentCreation #Writing #CodeEditing #HTML #CSS #JavaScript #TechTricks #WebBrowsers #TextFormatting #TechBlog #TechTips #OneCoolTip #Google @Google

Monday, May 1, 2023

Get Your Formatting Right with Gridlines and Ruler in Microsoft Word

Microsoft Word
Are you tired of spending hours formatting your document in Microsoft Word, only to find that it's still not aligned correctly? 

Do you struggle to maintain consistency throughout your document? 

Are you looking for a way to format your document with precision and ease? 

Here's a Cool Tip: Use gridlines and ruler in Microsoft Word

Say goodbye to formatting woes and hello to precise document design.

By default, the gridlines and ruler are not visible in Microsoft Word. 

However, you can easily view them by following these steps:

  • Click on the View tab in the Ribbon.
  • Click on the Gridlines checkbox to show the gridlines in your document.
  • Click on the Ruler checkbox to show the ruler in your document.

Added Cool Tips:  Use the keyboard shortcuts Ctrl + G to show or hide the gridlines and Ctrl + R to show or hide the ruler.

Microsoft Word View Gridlines and Ruler
fig. 1 Turn on Ruler and Gridlines for more precise alignment

Once you have enabled the gridlines and ruler in your document, you can use them to format your document accurately. 

  • Align text: You can use the ruler to set margins, indents, and tabs to align text in your document. You can drag the markers on the ruler to set the desired margins, indents, and tabs.

  • Align objects: You can use the gridlines to align objects such as images, shapes, and tables in your document. You can drag the objects to align them with the gridlines or use the Align options in the Ribbon to align them precisely.

  • Measure distance: You can use the ruler to measure the distance between the elements in your document. You can drag the cursor on the ruler to measure the distance between the elements.


Gridlines and ruler can be useful tools for formatting your document accurately in Microsoft Word.


Please LIKE and SHARE OneCoolTip.com!


READ MORE


OneCoolTip.com
Cool Tech Tips for a Cooler Life!


#MicrosoftWord #DocumentDesign #Gridlines #Ruler #Formatting #Precision #TechTips #WritingTips #Productivity #OfficeTips #DocumentFormatting #TechTricks #WordProcessing #ProfessionalDocuments #SocialMediaTips #ContentCreation #ContentMarketing #TechTips #OneCoolTip @Microsoft 

Sunday, April 30, 2023

Simplify Your Life with Alexa's New Timed Commands

Alexa
Do you know you can turn off or turn on lights using Alexa with a Timer?

You can now ask Alexa to turn your connected smart home devices on or off at a set amount of time.

You can say “Alexa, turn off the bedroom lamp in 15 minutes” or “Alexa, turn on the front porch at 5 p.m.” 

Previously, the device would just turn on or off.

This is a great upgrade to the Alexa digital home assistant.

Check it out!

Man Calling out to Alexa

Please LIKE and SHARE OneCoolTip.com!

READ MORE

OneCoolTip.com
Cool Tech Tips for a Cooler Life!

#Amazon #Alexa #smarthome #digitalassistant @Amazon 

Saturday, April 29, 2023

How to Make the Apple Watch Text Bigger, Brighter and Bolder

Apple Watch Face
Are you tired of squinting at your Apple Watch's display in bright sunlight? 

Or maybe you find the screen too bright in dimly lit rooms? 

Whatever your preference, adjusting the brightness and display settings on your Apple Watch is simple and easy to do. 

In this Cool Tip, we'll show you how to change the Apple Watch's brightness and display settings directly from the watch itself, as well as from your iPhone.

Changing Brightness and Display Settings on Apple Watch

  • Press the Digital Crown to access the Home screen.
  • Open the Settings app.
  • Tap Display & Brightness.
Apple Watch Settings
  • To adjust the brightness, tap the Brightness icons to increase or decrease brightness.
  • To change text size, tap Text Size then tap the text icons to increase or decrease text size.
  • To bold text, tap Bold to toggle the setting.
Apple Watch Display Brightness Settings

Changing Brightness and Display Settings on iPhone

  • Open the Watch app on your iPhone.
  • Tap My Watch, then tap Display & Brightness.
iPhone Watch Settings
  • To adjust the brightness, swipe the Brightness slider left or right.
  • To adjust Text Size, slide the Text Size slider left or right.
  • To bold text, tap Bold to toggle the setting.
iPhone Watch Display Brightness Settings

Changing the brightness and display settings on your Apple Watch is a quick and easy process, whether you prefer to make adjustments directly from the watch or from your iPhone. 

With just a few simple steps, you can customize your watch to suit your personal preferences and ensure that you can always see the information you need.

Enjoy!

Please LIKE and SHARE OneCoolTip.com!

READ MORE


OneCoolTip.com
Cool Tech Tips for a Cooler Life!

#AppleWatch #Watch #DisplaySettings #Brightness #Adjustments #Customization #SmartWatches #TechTips #iOS #WatchOS #iPhoneTips @TechTips #OneCoolTip #Apple @Apple

Friday, April 28, 2023

What was the Top Song on the Day You were Born? Find Out!

Are you tired of singing the same old "Happy Birthday" song every year? 

If so, this Friday Funday Cool Tip has you covered.

Playback.fm Birthday Song

This Friday Funday site is a fun and unique way to celebrate birthdays. 

You can discover which song was at the top of the charts on the day you were born.

It's easy to use, simply enter your birth date, and the site will generate a video featuring the top song on that day in history. 

Happy Birthday Song PlaybackFM

That's it.

Enjoy!


Please LIKE and SHARE OneCoolTip.com!


READ MORE


OneCoolTip.com
Cool Tech Tips for a Cooler Life!


#BirthdaySongGenerator #Playbackfm #MusicTimeline #HappyBirthday  #BirthdayFun  #MusicHistory #BirthYearTrivia #TechTip #OneCoolTip


Thursday, April 27, 2023

Stop the App Rating Madness on your iPhone

Do you get tired of getting messages asking if you like using an App?

You click No, Thanks.

But you just get the message over and over and over. again

Want to make it stop?

Here's a Cool Tip.

With an iPhone, you can.

Here's how.
  • Open Settings
  • Select App Store
iPhone Settings App Store

  • Scroll down to In-App Ratings and Reviews
  • Toggle setting to Off.

iPhone App Store Settings


That's it.

No more annoying requests to give ratings or reviews within iPhone apps.

Please LIKE and SHARE OneCoolTip.com!

READ MORE

OneCoolTip.com
Cool Tech Tips for a Cooler Life!

#iPhone #iOS #In-AppRatingsReviews #TechTip #OneCoolTip #apple #iOS @apple 

Wednesday, April 26, 2023

How to Set a Timer or Stopwatch in Google Chrome

Google Chrome
Whether you're cooking a meal, need to know when to leave, or something else, a timer can be a handy tool. 

And with Google Chrome, you can set a timer or stopwatch right from your browser.


To set a timer in Google Chrome, follow these steps:
  • Open Google Chrome.
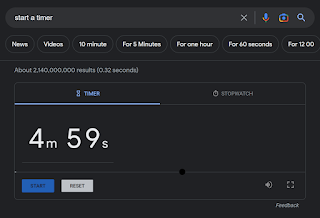
  • In the address bar, type set a timer for followed by the amount of time you want the timer to run. For example, to set a timer for 5 minutes, you type set a timer for 5 minutes.
  • Press Enter.
  • A timer will appear.
  • The timer will start automatically.
  • To stop the timer, click the "Stop" button.
Google Chrome Timer
fig. 1 Google Chrome Timer


To set a stopwatch in Google Chrome, follow these steps:
  • Open Google Chrome.
  • In the address bar, type start a stopwatch.
  • Press Enter.
  • A stopwatch will appear.
  • To start the stopwatch, click the Start button.
  • To stop the stopwatch, click the Stop button.

Here are a few tips for using timers and stopwatches in Google Chrome:
  • You can set multiple timers at the same time.
  • You can pause and resume timers.
  • You can reset timers.
  • You can adjust the volume of the timer alarm.
  • You can customize the appearance of the timer and stopwatch.

Setting a timer or stopwatch in Google Chrome is easy and convenient.

Enjoy!


Please LIKE and SHARE OneCoolTip.com!


READ MORE

OneCoolTip.com
Cool Tech Tips for a Cooler Life!

#googlechrome  #timer  #stopwatch  #howto  #techblog #TechTip #OneCoolTip #Chrome #Google @Google 

Tuesday, April 25, 2023

How to Add Multiple Links in Your Instagram Bio

Instagram
Are you an Instagram influencer? 

Are you a business that uses many social media sites to promote your brand?

If so, you'll want to know that you can now your other social media links in your bio.
 
Instagram recently announced a new feature that allows users to add up to five links in their bio, which is a game-changer for creators and businesses alike! 

This new feature has been highly anticipated by many Instagram users who have been looking for ways to share more information about their brand or business with their followers. 

With this new feature, users can now add multiple links to their profile through the mobile app and edit them to include titles and rearrange the order in which they are displayed.

Here's how to add multiple links to your Instagram bio:
  • Open the Instagram app on your device
  • Tap on your account icon
  • In the top left corner under your profile picture, tap the Edit profile button
  • Tap links
  • Tap Add external link

Instagram Add External Link
fig. 1 Instagram Add External Link
  • Type in the URL and title of the link you want to include
  • Tap Done
  • Tap Add external link again to keep adding more links.

That's it!

Please LIKE and SHARE OneCoolTip.com!

READ MORE

OneCoolTip.com
Cool Tech Tips for a Cooler Life!


#Instagram #Meta #facebook #TechTips #SocialMedia #OneCoolTip

Monday, April 24, 2023

Boost Your Excel Productivity with this Cool Status Bar Tip!

Microsoft Excel logo
Are you looking for ways to improve your Excel productivity and efficiency? 

Check out this very Excel Cool Tip.

The status bar in Excel is a powerful tool that can help you quickly calculate and analyze data. 

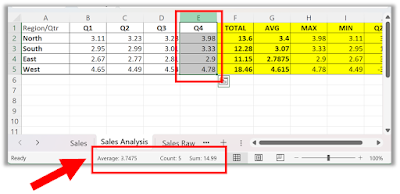
It displays a variety of information about your worksheet, including the average, count, and sum of selected cells.

Here are some steps to use Excel status bar:
  • Select the range of cells you want to analyze.
  • Look at the status bar at the bottom of the window to see the average, count, and sum of these cells.
  • To quickly change the workbook view, use the three view shortcuts on the status bar.

Microsoft Excel Status Bar
fig.1 Microsoft Excel Status Bar

  • You can also customize your status bar by right-clicking anywhere on it 
  • Select the items you want to see.  
  • For example, minimum and maximum.

Customize Microsoft Excel Status Bar

fig. 2 Customize Microsoft Excel Status Bar


That's it!

Please LIKE and SHARE OneCoolTip.com!

READ MORE

OneCoolTip.com
Cool Tech Tips for a Cooler Life!


#Microsoft #Excel #ExcelTips #ExcelStatusbar #DataAnalysis #TechTip #OneCoolTip @Microsoft

Sunday, April 23, 2023

How to Access Chat Option in Windows 11 Search Taskbar

Bing
Are you using Windows 11 and wondering how to quickly access Bing Chat, Bing's AI feature? 

It's easy with this Cool Tip.

Access Bing Chat from the search box on the taskbar.

A recent Windows 11 update now allows you quick access to the Bing Chat feature.

Here's how to do it.

  • Click in the Search bar on the Windows 11 taskbar.
  • When you first click in the box, you won't see anything different.
  • Type your search words in the Search Bar and you'll see options.
  • Click on the Chat option that appears on the top of the search results screen

Windows 11 Bing Char Search Taskbar


Congratulations! 

You have successfully accessed the Bing Chat option in Windows 11 search taskbar. 

If this isn't working correctly, ensure you have the last Windows update.

  • Search for Windows Update in the search box to bring up the option to update your Windows 11.

You can also toggle the search highlights option on or off by following these steps:

  • Press the Windows + I hotkey to open the Settings app.
  • Choose Privacy & security from the left sidebar.
  • Choose Search permissions.
  • Enable the toggle under Show search highlights.

That's it!


Please LIKE and SHARE OneCoolTip.com!


READ MORE


OneCoolTip.com
Cool Tech Tips for a Cooler Life!

#Windows11 #SearchTaskbar #ChatOption #QuickAccess #TechTips #OneCoolTip #Microsoft @microsoft