Tuesday, February 28, 2023

Lost Your iPhone? Here's How Your Apple Watch Can Help You Find It!

Lost iPhone Ringing
The Apple Watch is a versatile device that can do much more than simply tell time. 

One of its most useful features is the ability to make and receive phone calls, even when your iPhone is not nearby. 

But what if you misplace your iPhone and need to find it quickly? 

Thankfully, the Apple Watch can help with that too. In this article, we'll show you how to make your iPhone ring from your Apple Watch.

  • Swipe up on the watch face to access the Control Center. UPDATE: (or press the Side button if you're running watchOS 10 or later).
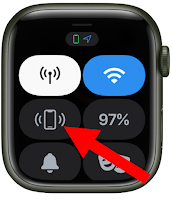
  • Look for the Ping iPhone button, which looks like an iPhone with sound waves emanating from it. 
    • If you don't see it, you may need to add it to the Control Center. 
    • To do this, go to the Watch app on your iPhone, tap My Watch, then tap Control Center. From there, you can add the Ping iPhone button.
  • Once you've located the Ping iPhone button, tap it. 
    • Your iPhone will emit a loud pinging sound, even if it's in silent mode.
Apple Watch Ping iPhone
Use the Ping iPhone Feature on Apple Watch to Make Your iPhone Ring
  • If your iPhone is not within range of your Apple Watch, you'll receive a message on the watch indicating that it's out of range. 
    • In this case, you may need to physically search for your phone.
  • If your iPhone is nearby, but you still can't find it, try tapping the Ping iPhone button again. 
    • This will cause your iPhone to emit another loud pinging sound, which should help you locate it.
  • If you've tried everything and still can't find your iPhone, you can use the Find My app on your Apple Watch or another device to locate it. 
    • Simply open the app, select your iPhone, and follow the instructions to locate it on a map.
That's it.  Enjoy!

Please Like and Share OneCoolTip.com!

READ MORE

OneCoolTip.com
Cool Tech Tips for a Cooler Life!

#iphone #AppleWatch #FindMyiPhone #Apple @Apple #TechTips #OneCoolTip @OneCoolTip 

Monday, February 27, 2023

How to Use Microsoft 365 Word Outline Feature to Organize Your Documents

Microsoft Word 365 Icon
When creating a new document, the biggest challenge is to get started with your thoughts.

One way to do that is to outline your thoughts so that you can see how you want your document to be organized and structured.

Microsoft 365 Word has a powerful feature that can help you create and structure your documents more efficiently: the Outline feature. 

The Outline feature allows you to view your document as a hierarchy of headings and paragraphs, and easily rearrange them by dragging and dropping. 

You can also use the Outline feature to create a PowerPoint presentation from your document with just a few clicks.

To use the Outline feature, follow these steps:

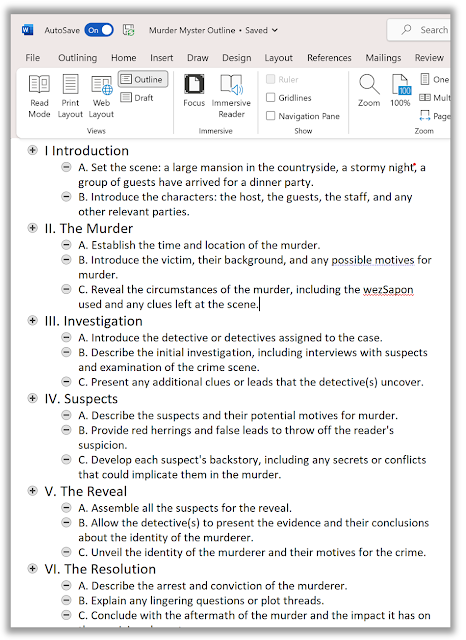
  • Open Word and select View > Outline
    • This automatically generates an outline and opens the Outlining tools1.
  • If your document has headings (any heading levels from H1-H9), you’ll see those headings organized by level. 
  • If your document doesn’t have headings and subheadings yet, you can add them by using the buttons on the Outlining toolbar or tab to promote and demote heading levels.
  • To rearrange your outline, simply drag and drop any heading or paragraph to a new location. 
  • You can also collapse or expand any level of your outline by using the arrows next to the headings.
Microsoft Word 365 Outline
Use Microsoft Word 365 Outline to Outline Your Documents
  • To create a PowerPoint presentation from your outline, click File > Export > Create Handouts. 
  • Choose how you want to send your outline to PowerPoint, and click OK. A new PowerPoint file will be created with slides based on your outline.

The Outline feature is a great way to organize your thoughts and ideas before writing your document. It can also help you save time and effort by creating presentations from your existing content. 

Try it out today and see how it can improve your productivity!

Please Like and Share OneCoolTip.com!

READ MORE

#Microsoft #Word #365 #Outline @Microsoft 

Sunday, February 26, 2023

In Case You Missed It - Cool Tech Tips for the Week 2/26/23


We had a great week of Cool Tips here at www.OneCoolTip.com.  

These Cool Tips include how to use Microsoft Excel's Flash Fill feature, add a FaceTime call to an iPhone Calendar entry, sign out of all Netflix devices,  use the date calculator in Windows, listen to the incredible sounds of nature and listen to background sounds on your iPhone.

Check them all out!

Please Like and Share OneCoolTip.com!

OneCoolTip.com
http://www.onecooltip.com
Cool Tech Tips for a Cooler Life!


Monday, February 20, 2023

How to Master Microsoft Excel's Flash Fill Feature 

Learn how to quickly split, combine, or format data without using complicated formulas or macros.

#Microsoft #Excel #FlashFill @Microsoft 


Tuesday, February 21, 2023

How to Add FaceTime to an iPhone Calendar Entry 

Here's how to add FaceTime as a video call option when you create or edit an event in your Calendar app. 

#iPhone #calendar #Apple


Wednesday, February 22, 2023

Signing Out of All Devices on Netflix is Good for Your Account 

Have you lost control of who is using your password on Netflix?  Here's how to kick them off.

#Netflix #security #signout


Thursday, February 23, 2023

How to Use the New Date Calculator Feature in Windows 11 

Or how many days until your wedding?

Here's how to find out using this Windows tool!

#Calculator #Microsoft #Windows11 @Microsoft


Friday, February 24, 2023

Listen to the Rhythm of the Falling Rain 

Have you ever found yourself feeling stressed, anxious, or unable to focus on your work? 

Let the sounds of gentle rain be your answer.

#FridayFunday #ASoftMurmur 


Saturday, February 25, 2023

The One iPhone Feature That Will Make You Forget About All Your Problems 

Do you ever feel stressed, distracted, or bored when using your iPhone? 

If so, you might want to try out the background sounds feature that Apple introduced in iOS 15.

#iphone #backgroundsounds #Apple @Apple 


Sunday, February 26, 2023

Windows Can be Dark. Learn How.

Is Dark your thing?

It could be if you make this change to your Windows 11 settings.

#Windows10 #Windows11 #darkmode #dark #mode #Microsoft @Microsoft 
Windows Can be Dark. Learn How.

Windows 11 Dark Mode
Is Dark mode your thing?

It could be if you make this change to your Windows 10 or 11 settings.

Dark mode is popular because it can be easier on the eyes, especially when using a device for long periods. 

Many users simply prefer the look and feel of dark mode and find it more comfortable to use. 

If you prefer darker mode for your Windows experience, here's how to make the change in Windows 11: 

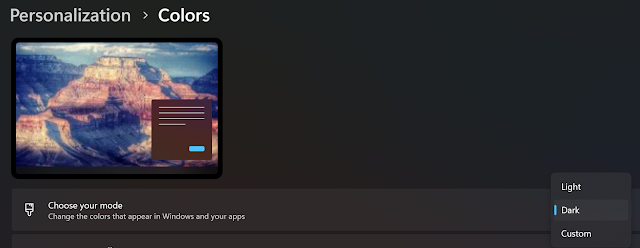
  • Right-mouse-click an empty section of the desktop and select Personalize
  • Select Color section.
  • From the drop-down menu labeled Choose your mode, select Dark.
Windows 11 Dark Mode
Setting Windows 11 Dark Mode

That's it!  Your Windows 11 is in Dark mode.  If you want to change it back, just go back to the settings and change your Mode back to Light.

This feature has been around since Windows 10.   To make the change for Windows 10: 
  • Select Start 
  • Select Settings .
  • Select Personalization 
  • Select Colors.
  • Open Colors setting
  • Under Choose your color, select Dark.

Enjoy!

Please Like and Share OneCoolTip.com!

READ MORE

OneCoolTip.com
Cool Tech Tips for a Cooler Life!

#Windows10 #Windows11 #darkmode #dark #mode #Microsoft @Microsoft 

Saturday, February 25, 2023

The One iPhone Feature That Will Make You Forget About All Your Problems

iPhone Control Center Hearing
Do you ever feel stressed, distracted, or bored when using your iPhone? 

If so, you might want to try out the background sounds feature that Apple introduced in iOS 15.

Background sounds are ambient noises that you can play on your iPhone to mask environmental noise, enhance your mood, or improve your focus. 

Whether you want to relax with ocean waves, get creative with bright noise, or sleep better with rain sounds, background sounds can help you achieve your goals. 

Here's the Cool Tip to enable and customize background sounds on your iPhone:

  • Launch the Settings app on your iPhone 
  • Tap on Accessibility.
  • Under the Hearing section, tap on Audio/Visual
  • Tap on Background Sounds.
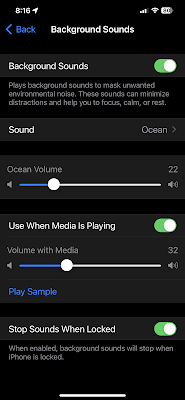
  • To play background sounds, enable the toggle next to Background Sounds.
  • To change the background sound, tap on Sound and then choose your preferred sound profile. 
    • There are six different sounds to choose from: Balanced Noise, Bright Noise, Dark Noise, Ocean, Rain, and Stream.
  • To adjust the volume of the background sound, drag the slider next to Volume

iPhone Background Sounds Settings
Play Background Sounds from Settings

That’s it! You can now enjoy background sounds on your iPhone.

You can also add Background Sounds to you Control Center for easier access.

Here's how to add Background Sounds to your Control Center:
  • Open Settings on your iPhone.
  • Tap on Control Center.
  • Scroll down and tap the + icon next to Hearing to add it to Control Center.
  • Now, swipe down from the top right to open Control Center. You’ll see a new ear-like option.
  • Tap the ear icon to enable background sounds quickly. 
  • Tap Background Sounds to turn on.
  • You can also tap the name of the current sound to view other sounds and choose your preferred one.
  • To turn off, tab Background Sounds at the bottom.
iPhone Control Center Background Sounds
Play Background Sounds from Control Center

Please Like and Share OneCoolTip.com!

READ MORE

OneCoolTip.com
Cool Tech Tips for a Cooler Life!

#iphone #backgroundsounds #Apple @Apple 

Friday, February 24, 2023

Listen to the Rhythm of the Falling Rain

Rain
Have you ever found yourself feeling stressed, anxious, or unable to focus on your work? 

Or perhaps you're just looking for a way to unwind and relax after a long day. 

If so, here's a Friday Funday Cool Tip:

Visit this website to listen to cool relaxing ambient sounds.

A Soft Murmur: https://asoftmurmur.com/

Rain Thunder Waves Wind Fire

A Soft Murmur offers the gentle sounds of natural environments, from a gentle rainstorm to crashing ocean waves. 

By immersing yourself in the sounds of nature, you can create a sense of calm and tranquility that can benefit your mental and physical health in countless ways.

Enjoy your day!

#FridayFunday #ASoftMurmur 

Thursday, February 23, 2023

How to Use the New Date Calculator Feature in Windows 11

Windows 11 Calculator Icon

How many days until Christmas?

Or how many days until your wedding?

Or how many days until your vacation?

You could always pull out a printed calendar and start counting the days.

But here's a Cool Tip.

When you need to calculate the number of day until a specific day, Windows 11 has an app for that!

What?   You haven't seen it?

It's a hidden feature of the Calculator app.

Here's how to use it:

  • Search for Calculator using the Search function in the Windows bar.
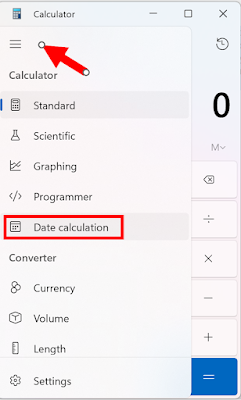
  • Select the Open Navigation button (the three horizontal lines on the top left corner) and then select Date Calculation.

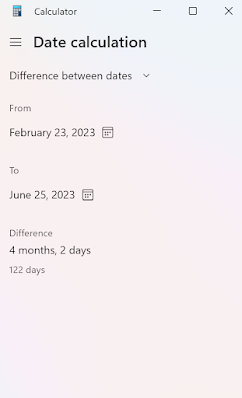
Windows 11 Date Calculator
Select the type of calculator
  • By default, Difference between dates is selected. 
    • You can use this mode to calculate how many days are between two dates. 
    • For example, you can find out how many days are left until your birthday or anniversary.
  • To calculate the difference between two dates, select a date under From and another date under To
    • The number of days between the two dates will be displayed at the bottom. 
Windows 11 Date Calculator
Select From and To Dates
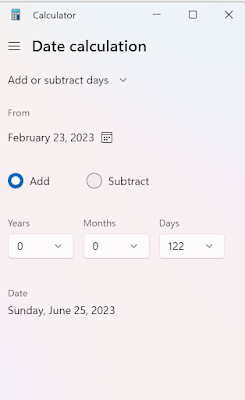
  • To calculate a future or past date based on a given date and a number of days, months, or years, select Add or subtract days from Date Calculation mode. 
    • For example, you can find out what date it will be 100 days from now or what date it was 100 days ago.
Windows 11 Calculator Add or subtract days
Select Add or subtract days and
then enter the number of years, months or days
  • To calculate a future or past date, select a date under From and enter a number under Days to add/subtract. 
    • You can also enter a number under Months to add/subtract or Years to add/subtract if you want to use those units instead of days. The resulting date will be displayed under To.

Please Like and Share OneCoolTip.com!

READ MORE

OneCoolTip.com
Cool Tech Tips for a Cooler Life!

#Calculator #Microsoft #Windows11 @Microsoft

Wednesday, February 22, 2023

Signing Out of All Devices on Netflix is Good for Your Account

Netflix
Netflix is one of the most popular streaming services in the world, providing a vast array of movies, TV shows, and documentaries for viewers to enjoy. 

However, with the convenience of being able to access your account from multiple devices, there's a risk that unauthorized users might gain access to your account.  

  • Maybe you signed into Netflix at a friends house and never logged out.
  • Perhaps you're still signed in on your Ex's TV.
  • Or your children have shared your account details with all of their friends.

Whatever the reason, you should periodically check which devices have signed into your account and remove some or all of them if necessary.

And change your password to keep them out.

Here's how to do it.

To sign out of Netflix sessions, follow these steps:

  • Go to the Netflix website, http://www.netflix.com.
  • Sign in to your account.
  • Click on your profile icon in the upper right corner of the page.
  • Select Account from the dropdown menu.
  • Scroll down to the Security and Privacy section.
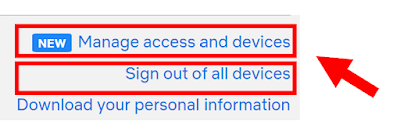
  • Select one of these options below:
Netflix Signout
Select these sign out options
Sign Out of Some Devices
  • Click on Manage access and devices.
  • You'll see all recent logins, including their location.
  • Click on Sign Out next to any device to sign that device out of your account.
Sign Out of All Devices
  • Click on Sign out of all devices.
  • Confirm your choice by clicking on Sign Out.
  • This will sign you out of all devices currently signed in to your Netflix account, including your own device and any other devices that may have access to your account.
Change Your Password

  • While you're at the Account page, you can also select Change Your Password to change your password to prevent others from signing into your account.

That's it!

Please Like and Share OneCoolTip.com!

READ MORE


OneCoolTip.com
Cool Tech Tips for a Cooler Life!

#Netflix #security #signout

Tuesday, February 21, 2023

How to Add FaceTime to an iPhone Calendar Entry

FaceTime Logo
FaceTime is a built-in app on iPhone that lets you make video calls with your contacts. 

You can also use FaceTime as a video call option when you create or edit an event in your Calendar app. 

This way, you can easily join or start a FaceTime call from your calendar reminder.

And don't worry if attendees don't use an iPhone, Mac or iPad, users can use the weblink to participate from the FaceTime website.

Here's how to FaceTime to an iPhone calendar entry:

  1. Open the Calendar app on your iPhone and tap on the ‘+’ icon at the top right corner to create a new event.
  2. Enter a title for your event, such as ‘Review OneCoolTip.com’.
  3. Set up the time and date when you want it to take place.
  4. Tap on Location or Video Call, then select FaceTime from the list of options.
FaceTIme iPhone Calendar Entry
Adding FaceTime when creating an iPhone Calendar entry 

        5. Tap Add to save your event.


That's it!    You and your meeting participants can all use FaceTime for your video call.


Please Like and Share OneCoolTip.com!

Monday, February 20, 2023

How to Master Microsoft Excel's Flash Fill Feature

Microsoft Cool Tip Logo
One cool tech tip for using Microsoft Excel is to use the "Flash Fill" feature. 

This feature allows you to quickly split, combine, or format data without using complicated formulas or macros.

For example, let's say you have two column of names, First and Last and you want to join them into one new column. 

Instead of manually copying and pasting the data into the one new column and adding a space between the names, you can use Flash Fill to automate the process.

Here's how to do it:

  • Start by typing the first and last name in the third column of the first row, next to the last name.
  • Type the First name in the next row.
  • Excel will automatically recognize the pattern and suggest the combines names in the list.
  • Press Enter to confirm the suggestion.
  • The rest of the names will automatically be entered.

You can use Flash Fill for many other data manipulation tasks, such as formatting dates or removing duplicates. 

This feature can save you a lot of time and effort, especially when working with large data sets.

Microsoft Excel Flash Fill Example
Microsoft Excel Flash Fill 

Enjoy!

Please Like and Share OneCoolTip!


READ MORE


OneCoolTip.com
Cool Tech Tips for a Cooler Life!

#Microsoft #Excel #FlashFill @Microsoft 

Sunday, February 19, 2023

ICYMI: In Case You Missed It - Cool Tech Tips for the Week 2/19/23

We had a great week of Cool Tips here at www.OneCoolTip.com.  

These Cool Tips include how to use Microsoft Word's Format Painter, Scheduling an Email on an iPhone, the end of life for Microsoft's Internet Explorer, a very cool site with photos from around the world each day, how to use the Panorama mode on the iPhone camera app and a cool tip to quickly view your browser history.

Check them all out!

Please Like and Share OneCoolTip.com!

OneCoolTip.com
http://www.onecooltip.com
Cool Tech Tips for a Cooler Life!


Monday, February 13, 2023

Revolutionize Your Document Formatting with Microsoft Word's Little-Known Feature: The Format Painter! 

Do you like the format of a word or paragraph in Microsoft Word and want to "copy" that format and apply it to other sections of your document?  Learn this cool tip to save time.

#MicrosoftWord #FormatPainter


Tuesday, February 14, 2023

How to Use the Scheduled Email Function on Your iPhone 

Do you ever find yourself sending emails at odd hours, only to regret it later? 

Learn this cool tip to schedule your iPhone emails!

#iphone #mail #email #ios16 #Apple @apple


Wednesday, February 15, 2023

The Secret to Deleting Files Permanently in Windows! 

Want a file to be deleted permanently?  Learn this cool tip to make files disappear!

#windows #delete #microsoft @microsoft


Thursday, February 16, 2023

Internet Explorer Bids Farewell: End of Life for Microsoft's Legacy Browser

Internet Explorer is dead.  What do you use now to browse the world wide web?

#InternetExplorer #Edge #microsoft #Chrome #DuckDuckGo #Opera


Friday, February 17, 2023

Capturing the World in a Snapshot: VOA's Photo of the Day Shines a Light on Global Stories 

Do you ever wonder how the world looks every day?  Check out this amazing site.

There's a Friday Funday website that can show you.

#VOA #VoiceofAmerica #photooftheday #FridayFunday


Saturday, February 18, 2023

Stop Taking Boring Photos! Learn How to Use iPhone Panorama Mode and Reverse Direction to Capture Jaw-Dropping Shots!

The iPhone's panoramic mode is a great feature that lets you capture wide and expansive vistas in a single shot.   Learn more including how to reverse directions.

#iPhone #camera #app #pano #panorama

 
Sunday, February 19, 2023
Master Your Browsing Experience: Shortcut to View Your Browser History
 
Use this cool tip to view your browsing history.

#history #Google #Chrome #Microsoft #Edge


Saturday, February 18, 2023

Stop Taking Boring Photos! Learn How to Use iPhone Panorama Mode and Reverse Direction to Capture Jaw-Dropping Shots!

The iPhone's panoramic mode is a great feature that lets you capture wide and expansive vistas in a single shot. 

It's especially useful for landscapes, cityscapes, or any other scenes that require a wider field of view. 

Here's how to use the iPhone panoramic mode and how to reverse direction.

  • Open the Camera App.
  • Choose Pano mode.
  • Tap the Shutter button, the big white circle.
  • While keeping the white arrow on the center line, pan slowly in the direction of the arrow. 
  • Tap the Shutter button again to finish.
iPhone Panorama Mode

Here's the real Cool Tip:

  • Tap the arrow to reverse the arrow direction.  
  • Pan in the opposite direction. 
  • To pan vertically, rotate iPhone to landscape orientation. 
  • You can reverse the direction of a vertical pan, too.

If you like OneCoolTip, please Like and Share!


READ MORE

OneCoolTip.com
Cool Tech Tips for a Cooler Life!

#iPhone #camera #app #pano #panorama