Showing posts with label Microsoft Outlook. Show all posts

Monday, November 4, 2024

How to Use the Accessibility Checker in Microsoft 365 to Create Inclusive Content

How to Use the Accessibility Checker in Microsoft 365 to Create Inclusive Content

Learn how Microsoft 365's Accessibility Checker in Word, Excel, and PowerPoint can help you create content that is inclusive and accessible to all users, ensuring compliance and enhancing user experience.

By Rodger Mansfield, Technology Editor
November 4, 2024


Microsoft365
Ever wondered if your documents, spreadsheets, or presentations are accessible to all users?

Accessibility isn't just a buzzword—it's a crucial aspect of creating inclusive content that everyone can use, regardless of their abilities. 

Here's a Cool Tip:  Use the Accessibility Checker in Microsoft 365 apps.

With Microsoft 365's Accessibility Checker, you can ensure your content meets accessibility standards and provides a seamless experience for all users.

The Accessibility Checker in Microsoft 365 apps like Word, Excel, PowerPoint, Outlook and OneNote is designed to help users create content that is accessible to everyone, including people with disabilities. 

Back to Work Monday

It scans your documents for potential accessibility issues and offers suggestions on how to fix them. 

This tool is essential for ensuring that your content is usable by a broader audience and compliant with accessibility standards, which is particularly important in professional and educational settings.

Here's how to do it.
  1. Open your document in Word, Excel, PowerPoint or OneNote.
  2. Go to the Review tab.
  3. Click on Check Accessibility. This will open the Accessibility Checker pane on the right side of the screen.
  4. Review the findings under Inspection Results. The checker lists any errors and warnings, along with recommendations on how to fix them.
  5. Apply the recommended actions to address each issue. Select an issue, view the recommended actions, and apply the fix directly from the pane.

Note: In Outlook, the Accessibility Checker runs automatically in the background when you're composing an email. If the Accessibility Checker detects accessibility issues, a MailTip provides a convenient nudge to review and correct the issues before sending your email.


Check Accessibility

fig. 1 - Check Accessibility


Check Accessibility Best Practices

fig. 2 - Check Accessibility Best Practices


Accessibility Checker helps create content that is accessible to everyone and provides clear instructions and fixes for accessibility issues.

To enable real-time accessibility notifications:
  1. Go to File > Options > Accessibility
  2. Select the option to show "Keep accessibility checker running while I work."

The Accessibility Checker in Microsoft 365 is a powerful tool for creating inclusive content. 

By ensuring that your documents, spreadsheets, and presentations are accessible to everyone, you can provide a better user experience and meet accessibility standards. 

Using this tool helps create a more inclusive environment, benefiting everyone.

Have you tried using the Accessibility Checker in Microsoft 365? 

Share your thoughts and experiences in the comments below, and don't forget to share this article on your social media to spread the word!


READ MORE

Please LIKE and SHARE OneCoolTip.com!
Subscribe to the FREE OneCoolTip Newsletter.
Visit the OneCoolTip YouTube Channelhttps://www.youtube.com/@onecooltip

Do you have a Cool Tip or question? Email us at onecooltip.com@gmail.com

Rodger Mansfield, a seasoned tech expert, is the mastermind behind www.OneCoolTip.com where he serves as both writer and editor. With a keen eye for simplifying complex tech, Rodger delivers practical advice that empowers readers to navigate the digital world with confidence. Dive into www.OneCoolTip.com for a treasure trove of savvy tips and tricks that keep you one step ahead in tech.


One Cool Tip
Cool Tech Tips for a Cooler Life!


#Microsoft365 @microsoft365 #Accessibility #InclusiveContent #Office365
#TechTips #TechGuide #OneCoolTip @OneCoolTip 


Copyright © 2024 | www.OneCoolTip.com | All Rights Reserved

Monday, October 21, 2024

Streamline Your Day with Outlook's New Meeting Setup Option

Streamline Your Day with Outlook's New Meeting Setup Option

Discover how Outlook's new meeting setup option can automatically set your meetings to start a few minutes early or late, ensuring you have breaks between meetings and enhancing your productivity.

By Rodger Mansfield, Technology Editor
October 21, 2024


Outlook
Ever found yourself rushing from one virtual meeting to the next with barely a moment to catch your breath? 

Here's a Cool Tip: Set your calendar meetings to start a few minutes early or late.

Outlook's new feature might just be the game-changer you need. 

With the ability to configure meetings to start a few minutes early or late, you can now ensure those precious breaks between meetings. 

But how does this feature work, and why is it so important?

Monday, March 4, 2024

Create Like a Pro with Copilot Pro in Outlook

Step into the cockpit of your inbox with Copilot Pro and discover how the Draft and Coaching features can elevate your email game in Microsoft Outlook.

By Rodger Mansfield, Editor
March 4, 2024


Have you ever felt like you’re just winging it with your emails? 

Want to draft messages that hit the mark every time? 

Curious about how a virtual coach could up your email game?

Here's a Cool Tip.  Use Copilot Pro in Microsoft 365 Outlook.


Copilot Pro in Microsoft 365 Outlook is a premium AI feature that enhances your email experience by offering advanced capabilities such as summarizing long threads, suggesting replies, and assisting in drafting emails with the appropriate tone. 

It’s designed to streamline your inbox management and boost productivity within the Microsoft Outlook environment. 

To access Copilot Pro, you need a Microsoft 365 Personal or Family subscription1. 

It’s available on the web and in select Microsoft 365 apps on various platforms, including Windows, macOS, and iPadOS.


Here's how to use it.
  1. Ensure you have an active subscription to Microsoft 365 that includes Copilot Pro.
  2. Once the purchase is confirmed, Copilot Pro will be added to your Outlook.
  3. Find the Copilot Pro icon in the Outlook ribbon to start using its features.
  4. Use the ‘Draft’ feature to compose emails with AI-powered assistance, enhancing your writing efficiency.
  5. Try the ‘Coaching’ feature for real-time suggestions to improve your email communication style.

Using Copilot when creating emails simplifies email drafting.

It also offers personalized coaching for better communication and seamlessly integrates with Outlook’s interface.

Copilot Pro in Outlook Prompt
fig. 1 - Copilot Pro in Outlook - Prompt

        6. Just click the Generate button to generate a response.

Copilot Pro in Outlook - Draft Response
fig. 2 - Copilot Pro in Outlook - Draft Response


        7. Click Keep It to keep the draft response.

        8. Or click Discard.

        9. Add something to add, for example, "make it more formal" and click Regenerate.

But like all AI, it might take a few tries to get the hang of it.

With Copilot Pro’s Draft and Coaching features, you’re not just sending emails; you’re crafting communications like a seasoned pro. 

Don't have or can't afford the subscription to Copilot Pro?

No problem.


Embrace these tools and watch your email confidence soar!


Please LIKE and SHARE OneCoolTip.com!
Visit the OneCoolTip YouTube Channelhttps://www.youtube.com/@onecooltip

Do you have a Cool Tip or question? Email us at
onecooltip.com@gmail.com


READ MORE


Rodger Mansfield, a seasoned tech expert, is the mastermind behind OneCoolTip.com, where he serves as both writer and editor. With a keen eye for simplifying complex tech, Rodger delivers practical advice that empowers readers to navigate the digital world with confidence. Dive into OneCoolTip.com for a treasure trove of savvy tips and tricks that keep you one step ahead in tech.


OneCoolTip.com
Cool Tech Tips for a Cooler Life!


#Microsoft @Outlook #Outlook #CopilotPro #EmailLikeAPro #DraftAndCoach  #TechTips #BacktoWorkMonday #OneCoolTip @OneCoolTip

Monday, January 22, 2024

Unleash the Hidden Power of Outlook Shortcuts

Microsoft Outlook
Are you juggling a hundred emails, managing a packed calendar, navigating the contact jungle.

Does your Outlook feel more like a productivity swamp than a seamless workspace?

Mastering Microsoft Outlook keyboard shortcuts is your hidden power-up, transforming you from keyboard klutz to email efficiency king (or queen)!

Here's a Cool Tip.  Use these keyboard shortcuts to navigate Microsoft Outlook.

Ditch the mouse clicks and tap into lightning-fast navigation. 

Here's how to do it.

Ctrl + 1: Your inbox awaits – jump in instantly!
Ctrl + 2: Calendar at your fingertips – plan your victory!
Ctrl + 3: Contact mastery – find anyone in a flash!
Ctrl + 4: Task titan – conquer your to-do list with ease!


Boost Productivity with Keyboard Shortcuts - www.OneCoolTip.com

These four shortcuts allow you to quickly move from key functions - your Inbox, Calendar, Contacts and Tasks.

No need to move your mouse.

Mastering shortcuts boosts your productivity, eliminates mouse fatigue, and frees you to focus on what truly matters. 

Remember, small changes yield big results – and when it comes to email efficiency, every second saved is a victory won. 

Enjoy!


 Please LIKE and SHARE OneCoolTip.com!
Visit the OneCoolTip YouTube Channelhttps://www.youtube.com/@onecooltip

Do you have a Cool Tip or question? Email us at
onecooltip.com@gmail.com

READ MORE

OneCoolTip.com
Cool Tech Tips for a Cooler Life!


#Microsoft @Microsoft #BackToWorkMonday #OutlookHacks #KeyboardNinjas #EmailEfficiency #ProductivityBoost #WorkSmarterNotHarder #MasterOutlook #TimeManagementTips #TechTips #OneCoolTip @OneCoolTip 

Monday, November 27, 2023

How to Master Microsoft Outlook Search

Have you ever found yourself sifting through hundreds of emails in your Microsoft Outlook inbox, trying to find that one important message? 

Ever wished there was a quicker way to locate specific emails?

Here's a Cool Back-to-Work-Monday Tip.  Use Microsoft Outlook Search Operators.

Here's how to do it.
  • Open Microsoft Outlook.
  • Navigate to the Search Box, located at the top of the Outlook window.
  • Type in the specific search operator you wish to use. 
    • For example, from:(sender) will show all emails from a specific sender.
  • Press Enter to display all emails that match your search operator.

But wait...  

There's a even Cooler Cool Tip.  Use the Outlook Search Filter screen.
  • Press and Hold the Filter icon to display search screen.

Outlook Search Screen
fig. 1 - Outlook Search Screen

  • Use the screen to enter your search criteria in one or more fields.
  • Then press Search to see the results.
But if you want to enter your own search operators, there are a number of operators that you can manually enter in the main search box.

Enter your search criteria in the Search box at the top of screen.


fig. 2 - Outlook Search

Using search operators can drastically reduce the time spent looking for specific emails, making your work more efficient.

Here are a few examples of search operators you can use:

from:(sender): 
Shows all emails from a specific sender.

subject:(keyword): 
Shows all emails with a specific keyword in the subject line.

NOT operator: 
This operator is used to exclude emails that contain a certain word.

OR operator: 
This operator is used to include emails that contain any of the specified words.

[ ] operator: 
This operator is used to search for empty fields.

to:
This operator searches the To line for emails addressed to a specified recipient.

cc:
This operator searches the Cc line for specified email recipients.

before:
This operator searches for emails sent or received before the given date.

after:: 
This operator searches for mail sent or received after the given date.

date:: 
This operator searches for mail sent or received on the given date.

folder:
This operator searches for mail in the specified folder.

has:attachment:
This operator searches mail messages that have at least one file attachment.

Remember, by default, you will be searching with the AND operator which you do not have to specify in your search. 

You can use the OR operator if you want your search results to also include items for which only a single condition is met. 

You can combine this field with the NOT operator to find items for which any value is selected.

For a full list of search operators, check out this Microsoft Support page.

That's it.

Enjoy!

Please LIKE and SHARE OneCoolTip.com!
Visit the OneCoolTip YouTube Channelhttps://www.youtube.com/@onecooltip


READ MORE


OneCoolTip.com
Cool Tech Tips for a Cooler Life

#Microsoft  @Microsoft #Outlook #Search #OutlookTips #EmailManagement #ProductivityHacks #TechTips #BacktoWorkMonday #OneCoolTip @OneCoolTip

Saturday, September 16, 2023

Windows Super Secret Keyboard Shortcuts to Open Microsoft Applications

Microsoft Windows
Do you think you know Windows?

Do you know the super secret keyboard shortcuts to open Microsoft Applications?

There's even one to open the Microsoft-owned LinkedIn website.

Here's a Cool Tip:  Secret Microsoft Application Keyboard Shortcuts.

 
Here's how to do it.

  • Press and hold the Control + Shift + Alt + Windows + a letter from the list below for each application.
  • For example, L for LinkedIn.

Application

Windows Keyboard Shortcut

LinkedIn

CTRL + SHIFT + ALT + WIN + L

Word

CTRL + SHIFT + ALT + WIN + W

Excel

CTRL + SHIFT + ALT + WIN + X

PowerPoint

CTRL + SHIFT + ALT + WIN + P

Outlook

CTRL + SHIFT + ALT + WIN + O

Microsoft Teams

CTRL + SHIFT + ALT + WIN + T

OneDrive

CTRL + SHIFT + ALT + WIN + D

OneNote

CTRL + SHIFT + ALT + WIN + N


The keyboard shortcut to open LinkedIn on Windows is CTRL + SHIFT + ALT + WIN + L. 

This shortcut opens LinkedIn in your default browser. 

You can also use this shortcut to open other Office apps, including Word, Excel, PowerPoint, Outlook, Microsoft Teams, OneDrive and OneNote.

That's it!

Enjoy!


Please LIKE and SHARE OneCoolTip.com!

READ MORE


OneCoolTip.com
Cool Tech Tips for a Cooler Life


#Microsoft #keyboardshortcut #LinkedIn #Word #Excel #PowerPoint #Outlook #MicrosoftTeams #OneDrive #OneNote #techtips #OneCoolTip #Microsoft 

Tuesday, September 5, 2023

How to Quickly Create Different Types of Lines in Microsoft Word

Microsoft Word
Have you ever wanted to quickly add a line to your document or email, but didn’t want to go through the hassle of finding the right tool or button? 

Did you know that you can easily create different types of lines using the autocomplete feature in both Microsoft Word and Outlook? 

Here's a Cool Tip:  Use the AutoFormat Feature in Microsoft Word and Outlook.

To create different types of lines using autocomplete, all you need to do is type at least three characters at the left margin of a new line and then press Enter. 

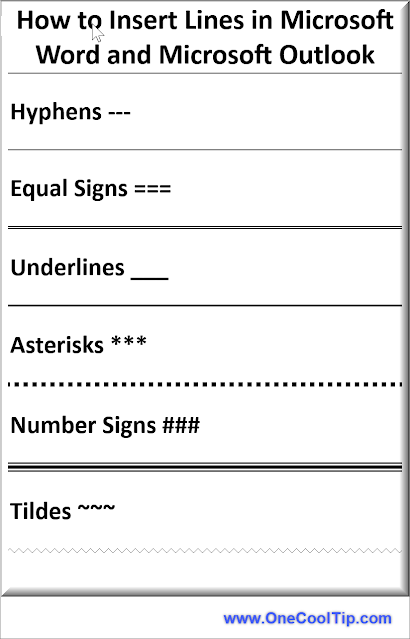
The result will be a line based on the characters you typed. Here are the characters you can use and the lines they create:
  • Three hyphens (—) create a plain single line
  • Three equal signs (===) create a plain double line
  • Three underline symbols (___) create a bold single line
  • Three asterisks (***) create a broken or dotted line
  • Three number signs (###) create a triple line with a thick center
  • Three tildes (~~~) create a wavy line

Insert Line in Microsoft Word and Outlook


This is a quicker step versus using Insert --> Shapes --> Lines command from the Home menu.

Enjoy!


Please LIKE and SHARE OneCoolTip.com!


READ MORE


OneCoolTip.com
Cool Tech Tips for a Cooler Life!


#Microsoft #Word #MicrosoftWord #Outlook #Autocomplete #ProductivityTips #TechTips #OneCoolTip @OneCoolTip @Microsoft 

Monday, July 17, 2023

Say Goodbye to Calibri - Hello Aptos!

Do you use Microsoft Office?

If so, there's a change coming with the default font.

Microsoft has announced that it is replacing its default font, Calibri. 

This change comes after 15 years of Calibri being the default font for Microsoft Office. 

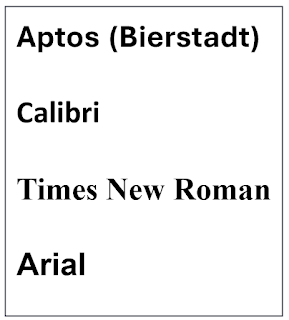
The new default font is called Aptos.

But here's a Cool Tip:  You can already ready use it since it's currently called Bierstadt

Microsoft Default Font Aptos
fig.1 - Microsoft New Default Font Aptos and Previous Fonts


The decision to choose Aptos as the new default font was based on user feedback, with Aptos striking a balance between professionalism and relatability.

The new font will gradually become the default across all Microsoft 365 apps and services for all users over the coming months. 

However, Calibri will still be pre-pinned at the top of a new font menu alongside its predecessors, Times New Roman and Arial.

Please Like and Share OneCoolTip.com!


READ MORE

OneCoolTip.com
http://www.onecooltip.com
Cool Tech Tips for a Cooler Life!


#Microsoft #Aptos #NewFont #DefaultFont #MicrosoftOffice #Office #Microsot365 #Word #Excel #PowerPoint #Outlook #TechTip #OneCoolTip @Microsoft 


Source: Microsoft Design

Monday, May 15, 2023

How to Save Time and Effort with Microsoft Quick Parts

Microsoft Word
Do you often find yourself typing the same text over and over again in your emails and documents? 

Do you wish there was a way to insert reusable pieces of content with just a few clicks? 

If so, try this Cool Tip: Microsoft Quick Parts.

Quick Parts is a feature that allows you to create, store, and insert snippets of text, graphics, fields, and document properties into your Microsoft Word and Microsoft Outlook files. 

Microsoft Outlook

Y
ou can use Quick Parts to speed up repetitive tasks, such as adding directions, signatures, meeting notes, and more.

There are different types of building blocks, such as AutoText, Document Property, Field, and Header

AutoText is the most common type of building block that stores text and graphics. 

For example, you can create an AutoText entry for your email signature and insert it into any email with a few clicks.

Quick Parts are not limited to text and graphics. 

You can also use them to insert fields that display dynamic information, such as dates, page numbers, document titles, and more. 

You can also use them to insert document properties that store metadata about your file, such as author name, company name, keywords, and more.

How to Create a Quick Part


  • Select the text or graphic that you want to save as a Quick Part. You can select any amount of content, from a single word to a whole paragraph or table.

Select Text
fig. 1 - Select Text to Save as Quick Parts

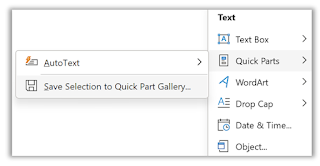
  • On the Insert tab, in the Text group, click Quick Parts.
  • Click Save Selection to Quick Part Gallery.

Save Selection to Quick Parts Gallery
fig. 2 - Save Selection to Quick Parts Gallery

  • In the Create New Building Block dialog box, give your Quick Part a name and choose a gallery where you want to store it. You can also add a description, category, and options for how you want it to be inserted.
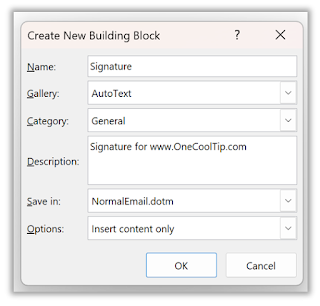
Save New Building Block
fig. 3 - Save New Building Block

  • Click OK.

Your Quick Part is now saved and ready to use.


How to Insert a Quick Part

Inserting a Quick Part is even easier than creating one. 

Just follow these steps:

  1. Place your cursor where you want to insert the Quick Part.
  2. On the Insert tab, in the Text group, click Quick Parts.
  3. Select the Quick Part that you want to insert from the gallery.

Alternatively, you can type the name of the Quick Part and press F3 to insert it automatically.


How to Modify a Quick Part

If you want to change the content or properties of a Quick Part, you can do so by following these steps:

  1. Insert the Quick Part that you want to modify into your file.
  2. Make the changes that you want to apply.
  3. Select the modified content.
  4. On the Insert tab, in the Text group, click Quick Parts.
  5. Click Save Selection to Quick Part Gallery.
  6. In the Create New Building Block dialog box, choose the same name and gallery as the original Quick Part.
  7. Click OK.

You will be asked if you want to overwrite the existing Quick Part. Click Yes.

Your Quick Part is now updated with the changes.


How to Delete a Quick Part

If you no longer need a Quick Part, you can delete it by following these steps:

  1. On the Insert tab, in the Text group, click Quick Parts.
  2. Click Building Blocks Organizer.
  3. In the Building Blocks Organizer dialog box, select the Quick Part that you want to delete from the list.
  4. Click Delete.
  5. Click Yes to confirm.

Your Quick Part is now deleted from the gallery.


Cool Tips for Using Quick Parts


  • Use descriptive names for your Quick Parts so that you can easily find them in the gallery or type them with F3.
  • Use categories to organize your Quick Parts by topic or purpose.
  • Use keyboard shortcuts to create and insert Quick Parts faster. 
  • For example:
    • Press Alt+F3 to create a new Quick Part from selected content.
    • Press Ctrl+F3 to copy selected content to the Spike (a special clipboard that stores multiple items).
    • Press Ctrl+Shift+F3 to paste all


That's it!

Enjoy.

Please LIKE and SHARE OneCoolTip.com!


READ MORE


OneCoolTip.com
Cool Tech Tips for a Cooler Life!


#QuickParts #MicrosoftWord #MicrosoftOutlook #Outlook #Microsoft @Microsoft #Word #TechTip #OneCoolTIp