Friday, March 31, 2023

Scream into the Void: A Safe Space to Let it All Out

Scream
Are you feeling overwhelmed? 

Do you need to vent? 

Is it Friday yet?

Here's the Friday Funday Cool Tip:  Look no further than Scream into the Void

This website provides a safe space for you to scream your heart out without fear of judgement. 

Whether you’re dealing with stress at work or just need to let out some pent-up emotions, Scream into the Void is here for you.

So what are you waiting for? 

Head over to screamintothevoid.com and let it all out! 

Scream Into The Void

You can type your feelings onto the page and then when you are done, press the Scream button.

Enjoy!

Please Like and Share OneCoolTip.com!

READ MORE


OneCoolTip.com
Cool Tech Tips for a Cooler Life!

#ScreamIntoTheVoid #LetItOut #SafeSpace #MentalHealthAwareness #OneCoolTip #FridayFunday

Thursday, March 30, 2023

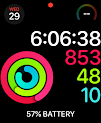
Capture the Moment: How to Take a Screenshot of Your Apple Watch!

Apple Watch Screen
Are you an Apple Watch user who wants to capture a moment on your watch and save it for later?
Whether it's a message from a loved one, a fitness milestone, or just a cool watch face, taking a screenshot of your Apple Watch is a great way to preserve these moments.
Here's a Cool Tip on how to take a screenshot of your Apple Watch.
  • Take the Screenshot: Simultaneously press the Digital Crown and the Side Button on your Apple Watch. Press both buttons at the same time and hold for a few seconds.
    • You'll see the screen flash, indicating that the screenshot has been taken.
  • View the Screenshot: Open the Photos app on your iPhone and find the screenshot in the recent photos on the Camera Roll.
    • Edit or share the screenshot as you would for any photo.
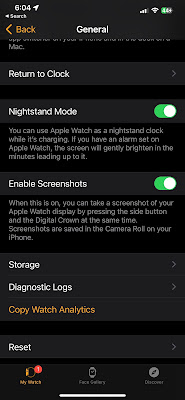
  • If the screenshot doesn't work, check to ensure Enabling Screenshots is set to On
    • To do this, open the Apple Watch app on the iPhone 
    • Select General
    •  Scroll down to Enable Screenshots and ensure it is toggled On.
Apple Watch Screen Shot Setting
Apple Watch Screenshot Setting - Toggle to On

Please Like and Share OneCoolTip.com!

Wednesday, March 29, 2023

How to Use YouTube's Show Transcript Feature for Better Video Experience

YouTube
Are you tired of scrolling through millions of videos on YouTube to find the exact information you need? 

Or maybe you have hearing difficulties and struggle to follow the audio in videos? 

Don't worry, here's a Cool Tip that can help: YouTube's Show Transcript feature.

The Show Transcript feature is a powerful tool that allows you to view the text of a video's audio in real-time. 

It can enhance your video experience by making videos more accessible and easier to understand.

Here's how to use it:

Enable the Show Transcript feature
  • Click the three dots that appear in the video's lower right-hand corner, then select Open Transcript. 
    • Note: Not all videos have transcripts.
Read the Transcript
  • Once you have enabled the Show Transcript feature, you will see the video's transcript appear on the right side of the screen. 
  • You can read along with the transcript while watching the video, or you can read it separately to get a better understanding of the video's content. 
  • You can also search for specific keywords within the transcript by using the Ctrl + F (Windows) or Command + F (Mac) keyboard shortcut.
Show Transcript
Show Transcript

Customize the Transcript
  • The Show Transcript feature allows you to customize the appearance of the transcript to suit your needs. 
  • You can change the font size, font style, and background color by clicking on the gear icon located on the bottom right-hand side of the transcript window. 
  • This is especially helpful for people with visual impairments or who prefer a certain reading style.

Interact with the Transcript
  • In addition to reading the transcript, you can also interact with it. For example, you can click on a specific line in the transcript to jump to that point in the video. 
  • This is especially useful if you need to revisit a certain part of the video or if you want to skip ahead to a specific topic.

YouTube's Show Transcript feature is a powerful tool that can help you access and understand the content of any video. 

Please LIKE and SHARE OneCoolTip.com!

READ MORE

OneCoolTip.com
Cool Tech Tips for a Cooler Life!

#YouTubeTips #TranscriptFeature #VideoAccessibility #Google @Google 

Tuesday, March 28, 2023

Scan and Save: How to Turn Your iPhone Notes App into a PDF Scanner

PDF
In today's digital age, it's becoming more common to move away from physical documents and towards digital ones. 

One way to do this is to scan a printed document to a Portable Document Format (PDF) file. 

Did you know that you can easily scan a document using your iPhone's Notes app? 

Here's how to do it:
  • Open the Notes App

iPhone Notes App Icon
  • Tap the icon in the bottom right-hand corner to create a new note.
  • Tap the Camera Icon
  • Tap Scan Documents from the menu.
  • Position the Document
  • Tap to Scan (the big circle)
    • If you align the document and you're set to Auto, the app will scan automatically.
    • Before saving, you can crop, rotate, and adjust the colors of the document if needed. 
  • Tap Save (if you manually took the scan, tap Keep Scan), then Save
  • Select the Send to Icon and choose Message or Email to send your PDF.
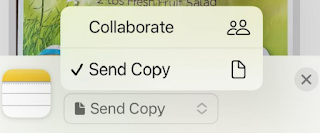
  • Change the drop-down, if needed, to Send Copy.
iPhone Notes App Send Copy
  • Select and address the app message to send your document.
And that's it! 

Please LIKE and SHARE OneCoolTip.com!


READ MORE

OneCoolTip.com
Cool Tech Tips for a Cooler Life!


#PDF #Adobe #Apple #PDFScanning #iPhoneNotes #DigitalDocuments #ScanToPDF #GoPaperless #iOS #iPhone #iPhoneTips #ProductivityHacks #DocumentScanning #Technology #iPhoneTricks #SavePaper #EcoFriendly @Apple @Adobe 

Monday, March 27, 2023

Why Adding a DRAFT Watermark to Your Word Document Can Save You from Embarrassing Mistakes

Microsoft Word Watermark Icon
When working on a document in Microsoft Word, have you ever shared a document via email, only to realize that you've accidentally sent an incomplete or unedited version of your document? 

Adding a DRAFT watermark to your Word document is a subtle but effective way to indicate that a document is not yet final and can save you from potential mistakes and embarrassment. 

It also provides a visual cue to remind you to review and edit your document before sharing or printing. 

Here's how to add a DRAFT watermark to your Word document:
  • Open your Word document.
  • Click on the Design tab in the Ribbon.
  • Click on Watermark in the Page Background group.
  • Select Draft from the Watermark menu.
  • The DRAFT watermark will be applied to your document.
Microsoft Word Watermark DRAFT
Microsoft Word DRAFT Watermark

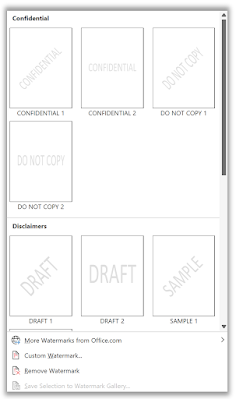
Besides several DRAFT options, you can also select Confidential watermarks.

You can also customize your DRAFT watermark by changing its font, size, and color to suit your preferences.  Select Custom Watermark to customize the watermark.

Microsoft Word Watermark Options
Microsoft Word Options

The next time you're working on a document in Word, remember to add a DRAFT watermark for an added layer of protection and professionalism.

Please LIKE and SHARE OneCoolTip.com!

READ MORE

OneCoolTip.com
Cool Tech Tips for a Cooler Life!

#Microsoft #Word #DraftWatermark #MicrosoftWord #DocumentEditing #WritingTips #ProductivityHacks #MistakePrevention #Professionalism #OneCoolTip @Microsoft 

Sunday, March 26, 2023

In Case You Missed It - Cool Tech Tips for the Week 3/26/23


We had a great week of Cool Tips here at 
www.OneCoolTip.com.  

These Cool Tips include how to use Microsoft Word in Focus mode, how to set a confidential mode in Google's Gmail, how to turn off Clean Energy charging mode on an iPhone, how to sign up to preview Google's new AI service, Bard, how to create stunning digital art, how to set Window's file delete confirmations and how to view saved Wi-Fi passwords on an iPhone.

Check them all out!

Please LIKE and SHARE OneCoolTip.com!

OneCoolTip.com
Cool Tech Tips for a Cooler Life!


Monday, March 20, 2023

Stay Focused and Productive with this Microsoft Word Cool Tip 

Do you get distracted when trying to use Microsoft Word?

Wouldn't it be nice if you could star focused?

Check out this Cool Tip!

#Microsoft #MicrosoftOffice #Focus #Word #OfficeTips #OneCoolTip


Tuesday, March 21, 2023

How to Use Gmail Confidential Mode: A Step-by-Step Guide 

Check out this Cool Tip on Gmail's Confidential Mode.

#Google #Gmail #ConfidentialMode #EmailSecurity #Privacy #OneCoolTip @Google 


Wednesday, March 22, 2023

How to Turn Off Clean Energy Charging on an iPhone

Is your iPhone slow to charge?  

It might be due to a quietly introduced new iPhone feature: Clean Energy Charging.

Learn how to turn this feature OFF!

#iPhone #Apple #iOS #OneCoolTip #CleanEnergyCharging #Technology #ClimateChange #Environment #Sustainability 


Thursday, March 23, 2023

How to Sign Up to Use Google Bard

Google Bard is a new experimental AI chatbot that can help you with a variety of tasks, such as generating text, translating languages, and writing different kinds of creative content. 

Learn how you can preview this new tool.

#Google #Bard #GoogleBard #AI #ChatBot #OneCoolTip #ChatGPT #Microsoft 


Friday, March 24, 2023

Create Stunning Digital Art with Just a Few Clicks 

Need to be creative during a boring call?

Then try making some digital art.

#digitalart #WeaveSilk #creativity #art #design #FridayFunday #OneCoolTip


Saturday, March 25, 2023

Don't Lose Your Files! Here's How to Enable Delete Confirmation Alerts in Windows 

Check out how to enable delete confirmation alerts.

#Windows #delete #RecycleBin #confirmation #Microsoft  #WindowsTips #DeleteConfirmation #FileManagement #DataProtection #TechHowTo #OneCoolTip @Microsoft


Sunday, March 26, 2023

How to Easily View Saved iPhone WiFi Passwords

Forgot a WiFi password?  Learn how to check your iPhone WiFi passwords.

#iPhone #iOS #Apple #iPhone #iPhoneTips #WiFiPasswords #TechHowTo #DataSecurity #Networking #OneCoolTip @Apple


How to Easily View Saved iPhone WiFi Passwords

iPhone WiFi Password Logo
Don't you hate it when you're at a friend's house and they don't remember their Wi-Fi password? 

Or maybe you want to log in using another device to their network.   

Here's a Cool Tip to solve these problems.

 View saved WiFi passwords on your iPhone with just a few simple steps

  • Open the Settings app on your iPhone
  • Tap on Wi-Fi.
  • Tap on Edit.
  • Find the WiFi network that you want to view the password for
iPhone Wi-Fi List
iPhone Wi-Fi List
  • Tap on the i icon next to it.
  • Tap on Password.
    • Note: You may be prompted to enter your iPhone's passcode or use Touch ID/Face ID to verify your identity. After entering your credentials, the password for the selected Wi-Fi network will be displayed.
iPhone WiFi Password
iPhone Wi-Fi Password

That's it! 

You now have access to the WiFi password for the selected network. 

You can share this password with others or use it to reconnect to the network on other devices.

Now that you know this secret trick, share it with your friends and family to make their lives easier too!


 Please Like and Share www.OneCoolTip.com!


READ MORE


OneCoolTip.com
Cool Tech Tips for a Cooler Life!

#iPhone #iOS #Apple #iPhone #iPhoneTips #WiFiPasswords #TechHowTo #DataSecurity #Networking #OneCoolTip @Apple

Saturday, March 25, 2023

Don't Lose Your Files! Here's How to Enable Delete Confirmation Alerts in Windows

Windows Recycle Bin Icon
Did a file on your Windows PC disappear?

Check your Recycle bin.  

When working with files and folders on a Windows computer, it can be easy to accidentally delete something important. 

Fortunately, Windows includes a feature that can help prevent accidental deletions: delete confirmation alerts. 

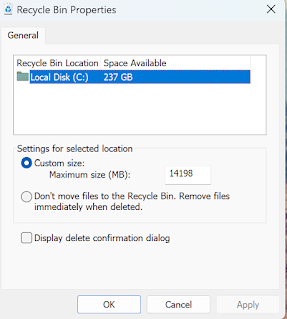
By enabling delete confirmation alerts, Windows will prompt you to confirm that you want to delete a file or folder before it is permanently removed from your computer.

Here's how to do it. 

  • Right mouse-click on the Recycle Bin.
  • Select Properties.

Windows Recycle Bin Properties
Recycle Bin Options


  • Select Display delete confirmation dialog.
  • Windows Recycle Bin Properties
    Recycle Bin Properties

    • When you delete a file, you’ll see an alert to confirm that the file will be sent to the Recycle bin.

    Windows Delete Confirmation Dialog
    Delete File Confirmation Dialog

    • Note:  Files deleted using other programs will not receive this confirmation.


     Please Like and Share OneCoolTip.com!


    READ MORE


    OneCoolTip.com
    Cool Tech Tips for a Cooler Life!

    #Windows #delete #RecycleBin #confirmation #Microsoft  #WindowsTips #DeleteConfirmation #FileManagement #DataProtection #TechHowTo #OneCoolTip @Microsoft

    Friday, March 24, 2023

    Create Stunning Digital Art with Just a Few Clicks

    Weave Silk Logo
    Need to be creative during a boring call?

    Don't want to make a mess with crayons and paint?

    Then try making some digital art.

    Check out this Friday Funday Cool Tip:

    WeaveSilk

    Weavesilk.com is a website that allows you to create beautiful digital art with ease. 

    It’s an interactive platform that lets you draw with your mouse or finger and create mesmerizing patterns and designs.

    The website has a simple interface that makes it easy to use. 

    You can choose from a variety of colors and brush sizes to create your own unique designs. 

    Weave Silk
    Weave Silk

    The website also has a feature that allows you to save your creations so you can come back to them later.

    Unfortunately, it only works on a PC.  A paid version is available for iPhones and iPads.

    If you’re looking for a fun way to express your creativity or just want to relax and unwind, Weavesilk.com is definitely worth checking out!

    Enjoy!

    Please LIKE and SHARE OneCoolTip.com!


    READ MORE

    OneCoolTip.com
    Cool Tech Tips for a Cooler Life!

    #digitalart #WeaveSilk #creativity #art #design #FridayFunday #OneCoolTip

    Thursday, March 23, 2023

    How to Sign Up to Use Google Bard

    Another day.

    Another AI Chat site.

    Google Bard is a new experimental AI chatbot that can help you with a variety of tasks, such as generating text, translating languages, and writing different kinds of creative content. 

    To sign up to use Google Bard, follow these steps:
    • Go to the Google Bard website http://bard.google.com
    • Click on the Join waitlist button.
    • Enter your name and email address.
    • Click on the Submit button.
    Once you have submitted your information, you will be added to the waitlist. 

    Google Bard is currently only available to a limited number of users, but more users will be added over time. 

    If you are added to the waitlist, you will receive an email from Google with instructions on how to create a Google Bard account and start using the service.

    So, is Google Bard any good?

    It depends.

    Google is certainly playing catch-up to Open AI's ChatGPT and Bing's use of ChatGPT.  

    Here's a test from both:

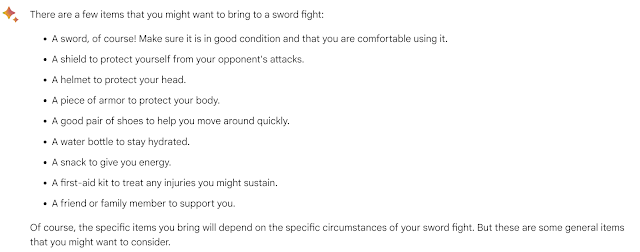
    What Items Should I Bring to a Sword Fight?

    Microsoft Bing:
    Microsoft Bing
    Microsoft Bing Chat


    Google Bard:

    Google Bard
    Google Bard


    The AI Wars will play out over the coming weeks, months and years.  

    Like the browser wars, the winner will reap rewards until the next worthy challenger emerges.


    Please LIKE and SHARE OneCoolTip.com!


    READ MORE
    OneCoolTip.com
    Cool Tech Tips for a Cooler Life!

    #Google #Bard #GoogleBard #AI #ChatBot #OneCoolTip #ChatGPT #Microsoft 


    Wednesday, March 22, 2023

    How to Turn Off Clean Energy Charging on an iPhone

    Slow Charging iPhone
    Is your iPhone slow to charge?  

    It might be due to a quietly introduced new iPhone feature: Clean Energy Charging.

    The clean energy charging feature, introduced in iOS 16.1, is designed to reduce the carbon footprint of your iPhone by charging it when the power grid is using clean energy sources. 

    But that can mean that your iPhone doesn't charge as fast as it can.

    Instead of waking up to a fully charged iPhone, you might see a message that charging will be completed later.

    If you want to turn this new "feature" off, here's how to do it:

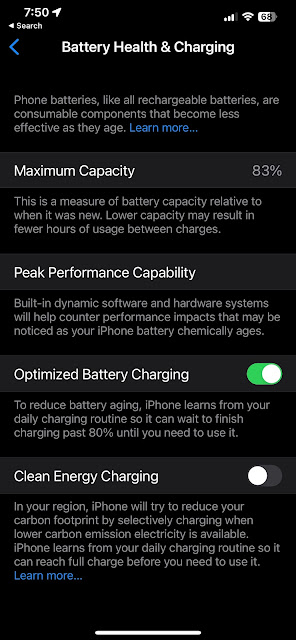
    How to turn off Clean Energy Charging
    • Go to your Settings app
    • Select Battery
    • Tap Battery Health & Charging 
    • Toggle off Clean Energy Charging 
    iPhone Clean Energy Charging
    iPhone Clean Energy Charging Can Be Toggled Off

    That's it.  

    Your iPhone will be back to charging normally.

    Please LIKE and SHARE OneCoolTip.com!


    READ MORE

    OneCoolTip.com
    Cool Tech Tips for a Cooler Life!


    #iPhone #Apple #iOS #OneCoolTip #CleanEnergyCharging #Technology #ClimateChange #Environment #Sustainability 


    Tuesday, March 21, 2023

    How to Use Gmail Confidential Mode: A Step-by-Step Guide

    Spy
    Gmail is one of the most popular email services in the world, with millions of users relying on it for their personal and professional communication needs. 

    Here's a Cool Tip about one of its most useful features: Confidential Mode

    This feature allows you to send emails with an extra layer of security and privacy, ensuring that your sensitive information stays confidential. 

    With this Cool Tip, we’ll explain how to use Gmail confidential mode in a step-by-step guide.

    • Log in to your Gmail Account
    The first step is to log in to your Gmail account. 

    If you don't have an account, create one by visiting the Gmail website and following the prompts.
    • Compose a New Email
    Once you are logged in, click on the Compose button to start writing a new email.
    • Enable Confidential Mode
    In the bottom of the compose window, you will see a small lock with a clock icon. Click on it to enable confidential mode.
    • Set Expiration Date and Passcode
    Once you have enabled confidential mode, you can set an expiration date for the email and a passcode that the recipient will need to enter to open the email. 

    The expiration date ensures that the email self-destructs after a certain amount of time, while the passcode ensures that only the intended recipient can access the email.
    Gmail Confidential
    • Add Recipients and Subject
    After setting the expiration date and passcode, select Save.

    Add the recipient's email address and subject of the email, just like you would for a regular email.
    • Write Your Message
    Write your message in the body of the email, as you would for a regular email.
    • Send the Email
    Once you have written your message, click on the "Send" button to send the email.
    • Revoke Access (Optional)
    If you want to revoke access to the email before the expiration date, open the email in your Sent folder and click the Remove Access button.

    So next time you need to send sensitive information via email, remember to use confidential mode! 


    Please LIKE and SHARE OneCoolTip.com!


    READ MORE


    OneCoolTip.com
    Cool Tech Tips for a Cooler Life!

    #Google #Gmail #ConfidentialMode #EmailSecurity #Privacy #OneCoolTip @Google 

    Monday, March 20, 2023

    Stay Focused and Productive with this Microsoft Word Cool Tip

    Microsoft Word Focus
    Do you get distracted when trying to use Microsoft Word?

    Wouldn't it be nice if you could star focused?

    Here's a Cool Tip:

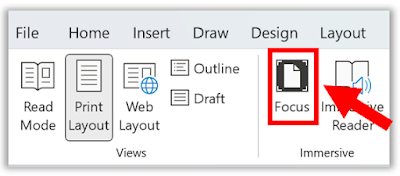
    Use the Focus feature in Microsoft Word.

    The Focus feature in Microsoft Word is a tool that allows you to focus on the content you are working on by hiding everything else. 

    When you use the Focus feature, everything except the content you are working on will be grayed out, making it easier for you to concentrate on what you are doing. 

    This is particularly useful when you are working on a long document or trying to edit a complex section.

    How to use the Focus feature in Microsoft Word
    • Open the Microsoft Word document you want to work on.
    • Click on the View tab in the ribbon at the top of the screen.
    • Click on the Focus button.
    Microsoft Word Focus Feature
    Microsoft Word Focus Feature
    • The Focus feature will be activated, and everything except the section you selected will be grayed out.
    • To exit the Focus feature, click on the Close Focus button in the top right corner of the screen.

    The Focus feature in Microsoft Word is a useful tool that can help you to concentrate on the content you are working on, reduce distractions, and improve editing. 

    Stay focused!

    Please LIKE and SHARE OneCoolTip.com!


    READ MORE

    OneCoolTip.com
    Cool Tech Tips for a Cooler Life!

    #Microsoft #MicrosoftOffice #Focus #Word #OfficeTips #OneCoolTip