Thursday, February 29, 2024

How to Use Gemini on iPhone and Android

Ready to tap into Google's most advanced AI? Discover how to access Gemini on your smartphone and transform how you search, ask questions, and get things done.

By Rodger Mansfield, Editor
February 29, 2024


Google Gemini
Have you heard whispers of a powerful new AI called Gemini? 

Do you want to use it on the go?

Here's a Cool Tip.  Use Gemini on your mobile devices.

If you're eager to experience the future of Google with conversational AI, get ready to dive in. 

Here's the breakdown of how to put Gemini in your pocket.

What is Google Gemini?

Gemini is a new AI-powered offering within the Google ecosystem. 

Think of it as the next evolution of Google Assistant or a supercharged version of Google Search. 

Gemini taps into advanced language models to deliver more informative and conversational responses, helping you accomplish tasks in new and exciting ways.

How to Access Gemini on iPhone and Android

iPhone:
  1. Update or download the latest Google app from the App Store.
  2. Open the Google app.
  3. You'll see a Gemini tab at the top – tap it to engage with the AI.
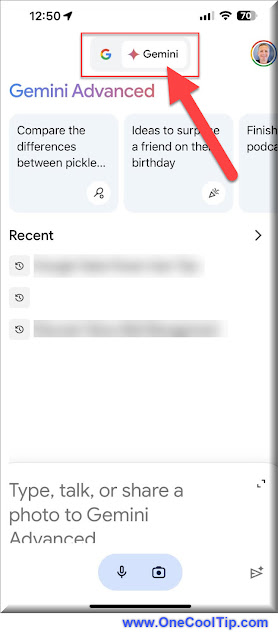
fig. 1 - Google Gemini in iPhone Google App
fig. 1 - Google Gemini in iPhone Google App

Note:  Google is rolling this feature out to users.  If you don't see this feature, check your settings:
  • At the top right, tap your Profile picture or initial and then Settings and then Voice.
  • Check your setting for Show Gemini.


Android:
  1. Search for the Gemini app in the Google Play Store or Click HERE. If it's available in your region, download and install it.
  2. Once installed, open the Gemini app. Type or speak your questions and requests directly to Gemini.
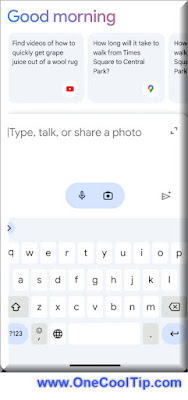
Google Gemini App on Android
fig. 2 - Google Gemini App on Android

Using Gemini
  1. Converse with Gemini by typing questions in the Google app, or speaking them aloud after activating it.
  2. Ask detailed questions, request summaries, or even have Gemini compose an email!
  3. Use Gemini to brainstorm ideas, seek advice, or get step-by-step instructions.

Get tasks done faster by asking Gemini to draft emails, write outlines, or summarize information.
Spark creativity: 

By harnessing its power on your iPhone or Android, you can streamline tasks, access information more intelligently, and even unleash a spark of creativity. 

Be sure to stay tuned for updates as Gemini continues to evolve!


Please LIKE and SHARE OneCoolTip.com!
Visit the OneCoolTip YouTube Channelhttps://www.youtube.com/@onecooltip


READ MORE


Rodger Mansfield, a seasoned tech expert, is the mastermind behind OneCoolTip.com, where he serves as both writer and editor. With a keen eye for simplifying complex tech, Rodger delivers practical advice that empowers readers to navigate the digital world with confidence. Dive into OneCoolTip.com for a treasure trove of savvy tips and tricks that keep you one step ahead in tech.


OneCoolTip.com
Cool Tech Tips for a Cooler Life!
 

#AI #artificialintelligence #Google @Google #GoogleGemini #mobiletech #techtrends #TechTips #OneCoolTip @OneCoolTip 

Wednesday, February 28, 2024

Master Your To-Do List with Google Tasks

Discover the hidden power of Google Tasks to streamline your days and crush your to-do list. Learn pro tips and tricks for mastering this simple yet effective tool.

By Rodger Mansfield, Editor
February 28, 2024


Google Tasks
Are you constantly feeling overwhelmed by a never-ending to-do list? 

Do important tasks seem to slip through the cracks? 

Here's a Cool Tip.  Use Google Tasks.

What is Google Tasks?

Google Tasks is a simple, yet powerful to-do list app built right into Google's ecosystem. 

It's perfect for jotting down quick reminders, creating detailed task lists, and seamlessly integrating those tasks into your Gmail and Google Calendar workflow.

Let's break down how to utilize these features effectively:

Creating and organizing tasks:  Add simple tasks with just a title, or dive into more detail with due dates, notes, and subtasks to break down larger projects.  Create multiple lists to categorize tasks by project, context, or importance.

Setting due dates and reminders: Ensure nothing slips through the cracks with due dates and optional time-based or location-based reminders. Get notified on your desktop or mobile device so you never miss a deadline.

Using subtasks: Complex tasks feel less daunting when broken down.  Add subtasks to create checklists within a main task, providing a clear path to completion.

Gmail integration: Turn important emails into actionable items. Within Gmail, open an email, click the three dots in the top right corner and select "Add to Tasks."  Your task will automatically link back to the original email.

Google Calendar integration:  Tasks with due dates appear within your Google Calendar, giving you a comprehensive overview of your day that includes both scheduled events and important to-dos.

Mobile app functionality:  Manage tasks on the go with dedicated iOS and Android apps. Check things off your list no matter where you are.

Here's how to use it.
  1. Access Tasks through 
    1. the sidebar in Gmail
    2. Google Calendar
    3. standalone website Google Tasks or 
    4. in the mobile app.
  2. Click or tap the "Add a Task" button, then type in your task title.
  3. Click the "Edit" (pencil) icon next to your task to add more info:
  4. Set a deadline and choose whether to include a specific time.
  5. Add extra details or links relevant to the task.
  6. Click "Add subtask" to create steps within the main task.
  7. Drag and drop tasks to reorder them within a list or move them between different task lists.

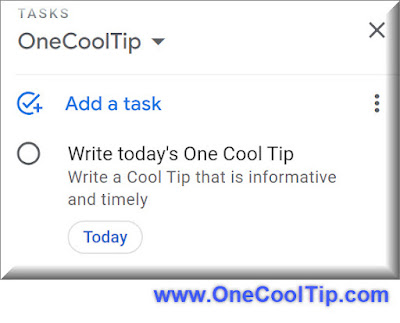
Google Tasks
fig. 1 - Google Tasks


The intuitive interface makes it quick to start using, with minimal setup required.

So what can you use Google Tasks for?
  • Project planning: Breakdown project phases into tasks with subtasks for steps in each phase.
  • Grocery and shopping lists: Share lists with family members for easy coordination.
  • Appointment reminders: Add tasks for doctor visits, meetings, or errands with date/time reminders.
  • Daily routines: Create lists for morning/evening routines with subtasks for each step.

Google Tasks, while deceptively simple on the surface, offers a powerful way to stay organized and focused. 

By following these tips and integrating it into your Google routine, you'll gain clarity on your priorities and accomplish more each day.

Enjoy!


Please LIKE and SHARE OneCoolTip.com!
Visit the OneCoolTip YouTube Channelhttps://www.youtube.com/@onecooltip


READ MORE


Rodger Mansfield, a seasoned tech expert, is the mastermind behind OneCoolTip.com, where he serves as both writer and editor. With a keen eye for simplifying complex tech, Rodger delivers practical advice that empowers readers to navigate the digital world with confidence. Dive into OneCoolTip.com for a treasure trove of savvy tips and tricks that keep you one step ahead in tech.


OneCoolTip.com
Cool Tech Tips for a Cooler Life!


#Google @Google #Tasks #GoogleTasks #productivity #taskmanagement #GoogleWorkspace #todolist #getorganized #TechTips #OneCoolTip @OneCoolTip 

Tuesday, February 27, 2024

Maximize Your Year with the Ultimate Guide to the National Day Calendar

Discover how to navigate and utilize the National Day Calendar to enrich your daily life and connect with the community. This Cool Tip offers practical tips and insights for making the most of every celebration.

By Rodger Mansfield, Editor
February 27, 2024


Have you ever wondered how to keep track of the myriad of national days that pop up on your social media feed? 

Are you looking for ways to incorporate these celebrations into your personal or professional life? If so, you’re not alone. 

Here's a Cool Tip.   Visit the National Day Calendar.

The National Day Calendar has become a go-to resource for recognizing and participating in national days. 

National Strawberry Day - February 27
fig. 1 - National Strawberry Day - February 27

But how can you use it effectively?

Here's how to do it.
  • Navigate to the National Day Calendar website, www.nationaldaycalendar.com.
  • Use the search function or browse the calendar to find days that resonate with you or your business.
  • Mark your calendar for upcoming national days and begin preparing how you’ll participate or celebrate.
  • Share your plans or celebrations on social media using the day’s specific hashtags.
  • Use national days as inspiration for content creation, whether it’s blog posts, videos, or social media updates.

The National Day Calendar is a fantastic way to engage with others and create content that’s timely and relevant. 

However, it’s important to choose national days that align with your values and brand to avoid appearing disingenuous.

Here are popular national calendar days!*:

January
  • National Spaghetti Day (January 4)
  • National Bubble Bath Day (January 8)
February
  • National Pizza Day (February 9)
  • National Love Your Pet Day (February 20)
March
  • National Puppy Day (March 23)
  • National Doctors’ Day (March 30)
April
  • National Siblings Day (April 10)
  • National Earth Day (April 22)
May
  • National Teachers Day (First Tuesday in May)
  • National Space Day (First Friday in May)
June
  • National Donut Day (First Friday in June)
  • National Best Friends Day (June 8)
July
  • National Ice Cream Day (Third Sunday in July)
  • National Father Daughter Take a Walk Day (July 7)
August
  • National Book Lovers Day (August 9)
  • National Lemonade Day (August 20)
September
  • National Dance Day (Third Saturday in September)
  • National Coffee Day (September 29)
October
  • National Taco Day (October 4)
  • National Make a Difference Day (Fourth Saturday in October)
November
  • National Veterans Day (November 11)
  • National Adoption Day (Saturday before Thanksgiving)
December
  • National Cookie Day (December 4)
  • National Ugly Christmas Sweater Day (Third Friday in December)
*These days are celebrated for various reasons, from food to social causes, and provide a fun way to engage with others and create themed content.

By following these steps, you can seamlessly integrate the National Day Calendar into your life, ensuring you never miss an opportunity to celebrate or connect with your audience. 

Remember, it’s more than just marking a day; it’s about creating moments that matter.

Enjoy!


Please LIKE and SHARE OneCoolTip.com!
Visit the OneCoolTip YouTube Channelhttps://www.youtube.com/@onecooltip


READ MORE


Rodger Mansfield, a seasoned tech expert, is the mastermind behind OneCoolTip.com, where he serves as both writer and editor. With a keen eye for simplifying complex tech, Rodger delivers practical advice that empowers readers to navigate the digital world with confidence. Dive into OneCoolTip.com for a treasure trove of savvy tips and tricks that keep you one step ahead in tech.


OneCoolTip.com
Cool Tech Tips for a Cooler Life!


#NationalDayCalendar #CelebrateEveryDay #DailyCelebrations #SocialMediaTrends #TechTips #OneCoolTip @OneCoolTip 

Monday, February 26, 2024

Transform Your Reading Experience in Microsoft 365 Word with Immersive Reader

Unlock the Full Potential of Your Documents with Immersive Reader in Microsoft 365 Word

By Rodger Mansfield, Editor
Monday, February 25, 2024


In today’s fast-paced digital world, the ability to quickly absorb and comprehend written material is more crucial than ever. 

But have you ever considered how technology can transform your reading experience within Microsoft Word? 

Here's a Cool Tip.  Use Microsoft Word's Immersive Reader.

Immersive Reader is a game-changing tool that’s redefining accessibility and ease of use in document reading.

In the quest for efficiency and accessibility, Microsoft 365 Word’s Immersive Reader stands out as a beacon of innovation. 

Back to Work Monday - OneCoolTip.com

But how can it transform your reading experience?

Here's how to do it.

Step-by-Step Guide to Using Immersive Reader:
  1. Open your Word document.
  2. Navigate to the View tab.
  3. Click on Immersive Reader to launch a full-screen reading experience.
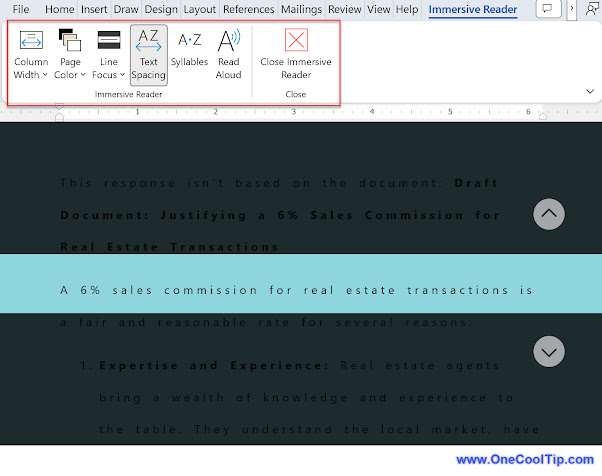
  4. Customize your reading space using options like Column Width, Page Color, and Line Focus.
  5. Utilize Text Spacing and Syllables to improve word recognition.
  6. Activate Read Aloud to have the document read to you, adjusting the voice and speed as needed.


Microsoft 365 Word Immersive Reader
fig. 1 - Microsoft 365 Word Immersive Reader

This Microsoft 365 feature is highly customizable.

Change these options to improve your use of the tool.

Detailed Guide to Immersive Reader Features:
  • Column Width: Adjust the width of the text column to reduce eye movement and improve focus. Choose from Very Narrow to Wide to find the perfect fit for your reading style.
  • Page Color: Change the background color to reduce glare and create a comfortable reading environment. Select from a variety of colors or create a custom shade that suits you best.
  • Line Focus: Concentrate on the text line-by-line by dimming out the rest of the document. You can choose to focus on one, three, or five lines at a time.
  • Text Spacing: Increase the spacing between words and characters to enhance clarity and reduce visual crowding, making it easier to track and recognize words.
  • Syllables: Break words into syllables to aid in pronunciation and understanding, especially beneficial for readers with dyslexia or those learning English as a second language.
  • Read Aloud: Have the document read to you with options to adjust the voice and speed, highlighting each word as it’s read for better tracking and comprehension.

Immersive Reader in Microsoft 365 Word is not just a tool; it’s a bridge to a more inclusive and efficient reading environment. 

By following the steps outlined above, you can transform your documents into a personalized reading haven that caters to your unique needs.

Enjoy!


Please LIKE and SHARE OneCoolTip.com!
Visit the OneCoolTip YouTube Channelhttps://www.youtube.com/@onecooltip


READ MORE


Rodger Mansfield, a seasoned tech expert, is the mastermind behind OneCoolTip.com, where he serves as both writer and editor. With a keen eye for simplifying complex tech, Rodger delivers practical advice that empowers readers to navigate the digital world with confidence. Dive into OneCoolTip.com for a treasure trove of savvy tips and tricks that keep you one step ahead in tech.


OneCoolTip.com
Cool Tech Tips for a Cooler Life!


#Microsoft @Microsoft #Word #ImmersiveReader #Microsoft365 #Accessibility #ReadingTools #ProductivityHacks #LearningTools #TechTips #OneCoolTip @OneCoolTip 

Sunday, February 25, 2024

Master Audio-Enhanced Screen Recording with Windows 11 Snipping Tool

Discover the seamless integration of audio in screen recordings with the Windows Snipping Tool, transforming your content creation process.

By Rodger Mansfield, Editor
February 25, 2024


Snipping Tool
Have you ever needed to capture a video tutorial or a gaming victory, complete with all the in-game sounds and commentary? 

What if you could do all that without installing any third-party software?

Here's a Cool Tip.  Use the Windows 11 Snipping Tool now with Audio Recording.

Here's how to do it.

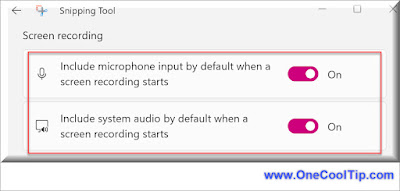
Configuration Tips: Include system audio by default:
  1. Open Snipping Tool settings from the three dot icon at the top right corner of the tool.
  2. Under ‘Screen recording’, toggle 'Include Microphone input by default' and ‘Include system audio by default’.

Snipping Tool - Audio Settings
fig. 1 - Snipping Tool - Screen Recording - Audio Settings


Record Screen video with Audio:
  1. Open the Windows Snipping Tool from the Start menu.
  2. Click the ‘Record’ button in the top toolbar, then select ‘New’.
  3. Drag to select the screen area you wish to record.
  4. Ensure your microphone is unmuted to include voiceovers.
  5. Hit ‘Start’ to begin recording after the countdown.
  6. Press ‘Stop’ to end the recording, which saves in MP4 format.
Snipping Tool Audio Recording
fig. 2 - Snipping Tool Audio Recording

This new feature means there is no need for additional software.

It has a simple and intuitive interface and  directly integrates system and microphone audio.

Currently, only MP4 format is supported and unfortunately, there is no direct keyboard shortcut for recording initiation.

Imagine creating a software tutorial. With the Snipping Tool, you can record step-by-step instructions while narrating, making your tutorial more engaging and informative.

Embrace the simplicity and efficiency of the Windows Snipping Tool for your screen recording needs. 

With audio integration, your content will be more dynamic and immersive than ever before.

Enjoy!


Please LIKE and SHARE OneCoolTip.com!
Visit the OneCoolTip YouTube Channelhttps://www.youtube.com/@onecooltip


READ MORE


Rodger Mansfield, a seasoned tech expert, is the mastermind behind OneCoolTip.com, where he serves as both writer and editor. With a keen eye for simplifying complex tech, Rodger delivers practical advice that empowers readers to navigate the digital world with confidence. Dive into OneCoolTip.com for a treasure trove of savvy tips and tricks that keep you one step ahead in tech.


OneCoolTip.com
Cool Tech Tips for a Cooler Life!


#Microsoft @Microsoft #SnippingTool #WindowsTips#ScreenRecording #AudioCapture #TechTutorial  #WindowsHowTo #ScreenRecordWithAudio #Windows11 #TechTips #OneCoolTip @OneCoolTip 
Saturday, February 24, 2024

How to Master Gmail Keyboard Shortcuts

Learn to navigate Gmail like a pro with these essential keyboard shortcuts and save valuable time.

By Rodger Mansfield, Editor
February 24, 2024


Gmail logo
Tired of endless clicking in Gmail?

Wish you could manage emails like a pro?

Do you wish there was a way to manage your email faster without all the mouse work? 

Here's a Cool Tip.  Use The Gmail Keyboard Shortcuts.

Gmail keyboard shortcuts are your secret weapons for inbox domination!

Skyrocket your productivity, reduce hand strain, and stay focused with Gmail keyboard shortcuts.

Here's how to do it.

Turn on Keyboard Shortcuts
  1. Log in to your Gmail account on the web at http://www.gmail.com .
  2. Before you can master Gmail shortcuts, you need to enable them.
  3. Click the gear icon (Settings) in the top right corner.
  4. Choose "See All Settings".
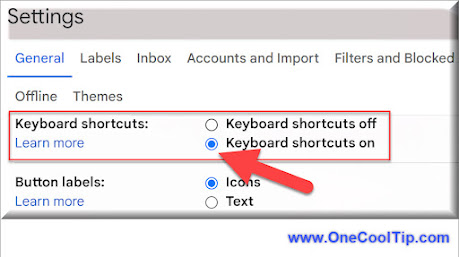
  5. Scroll down to the "Keyboard shortcuts" section.
  6. Select "Keyboard shortcuts on".
  7. Click "Save Changes" at the bottom.

Gmail Keyboard Shortcut Setting
fig. 1 - Gmail Keyboard Shortcut Setting


Top Gmail Keyboard Shortcuts
  • Compose New Message (C): Start drafting a new email instantly.
  • Open an Email (O): Read a selected email without extra clicks.
  • Jump to Search Bar (/): Find exactly what you need, fast.
  • Send (Control + Enter): Send email.
  • Archive an Email (E): Remove an email from the inbox while keeping it accessible.

For a complete guide to Gmail keyboard shortcuts, press "Shift + ?" within your inbox.

Gmail Keyboard Shortcuts List
fig. 2 - Gmail Keyboard Shortcuts List


These top Gmail keyboard shortcuts dramatically increase your inbox navigation speed.

Mastering Gmail keyboard shortcuts is a simple change with a huge payoff.  

By adopting these techniques, you'll transform yourself into an email ninja, saving time, and boosting inbox efficiency.

What's your favorite Gmail keyboard shortcut?

Let us know in the comments below.

Enjoy!


Please LIKE and SHARE OneCoolTip.com!
Visit the OneCoolTip YouTube Channelhttps://www.youtube.com/@onecooltip


READ MORE


Rodger Mansfield, a seasoned tech expert, is the mastermind behind OneCoolTip.com, where he serves as both writer and editor. With a keen eye for simplifying complex tech, Rodger delivers practical advice that empowers readers to navigate the digital world with confidence. Dive into OneCoolTip.com for a treasure trove of savvy tips and tricks that keep you one step ahead in tech.


OneCoolTip.com
Cool Tech Tips for a Cooler Life!


#Google @Google #Gmail #KeyboardShortcuts #Productivity #Efficiency #Timesaver #TechTips #OneCoolTip @OneCoolTip 

Friday, February 23, 2024

Unlock the Secrets of the Great Pyramid: A Breathtaking 3D Virtual Tour Experience

Embark on a digital journey through time and space to unravel the mysteries of the Great Pyramid, without ever leaving your chair. Discover the wonders of this ancient marvel with a free, immersive 3D tour.

By Rodger Mansfield, Editor
February 23, 2024


Have you ever wondered what secrets lie within the Great Pyramid of Giza? 

Now you can uncover them from the comfort of your home

While physically traveling to Egypt may not be on the cards right now, did you know you can experience the breathtaking scale and detail of this ancient monument through a fascinating virtual 3D tour?

Here's a Friday Funday Cool Tip.  Check out the The Digital Giza project.

The Digital Giza project, powered by Harvard University and Mused, offers an extraordinary online experience at https://giza.mused.org/en/guided/266/inside-the-great-pyramid


Here's how to do it.
  1. Head to https://giza.mused.org/en/guided/266/inside-the-great-pyramid.
  2. Sign up for a free account
  3. Once in, click on the "Go Inside the Great Pyramid of Giza in 3D" tour to begin.
  4. Use the onscreen arrows or your mouse to navigate the richly detailed 3D environment
    1. See the imposing passages, the Grand Gallery, and the King's Chamber.
  5. Informative overlays provide historical context and architectural insights at key points within the pyramid.

Giza Pyramid 3D Virtual Tour
fig. 1 - Giza Pyramid 3D Virtual Tour

Explore a world wonder from anywhere, at any time and learn about ancient Egyptian history, architecture, and possible construction techniques.

This immersive experience with 3D technology conveys the scale and grandeur of the pyramid in a way that photos cannot.

The Great Pyramid of Giza's virtual 3D tour is a remarkable feat. 

It allows you to satisfy your curiosity about ancient Egypt, igniting a desire to learn more. 

If you're an armchair archaeologist, a history buff, or simply fascinated by world wonders, this experience is well worth your time.

Don’t just read about history—experience it. Start your 3D journey through the Great Pyramid today.

Enjoy!


Please LIKE and SHARE OneCoolTip.com!
Visit the OneCoolTip YouTube Channelhttps://www.youtube.com/@onecooltip


READ MORE


Rodger Mansfield, a seasoned tech expert, is the mastermind behind OneCoolTip.com, where he serves as both writer and editor. With a keen eye for simplifying complex tech, Rodger delivers practical advice that empowers readers to navigate the digital world with confidence. Dive into OneCoolTip.com for a treasure trove of savvy tips and tricks that keep you one step ahead in tech.


OneCoolTip.com
Cool Tech Tips for a Cooler Life!


#GreatPyramid #AncientEgypt #VirtualTour #history #archaeology #travel #education #digital #innovation #TechTips #OneCoolTip @OneCoolTip

Thursday, February 22, 2024

Score Big with the New iPhone Apple Sports App

Discover the game-changing features of Apple’s latest innovation for the iPhone, the Apple Sports app, designed to keep sports enthusiasts ahead of the game with real-time updates and personalized content.

By Rodger Mansfield, Editor
February 22, 2024


Are you tired of juggling multiple sports apps to stay updated? 

Do you crave a seamless experience that puts you in the center of the action? 

Here's a Cool Tip.  Use Apple’s new iPhone Sports app.

It might just be the MVP you’re looking for.

In an era where mobile technology meets sports fanaticism, Apple’s iPhone Sports app emerges as a revolutionary tool, promising to redefine how fans engage with their favorite sports.

And it's FREE.

Here's how to do it.
  1. Head to the App Store and download the Apple Sports app for free.
  2. Select your favorite teams and leagues to personalize your dashboard.
  3. Enjoy real-time scores, stats, and news tailored to your preferences.

Apple Sports App for iPhone
fig. 1 - Apple Sports App for iPhone


The Apple Sports app is a game-changer for sports fans, offering a personalized, fast, and comprehensive sports experience right at your fingertips. 

Apple Sports is available to download now in the App Store in the U.S., the U.K. and Canada.

Join the legion of sports enthusiasts who have already made the switch to Apple’s iPhone Sports app. 

Download today and transform your game-watching experience forever.

Enjoy!


Please LIKE and SHARE OneCoolTip.com!
Visit the OneCoolTip YouTube Channelhttps://www.youtube.com/@onecooltip


READ MORE


Rodger Mansfield is the mastermind behind OneCoolTip.com, where he serves as both writer and editor. With a keen eye for simplifying complex tech, Rodger delivers practical advice that empowers readers to navigate the digital world with confidence. Dive into OneCoolTip.com for a treasure trove of savvy tips and tricks that keep you one step ahead in tech.


OneCoolTip.com
Cool Tech Tips for a Cooler Life

#Apple @Apple #iPhone #AppleSports #LiveSportsScores #TechTips #OneCoolTip @OneCoolTip 

Wednesday, February 21, 2024

Unlock Hidden iPhone Editing Powers with The Three-Finger Tap Trick

Discover a time-saving iPhone shortcut!  Master the three-finger tap to instantly access editing tools for text, images, and more.

By Rodger Mansfield
February 21, 2024


Have you ever found yourself repeatedly tapping and holding on your iPhone screen to get those editing options to pop up?  

Is wrestling with the tiny cursor to make text changes giving you a headache? 

Here's a Cool Tip.  Use the hidden power of the three-finger tap.

What is the Three-Finger Tap?

The three-finger tap is a convenient iOS gesture that brings up a handy editing toolbar.  

This toolbar usually offers actions like:
  • Cut
  • Copy
  • Paste
  • Undo
  • Redo

Here's how to do it. 
  1. Open any app where you can edit text (Notes, Messages, email, etc.)
  2. Tap into a text field.
  3. Tap one time on the screen with three fingers.
  4. The editing toolbar will appear above your text selection.

iPhone Three Finger Tap
fig. 1 - iPhone Three Finger Tap


This gesture is a must-know productivity shortcut for iPhone users.

It streamlines workflows, especially if you do a lot of editing on your iPhone.

After performing a three-finger tap, a single tap on the side of the screen will usually dismiss the toolbar.

The three-finger tap is a lesser-known but incredibly useful iPhone gesture.  

Whether you're a writer, student, or everyday texter, adding this shortcut to your toolbox will supercharge your editing game, saving you time and frustration.

Ready to streamline your iPhone editing? 

Start using the three-finger tap today and see the difference!

Enjoy!


Please LIKE and SHARE OneCoolTip.com!
Visit the OneCoolTip YouTube Channelhttps://www.youtube.com/@onecooltip


READ MORE

OneCoolTip.com
Cool Tech Tips for a Cooler Life


Rodger Mansfield is the mastermind behind OneCoolTip.com, where he serves as both writer and editor. With a keen eye for simplifying complex tech, Rodger delivers practical advice that empowers readers to navigate the digital world with confidence. Dive into OneCoolTip.com for a treasure trove of savvy tips and tricks that keep you one step ahead in tech.


#Apple @Apple #iPhone #iOS #productivity #shortcuts #techtips #iPhonehacks #TechTips #OneCoolTip @OneCoolTip 

Tuesday, February 20, 2024

Unveiling the Secrets of Your Wi-Fi: Retrieve Your Windows 11 Password in a Snap!


Wifi Logo
This Cool Tip for Windows 11 shows how to retrieve your network security key in no time, getting you back online and connected.

By Rodger Mansfield, Editor
February 20, 2024


Have you ever been locked out of your own Wi-Fi network, scrambling to remember the password? 

In today’s connected world, being locked out of your Wi-Fi can feel like being stranded on a deserted island. 

Here's a Cool Tip.  Windows 11 offers a straightforward solution to recover your Wi-Fi password with ease. 

Whether you’re a tech newbie or a seasoned pro, this guide will walk you through the process, ensuring you’re never disconnected for long.

Here's how to do it.

Find you Wi-Fi password in Windows 11.
  1. Press Windows+i to open the Settings app.
  2. Select ‘Network & Internet’ and then ‘Wi-Fi’.
  3. Click on your network’s name and select ‘Properties’.
  4. Scroll down and click ‘View Wi-Fi Security Key’ to display your password.

Find you Wi-Fi Password in Windows 11
fig. 1 - Find you Wi-Fi Password in Windows 11


This Cool Tip quickly recovers passwords without technical expertise.

You’ll not only regain access to your Wi-Fi network but also enhance your understanding of Windows 11’s network management capabilities. 

Stay connected and secure with these simple yet effective tips.

Please LIKE and SHARE OneCoolTip.com!
Visit the OneCoolTip YouTube Channelhttps://www.youtube.com/@onecooltip


READ MORE


Rodger Mansfield is the mastermind behind OneCoolTip.com, where he serves as both writer and editor. With a keen eye for simplifying complex tech, Rodger delivers practical advice that empowers readers to navigate the digital world with confidence. Dive into OneCoolTip.com for a treasure trove of savvy tips and tricks that keep you one step ahead in tech.


OneCoolTip.com
Cool Tech Tips for a Cooler Life


#Microsoft @Microsoft @Windows #Windows11 #WiFiPasswordRecovery #TechTips #StayConnected #OneCoolTip @OneCoolTip