Showing posts with label ios17. Show all posts

Tuesday, April 9, 2024

Protect Your Eyesight with iPhone's Screen Distance Feature

Protect Your Eyesight with iPhone's Screen Distance Feature

Learn how to enable and use iPhone's Screen Distance feature designed to promote healthy viewing habits and potentially reduce eye strain.

By Rodger Mansfield, Technology Editor
April 9, 2024


iOS 17
Do you find yourself constantly glued to your iPhone screen, sometimes holding it too close to your face?  

If you worry about the potential impact on your eyesight, there's a handy feature built right into your iPhone in iOS17 that can help. 

Here's a Cool Tip.  Ensure Your Screen Distance is Set.

What is Screen Distance?

Screen Distance is an iOS feature  that reminds you to hold your iPhone at a healthy distance from your eyes. 

It uses your iPhone's Face ID technology to measure how close the screen is.

Holding screens too close for extended periods can contribute to eye strain and potential long-term problems. 

Screen Distance helps you build better habits.

Here's how to do it.
  1. Go to Settings on your iPhone.
  2. Tap on Screen Time.
  3. Select Screen Distance.
  4. Toggle the Screen Distance switch to turn the feature on.

iPhone Screen Distance Setting
fig. 1 - iPhone Screen Distance Setting

How Screen Distance Works
Once enabled,  Screen Distance will subtly dim your screen if it detects you're holding your iPhone too close. 

iPhone Screen Distance Warning
fig. 2 - iPhone Screen Distance Warning


Screen Distance dims your display as a gentle reminder to adjust your position.

Setting screen distance promotes healthy screen use habits, potentially reduces eye strain, easy to set up.

Prioritize your eye health! 

Turn on Screen Distance today for a small step towards healthier phone use.

It could make a positive difference in your long-term eyesight.


READ MORE


Please LIKE and SHARE OneCoolTip.com!
Visit the OneCoolTip YouTube Channelhttps://www.youtube.com/@onecooltip

Do you have a Cool Tip or question? Email us at
onecooltip.com@gmail.com


Rodger Mansfield, a seasoned tech expert, is the mastermind behind OneCoolTip.com, where he serves as both writer and editor. With a keen eye for simplifying complex tech, Rodger delivers practical advice that empowers readers to navigate the digital world with confidence. Dive into OneCoolTip.com for a treasure trove of savvy tips and tricks that keep you one step ahead in tech.


OneCoolTip.com
Cool Tech Tips for a Cooler Life!


 #Apple @Apple #iPhone #eyehealth #screentime #techtips #ios #eyesight #wellness #digitalhealth #TechTips #OneCoolTip @OneCoolTip

(c) 2024 OneCoolTip.com

Saturday, January 20, 2024

How to Add Pronouns to iPhone Contacts

iPhone Pronouns
Ever heard someone say, "My pronouns are..." after introducing themselves? 

It's a simple way to ensure people address you in a way that aligns with their gender identity. 

Here's a Cool Tip.  Apple's Contacts app now lets you add pronouns to your own contact card and those of your contacts. 

Introducing yourself and others just got easier thanks to the latest iOS update!

Here's how to do it.
  • Open the Contacts app.
  • Locate any contact (or create a new contact).
  • Tap "Edit".
  • In the edit menu, tap "Add Pronouns.

iPhone Contacts Add Prnouns
fig. 1 - Add Pronouns - iPhone Contact App

  • Choose your language.
  • Type in the preferred pronouns (e.g., he/his, she/her, they/them, ze/zir).

iPhone Contact Pronoun Entry
fig. 2 - Add Pronouns - iPhone Contact App


  • Tap "Add"
  • Tap "Done"
iPhone pronouns are more than just a cool tech feature; they're a step towards a more mindful and accepting society.

Join the pronoun revolution and let your iPhone be your voice for inclusivity!

That's it!

Have you tried it yet?

What do you think?

Let us know in the comments below.


Please LIKE and SHARE OneCoolTip.com!
Visit the OneCoolTip YouTube Channelhttps://www.youtube.com/@onecooltip

Do you have a Cool Tip or question? Email us at
onecooltip.com@gmail.com


READ MORE

OneCoolTip.com
Cool Tech Tips for a Cooler Life!

#Apple @Apple #iPhone #iPhonePronouns #InclusiveTech #GenderIdentity #RespectEveryone #ShareYourPronouns #iOS17 #TechTips #OneCoolTip @OneCoolTip 

Wednesday, January 17, 2024

Never Decipher Laundry Tags Again: iOS 17's Laundry Look Up is a Wash Day Game Changer!

iOS17
Have you ever wondered how to make your laundry chores easier? 

Confused by cryptic laundry symbols? 

Say goodbye to squinting at tags and guessing wash settings! 

Here's a Cool Tip.  Use Visual Lookup in iOS17 for Laundry,

iOS 17 empowers you with Visual Look Up for laundry care, a hidden gem that transforms your iPhone into a garment-guru. 

So, ditch the deciphering dramas and join me as we explore this life-saving feature for all laundry-wrangled souls!

Here's how to do it.
  • Update to iOS 17 if needed.
  • Snap a Close-Up on the laundry tag, ensuring all symbols are clear.

iOS17 Laundry Look Up Image
fig. 1 - iOS17 Laundry Lookup Image
  • Navigate to the captured image.
  • Swipe up on the photo or tap the "i" icon within a circle at the bottom.
  • Watch for the "Look Up Laundry Care" option and tap it.
iOS17 Look Up Laundry Care
fig. 2 - iOS17 Look Up Laundry Care

  • iPhone identifies individual symbols and displays their meanings right beside them.
iOS17 Look Up Laundry Care Results
fig. 3 - Look Up Laundry Care Results


iOS 17's Visual Look Up for laundry care is a simple yet transformative feature, empowering you to conquer wash day with confidence. 

Visual Look Up handles it all:
  • From delicate fabrics to bleach warnings.
  • No more shrinking sweaters or faded colors – follow the accurate guidance!
  • Wash with newfound assurance, knowing you're treating your clothes right.

No more deciphering dilemmas or garment-ruining guessing games! 

So, unleash your inner laundry master and embrace the freedom of knowing your clothes are always in good hands.

Have you tried it yet?

Let us now in the comments below.

Enjoy!


READ MORE

Please LIKE and SHARE OneCoolTip.com!
Visit the OneCoolTip YouTube Channelhttps://www.youtube.com/@onecooltip

Do you have a Cool Tip or question? Email us at
onecooltip.com@gmail.com


OneCoolTip.com
Cool Tech Tips for a Cooler Life!

#Apple @Apple #iOS17 #LaundryLife #TechHacks #LaundryTips #AppleLife #WashDayWin #NoMoreSymbols #VisualLookUp #Clotheswhisperer #TechTip #OneCoolTip @OneCoolTip 

Thursday, January 11, 2024

Stop the Hovering Hints: How to Turn Off Inline Text Predictions on iPhone

Have you ever tap out a text and feel like your iPhone is reading your mind a little too closely? 

Those hovering word suggestions hovering above your keyboard - the ones you accidentally tap all the time - are called inline text predictions

While helpful in theory, they can sometimes be more distracting than insightful.

Tired of the unwanted auto-complete?


Inline Predictive Text Example

fig. 1 - Inline Predictive Text Example

Here's  Cool Tip.  Turn off Inline Text Prediction in iOS 17.

Here's how to do it.
  • Update your iPhone to the latest version of iOS (17.2).
  • Open the Settings app on your iPhone.
  • Scroll down and tap "General."
  • Tap "Keyboard." (You might need to tap "Keyboard Settings" on older iPhones.)
  • Under "Predictive Text," toggle off the "Show Predictions Inline" switch.

iPhone Inline Predict Text Setting

fig. 2 - iPhone Inline Predict Text Setting

That's it!

No more accidentally tapping the wrong suggestion or fighting against the auto-complete.

So, say goodbye to the unwelcome word whispers and hello to a clean, distraction-free typing experience. 

By taking a few simple steps, you can reclaim your keyboard and unleash your inner wordsmith (without any unwanted autocomplete interference).

Enjoy!

Please LIKE and SHARE OneCoolTip.com!
Visit the OneCoolTip YouTube Channelhttps://www.youtube.com/@onecooltip

READ MORE


OneCoolTip.com
Cool Tech Tips for a Cooler Life!


#Apple @Apple #iPhone #iphonetips #iOS17 #keyboardhacks #predictivetext #autocompleteoff #typefreely #TechTips #OneCoolTip @OneCoolTip 

Wednesday, January 3, 2024

Snoopy Takes Over! How to Add the Adorable New Apple Watch Face


Snoopy Takes Over! How to Add the Adorable New Apple Watch Face

Snoopy fans rejoice! Transform your Apple Watch with the new Snoopy watch face – it's easy to set up and delivers delightful charm with every glance.

By Rodger Mansfield, Technology Editor
January 3, 2024


Are you an Apple Watch user? 

Do you love Snoopy? 

Here's a Cool Tip.  Add the new Snoopy watch face feature to your Apple Watch.


The Snoopy Apple Watch face is lively, interactive, and fun. 

It brings your Apple Watch to life with cool animations and movements. 

Snoopy and Woodstock react whenever you raise your wrists. 

Here's how to do it.
  • To use the Snoopy Watch face, you need to update your Apple Watch to watchOS 10.
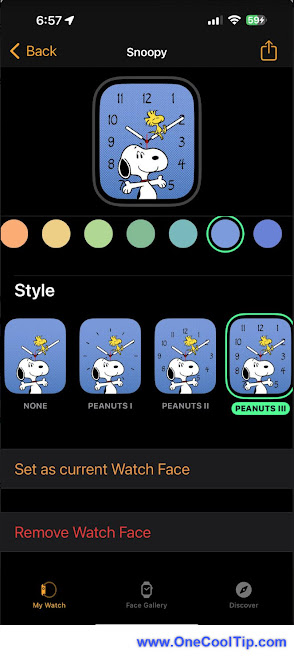
  • On your iPhone, launch the Watch app.
  • Tap on the Face Gallery tab in the bottom middle of the app.
  • You’ll see the Palette and Snoopy watch faces under New Watch Faces. 
  • Tap on Snoopy.
  • Choose the Color 
  • Choose a Style.
Apple Watch - Snoopy Watch Face Setting
fig. 1 - Apple Watch - Snoopy Watch Face Setting

  • Tap "Set as current Watch Face" to make it your watch face.

Apple Watch - Snoopy
fig. 2 - Apple Watch - Snoopy


It’s one of the most intuitive watch faces on an Apple Watch.

Snoopy can be seen surfing, playing basketball, or giving you side looks to bring the watch face to life. 

While my Apple Watch SE doesn’t support the always-on display function, Snoopy and Woodstock can be seen sleeping on the always-on display for Apple Watches that support it.

Enjoy!


READ MORE

Please LIKE and SHARE OneCoolTip.com!
Never miss a Cool Tip: OneCoolTip Newsletter.

Do you have a Cool Tip or question? Email us at onecooltip.com@gmail.com


Rodger Mansfield, a seasoned tech expert, is the mastermind behind OneCoolTip.com, where he serves as both writer and editor. With a keen eye for simplifying complex tech, Rodger delivers practical advice that empowers readers to navigate the digital world with confidence. Dive into OneCoolTip.com for a treasure trove of savvy tips and tricks that keep you one step ahead in tech.


OneCoolTip.com
Cool Tech Tips for a Cooler Life!


#Apple @Apple #AppleWatch #SnoopyWatchFace #watchOS10 #AppleWatchSE #TechTips #OneCoolTip @OneCoolTip 

Saturday, December 30, 2023

How to Use Copilot, the AI-Powered Chat and Content Generator, on Your Smartphone

Do you want to get more out of your smartphone? 

Do you wish you had a smart assistant that can help you with your tasks, research, and creativity? 

Here's a Cool Tip.   Use the NEW Copilot mobile apps for iOS and Android. 

Copilot, formerly called Bing Chat,  is an AI-powered chat and content generator that can help you with your tasks, research, and creativity. 

You can chat with Copilot, ask it questions, and request it to generate content for you, such as code, poems, stories, essays, and more. 

Copilot is available on various platforms, including mobile apps for iOS and Android, Windows, and Microsoft Office tools.

Here's how to Use the Copilot Mobile App

  • Download the app from the Apple App Store or the Google Play Store, respectively. 
  • Sign in with your Microsoft account to access more features and have longer conversations. You can also use the app without signing in, but with some limitations.
  • Type in your question or request, or use voice recognition to speak to Copilot. 
  • Copilot responds in a chat bubble. 
  • Continue the conversation by typing or speaking more. 
  • Use the app’s menu to access different modes and settings.
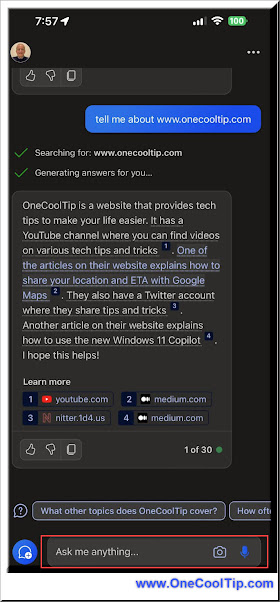


Microsoft Copilot iOS mobile app

fig. 1 Microsoft Copilot iOS mobile app


Here are some examples of how you can use the Copilot mobile apps for iOS and Android for different purposes and topics:
  • Learn to Code - Ask Copilot to write a simple program for you, such as “Write a program that prints Hello World” or “Write a program that calculates the area of a circle”. Copilot generates the code for you in a code block, and you can copy and paste it into your editor or compiler. You can also ask Copilot to explain the code or modify it according to your needs.
  • Write a Poem - Ask Copilot to write a poem, such as “Write a poem about winter”.. Copilot generates the poem in a code block.  You can copy and paste it into your document. You can also ask Copilot to change the style or tone of the poem, or add more verses or lines.
  • Recommend Restaurant -  Ask Copilot to recommend a restaurant for you, such as “Recommend a restaurant near me” or “Recommend a restaurant that serves Italian food”. Copilot gives you a list of restaurants that match your criteria, along with their ratings, reviews, and locations.

From a PC, you also can access Copilot at http://copilot.microsoft.com as well as at Bing, www.bing.com/ then select "Chat".

What do you think of Copilot?

Let us know in the comments below.

Enjoy!

Please LIKE and SHARE OneCoolTip.com!
Visit the OneCoolTip YouTube Channelhttps://www.youtube.com/@onecooltip


READ MORE

OneCoolTip.com
Cool Tech Tips for a Cooler Life!


#Microsoft @Microsoft #Copilot #CopilotApp #CopilotChat #iOS #Android #AI #TechTips #OneCoolTip @OneCoolTip 

Thursday, December 28, 2023

Turn Your Photos into a Living Lock Screen with iPhone's Secret Photo Shuffle!

Tired of staring at the same old image on your iPhone Lock screen? 

Wishing your phone could reflect your ever-changing mood or capture the highlights of your life? 

Here's a Cool Tip.  Use the new Photo Shuffle option, 

Imagine your favorite memories greeting you every time you unlock your phone. Photo Shuffle makes it possible.

Photo Shuffle is a hidden gem in your camera roll that lets you curate a dynamic, personal lock screen slideshow!

The iPhone Photo Shuffle is just one of the many new iOS 17 features.

Here's how to do it.
  • Open the Settings app, tap Wallpaper, and then Add New Wallpaper.
  • Select Photo Shuffle from the top row of options. 
  • Choose what photos you want to include in the shuffle.
    • People: Focus on portraits and close-ups for a human touch.
    • Pets: Your favorite animals.
    • Nature: Immerse yourself in landscapes and serene sceneries.
    • Cities: Capture the urban vibe with bustling streets and architectural delights.
    • Albums: Select a specific album to feature your favorite vacation snaps or family moments.
  • Choose how often your photos automatically update. Options include:
    • On Tap: Change the image by tapping the Lock screen.
    • On Lock: Switch photos every time you unlock your phone.
    • Hourly: Get a fresh image every hour to keep things interesting.
    • Daily: Wake up to a new picture each day.
  • Press "Use Featured Photos"

iPhone Photo Shuffle

That's it.

Enjoy!

Please LIKE and SHARE OneCoolTip.com!
Visit the OneCoolTip YouTube Channelhttps://www.youtube.com/@onecooltip


READ MORE

OneCoolTip.com
Cool Tech Tips for a Cooler Life

#iPhoneHacks #PhotoShuffle #DynamicLockScreen #iOS17 #Personalization #LockScreenGoals #NewLookNewDay #MemoriesOnDisplay #CuratedPhotos #ShakeUpYourPhone  #iPhoneLockScreen #TechLife #LifeHacks #TechTips #OneCoolTip @OneCoolTip 

Wednesday, December 20, 2023

How to Check-In on an iPhone

iOS17
Have you ever wondered how to keep your loved ones informed about your whereabouts without the hassle of constant updates? 

Or perhaps you’ve been concerned about a friend traveling alone late at night? 

Here's a Cool Tip.  Use the new iOS 17 iMessage Check-In feature. 


The Check-In feature provides peace of mind by automatically notifying your contacts when you’ve arrived somewhere safely. 

It’s particularly useful when you’re traveling alone or returning home late at night.

Here's how to do it.
  • Open the Messages app and choose or start a conversation with someone you want to Check In with.
  • Tap the plus sign, then More (if needed), then Check In.
  • Tap Edit and choose to send your Check In after a certain time or when you arrive at a location.
    • If you choose the location option, tap Change and search for the place you want to Check In at.
  • Choose how you’ll be traveling and how much information you want to share if you don’t Check In.
  • Tap Done and send your Check In message.
  • You can cancel the Check In if you want to.

iPhone Check In


Add time to your Check In
You can add time to your Check In.
  • Open the Messages app.
  • Open the conversation that contains Check In.
  • On the Check In message, tap Details, tap Add Time, then select an option.
Cancel a Check In
You can cancel your Check In.
  • Open the Messages app  on your iPhone.
  • Open the conversation with the friend you sent a Check In to.
  • On the Check In message, tap Details, then tap Cancel Check In and confirm.

This new feature only works if both parties have iOS 17. 

Be safe out there!

Enjoy!


#Apple @Apple #iPhone #iOS #iOS17 #iMessage #CheckIn #iPhoneSafety #AppleUpdate #TechTips #OneCoolTip @OneCoolTip 

Sunday, December 17, 2023

Unleash the Power of Shared Tracking With iOS 17’s AirTag Sharing Feature

Apple AirTag
Remember that frantic dash around the house searching for your keys... again? 

Or the sinking feeling when your luggage doesn't appear on the carousel? 

We've told you about Apple's amazing AirTags before as a "must have" accessory.

But iOS17 has brought yet another great feature.

Here's a Cool Tip.  Use the new Air Tag sharing feature in iOS 17.

An Apple AirTag is a small, Bluetooth-enabled tracking device designed to help you find lost or misplaced items. 

It connects to your Apple device's Find My network, allowing you to see its location on a map, play a sound to locate it nearby, and even get directions to it.

Sharing an AirTag in iOS 17 adds a whole new layer of convenience and security to this already helpful tool.

Here's how to do it.
  • Open the Find My app on your iPhone.
  • Tap Items.
  • Select the AirTag you want to share.
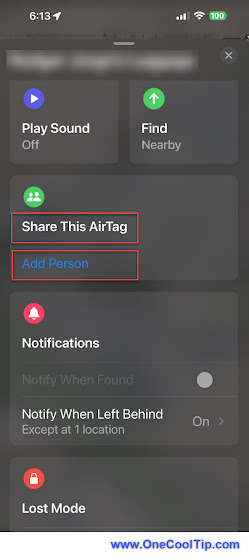
  • Tap Share This AirTag.
  • Choose Add Person.
  • Select the contacts with whom you want to share it with. 
    • You can select up to 5 people.
  • Tap Send.

Share Apple AirTag

fig. 1 - Share Apple AirTag

  • Your chosen contact now has access to that AirTag's location on their Find My app. 
  • They can see its last known location on a map, receive notifications when it's nearby, and even play a sound to help them find it.

So check out this great new feature of iOS 17!

That's it.

Enjoy!


Please LIKE and SHARE OneCoolTip.com!
Visit the OneCoolTip YouTube Channelhttps://www.youtube.com/@onecooltip


READ MORE

OneCoolTip.com
Cool Tech Tips for a Cooler Life


#iPhone #iOS #LostAndFoundNoMore #iOS17 #AirTag, #Apple @Apple #FindMy  #SharedTracking #TechTips #OneCoolTip @OneCoolTip 

Wednesday, December 13, 2023

Unlock Your Inner Voice With The New Journal App on iPhones

iOS17
Are you ready to capture your thoughts, feelings, and experiences like never before? 

Have you wanted to start a digital journal but didn't know which app to use on your iPhone?

Here's a Cool Tip.  Use the new Journal app.

The latest iOS update, 17.2, introduces a revolutionary app - Journal - designed to transform your journaling journey. 

Here's how to use it.
  • Download iOS 17.2 (Settings-->General--> Software Update)
  • Launch the  Journal App.
  • Create Your First Entry.
    • Tap the "+" button. 
    • Select "New Entry." 
  • Type your thoughts.  
  • Add photos, videos, location, or even voice notes to make your entry memorable.

iPhone Journal App

The Journal app is designed for everyone, regardless of their technical expertise.

You can easily create journal entries throughout your day.

For example,
  • Record your day: Capture your daily reflections, including triumphs, challenges, and moments of gratitude.
  • Document your travels: Use photos and videos to create a vibrant record of your adventures.
  • Capture your creative spark: Jot down your fleeting ideas, sketches, and poems for future reference.
The Journal app, with its access to iOS suggest entries after key activities such as workouts.

Now is your change to "write it out" and start your journaling adventure!

Enjoy.


Please LIKE and SHARE OneCoolTip.com!
Visit the OneCoolTip YouTube Channelhttps://www.youtube.com/@onecooltip


READ MORE

OneCoolTip.com
Cool Tech Tips for a Cooler Life


#iPhone #Journal #JournalApp #iOS172 #Journaling #SelfDiscovery #DigitalJournal #Expression #CreativeWriting #TechTips #OneCoolTip @OneCoolTip

Saturday, December 2, 2023

Protect Your Privacy. How to Disable NameDrop on iPhones

Have you recently updated your iPhone to iOS 17.

Did you notice a new feature called NameDrop? 

Are you curious about what it does and how it can affect your privacy? 

NameDrop is a new feature introduced in iOS 17 that allows iPhone users to share their contact details simply by holding their iPhones close to each other. 

Here's a Cool Tip.  You can Disable the Feature.

It’s designed to make sharing contact information quick and effortless. 

But like any feature, it has its pros and cons.

For most users, this is an unneeded feature.

Here's how to disable NameDrop
  • Open the Settings app.
  • Tap General.
  • Tap AirDrop.
  • Toggle the switch next to Bringing Devices Together on or off.

NameDrop Settings

The primary benefit of NameDrop is convenience. 

It eliminates the need to manually type in contact details, making the process of sharing information faster and more efficient.

However, many users have privacy concerns. 

Many police departments around the country warned residents to turn this new feature off.

Although NameDrop requires both parties to agree before any information is shared, the feature could potentially be triggered accidentally. 

If you’re worried about this, you can choose to disable NameDrop.

And if it's not a concern to you, leave it on!

That's it.

Enjoy!


Please LIKE and SHARE OneCoolTip.com!
Visit the OneCoolTip YouTube Channelhttps://www.youtube.com/@onecooltip


READ MORE

OneCoolTip.com
Cool Tech Tips for a Cooler Life


#Apple @Apple #iPhone #iOS17 #Technology #Tech #TechTips #Privacy #OneCoolTip @OneCoolTip