Showing posts with label Windows 10. Show all posts

Wednesday, November 27, 2024

How to Delete Windows Clipboard Contents

How to Delete Windows Clipboard Contents

Learn how to clear your Windows clipboard contents efficiently using several methods to ensure your data remains secure and your system operates smoothly.

By Rodger Mansfield, Technology Editor 
November 27, 2024


Windows Wednesday
Ever copied sensitive information only to worry later about it sitting in your clipboard? 

Whether it's passwords, private messages, or important data, keeping your clipboard clean is crucial for maintaining security and efficiency. 

The clipboard is a handy tool for temporarily storing information you copy or cut, but leaving sensitive data in the clipboard can pose a security risk. 

Moreover, an overloaded clipboard can slow down your system's performance. 

Here's a Cool Tip:  Delete Your Clipboard Contents on a regular basis.

Regularly clearing the clipboard ensures your sensitive data remains protected and your system runs smoothly.

Here's how to do it.

Using Clipboard History:
  1. Press Windows key + V to open the Clipboard history.
  2. Click the three dots (ellipsis) next to the item you want to delete.
  3. Select Delete from the menu.
Clear Windows Clipboard History

fig. 1 - Clear Windows Clipboard History


Clear All Clipboard Data:
  1. In the Clipboard history window, click the Clear All icon to delete all items from the Clipboard history.

Using Windows Settings:
  1. Go to Settings > System > Clipboard.
  2. Click on the Clear button under Clear Clipboard Data.

The Clipboard History feature is particularly useful for those using the latest versions of Windows 10 and Windows 11.

Deleting your clipboard memory improves your system's performance by freeing up resources and enhances security by ensuring sensitive data is not left lingering in the clipboard. 

Have you tried any of these methods to clear your clipboard? 

Share your experiences in the comments below, and don’t forget to share this article on social media to help others enhance their Windows security and performance!


READ MORE
Please LIKE and SHARE OneCoolTip.com!
Subscribe to the FREE OneCoolTip Newsletter.
Visit the OneCoolTip YouTube Channelhttps://www.youtube.com/@onecooltip

Do you have a Cool Tip or question? Email us at onecooltip.com@gmail.com

Rodger Mansfield, a seasoned tech expert, is the mastermind behind www.OneCoolTip.com where he serves as both writer and editor. With a keen eye for simplifying complex tech, Rodger delivers practical advice that empowers readers to navigate the digital world with confidence. Dive into www.OneCoolTip.com for a treasure trove of savvy tips and tricks that keep you one step ahead in tech.


One Cool Tip
Cool Tech Tips for a Cooler Life!


#windows @windows #clipboard #WindowsTips #TechSecurity #ClipboardManagement #Productivity
#TechTips #TechGuide #OneCoolTip @OneCoolTip 


Copyright © 2008-  2024 | www.OneCoolTip.com | All Rights Reserved

Wednesday, August 28, 2024

Throwback: Open Task Manager FAST With this Quick Trick

Throwback: Open Task Manager FAST With this Quick Trick

Forget the three-finger salute! Learn a faster way to access the Task Manager in Windows and quickly shut down those pesky unresponsive programs.

By Rodger Mansfield, Technology Editor
August 28, 2024 - First published September 3, 2015


Windows 10
Do you have a program that is non-responding in Windows?

The Task Manager app is the best tool to exit a non-responding program.  The Task Manager displays programs, processes and services that are currently running on your computer.  You can use Task Manager to check your PC's performance too.  And...close down an application that has frozen.

We've all usually opened the Task Manager by using the ALT-CTRL+DELETE (the three finger Windows salute!) to get to the security screen and then choosing the Task Manager option.

There is a much faster way.

Press and hold   CTRL + SHIFT + ESC

Wednesday, August 14, 2024

Master the Art of Opening Multiple App Instances in Windows

Master the Art of Opening Multiple App Instances in Windows

Discover the simple yet powerful trick of opening a second instance of any app in Windows with just a shift key hold, transforming your multitasking experience.

By Rodger Mansfield, Technology Editor
August 14, 2024


Windows 11
Have you ever found yourself juggling between tasks and wishing for a quicker way to access multiple instances of your favorite apps? 

What if the key to enhanced productivity lies right beneath your fingertips?

Here's a Cool Tip.  Hold down the Shift key when opening a Windows app.

Holding down the Shift key when opening a Windows app opens a second instance of the app.

Wednesday, June 26, 2024

Missing the Familiar? How to Bring Back the Classic File Explorer Ribbon in Windows 11

Missing the Familiar? How to Bring Back the Classic File Explorer Ribbon in Windows 11

Yearning for the Windows 10 File Explorer ribbon in Windows 11?  This guide will walk you through multiple methods to restore that classic interface and customize your Windows 11 experience.

By Rodger Mansfield, Technology Editor
July 26, 2024


Windows 11
Does the streamlined File Explorer ribbon in Windows 11 leave you feeling a bit lost? 

Are you yearning for the familiar ribbon interface from Windows 10?

Many users find themselves longing for the familiar, feature-rich ribbon interface from Windows 10. 

Here's a Cool Tip.  Use this Cool Tip to view the Windows 10 interface.

Wednesday, June 19, 2024

🚨 Urgent Alert: Windows Wi-Fi Vulnerability Exposes Millions to Hackers 🚨

🚨 Urgent Alert: Windows Wi-Fi Vulnerability Exposes Millions to Hackers  ðŸš¨

A newly discovered vulnerability in the Windows Wi-Fi driver could allow attackers to execute code on your device remotely. Learn how to protect yourself from this serious threat.

By Rodger Mansfield, Technology Editor
June 19, 2024


Have you ever thought about how secure your Wi-Fi connection is?

It's not just about passwords anymore. 

A recently revealed vulnerability in the Windows Wi-Fi driver, tracked as CVE-2024-30078, has sent shockwaves through the cybersecurity world.  

Could your computer be at risk? 

What can you do to protect yourself? 

Here's a Cool Tip.  Update your Windows ASAP!

Wednesday, June 12, 2024

Lost Your Windows Device? Here’s How to Find and Lock It Remotely

Lost Your Windows Device? Here’s How to Find and Lock It Remotely

Learn how to enable “Find My Device” on both Windows 10 and Windows 11, locate your lost device, and secure it remotely. Whether it’s a laptop, tablet, or desktop, these steps will help you regain control and protect your data.

By Rodger Mansfield, Technology Editor
June 12, 2024


Windows 11
Imagine this scenario: You’re rushing through a crowded airport, and suddenly, panic sets in. 

Your laptop—the repository of your work, memories, and cat videos—is nowhere to be found. 

Here's a Cool Tip.  Enable Find My Device in Windows 10 and Windows 11.

Find My Device is a built-in feature in Windows 10/11 that allows you to track your PC’s location. 

Think of it as Windows’ counterpart to Apple’s Find My feature. 

Once enabled, you can use your Microsoft account to locate your Windows PC on a map. 

Not only that, but you can also lock the PC remotely, preventing unauthorized access to your data. 

Additionally, you have the option to display a message on the lost device, making it easier for someone who finds it to return it to you


Here's how to do it.

Wednesday, June 5, 2024

Boost Your Productivity: Pin Folders to the Windows Start Menu!

Boost Your Productivity: Pin Folders to the Windows Start Menu!

Pin frequently accessed folders to your Windows Start Menu for quick access. Learn how in this step-by-step Cool Tip.

By Rodger Mansfield, Technology Editor
June 5, 2024


Windows 11
Are you tired of digging through layers of directories to find that important folder? 

Imagine having your most-used folders right at your fingertips?

Here's a Cool Tip.  Pin your favorite folders to the Windows Start Menu. 

Pinning folders to the Start Menu in Windows offers quick access to frequently used directories. 

It streamlines your workflow, saving time and reducing the need to navigate through layers of folders


Subscribe to the FREE OneCoolTip Newsletter.

Here's how to do it.

Wednesday, May 8, 2024

How to Master File Tags in Windows to Organize Your Files

How to Master File Tags in Windows to Organize Your Files

Elevate your file organization with our expert tagging tips for Windows. Streamline your search and retrieval process with these advanced strategies.

By Rodger Mansfield, Technology Editor
May 8, 2024


Microsoft Windows 11
Are you maximizing the potential of file tags in Windows? 

Could your digital filing system use a boost to match your dynamic workflow?

Here's a Cool Tip.  Use tags to organize your files in Microsoft Windows.

File tags in Windows are keywords or terms that you can assign to files as part of their metadata. 

Windows Wednesday - OneCoolTip

Why Use Flags?

They serve as an organizational tool, allowing you to categorize files based on content, project, or any other system you find useful.

These tags help describe the contents of a file and make it easier to organize and locate files through search

How to Tag Your Files

Here's how to do it.
  1. Open File Explorer. Use Windows+E shortcut!
  2. Locate the file you want to tag.
  3. Right-click and select "Properties" to access the file’s properties menu.  Use Alt+ Ent shortcut!
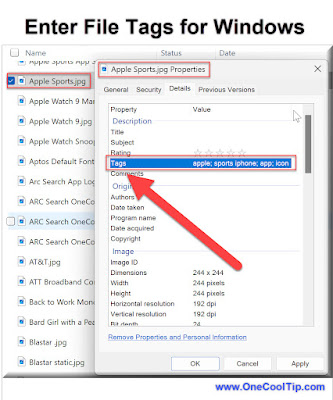
  4. Navigate to the Details Tab.
  5. Type your tags, separated by semicolons.
  6. Click Apply and OK to close the properties window.
Searching with file tags in Windows is a straightforward process that can greatly enhance your ability to quickly locate files. 

Enter File Tags for Windows
fig. 1 - Enter File Tags for Windows

Searching with Tags

Here's how to do it.
  1. Open File Explorer. Use Windows+E shortcut!
  2. Click on the search box located at the top right corner of the File Explorer window.
  3. Type "tag:" followed by the name of the tag you’re looking for. 
    • For example, if you’re searching for files tagged as ‘report’, type "tag:report" into the search box.
  4. To search for files with multiple tags, use operators like AND and OR
    • For instance, "tag:report AND tag:2024" will show files that have both ‘report’ and ‘2024’ tags.
By using tags in combination with the search functionality, you can quickly filter through your files and find exactly what you need without remembering the exact file name or location. 

This feature is especially useful for managing large collections of files and staying organized in a busy digital environment. 

With these advanced tagging techniques, you’re well on your way to a more organized and efficient digital environment. 

Remember to use consistent and relevant tags to make the most of this powerful organizational tool.

Start tagging today!


READ MORE


Please LIKE and SHARE OneCoolTip.com!
Never miss a Cool Tip: OneCoolTip Newsletter.

Do you have a Cool Tip or question? Email us at onecooltip.com@gmail.com


Rodger Mansfield, a seasoned tech expert, is the mastermind behind OneCoolTip.com, where he serves as both writer and editor. With a keen eye for simplifying complex tech, Rodger delivers practical advice that empowers readers to navigate the digital world with confidence. Dive into OneCoolTip.com for a treasure trove of savvy tips and tricks that keep you one step ahead in tech.


OneCoolTip.com
Cool Tech Tips for a Cooler Life!


#Microsoft #Windows #Windows11 #Windows10 #AdvancedWindowsTips #EfficientFileSearch #OrganizeWithTags #TechSavvy #WindowsWednesday#TechTips #OneCoolTip @OneCoolTip


Copyright © 2024 | www.OneCoolTip.com | All Rights Reserved

Wednesday, May 1, 2024

Three Cool Ways to Empty the Recycle Bin in Windows 11

Three Cool Ways to Empty the Recycle Bin in Windows 11

Declutter Your Digital Space and Reclaim Storage

Learn how to efficiently empty the Recycle Bin in Windows 11, freeing up valuable disk space and ensuring your deleted files are truly gone. Whether you’re a tech novice or a seasoned user, these step-by-step instructions will help you master this essential task.

By Rodger Mansfield, Technology Editor
May 1, 2024


Windows Recycle Bin
“Have you ever wondered where your deleted files go in Windows 11? 

They don’t vanish into thin air! 

Here's a Cool Tip.  Empty the Recycle Bin in Windows 11.

Welcome to the Recycle Bin—a digital purgatory where your discarded documents, photos, and cat memes await their final fate. 

But what if I told you that this seemingly mundane bin holds secrets to decluttering your digital life?

Here's how to empty the Recycle Bin in Windows 11

The Classic Approach: File Explorer
  1. Click on the Recycle Bin icon on your desktop.
  2. A File Explorer window opens, revealing the bin’s contents.
  3. Click the “Empty Recycle Bin” button on the Explorer’s command bar.
  4. Poof! Your deleted files are gone.

Empty Recycle Bin - Right Click
fig. 1 - Empty Recycle Bin - Open Recycle Bin


Context Menu Magic: Right-Click and Empty
  1. Right-click the Recycle Bin desktop icon.
  2. From the context menu, select “Empty Recycle Bin.”
  3. Confirm your action by clicking “Yes” in the dialog window.

fig. 2 - Empty Recycle Bin - Right Click


Streamlined Settings: The Storage Cleanup Route
  1. Press the Start button and type “Storage settings” in the search utility.
  2. Click the “Storage settings” result.
  3. Under “Temporary files,” deselect other checkboxes if you only want to empty the Recycle Bin.
  4. Select the Recycle Bin checkbox.
  5. Hit “Remove files” and confirm by clicking “Continue.”
Empty Recycle Bin - Temp Files
fig. 3 - Empty Recycle Bin - Temp Files


Emptying the Recycle Bin frees up storage, preventing it from becoming a digital hoarder’s paradise.

In the grand symphony of Windows 11, emptying the Recycle Bin is a humble yet crucial note. 

Embrace the art of decluttering, and let your digital canvas breathe. 

Ready to declutter? 

Try these methods today!

Remember, a tidy digital space is a happy digital space.


READ MORE

Please LIKE and SHARE OneCoolTip.com!
Never miss a Cool Tip: OneCoolTip Newsletter.

Do you have a Cool Tip or question? Email us at onecooltip.com@gmail.com


Rodger Mansfield, a seasoned tech expert, is the mastermind behind OneCoolTip.com, where he serves as both writer and editor. With a keen eye for simplifying complex tech, Rodger delivers practical advice that empowers readers to navigate the digital world with confidence. Dive into OneCoolTip.com for a treasure trove of savvy tips and tricks that keep you one step ahead in tech.


OneCoolTip.com
Cool Tech Tips for a Cooler Life!


#Windows11 @windwos #RecycleBin #Declutter #Windows #WindowsWednesday #TechTips #OneCoolTip @OneCoolTip 


Copyright © 2024 | www.OneCoolTip.com | All Rights Reserved

Wednesday, April 24, 2024

The Secret Windows Shortcut for Effortless Screen Sharing

The Secret Windows Shortcut for Effortless Screen Sharing

Discover the simplicity of casting media from your Windows PC to other devices using the Windows Key + K shortcut, a feature that enhances your viewing experience and productivity.

By Rodger Mansfield, Technology Editor
April 24, 2024


Windows Display
Have you ever found yourself juggling multiple devices, trying to present or share media seamlessly? 

Tired of cluttered cables while trying to share your screen?

Or perhaps you’ve wondered how to effortlessly project your latest presentation or video from your laptop to a larger screen? 

Here's a Cool Tip.  Use the Windows Key + K keyboard shortcut to cast to a device.

The Windows Key + K shortcut is your gateway to a streamlined media-sharing experience. 

What is the Windows Key + K Shortcut?

This handy shortcut opens the Windows "Connect" pane, allowing you to quickly cast your display to compatible devices, such as:
  • Smart TVs
  • Projectors with Miracast support
  • Wireless monitors
  • Other Windows PCs
But how does it work, and what can it do for you?

Windows Wednesday


Here's how to do it.
  1. Ensure your PC and the target device are connected to the same Wi-Fi network.
  2. Press the Windows Key + K to open the Connect pane.
  3. Your PC will search for wireless displays and audio devices.
  4. Select the device you want to cast to from the list.
  5. Follow any on-screen instructions to complete the connection.
  6. Once connected, your media will be displayed on the chosen device.
  7. Click "More Cast Settings" to open the Settings > System > Display screen for more Display settings.

Pro Cool Tip
  • In the Settings app (System > Display), you can customize your projection settings – choose whether to extend your display, duplicate it, or show content on only the second screen.


Windows Key + K to Cast
fig. 1 - Windows Key + K to Cast


This keyboard shortcut works for both Windows 10 and Windows 11.

There is no need for cables or additional software.

This is quick and easy to set up and is ideal for presentations, watching movies, or sharing photos.

Imagine preparing for a crucial business presentation. 

With a few keystrokes, you cast your slides onto the conference room’s smart TV, impressing your colleagues with your efficiency.

The Windows Key + K shortcut is your key to a more streamlined and connected Windows experience. 

Whether you're looking to improve your presentations, enhance your entertainment, or level up your productivity, this hidden gem is worth mastering.

Have you tried this shortcut yet?

Let us know in the comments below.

Enjoy!


READ MORE


Please LIKE and SHARE OneCoolTip.com!
Never miss a Cool Tip: OneCoolTip Newsletter.

Do you have a Cool Tip or question? Email us at onecooltip.com@gmail.com


Rodger Mansfield, a seasoned tech expert, is the mastermind behind OneCoolTip.com, where he serves as both writer and editor. With a keen eye for simplifying complex tech, Rodger delivers practical advice that empowers readers to navigate the digital world with confidence. Dive into OneCoolTip.com for a treasure trove of savvy tips and tricks that keep you one step ahead in tech.


OneCoolTip.com
Cool Tech Tips for a Cooler Life!


#Microsoft @Microsoft #Windows #WindowsTips #TechHacks #ScreenMirroring #WirelessProjection #SmartComputing #TechTips #WindowsWednesday #OneCoolTip @OneCoolTip 


(c) 2024 www.OneCoolTip.com

Wednesday, April 17, 2024

How to Print Documents to PDF format in Windows

How to Print Documents to PDF format in Windows

Discover the seamless process of converting and printing your documents to PDF format in Windows, ensuring your files are easily shareable and professionally presented.

By Rodger Mansfield, Technology Editor
April 17, 2024


PDF
Have you ever needed to share a document that looks the same on any device and platform? 

Have you wondered how to secure your documents for distribution? 

Here's a Cool Tip.  Use Microsoft Print to PDF in Windows.


Microsoft Print to PDF is a feature built into Windows that allows you to convert documents into PDF (Portable Document Format) files without the need for third-party software. 

This virtual printer enables you to create a PDF file from any application that has a print option.


The Microsoft Print to PDF feature first became available with the release of Windows 10. 

It was introduced as a built-in feature that allowed users to save documents as PDF files directly from the print dialog in any application that supported printing. 

This feature eliminated the need for third-party PDF printing software and has been a standard part of Windows 10 since its initial release.

Here's how to do it.
  1. Open the document you wish to convert in its native application (e.g., Microsoft Word).
  2. Click on ‘File’ and select ‘Print’.
  3. In the Printer dropdown menu, choose ‘Microsoft Print to PDF’.
  4. Click ‘Print’, and you’ll be prompted to choose a location to save your new PDF.
  5. Name your file and click ‘Save’ to complete the process.

Microsoft Print to PDF
fig. 1 - Microsoft Print to PDF


PDFs are universally compatible across platforms and preserves the formatting of your original document.

Printing it to PDF ensures that it arrives intact, without any changes in layout or design.

Printing to PDF in Windows is a powerful tool for anyone needing to share documents widely. 

It’s a simple process that offers security and consistency, making it an essential skill for professionals and casual users alike.

Have you tried Microsoft Print to PDF yet?

If so, let us know in the comments.

Enjoy!


READ MORE


Please LIKE and SHARE OneCoolTip.com!
Never miss a Cool Tip: OneCoolTip Newsletter.

Do you have a Cool Tip or question? Email us at onecooltip.com@gmail.com


Rodger Mansfield, a seasoned tech expert, is the mastermind behind OneCoolTip.com, where he serves as both writer and editor. With a keen eye for simplifying complex tech, Rodger delivers practical advice that empowers readers to navigate the digital world with confidence. Dive into OneCoolTip.com for a treasure trove of savvy tips and tricks that keep you one step ahead in tech.


OneCoolTip.com
Cool Tech Tips for a Cooler Life!


#PrintToPDF #WindowsTips #DocumentConversion #TechSavvy #PDFGuide #TechTips #WindowsWednesday #OneCoolTip @OneCoolTip

(c) 2024 www.OneCoolTip.com

Wednesday, March 13, 2024

Fortify Your Files: A Step-by-Step Guide to Ransomware Protection on Windows

Discover how to safeguard your digital life by enabling and configuring ransomware protection settings in Windows, ensuring your files remain secure from malicious threats.

By Rodger Mansfield, Editor
March 13, 2024


Windows Security
Have you ever considered the security of your digital files? 

What measures are you taking to protect your personal data from ransomware attacks?

In today’s digital age, it’s not just about having antivirus software; it’s about being proactive in your defense strategies.

Here's a Cool Tip.  Be sure to set the Ransomware protection in Windows.

Ransomware is a type of malicious software designed to block access to a computer system or encrypt files until a sum of money is paid. 

It often spreads through phishing emails or by unknowingly visiting an infected website. 

Ransomware attacks can lead to significant data loss and require costly solutions to restore the affected systems.

The ransomware settings in Windows, specifically the Controlled folder access feature, provide a layer of protection against ransomware attacks. 

Windows Wednesday

When enabled, it monitors changes that apps make to files in protected folders. 

If an app that is not on the whitelist tries to make changes, you’ll receive a notification about the suspicious activity. 

This helps prevent unauthorized encryption of your files by ransomware, which could otherwise lock you out until a ransom is paid12.

Here's how to do it.

To find the Windows Security app on your Windows 10 or Windows 11 system, you can follow these steps:
  • Click on the Start button or press the Windows key on your keyboard.
  •  Type “Windows Security” into the search bar.
  • Click on the Windows Security app from the search results to open it.
  • Click on “Virus & threat protection” to access the ransomware protection settings.
Or
  • Click on the Start button, then select the gear-shaped Settings icon, or press Windows key + I.
  • In the Settings window, click on “Update & Security”.
  • On the left-hand side, click on “Windows Security”.
  • Click on “Virus & threat protection” to access the ransomware protection settings.
Windows Ransomware Setting
fig. 1 - Windows Ransomware Setting


  • Scroll down to the ‘Ransomware Protection’ section and click on ‘Manage Ransomware Protection’.
  • Turn on the toggle for ‘Controlled Folder Access’ to activate the feature.
  • By default, folders like Documents, Pictures, Videos, and Desktop are protected. You can add more folders by clicking on ‘Protected Folders’.
  • If you have trustworthy apps that need to access protected folders, you can allow them by clicking on ‘Allow an app through Controlled Folder Access’.
  • To see which apps have been blocked from accessing protected folders, you can check the ‘Block history’.
  • Ensure that your Windows Security app and your operating system are up to date to have the latest security protections.

Windows Ransomware Setting - Controlled Folders
fig. 2 - Windows Ransomware Setting - Controlled Folders


These settings are not on by default.

Making these changes provides an additional layer of defense against ransomware and ensures that your important files are not held hostage by cybercriminals.

Imagine you’re working on a critical project with tight deadlines. 

Suddenly, a ransomware attack encrypts all your files, demanding payment for their release. 

With ransomware settings enabled, your work would be secure, and productivity uninterrupted.

By following these steps, you can take control of your digital security and protect your files from ransomware. 

Remember, in the fight against cyber threats, knowledge is your best defense.


Please LIKE and SHARE OneCoolTip.com!
Visit the OneCoolTip YouTube Channelhttps://www.youtube.com/@onecooltip

Do you have a Cool Tip or question? Email us at
onecooltip.com@gmail.com


READ MORE


Rodger Mansfield, a seasoned tech expert, is the mastermind behind OneCoolTip.com, where he serves as both writer and editor. With a keen eye for simplifying complex tech, Rodger delivers practical advice that empowers readers to navigate the digital world with confidence. Dive into OneCoolTip.com for a treasure trove of savvy tips and tricks that keep you one step ahead in tech.


OneCoolTip.com
Cool Tech Tips for a Cooler Life!


#Microsoft #Windows @Microsoft #Cybersecurity #RansomwareProtection #WindowsSecurity #DataSafety #MalwareDefense #WindowsWednesday #TechTips #OneCoolTip @OneCoolTip