Sunday, March 31, 2024

Google Gemini Now Offers Turn-by-Turn Navigation with Google Maps Integration

Get turn-by-turn directions. Google Gemini's new Google Maps integration streamlines navigation.

By Rodger Mansfield, Technology Editor
March 31, 2024


Google Gemini
Ever found yourself juggling apps when you ask your phone for directions? 

Need to switch between your AI assistant and your favorite navigation app? 

Here's a Cool Tip.  Use Google Gemini to Navigate with Google Maps.

Google Gemini is streamlining the experience with a new integration that lets its powerful AI brain tap directly into Google Maps. 

Let's see how this could change how you get from point A to point B.

Here's how to do it.
  1. Make sure you have the latest Google app (for iOS) or Gemini app (for Android). 
  2. Make sure you have the latest Google Maps app (for iOS) and Google Maps (for Android).
  3. Trigger Google Gemini by opening the app.
  4. Enter a prompt like "Navigate to [destination]" or "Take me to [place]."
  5. Gemini will give a route summary, then automatically open Google Maps
  6. Navigation will begin seamlessly.

Google Gemini Google Maps Integration
fig.1 - Google Gemini Google Maps Integration


The Google Gemini and Google Maps integration is a prime example of AI improving everyday tasks. 

Expect this type of seamless interaction between Google's various AI tools to become increasingly common.

Enjoy!


READ MORE


Please LIKE and SHARE OneCoolTip.com!
Visit the OneCoolTip YouTube Channelhttps://www.youtube.com/@onecooltip

Do you have a Cool Tip or question? Email us at
onecooltip.com@gmail.com


Rodger Mansfield, a seasoned tech expert, is the mastermind behind OneCoolTip.com, where he serves as both writer and editor. With a keen eye for simplifying complex tech, Rodger delivers practical advice that empowers readers to navigate the digital world with confidence. Dive into OneCoolTip.com for a treasure trove of savvy tips and tricks that keep you one step ahead in tech.


OneCoolTip.com
Cool Tech Tips for a Cooler Life!


#GoogleGemini #GoogleMaps #AINavigation #TechNews #Google #TechTips#OneCoolTip @OneCoolTip 

(c) 2024 www.OneCoolTip.com

Saturday, March 30, 2024

How to Edit and Regenerate Gemini AI Responses

Take control of your AI conversations with Gemini. This Cool Tip shows you how to fine-tune responses for precision and better results.

By Rodger Mansfield, Technology Editor
March 30, 2024


Google Gemini
Have you ever wished your AI assistant could give you a slightly different answer? 

Ever read an AI-generated email draft that was almost perfect, but needed a slightly more professional tone?

Maybe you wanted a longer response, a more casual tone, or something with a slightly different focus. 

Here's a Cool Tip.  Regenerate or modify Google Gemini responses.

Here's how to do it.
  • Navigate to https://gemini.google.com/ .
  • Enter an AI prompt and submit.
  • Highlight the specific text within the Gemini response that you want to change.
  • Click the modify icon.
  • Select from the options to "Regenerate" (rewrite that section), make the text "Shorter" or "Longer," or completely "Remove" it.
  • For even more control, type your own instructions in the "Modify with a prompt" field. For example, "Rewrite this more formally."
With this new improvement, get more precise answers, tailor the tone of responses, and iterate on ideas quickly.

Some prompts might be too complex for Gemini to understand and it also won't change responses generated by extensions or ones containing code.

Real-World Example

Imagine you ask Gemini, "Write a poem about Cool Tech Tips at www.OneCoolTip.com.

If you highlight a specific line and ask, "Make this more funny," Gemini regenerates that section.

Regenerate Gemini AI Response
fig. 1 - Regenerate Gemini AI Response

Start with small edits first – it's easier to change one line at a time, then regenerate the whole response if needed.

Be specific with your regeneration prompts. 

Instead of 'make it better', try 'make this paragraph more persuasive'.

The ability to modify and regenerate Gemini responses gives you unprecedented control over your AI interactions.  

Now, you can achieve the output you want without starting from scratch each time. 

Experiment and see how this new feature sparks your creativity!

Enjoy!


READ MORE


Please LIKE and SHARE OneCoolTip.com!
Visit the OneCoolTip YouTube Channelhttps://www.youtube.com/@onecooltip

Do you have a Cool Tip or question? Email us at
onecooltip.com@gmail.com


Rodger Mansfield, a seasoned tech expert, is the mastermind behind OneCoolTip.com, where he serves as both writer and editor. With a keen eye for simplifying complex tech, Rodger delivers practical advice that empowers readers to navigate the digital world with confidence. Dive into OneCoolTip.com for a treasure trove of savvy tips and tricks that keep you one step ahead in tech.


OneCoolTip.com
Cool Tech Tips for a Cooler Life!


#Google #GoogleGemini #AI #artificialintelligence #LLM #GoogleAI #Gemini #TechTips #OneCoolTip @OneCoolTip 

Friday, March 29, 2024

Become a Virtual Musician with Viola the Bird

Discover the joy of music with Viola the Bird, an innovative online experiment that allows you to play the cello or violin with simple mouse movements. Learn how to use this playful tool!

By Rodger Mansfield, Technology Editor
March 29,2024


Ever wished you could play a musical instrument without years of practice? 

What if you could create beautiful melodies on a cello or violin with just the movement of your mouse? 

Here's a Cool Tip.  Play with Viola the Bird!

What is Viola the Bird?

Viola the Bird is a whimsical, interactive website that lets you "play" a virtual cello or violin. 

Powered by machine learning, it translates your mouse movements into realistic musical notes. 

It's a fantastic way to explore the world of string instruments and express your creativity.


How to Use Viola the Bird: Step-by-Step Guide

  1. Go to the Viola the Bird experiment on Google Arts & Culture 
  2. Select either the cello or violin.
  3. You'll see a virtual instrument and the adorable Viola the Bird waiting for your lead.
  4. Gently move your mouse horizontally across the strings to produce notes. Moving higher on the strings creates higher pitches and vice versa. Experiment with speed and motion to create different musical effects.
  5. Play Along to Music (Concert Mode): For a structured experience, try "Concert Mode" and play along to famous musical pieces.
  6. Get Creative (Freestyle Mode): Select "Freestyle Mode" to compose your own melodies!

Vioala the Bird
fig. 1 - Viola the Bird


It's a fantastic entry point into the world of music, requiring no prior knowledge and the cute bird and interactive interface make learning enjoyable.

Viola the Bird offers a delightful way to dip your toes into the world of music. 

Whether you're a music enthusiast or simply looking for a creative outlet, this experiment is sure to bring joy and spark your inner musician.

READ MORE


Please LIKE and SHARE OneCoolTip.com!
Visit the OneCoolTip YouTube Channelhttps://www.youtube.com/@onecooltip

Do you have a Cool Tip or question? Email us at
onecooltip.com@gmail.com


Rodger Mansfield, a seasoned tech expert, is the mastermind behind OneCoolTip.com, where he serves as both writer and editor. With a keen eye for simplifying complex tech, Rodger delivers practical advice that empowers readers to navigate the digital world with confidence. Dive into OneCoolTip.com for a treasure trove of savvy tips and tricks that keep you one step ahead in tech.


OneCoolTip.com
Cool Tech Tips for a Cooler Life!


#Google @Google #ViolaTheBird #InteractiveMusic #GoogleArts #MusicEd #FridayFunday #TechTips #OneCoolTIp @OneCoolTIp

(c) 2024 www.OneCoolTip.com

Thursday, March 28, 2024

Transform Your Browsing with Microsoft Edge’s Read Aloud Feature

Discover the convenience of Microsoft Edge’s Read Aloud feature on mobile devices. This guide provides easy steps to transform your browsing experience with voice-narrated content.

By Rodger Mansfield, Technology Editor
March 28, 2024


Have you ever wished for a personal narrator to read articles, emails, or documents to you while on the go? 

Do you know how to unlock this superpower on your mobile device?

Here's a Cool Tip.  Use Read Aloud now on the mobile versions of  Microsoft Edge?

Here's how to do it.
  1. Open Microsoft Edge on your mobile device.
  2. Navigate to a web page with text you wish to hear.
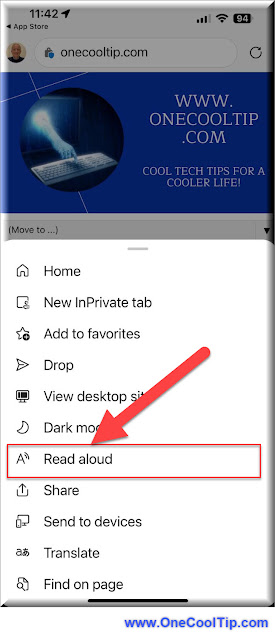
  3. Tap the three dots at the bottom of the screen to access the menu.
  4. Select Read Aloud from the menu options.
  5. Once started, use the Voice Options to adjust the reading speed and voice to your preference.

Microsoft Edge - Read Aloud on Mobile
fig. 1 - Microsoft Edge - Read Aloud on Mobile


Read Aloud makes content accessible for visually impaired users or anyone who wants to hear what's on a web page.

You can listen to content while performing other tasks and improve language skills by listening to pronunciation.

Read Aloud is also available on the desktop version of Microsoft Edge.

Here's how to do it.

To use the Read Aloud feature on Microsoft Edge desktop browser, you can follow these steps:
  1. Open Microsoft Edge and navigate to the webpage you want to be read aloud.
  2. Right-click on the page and select Read Aloud from the context menu, or use the keyboard shortcut Ctrl + Shift + U.
  3. Alternatively, click on the Immersive Reader icon (which looks like an open book) in the browser address bar, if available.
  4. Once Read Aloud starts, the screen will dim slightly, and words will be highlighted as they are read aloud.
  5. You can pause, play, or skip forward/backward using the controls that appear at the top of the page.
  6. To customize the reading voice and speed, select Voice options in the Read Aloud toolbar to adjust the settings to your preference.

Embrace the future of web browsing with Microsoft Edge’s Read Aloud. 

Whether you’re looking to improve accessibility, multitask, or learn a new language, this feature is your key to an enhanced mobile experience.

READ MORE


Please LIKE and SHARE OneCoolTip.com!
Visit the OneCoolTip YouTube Channelhttps://www.youtube.com/@onecooltip

Do you have a Cool Tip or question? Email us at
onecooltip.com@gmail.com


Rodger Mansfield, a seasoned tech expert, is the mastermind behind OneCoolTip.com, where he serves as both writer and editor. With a keen eye for simplifying complex tech, Rodger delivers practical advice that empowers readers to navigate the digital world with confidence. Dive into OneCoolTip.com for a treasure trove of savvy tips and tricks that keep you one step ahead in tech.


OneCoolTip.com
Cool Tech Tips for a Cooler Life!

#Microsoft #Edge #MicrosoftEdge #ReadAloud #TechTips #MobileAccessibility #VoiceNarration #LearnOnTheGo #TechTips #OneCoolTIp @OneCoolTip 

Wednesday, March 27, 2024

Unleash the Power of Right-Click on Windows 11’s Start Menu

Discover the secrets of the Windows 11 Start Menu and enhance your productivity with our comprehensive guide on right-click functionalities.

By Rodger Mansfield, Technology Editor
March 27, 2024


Windows 11
Have you ever wondered if you’re using your Windows 11 Start Menu to its full potential? 

What if I told you that a simple right-click could unlock a world of productivity?

Here's a Cool Tip.  Right-Click on the Windows Start icon to reveal a power menu.

Right-clicking the Start menu in Windows 11 opens a context-sensitive menu that provides a variety of shortcuts to system utilities and settings. 

This menu, also known as the “WinX” menu, includes quick access to features like Installed Apps, Mobility Center, Power Options, Event Viewer, System, Device Manager, Network Connections, Disk Management, Computer Management, Windows Terminal, Task Manager, and Settings.


It’s designed to offer flexibility and efficiency by reducing the number of steps to complete certain operations. 

For instance, instead of navigating through multiple windows to reach the Device Manager, you can simply right-click the Start button and select it from the list. 

This menu is especially handy for power users who need to access these tools frequently.

Here's how to do it.
  1. Right-click on the Windows Start icon to reveal a quick-access menu with options like Installed Apps, Mobility Center, and Power Options.


Windows 11 Right Click Start
fig. 1 - Windows 11 Right Click - Start

    2. Here is more information about each option:
  • Installed Apps: Quickly access the list of installed applications where you can uninstall or modify apps.
  • Mobility Center: Provides a central location for settings commonly used on laptops and tablets, like brightness and volume.
  • Power Options: Manage your power plans and adjust settings for battery and sleep options.
  • Event Viewer: View detailed logs to troubleshoot system errors and track Windows operation history.
  • System: Access system information and properties, including device specifications and Windows edition.
  • Device Manager: Manage and update hardware device drivers and troubleshoot hardware issues.
  • Network Connections: Shortcut to view and manage network adapters and settings.
  • Disk Management: Tool for managing disk partitions and storage spaces on your computer.
  • Computer Management: Provides system administrative tools to manage local or remote computers.
  • Windows Terminal: Open the advanced command-line interface for Windows, supporting multiple tabs and shells.
  • Task Manager: Monitor running applications and processes, and assess the performance of your system.
  • Settings: Direct access to the main Windows settings menu for system customization and preferences.
  • File Explorer: Opens the File Explorer, allowing you to browse files and folders on your system.
  • Search: Provides a quick way to search for files, folders, apps, settings, and more within your system.
  • Run: Opens the Run dialog box where you can execute commands or open applications by typing their names.
  • Shut down or sign out: Offers options to shut down, restart, sleep, hibernate, or sign out of your account.
  • Desktop: Minimizes all open windows and shows the desktop, providing quick access to your desktop icons and files.

Embracing the right-click menu in Windows 11’s Start Menu can significantly boost your efficiency. 

By customizing this powerful tool, you’ll streamline your daily tasks and elevate your computing experience.

Have you tried using right-click on the Start icon?

Let us know in the comments below.

Enjoy!


READ MORE

Please LIKE and SHARE OneCoolTip.com!
Visit the OneCoolTip YouTube Channelhttps://www.youtube.com/@onecooltip

Do you have a Cool Tip or question? Email us at
onecooltip.com@gmail.com


Rodger Mansfield, a seasoned tech expert, is the mastermind behind OneCoolTip.com, where he serves as both writer and editor. With a keen eye for simplifying complex tech, Rodger delivers practical advice that empowers readers to navigate the digital world with confidence. Dive into OneCoolTip.com for a treasure trove of savvy tips and tricks that keep you one step ahead in tech.


OneCoolTip.com
Cool Tech Tips for a Cooler Life!


#Windows11 #Windows11Tips #RightClickMagic #StartMenuHacks #ProductivityBoost #WednesdayWindows #TechTips #OneCoolTip @OneCoolTip 

Tuesday, March 26, 2024

Filter Political Noise on Instagram with This Simple Trick

Tired of endless political posts on Instagram? Learn how to easily turn political content on or off and customize your social media experience.

By Rodger Mansfield, Technology Editor
March 26, 2024


Ever find yourself scrolling through Instagram wishing you could escape the barrage of political posts? 

Do divisive opinions and election news sometimes make your social media experience less enjoyable?  

Here's a Cool Tip.  Customize how much (or how little) political content you see on Instagram.
.
Let's dive into how to take control of your Instagram feed.

Here's how to do it.
  1. Open the Instagram app on your mobile device.
  2. Navigate to your profile by tapping your profile picture in the bottom right corner.
  3. Tap the three horizontal lines in the top right corner to access the Settings menu.
  4. Select "Settings".
  5. Choose "Content Preferences".
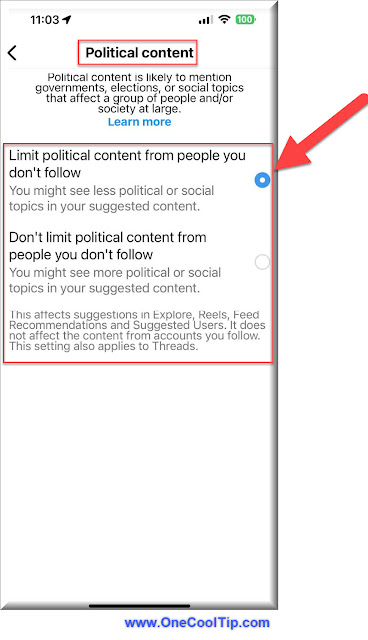
  6. Tap on "Political Content".
  7. Choose your preference:
    • "Limit political content from people you don't follow" (reduces the amount of political content)
    • "Don't Limit political content from people you don't follow" (shows the normal amount of political content)
  8. By default, Instagram limits political content.

Instagram Political Content Setting
fig. 1 - Instagram Political Content Setting


This setting allows you to curate a feed that better aligns with your interests and helps you avoid content you find draining or stressful.

You can reduce your exposure to potentially divisive or upsetting information.

But limiting exposure could create an echo chamber,  

It's important to supplement your social media with diverse news sources to get a well-rounded perspective.

If an upcoming election is causing heightened political discussion on your feed, the "Limit" options can offer temporary respite.

The Power is Yours

With these simple steps, you gain greater control over your Instagram experience. 

Remember, you can change your settings at any time to reflect your current needs.

Have you customized your Instagram political content settings? 

Share your experiences in the comments!

Enjoy!

READ MORE


Please LIKE and SHARE OneCoolTip.com!
Visit the OneCoolTip YouTube Channelhttps://www.youtube.com/@onecooltip

Do you have a Cool Tip or question? Email us at
onecooltip.com@gmail.com


Rodger Mansfield, a seasoned tech expert, is the mastermind behind OneCoolTip.com, where he serves as both writer and editor. With a keen eye for simplifying complex tech, Rodger delivers practical advice that empowers readers to navigate the digital world with confidence. Dive into OneCoolTip.com for a treasure trove of savvy tips and tricks that keep you one step ahead in tech.


OneCoolTip.com
Cool Tech Tips for a Cooler Life!


#Instagram #META #instagramtips #socialmedia #politics #customizeyourfeed #mentalhealth #filterbubble #TechTips #OneCoolTip @OneCoolTip 

Monday, March 25, 2024

One Cool Tip Question: What is Your Go-To Microsoft 365 App?

 What’s your go-to app in Microsoft 365 that boosts your productivity and creativity? 📈💡

👉 OneCoolTip Question

#Microsoft365 @microsoft365 #UserFeedback #FavoriteApp #ProductivityTools #TechTips #OneCoolTip


What is Your Favorite Microsoft 365 App?

Unleashing the Power of TEXTSPLIT: Excel’s Game-Changing Formula

Discover the transformative TEXTSPLIT formula in Microsoft Excel that simplifies text manipulation, enhancing data analysis and organization.

By Rodger Mansfield, Technology Editor
March 25, 2024


Have you ever found yourself lost in a sea of text data, wishing for a magic wand to organize it all? 

What if I told you that Microsoft Excel has just the spell you need?

Here's a Cool Tip.  Use Microsoft Excel's new TEXTSPLIT function.

The TEXTSPLIT formula is a powerful tool for data cleaning and preparation. 

It automates what would otherwise be a tedious manual task, saving time and reducing errors. 


Here's how to do it.
  • Open your Excel workbook 
  • Locate the cell where you wish to use the TEXTSPLIT function.
  • Enter the TEXTSPLIT function: 
    • =TEXTSPLIT(text,col_delimiter,[row_delimiter],[ignore_empty], [match_mode], [pad_with])
    • The text you want to split. Required.
    • col_delimiter       The text that marks the point where to spill the text across columns.
    • row_delimiter       The text that marks the point where to spill the text down rows. Optional.
    • ignore_empty       Specify TRUE to ignore consecutive delimiters. Defaults to FALSE, which creates an empty cell. Optional.
    • match_mode    Specify 1 to perform a case-insensitive match. Defaults to 0, which does a case-sensitive match. Optional.
    • pad_with           The value with which to pad the result. The default is #N/A.
  • Press Enter and watch as Excel splits the text into separate cells.

Microsoft Excel TEXTSPLIT
fig. 1 - Microsoft Excel TEXTSPLIT


The TEXTSPLIT function works the same as the Text-to-Columns wizard, but in formula form. 

However, over-reliance on this feature without understanding its nuances can lead to misinterpretation of data.

Here’s a practical scenario.

If A2 contains the string "apple,orange;banana,grape", the TEXTSPLIT function will split "apple" and "orange" into two adjacent columns and "banana" and "grape" into the rows below them, respectively.

=TEXTSPLIT(A2, ",", ";", TRUE)

In this example, A2 contains the text you want to split. 

The comma "," is the column delimiter, which means the text in A2 will be split into separate columns wherever a comma is found. 

The semicolon ";" is the row delimiter, so the text will also be split into separate rows at each semicolon. 

The TRUE parameter tells Excel to ignore any empty results that may occur if there are consecutive delimiters.

TEXTSPLIT is a robust addition to Excel’s arsenal, offering a new level of efficiency in text data management. 

Embrace this feature to transform your workflow and data analysis.

Have you tried it?

Let us know in the comments.

Enjoy!


READ MORE


Please LIKE and SHARE OneCoolTip.com!
Visit the OneCoolTip YouTube Channelhttps://www.youtube.com/@onecooltip

Do you have a Cool Tip or question? Email us at
onecooltip.com@gmail.com


Rodger Mansfield, a seasoned tech expert, is the mastermind behind OneCoolTip.com, where he serves as both writer and editor. With a keen eye for simplifying complex tech, Rodger delivers practical advice that empowers readers to navigate the digital world with confidence. Dive into OneCoolTip.com for a treasure trove of savvy tips and tricks that keep you one step ahead in tech.


OneCoolTip.com
Cool Tech Tips for a Cooler Life!


#Microsoft @Microsoft #Microsoft365 @Microsoft365 #ExcelTips #DataAnalysis #TEXTSPLIT #MicrosoftExcel #ProductivityHacks #TechTips #BackToWorkMonday #OneCooLTip @OneCoolTip 

Sunday, March 24, 2024

How to Use YouTube Incognito Mode on Your Phone for Private Browsing

Discover the power of YouTube Incognito mode on your mobile device for a history-free browsing experience. Learn how to easily activate it and enjoy enhanced privacy.

By Rodger Mansfield, Technology Editor
March 24, 2024


Ever find yourself wanting to watch a YouTube video without leaving a trace in your history or influencing your recommendations? 

Perhaps you're sharing a device and don't want to mix up viewing preferences, or maybe you're simply researching a sensitive topic. 

Here's a Cool Tip.  Use YouTube's Incognito mode.

Here's how to do it.
  1. Open the YouTube app on your smartphone or tablet.
  2. Tap on your profile picture in the top right corner.
  3. Select the option labeled "Turn on Incognito."
  4. You're Incognito! You'll see a confirmation message and an Incognito mode icon (hat and glasses) in the top right corner.
  5. To exit Incognito mode, simply tap the Incognito icon in the top right corner and select "Turn off Incognito."

YouTube Incognito Mode Mobile: Screenshot showing Incognito icon and activation message
fig. 1 - YouTube Incognito Mode Mobile


Your searches and watched videos won't appear in your YouTube history while in Incognito mode and your usual recommendations won't be impacted by your Incognito activity.

It's important to note that Incognito mode doesn't make your activity entirely invisible. 

Your internet service provider, school, or employer might still be able to see your browsing activity.

Incognito mode is perfect for when you're using someone else's phone or a public device.
Considerations

It is a simple, powerful tool for private moments on the platform. 

By following these steps, you can protect your viewing habits and keep those surprise birthday present searches under wraps!

Have you used YouTube's Incognito mode? 

Share your experiences in the comments below!

Enjoy!


READ MORE


Please LIKE and SHARE OneCoolTip.com!
Visit the OneCoolTip YouTube Channelhttps://www.youtube.com/@onecooltip

Do you have a Cool Tip or question? Email us at
onecooltip.com@gmail.com


Rodger Mansfield, a seasoned tech expert, is the mastermind behind OneCoolTip.com, where he serves as both writer and editor. With a keen eye for simplifying complex tech, Rodger delivers practical advice that empowers readers to navigate the digital world with confidence. Dive into OneCoolTip.com for a treasure trove of savvy tips and tricks that keep you one step ahead in tech.


OneCoolTip.com
Cool Tech Tips for a Cooler Life!


#Google #Google #YouTube @YouTube #Incognito #Privacy #Mobile #TechTips #TechBlog #Google @Google #TechTips #OneCoolTip @OneCoolTip 

Saturday, March 23, 2024

Never Forget Where You Parked Again: Teach Siri to Remember

Misplacing your car in a crowded parking lot can be a frustrating experience. With a simple Siri command, you can ensure you always find your way back to your vehicle.

By Rodger Mansfield, Editor
March 23, 2024


Have you ever found yourself wandering aimlessly through a vast parking lot, desperately searching for your car? 

If so, you're not alone!  

Here's a Cool Tip.  Use this easy Siri command to save the day.

Simply say "Hey Siri, I parked my car," and your trusty iPhone will keep tabs on your vehicle's location. 

This handy feature can alleviate parking anxiety and save you precious time.

Here's how to do it.

Before you can use this feature, you need to ensure a few settings are in place:
  1. Go to Settings > Privacy & Security> Location Services. Toggle Location Services on.
  2. In the same Location Services menu, scroll down, tap System Services, and ensure Significant Locations is toggled on.
  3. Open Settings > Maps. Toggle on the Show Parked Location setting.
Once your settings are ready, follow these steps:
  1. Park your vehicle.
  2. Let Siri know: Say, "Hey Siri, I parked my car.
  3. Siri will mark your location on Maps.

Apple Siri Maps Parked Car
fig. 1 - Apple Siri - Parked Car


Finding Your Parked Car

When you're ready to return to your car,  you can ask Siri "Where did I park?"  

Maps will provide walking directions back to your vehicle.

This feature is fantastic for navigating large parking structures or busy lots. 

Real-World Applications

Imagine attending a packed sporting event or exploring a sprawling shopping mall.  

With Siri tracking your parking spot, you can enjoy these outings without worrying about finding your car later.

By setting up your iPhone and using the simple Siri command "Hey Siri, I parked my car," you can gain peace of mind and save yourself from stressful searches for your vehicle.


READ MORE


Please LIKE and SHARE OneCoolTip.com!
Visit the OneCoolTip YouTube Channelhttps://www.youtube.com/@onecooltip

Do you have a Cool Tip or question? Email us at
onecooltip.com@gmail.com


Rodger Mansfield, a seasoned tech expert, is the mastermind behind OneCoolTip.com, where he serves as both writer and editor. With a keen eye for simplifying complex tech, Rodger delivers practical advice that empowers readers to navigate the digital world with confidence. Dive into OneCoolTip.com for a treasure trove of savvy tips and tricks that keep you one step ahead in tech.


OneCoolTip.com
Cool Tech Tips for a Cooler Life!


#Apple @Apple #Siri #Maps #iPhone #ParkingTips #FindMyCar #TechTips #OneCoolTip @OneCoolTip