Showing posts with label privacy. Show all posts

Tuesday, March 4, 2025

Secure Your Digital Life: Master Google's New Privacy Controls

Secure Your Digital Life: Master Google's New Privacy Controls. 

Google's revamped "Results about you" feature now offers proactive monitoring and a more intuitive interface, empowering users to efficiently manage their personal information in search results.

By Rodger Mansfield, Technology Editor
March 4, 2025


Google icon
Are you ready to take control of your online privacy with Google's latest updates? 

Here's a Cool Tip:  Remove Your Personal Information from Google.

The "Results about you" feature has been significantly enhanced, introducing proactive monitoring and a streamlined process for removing personal information.

Google has transformed its "Results about you" feature from a reactive tool to a proactive privacy guardian. 

This update provides users with greater control over their digital footprint, making it easier than ever to manage personal information in Google Search results. 

The new features, including proactive monitoring and streamlined removal requests, are designed to enhance user experience and privacy.

Wednesday, June 12, 2024

Lost Your Windows Device? Here’s How to Find and Lock It Remotely

Lost Your Windows Device? Here’s How to Find and Lock It Remotely

Learn how to enable “Find My Device” on both Windows 10 and Windows 11, locate your lost device, and secure it remotely. Whether it’s a laptop, tablet, or desktop, these steps will help you regain control and protect your data.

By Rodger Mansfield, Technology Editor
June 12, 2024


Windows 11
Imagine this scenario: You’re rushing through a crowded airport, and suddenly, panic sets in. 

Your laptop—the repository of your work, memories, and cat videos—is nowhere to be found. 

Here's a Cool Tip.  Enable Find My Device in Windows 10 and Windows 11.

Find My Device is a built-in feature in Windows 10/11 that allows you to track your PC’s location. 

Think of it as Windows’ counterpart to Apple’s Find My feature. 

Once enabled, you can use your Microsoft account to locate your Windows PC on a map. 

Not only that, but you can also lock the PC remotely, preventing unauthorized access to your data. 

Additionally, you have the option to display a message on the lost device, making it easier for someone who finds it to return it to you


Here's how to do it.

Saturday, June 8, 2024

Oh No! Has My Email Been Hacked? Find Out Now with This Free Tool

Oh No! Has My Email Been Hacked? Find Out Now with This Free Tool

Have I Been Pwned is a free service that helps you discover if your email  has been compromised in a data breach. Learn how to use this powerful tool to protect your online identity.

By Rodger Mansfield, Technology Editor
June 8, 2024


Have I Been Pwned?
Do you ever wake up in a cold sweat, wondering if your personal information has been leaked in one of the many data breaches plaguing the internet?  

The fear is real, and the consequences can be severe. 

Here's a Cool Tip.  Use Have I Been Pwned to check.

Have I Been Pwned (HIBP) is a free and easy-to-use tool that can give you answers – and peace of mind.


Have I Been Pwned?

fig. 1 - Have I Been Pwned?

Sunday, May 26, 2024

Exposing Your Photos? How to Strip Metadata from iPhone & Android Pics (Updated for 2024)

Exposing Your Photos? How to Strip Metadata from iPhone & Android Pics (Updated for 2024).

Learn why photo metadata can be a privacy risk and how to easily remove it from your iPhone or Android device, protecting your location and other sensitive details.

By Rodger Mansfield, Technology Editor
May 26, 2024


Remove Metadata
Have you ever wondered if your photos reveal more than just a pretty picture? 

Unbeknownst to many, your smartphone photos often contain hidden metadata – information about when and where the photo was taken, what camera was used, and sometimes even GPS coordinates. 

While seemingly harmless, this metadata can be a privacy concern.  

What if you want to share a photo online without revealing your exact location? 

Here's a cool tip.   Remove the meta data from your photos.

That's where the ability to remove metadata becomes essential. 

Here's how to do it.

Android:
  1. Launch the Google Photos app on your Android device.
  2. Find and open the photo from which you want to remove the metadata.
  3. Tap on the three dots (more options) at the top right corner of the screen.
  4. Select "Info" (or swipe up on the photo).
  5. If you only want to remove the location data, tap on the "Remove location" option.

iPhone:
  1. Open the Photos app
  2. Open the photo you want to remove location metadata from.
  3. Tap the Info button  or swipe up.
  4. You’ll see an image in the Maps app showing where the photo was taken.
  5. To remove the location metadata, tap Adjust.
  6. Tap No Location.

iPhone Photo Map
fig. 1 - iPhone Photo Map


iPhone Photo Location
fig. 2 - iPhone Photo Location


Prevent unwanted disclosure of location, time, and device details by removing metadata.

Removing photo metadata is a simple yet powerful way to enhance your privacy and maintain control over your digital life. 

Whether you're an everyday smartphone user or a professional photographer, taking a few minutes to scrub your photos is a worthwhile practice. 

It's your data, your photos – take charge!

Have you ever encountered a situation where photo metadata became an issue? 

Share your experiences in the comments below! 

Don't forget to share this guide with your friends and family to help them protect their privacy too.


Please LIKE and SHARE OneCoolTip.com!
Never miss a Cool Tip: OneCoolTip Newsletter.

Do you have a Cool Tip or question? Email us at onecooltip.com@gmail.com


Rodger Mansfield, a seasoned tech expert, is the mastermind behind OneCoolTip.com, where he serves as both writer and editor. With a keen eye for simplifying complex tech, Rodger delivers practical advice that empowers readers to navigate the digital world with confidence. Dive into OneCoolTip.com for a treasure trove of savvy tips and tricks that keep you one step ahead in tech.


OneCoolTip.com
Cool Tech Tips for a Cooler Life!


#iPhone #Android #photometadata #privacytips #techsecurity #iphonetips #androidtips #TechTips #OneCoolTip @OneCoolTip


Copyright © 2024 | www.OneCoolTip.com | All Rights Reserved

Thursday, May 9, 2024

Unlock the Power of Conversation: A Deep Dive into ChatGPT's Temporary Chat Feature

Unlock the Power of Conversation: A Deep Dive into ChatGPT's Temporary Chat Feature

Discover the innovative world of ChatGPT's Temporary Chat feature, an exciting tool designed for fleeting but impactful AI-driven interactions. This Cool Tip explores how to effectively utilize this cutting-edge feature while addressing both its advantages and challenges.

By Rodger Mansfield, Technology Editor
May 9, 2024


Have you ever wished for a digital conversation that disappears once it’s done? 

Wondering how secure and private your interactions can be with AI? 

In today’s fast-paced digital world, the ability to engage in temporary, privacy-focused discussions is not just a luxury—it's a necessity. 

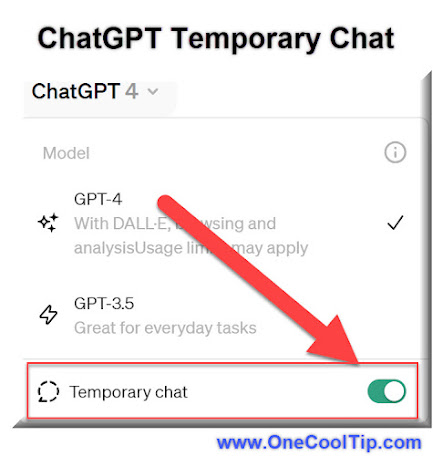
Here's a Cool Tip.  Use ChatGPT Temporary Chat.

ChatGPT Temporary Chat is a new feature that allows users to engage in conversations with the AI chatbot that are not stored or remembered beyond the session. 

Once the chat window is closed or the session ends, the conversation data is deleted. 

This feature is particularly valuable for those who need to discuss sensitive topics and want to ensure their conversations remain private and are not saved. 

It enhances user privacy by automatically erasing the chat history, offering a more secure and confidential way to interact with AI technologies.

Here's how to do it.
  1. Navigate to the ChatGPT platform. 
  2. Select the ‘Temporary Chat’ option from the menu to initiate a new session.
  3. Type your questions or prompts and receive responses in real-time. 
    • This interaction won’t be saved, ensuring a clean slate once you exit.
  4. Close the chat window or opt to end the session manually. 
  5. The chat will automatically disappear, leaving no trace behind.
ChatGPT Temporary Chat
fig. 1 - ChatGPT Temporary Chat


Temporary chats ensure that no records of the conversation are stored, providing a high level of privacy and security.

The intuitive design makes it accessible for users of all tech levels.

ChatGPT Temporary Chat gif
fig. 2 - ChatGPT Temporary Chat

ChatGPT’s Temporary Chat feature offers a revolutionary way to interact with AI while maintaining privacy. 

Whether you’re a professional handling sensitive data or a casual user seeking a clean slate after every interaction, this feature provides the flexibility and security you need. 
 
Embrace the future of communication by leveraging this innovative tool today.


READ MORE

Please LIKE and SHARE OneCoolTip.com!
Never miss a Cool Tip: OneCoolTip Newsletter.

Do you have a Cool Tip or question? Email us at onecooltip.com@gmail.com


Rodger Mansfield, a seasoned tech expert, is the mastermind behind OneCoolTip.com, where he serves as both writer and editor. With a keen eye for simplifying complex tech, Rodger delivers practical advice that empowers readers to navigate the digital world with confidence. Dive into OneCoolTip.com for a treasure trove of savvy tips and tricks that keep you one step ahead in tech.


OneCoolTip.com
Cool Tech Tips for a Cooler Life!


#ChatGPT #OpenAI #TemporaryChat #PrivacyMatters #TechInnovation #AISecurity #AIChatbot #DigitalPrivacy #TechTips #FutureOfAI#PrivacyMatters #TechTips #OneCoolTip @OneCoolTip @OpenAI @ChatGPT


Copyright © 2024 | www.OneCoolTip.com | All Rights Reserved

Sunday, April 21, 2024

Teach Your Kids to Be Internet Awesome

Teach Your Kids to be Internet Awesome

Google's Be Internet Awesome empowers parents and educators to guide kids towards becoming smart, safe, and responsible digital citizens. Learn how to use this fun and interactive resource.


By Rodger Mansfield, Technology Editor
April 21, 2024


Google Interland
In today's digital world, have you ever wondered how to ensure your children navigate the internet safely and responsibly? 

Do you wish to teach them how to make wise decisions online? 

Here's a Cool Tip.  Be Internet Awesome.

As a parent, you want your kids to enjoy the internet but also stay safe. 

Google's 'Be Internet Awesome' program is a fantastic tool to teach them exactly how to be smart and responsible online.

What is Be Internet Awesome?

Be Internet Awesome is a multifaceted program that aims to teach kids the essentials of staying safe and confident online. 

It features:
  • Interland: An engaging online game where kids explore themes of smart, alert, strong, kind, and brave internet usage.
  • Curriculum for Educators: Lesson plans covering key digital safety topics, designed to be taught in the classroom.

Here's how to do it.
  1. Visit the Be Internet Awesome Website at https://beinternetawesome.withgoogle.com/en_us/
  2. Encourage your kids to play the online game, helping them conquer challenges related to online safety.
  3. Teachers can access lesson plans and activities to integrate digital citizenship education into their classrooms.

Interland: Be Internet Awesome!
fig. 1 - Interland: Be Internet Awesome!


Benefits of Be Internet Awesome

With its interactive games and activities, Be Internet Awesome makes learning about online safety fun for kids. 

The program addresses a broad spectrum of online challenges, including phishing, scams, cyberbullying, and oversharing. 

Best of all, these invaluable resources are entirely free and easily accessible, allowing kids to apply their newfound knowledge in real-world online situations.

Be Internet Awesome can empower kids to make informed decisions in various online scenarios. Whether they encounter a mean comment on social media or a suspicious link,  the program helps them react with confidence and smarts.

Get Involved for a Safer Online Future

By using Be Internet Awesome's resources, parents and educators can equip kids with essential skills to become savvy digital citizens. 

Let's work together to make the internet a safer and kinder place for everyone!

Visit Be Internet Awesome today and let the learning begin.

Enjoy!


READ MORE


Please LIKE and SHARE OneCoolTip.com!
Never miss a Cool Tip: OneCoolTip Newsletter.

Do you have a Cool Tip or question? Email us at onecooltip.com@gmail.com


Rodger Mansfield, a seasoned tech expert, is the mastermind behind OneCoolTip.com, where he serves as both writer and editor. With a keen eye for simplifying complex tech, Rodger delivers practical advice that empowers readers to navigate the digital world with confidence. Dive into OneCoolTip.com for a treasure trove of savvy tips and tricks that keep you one step ahead in tech.


OneCoolTip.com
Cool Tech Tips for a Cooler Life!


#Google @Google #BeInternetAwesome #digitalsafety #onlinesafety #kids #parenting #education #digitalcitizenship #TechTips #OneCoolTip @OneCoolTip


(c) 2024 www.OneCoolTip.com

Tuesday, April 2, 2024

AT&T Data Breach: Millions of Customers' Information Exposed on Dark Web

AT&T confirms a data breach potentially exposing the personal information of over 70 million current and former customers.  The company is investigating the source and offering affected customers credit monitoring.

By Rodger Mansfield, Technology Editor
April 2, 2024


AT&T
Is your personal information safe with AT&T?  

That's the question swirling in the minds of millions of customers after the telecommunications giant confirmed a significant data breach. 

A dataset containing the information of approximately 73 million customers surfaced on the dark web. 

Should you be worried, and what can you do to protect yourself?

Here's a Cool Tip.   Be informed and protect your privacy.

This significant breach raises serious concerns about the security of customer data held by AT&T.  

Affected individuals should remain vigilant in the coming weeks and months to protect themselves from potential identity theft and financial fraud.

AT&T has launched a full-scale investigation into the data breach incident. 

While they've confirmed some AT&T-specific data was present, the full scope of the exposed information and its original source remain under investigation.  

Preliminary findings suggest the information dates back to 2019 or earlier.

What information might be exposed?

While the investigation is ongoing, the types of data potentially exposed could include:
  • Social Security Numbers
  • Contact Details (addresses, phone numbers)
  • Account Passcodes
  • Other personal identifiers

Protect Your Personal Data


What AT&T is doing

AT&T is proactively notifying affected customers. 

The company states they will offer credit monitoring services at their expense where applicable.

How to Protect Yourself
  • Change Passwords: Change your AT&T account passwords immediately, and update passwords on any other accounts where you may have reused them.
  • Monitor Your Accounts: Keep a close eye on your credit reports and financial accounts for any signs of unusual activity.
  • Consider Credit Monitoring: Even if not offered by AT&T, consider subscribing to a credit monitoring service for extra protection.
  • Be Wary of Scams: Fraudsters may try to capitalize on the breach, so be cautious of phishing emails or suspicious calls.
The Takeaway

Data breaches are an unfortunate reality in today's digital landscape. 

This AT&T incident underscores the importance of taking proactive measures to safeguard your personal information. 

Regularly updating passwords, monitoring your accounts, and utilizing credit monitoring services can significantly reduce your risk of identity theft and fraud.


READ MORE


Please LIKE and SHARE OneCoolTip.com!
Visit the OneCoolTip YouTube Channelhttps://www.youtube.com/@onecooltip

Do you have a Cool Tip or question? Email us at
onecooltip.com@gmail.com


Rodger Mansfield, a seasoned tech expert, is the mastermind behind OneCoolTip.com, where he serves as both writer and editor. With a keen eye for simplifying complex tech, Rodger delivers practical advice that empowers readers to navigate the digital world with confidence. Dive into OneCoolTip.com for a treasure trove of savvy tips and tricks that keep you one step ahead in tech.


OneCoolTip.com
Cool Tech Tips for a Cooler Life!

Source: AT&T

#ATT #databreach #darkweb #cybersecurity #identitytheft #TechTips #OneCoolTip @OneCoolTip 

(c) 2024 www.OneCoolTip.com

Sunday, March 24, 2024

How to Use YouTube Incognito Mode on Your Phone for Private Browsing

Discover the power of YouTube Incognito mode on your mobile device for a history-free browsing experience. Learn how to easily activate it and enjoy enhanced privacy.

By Rodger Mansfield, Technology Editor
March 24, 2024


Ever find yourself wanting to watch a YouTube video without leaving a trace in your history or influencing your recommendations? 

Perhaps you're sharing a device and don't want to mix up viewing preferences, or maybe you're simply researching a sensitive topic. 

Here's a Cool Tip.  Use YouTube's Incognito mode.

Here's how to do it.
  1. Open the YouTube app on your smartphone or tablet.
  2. Tap on your profile picture in the top right corner.
  3. Select the option labeled "Turn on Incognito."
  4. You're Incognito! You'll see a confirmation message and an Incognito mode icon (hat and glasses) in the top right corner.
  5. To exit Incognito mode, simply tap the Incognito icon in the top right corner and select "Turn off Incognito."

YouTube Incognito Mode Mobile: Screenshot showing Incognito icon and activation message
fig. 1 - YouTube Incognito Mode Mobile


Your searches and watched videos won't appear in your YouTube history while in Incognito mode and your usual recommendations won't be impacted by your Incognito activity.

It's important to note that Incognito mode doesn't make your activity entirely invisible. 

Your internet service provider, school, or employer might still be able to see your browsing activity.

Incognito mode is perfect for when you're using someone else's phone or a public device.
Considerations

It is a simple, powerful tool for private moments on the platform. 

By following these steps, you can protect your viewing habits and keep those surprise birthday present searches under wraps!

Have you used YouTube's Incognito mode? 

Share your experiences in the comments below!

Enjoy!


READ MORE


Please LIKE and SHARE OneCoolTip.com!
Visit the OneCoolTip YouTube Channelhttps://www.youtube.com/@onecooltip

Do you have a Cool Tip or question? Email us at
onecooltip.com@gmail.com


Rodger Mansfield, a seasoned tech expert, is the mastermind behind OneCoolTip.com, where he serves as both writer and editor. With a keen eye for simplifying complex tech, Rodger delivers practical advice that empowers readers to navigate the digital world with confidence. Dive into OneCoolTip.com for a treasure trove of savvy tips and tricks that keep you one step ahead in tech.


OneCoolTip.com
Cool Tech Tips for a Cooler Life!


#Google #Google #YouTube @YouTube #Incognito #Privacy #Mobile #TechTips #TechBlog #Google @Google #TechTips #OneCoolTip @OneCoolTip 

Sunday, January 14, 2024

Facebook's Link History: Convenience or Privacy Threat? Here's What You Need to Know

Facebook
Have you ever wondered how to make the most out of your Facebook experience? 

Have you heard about Facebook’s new Link History feature and wondered how it could enhance your social media journey?

Here's a Cool Tip.  Turn it off.

Facebook has recently introduced a new feature called Link History. 

This feature is designed to make navigating its mobile app even simpler by creating a repository of all the links you have clicked on while using the Facebook mobile app. 

But how does it work, and how can you use it to your advantage?

Here's how to do it.
  • Accessing Link History: 
    • Tap the profile icon at the bottom right of the Facebook app. 
    • Scroll down, 
    • Tap Settings & privacy. 
    • Tap Link History.
  • Turning Link History On/Off: 
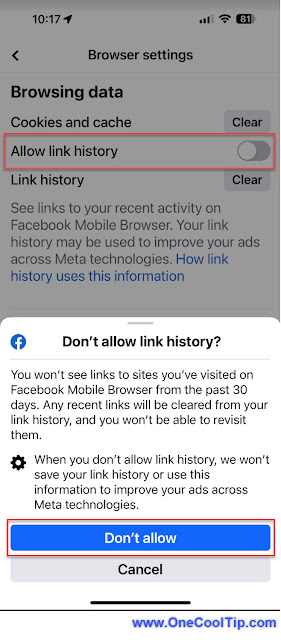
    • Open any link inside the app to launch the Facebook mobile browser. 
    • Tap the three-dot menu in the bottom right 
    • Select "Go to Settings".
    • Toggle "Allow link history" to off.
    • In popup screen, select "Don't allow"

Turn Off Facebook Link History

fig. 1 - Turn Off Facebook Link History

The Link History feature is being touted as a useful tool for consumers, allowing users to find and revisit links that they’ve been to before. 

However, if users allow Link History, Facebook uses the information to improve the ads seen across the app. 

While this might enhance the ad experience, it also raises privacy concerns.

Facebook’s new Link History feature can be a powerful tool for enhancing your social media experience, allowing you to easily revisit previously clicked links. 

However, it’s essential to be aware of the privacy implications and make an informed decision about whether to use this feature. 

Remember, the choice is always in your hands!

Please LIKE and SHARE OneCoolTip.com!
Visit the OneCoolTip YouTube Channelhttps://www.youtube.com/@onecooltip


READ MORE

OneCoolTip.com
Cool Tech Tips for a Cooler Life!

#Meta #Facebook #LinkHistory #SocialMediaTips #OnlinePrivacy #PrivacyMatters, #DigitalDetox, #DataTransparency #TechTips #OneCoolTip @OneCoolTip 

Wednesday, January 10, 2024

Venmo Privacy Lockout: How to Hide Your Friends List and Keep Your Transactions Hidden (Yes, Seriously!)

Venmo logo
Have you ever split a bill with friends on Venmo and then cringe at the thought of everyone seeing your entire social network?   

Believe it or not, your Venmo friends list (and even past transactions!) are public by default.  

Here's a Cool Tip.  Tighten down the Venmo privacy settings!

Venmo is a mobile payment app that lets you easily send and receive money from friends and family. 

It's like a digital wallet that makes settling up for shared expenses, paying roommates rent, or splitting dinner bills with friends a breeze.

But you need to change a default setting to make it more secure.

Here's how.
  • Open the Venmo app and tap the "Me" tab.
  • Click the gear icon in the top right corner to access Settings.
  • Tap "Privacy" and then "Friends List."
  • Choose "Private" to hide your list from everyone except yourself.
  • Bonus: 
    • Toggle "Appear in other users' friends lists" off to disappear from their lists entirely. (Ninja mode activated!)

Venmo Privacy

For maximum privacy, set your "Default Transaction Privacy" to "Private" under the Privacy settings. 

This keeps all future transactions hidden unless you choose otherwise.

In just a few simple steps, you can turn your Venmo account from a public spectacle to a privacy fortress. 

Remember, it's your money and your social circle – keep them both under your own lock and key. 

With these Cool Tips in your arsenal, feel free to split those bills and send those payments with newfound confidence, knowing your financial world is a closed book to anyone but you. 

Now go forth and conquer those awkward money moments with grace and a sprinkle of digital ninja moves!

Did you make the change?

Let us know what you think in the comments below.

Enjoy!


Please LIKE and SHARE OneCoolTip.com!
Visit the OneCoolTip YouTube Channelhttps://www.youtube.com/@onecooltip


READ MORE


OneCoolTip.com
Cool Tech Tips for a Cooler Life!


#Venmo #Privacy #money #VenmoPrivacy #SocialMediaSecurity #FinancialPrivacy #HideYourFriendsList #TechTips #MoneyManagement #OneCoolTip @OneCoolTip

Tuesday, December 19, 2023

Use This Shortcut to Hide Your Browsing

Have you ever wondered how to browse the web without leaving a trace? 

Have you ever needed to log into multiple accounts at once? 

Or maybe you just want to surprise someone with a gift without spoiling the surprise through your browser history. 

Here's a Cool Tip.  Open a new browser session in Incognito (Chrome), InPrivate (Edge) or Private (Safari) mode with this keyboard shortcut: Control + Shift + N (Windows) and Command + Shift + N (Mac)

Here's how to do it.
  • Open your favorite browser such as  Google ChromeMicrosoft Edge or Apple Safari.
  • Hold down the Ctrl and Shift keys on your keyboard, then press N
    • For Mac, hold Command + Shift + N keys.
  • You’ve just opened an Incognito or InPrivate browser session.

Incognito mode, also known as private browsing, is a feature in most web browsers that allows you to browse the internet without saving your browsing history, cookies, or temporary files. 

This means that once you close the incognito window, your activity on those websites won't be tracked by your browser or saved for future reference.

Using Incognito mode has several benefits including that your browsing history, cookies, and site data, and information entered in forms are not stored on your device.

You can also log into multiple accounts on the same website simultaneously.

Chrome Incognito Mode

However, it’s important to note that your activity might still be visible to the websites you visit, your employer or school, and your internet service provider.

Adding a reputable VPN offers additional privacy protection.

That's it.

Enjoy!

Please LIKE and SHARE OneCoolTip.com!
Visit the OneCoolTip YouTube Channelhttps://www.youtube.com/@onecooltip


READ MORE


OneCoolTip.com
Cool Tech Tips for a Cooler Life

#Chrome #Edge #Safari #Google #Microsoft #Apple #TechTips #BrowserShortcuts #IncognitoMode #Privacy #InternetPrivacy #OneCoolTip @OneCoolTip 

Sunday, November 19, 2023

Reclaim Your Privacy: How to Disable Sharing to Facebook and Instagram on Threads

Meta Threads
Are you concerned about your online privacy?

In today's interconnected world, where social media platforms seamlessly integrate, it's easy to lose control over how your personal content is shared. 

Threads, the new social networking app from Meta, is no exception. 

By default, your Threads posts may be shared with your other Meta accounts, including Facebook and Instagram. 

Here's a Cool Tip.  Change Your Settings to Prevent This Sharing to Other Apps.

If you're not comfortable with this level of visibility, you can disable cross-app sharing on Meta Threads and regain control over your privacy.

Here's how to do it.
  • Launch the Meta Threads app
  • Ensure you're logged into the account you want to manage sharing settings for.
  • Tap on your profile picture to access your profile settings.
  • Scroll down to the "Privacy" section
  • Tap on the "Suggesting posts on other apps" option.
  • Toggle off the switches next to "Facebook" and "Instagram" to disable cross-app sharing for both platforms.

Change Sharing Settings on Meta Threads App

fig. 1 - Change Sharing Settings on Meta Threads App

With this simple change, you can prevent your posts from being shared to the other Meta apps.

That's it!

Enjoy.


Please LIKE and SHARE OneCoolTip.com!
Visit the OneCoolTip YouTube Channelhttps://www.youtube.com/@onecooltip


READ MORE


OneCoolTip.com
Cool Tech Tips for a Cooler Life


#Meta #Threads #MetaThreads #Facebook #Instagram #PrivacySettings #CrossAppSharing #SocialMediaTips #PrivacyControl #TechTips #OneCoolTip @OneCoolTip