Showing posts with label Snipping Tool. Show all posts

Sunday, February 25, 2024

Master Audio-Enhanced Screen Recording with Windows 11 Snipping Tool

Discover the seamless integration of audio in screen recordings with the Windows Snipping Tool, transforming your content creation process.

By Rodger Mansfield, Editor
February 25, 2024


Snipping Tool
Have you ever needed to capture a video tutorial or a gaming victory, complete with all the in-game sounds and commentary? 

What if you could do all that without installing any third-party software?

Here's a Cool Tip.  Use the Windows 11 Snipping Tool now with Audio Recording.

Here's how to do it.

Configuration Tips: Include system audio by default:
  1. Open Snipping Tool settings from the three dot icon at the top right corner of the tool.
  2. Under ‘Screen recording’, toggle 'Include Microphone input by default' and ‘Include system audio by default’.
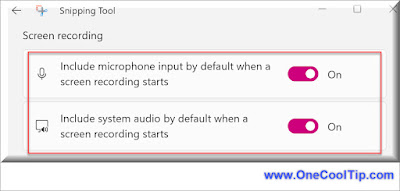
Snipping Tool - Audio Settings
fig. 1 - Snipping Tool - Screen Recording - Audio Settings


Record Screen video with Audio:
  1. Open the Windows Snipping Tool from the Start menu.
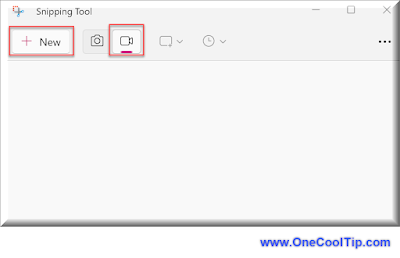
  2. Click the ‘Record’ button in the top toolbar, then select ‘New’.
  3. Drag to select the screen area you wish to record.
  4. Ensure your microphone is unmuted to include voiceovers.
  5. Hit ‘Start’ to begin recording after the countdown.
  6. Press ‘Stop’ to end the recording, which saves in MP4 format.
Snipping Tool Audio Recording
fig. 2 - Snipping Tool Audio Recording

This new feature means there is no need for additional software.

It has a simple and intuitive interface and  directly integrates system and microphone audio.

Currently, only MP4 format is supported and unfortunately, there is no direct keyboard shortcut for recording initiation.

Imagine creating a software tutorial. With the Snipping Tool, you can record step-by-step instructions while narrating, making your tutorial more engaging and informative.

Embrace the simplicity and efficiency of the Windows Snipping Tool for your screen recording needs. 

With audio integration, your content will be more dynamic and immersive than ever before.

Enjoy!


Please LIKE and SHARE OneCoolTip.com!
Visit the OneCoolTip YouTube Channelhttps://www.youtube.com/@onecooltip


READ MORE


Rodger Mansfield, a seasoned tech expert, is the mastermind behind OneCoolTip.com, where he serves as both writer and editor. With a keen eye for simplifying complex tech, Rodger delivers practical advice that empowers readers to navigate the digital world with confidence. Dive into OneCoolTip.com for a treasure trove of savvy tips and tricks that keep you one step ahead in tech.


OneCoolTip.com
Cool Tech Tips for a Cooler Life!


#Microsoft @Microsoft #SnippingTool #WindowsTips#ScreenRecording #AudioCapture #TechTutorial  #WindowsHowTo #ScreenRecordWithAudio #Windows11 #TechTips #OneCoolTip @OneCoolTip 

Tuesday, November 7, 2023

How to Use Windows 11 Snipping Tool to Convert Pictures to Text with Ease

OneCoolTip Snipping Tool
Have you ever wondered how to extract text from an image without typing it all out? 

Or perhaps you’ve been looking for a way to digitize your handwritten notes? 

Here's a Cool Tip.  Use the new and improved Snipping Tool in Windows 11.

The new feature in the Windows 11 Snipping Tool is here to revolutionize your workflow.

But how does it work? 

And what can it do for you?

Here's how to do it.
  • Click on the Start button, type ‘Snipping Tool’ in the search bar, and select the app from the results.
  • Click on ‘New’ and select the area of the screen you want to capture.
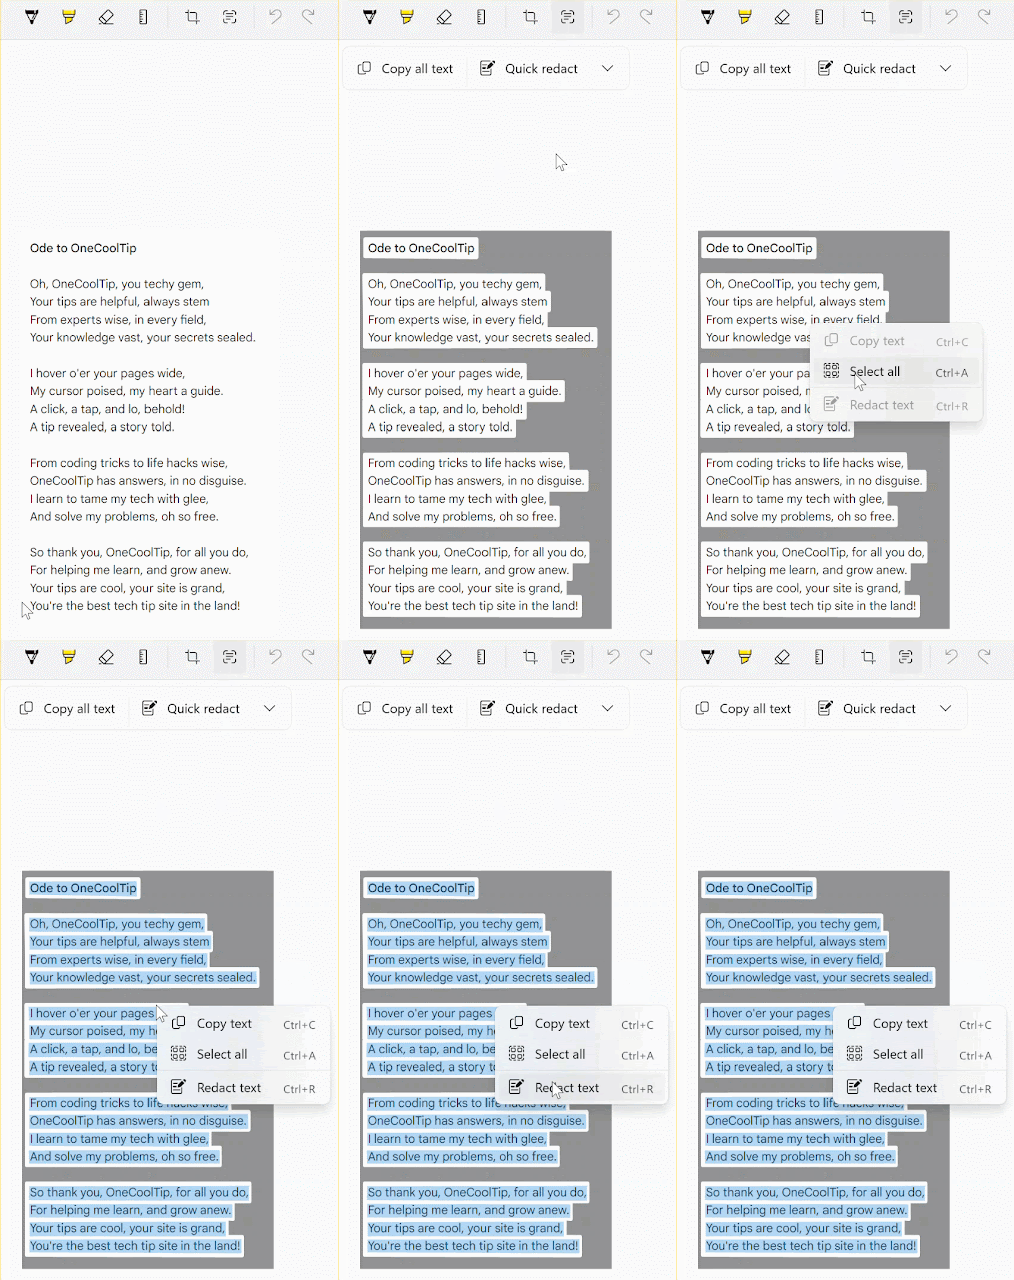
  • After capturing the snip, click on the ‘Text Actions’ button. This will convert the image in the snip to text.
OneCoolTip Snipping Tool Text Options

fig. 1 - Snipping Tool Text Options
  • You can now copy the text to your clipboard or edit it directly within the Snipping Tool.
    • Right Mouse click for copy options.

Snipping Tool Option Selections

fig. 2 - Snipping Tool Option Selections


Windows 11 Snipping Tool - Picture to Text

fig. 3 - Windows 11 Snipping Tool - Picture to Text


The ability to convert pictures to text can save you a significant amount of time, especially if you frequently work with images containing text. 

It’s also a great tool for digitizing handwritten notes or documents. 

However, the accuracy of the text conversion can vary depending on the quality of the image and the legibility of the text.

For instance, if you’ve taken a screenshot of a recipe from a cooking website, you can use the Snipping Tool to quickly convert the ingredients list into a text format that you can easily edit or share.

Enjoy!

Please LIKE and SHARE OneCoolTip.com!
Visit the OneCoolTip YouTube Channelhttps://www.youtube.com/@onecooltip


READ MORE


OneCoolTip.com
Cool Tech Tips for a Cooler Life


#Microsoft @Microsoft #Windows #Windows11 #SnippingTool #TextActions. #TechTips #OneCoolTip @OneCoolTip 

Sunday, October 1, 2023

Unleash the Power of Windows 11 Snipping Tool’s New Video Capture Feature

Snipping Tool
Ever wondered how to capture a video of your screen without downloading any additional software? 

Have you been looking for a way to record your screen right from your Windows 11 device? 

Here's a Cool Tip.  Use the new Windows 11 Snipping Tool Video capture feature.

The new Windows 11 Snipping Tool comes with a built-in video capture feature that’s easy to use and incredibly handy. 

Here's how to do it.
  • Open the Snipping Tool.
  • Click on the 'Record' icon
  • Select '+ New'
  • Choose your Capture Area
  • Click and drag your cursor to create a rectangle around the area you want to capture.
  • Click the ‘Record’ button to start capturing video. 
    • Everything within your selected area will be recorded.
  • When you’re done, click the ‘Stop’ button. 
  • Your video will automatically be saved in your Videos folder.
  • Navigate to your Videos folder to view your recording. From here, you can rename it, move it, or share it with others.

Windows 11 Snipping Tool Video Capture
fig. 1 - Windows 11 Snipping Tool Video Capture


Remember to turn off any notifications or other potential interruptions before you start recording to ensure a clean video capture. 

Also, consider closing any unnecessary applications or browser tabs for smoother performance.

So, are you ready to become a screen recording pro with the new Windows 11 Snipping Tool? It’s time to explore this feature and see how it can enhance your productivity!

Enjoy!

Please LIKE and SHARE OneCoolTip.com!


READ MORE


OneCoolTip.com
Cool Tech Tips for a Cooler Life


 #Windows11 #SnippingTool #ScreenRecording #TechTips #Microsoft #Windows @Microsoft #TechTips #OneCoolTip @OneCoolTip 

Sunday, May 28, 2023

Snip like a Pro with These Shortcuts

Windows Snipping Tool
Do you know the Snipping shortcuts?

Windows Snipping Tool is a powerful and versatile tool that can help you capture your screen with ease.

These keyboard shortcuts will help you use this amazing tool.

Here's how.


Windows Snipping Tool Example
fig. 1 - Snip a Screen Capture

Snipping Tool Keyboard shortcuts - Windows 10/8 (Snip and Capture Tool)

  • Windows Key + Shift + S –  The screen will darken while you select an area for a screenshot 
  • Alt + D – Sets a delay for the screen capture by 1-5 seconds
  • Alt + M – Choose a snip mode
  • Alt + N – Create a new snip in the same mode as the last one
  • Ctrl + C – Copy the snip to the clipboard.
  • Ctrl + O – Open File
  • Ctrl + P – Print
  • Shift + Arrow keys – Move the cursor to select a rectangular snip area
Note:  Windows 11 has fewer shortcuts.  Use Windows Key + Shift + S to capture a screenshot.

Enjoy!

Please LIKE and SHARE OneCoolTip.com!


READ MORE

OneCoolTip.com
Cool Tech Tips for a Cooler Life!

#Windows #Snipping #snip #capture #Microsoft @Microsoft #SnipandCapture

Monday, May 22, 2023

How to Create Graphics and Illustrations Using PowerPoint

Microsoft PowerPoint
Are you tired of spending hours creating artwork and design elements for your projects? 

Here's a Cool Tip: Look no further than Microsoft PowerPoint! 

This versatile tool is not just for presentations - it can also be used to create artwork and designs in just a few simple steps. 

This can save you the cost and complexity of buying more complicated and expensive software.

Here's how to use PowerPoint as a simple solution for creating artwork, text and design elements for normal computer users.

  • Open PowerPoint.
  • Select a blank slide.
  • Click on the Insert tab and select Shapes to add shapes to your slide.
  • You can also add text by clicking on the Insert tab and selecting Text Box.
  • To add images or pictures, click on the Insert tab and select Pictures.
  • Right-mouse click any object to Format.  Change the color of lines and fill.  Change the size and pattern for any line or object.
  • As you can see in fig. 1 below,  a snip of an Excel sheet was brought into PowerPoint, red boxes drawn around key areas, and a large red arrow was added.  Then this image was snipped, saved and then brought into a final document.
  • You can also use PowerPoint's built-in design templates to create professional-looking designs for your artwork.
PowerPoint as Graphics Editor Example
fig. 1 - Use PowerPoint to Compose Graphics
  • Use the Windows Snipping Tool (shortcut is Shift+Windows+S keyboard shortcut) to select your new artwork.  Save the image for future use as well.
  • You can also save the PowerPoint deck for future use if you need to modify the image.

Enjoy!

Please LIKE and SHARE OneCoolTip.com!


READ MORE


OneCoolTip.com
http://www.onecooltip.com
Cool Tech Tips for a Cooler Life!


#PowerPoint #Artwork #DesignElements #DigitalArt #GraphicDesign #OneCoolTip #TechTip #Microsoft @Microsoft 


Monday, January 2, 2023

Use Snipping Tool to Capture Screenshots in Windows


A picture is worth a thousand words. 

This is even more true in the digital age. 

But how do you capture something you see on your windows screen to be able to include it in your email or message?

When you need to capture a full or partial Windows screen, use this keyboard shortcut to open the Windows Snipping Tool: 

Windows Key + Shift + S

This shortcut will open the quick Snipping tool.  Select one of the tools to capture the screen:

Snipping Tool Quick Menu


  • Rectangular snip
    • Drag the cursor around an object to form a rectangle.
  • Free-form snip
    • Draw a free-form shape around an object.
  • Full-screen snip
    • Capture the entire screen.
  • Window snip
    • Select a window, such as a dialog box, that you want to capture.

You can paste (Ctrl+V) your screen snip into another program such as email or Microsoft Word.

After you capture an image, you'll see a pop-up message in the bottom, right-hand corner of the screen, you can click that message to open the full Snipping Tool application screen for more editing options.


READ MORE


OneCoolTip.com
Cool Tech Tips for a Cooler Life!

#Windows #Snipping #snip #capture

Monday, August 17, 2015

Snipping Tool in Windows 10 Now Lets You Capture Pop Up Menus with Delay Option

Windows 10 - www.OneCoolTip.com
Windows 10 is full of subtle changes for the better.

One small but important change is a very good enhancement to the Snipping Tool.

The Snipping Tool lets you capture a screenshot, called a "snip", of any part of your computer screen and then save the image.

This can be important if you need to document something that is showing on the screen for a technical issue or if you are capturing part of the screen for a presentation or detailed instructions.

Since its introduction in Windows Vista, there has been one drawback with the bundled Snipping Tool.

 A screen capture could not be taken if the mouse was holding down a dropdown menu or during some other screen actions or popup menus.

The upgrade fixes this by allowing you to set a 0, 1, 2, 3, 4, or 5 second delay before the capture begins..

Snipping Tool Windows 10 Delay Screen - www.onecooltip.com


Just select how many seconds delay you want, let's say 5, then perform the screen action.  When the time delay happens, you can then capture the part of screen as normal.

This is a great but important enhancement that makes using Windows 10 even better.

Enjoy!