Showing posts with label Microsoft PowerPoint. Show all posts

Monday, August 21, 2023

How to Add Visual Flair to Your PowerPoint Presentations

Have you ever wanted to add some visual flair to your PowerPoint presentations? 

Do you want to make your slides more engaging and eye-catching? 

Here's a Back to Work Monday Cool Tip: Use the Insert Icons feature in Microsoft PowerPoint! 

Microsoft 365 doesn't have traditional clip art anymore, but as a subscriber you get several new kinds of high quality art in its place for free: high-resolution photographs, icons, cutout people, stickers, illustrations, and cartoon people.

Here's how to do it.
  • Open Microsoft PowerPoint and navigate to the slide where you want to insert an icon.
  • Click on the Insert tab in the ribbon menu at the top of the screen.
  • In the Illustrations group, click on Icons.
    • A window will pop up with a variety of icons to choose from. 
    • You can search for specific icons using the search bar at the top of the window, or browse through the categories on the left side of the window.
  • Once you’ve found an icon that you like, click on it to select it, and then click on the Insert button at the bottom of the window.
  • The icon will be inserted onto your slide, and you can use the formatting options in the ribbon menu to customize its size, color, and position.
  • If you want to insert other types of images, select another category such as Images.

Microsoft Power Point Insert Icons
fig. 1 - Microsoft PowerPoint Insert Icons Feature

With this feature, you can add visual interest to your presentations and make them more engaging for your audience.


That's it!

Enjoy!

Please LIKE and SHARE OneCoolTip.com!


READ MORE

OneCoolTip.com
Cool Tech Tips for a Cooler Life!

#PowerPoint #Microsoft #Icons #Presentations #Visuals #TechTips #OneCoolTip @OneCoolTip @Microsoft 

Monday, July 17, 2023

Say Goodbye to Calibri - Hello Aptos!

Do you use Microsoft Office?

If so, there's a change coming with the default font.

Microsoft has announced that it is replacing its default font, Calibri. 

This change comes after 15 years of Calibri being the default font for Microsoft Office. 

The new default font is called Aptos.

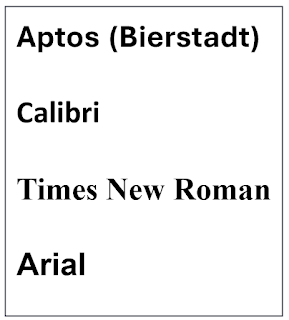
But here's a Cool Tip:  You can already ready use it since it's currently called Bierstadt

Microsoft Default Font Aptos
fig.1 - Microsoft New Default Font Aptos and Previous Fonts


The decision to choose Aptos as the new default font was based on user feedback, with Aptos striking a balance between professionalism and relatability.

The new font will gradually become the default across all Microsoft 365 apps and services for all users over the coming months. 

However, Calibri will still be pre-pinned at the top of a new font menu alongside its predecessors, Times New Roman and Arial.

Please Like and Share OneCoolTip.com!


READ MORE

OneCoolTip.com
http://www.onecooltip.com
Cool Tech Tips for a Cooler Life!


#Microsoft #Aptos #NewFont #DefaultFont #MicrosoftOffice #Office #Microsot365 #Word #Excel #PowerPoint #Outlook #TechTip #OneCoolTip @Microsoft 


Source: Microsoft Design

Monday, June 19, 2023

How to Fill a Shape with a Picture in Microsoft PowerPoint

Microsoft PowerPoint
Have you ever wanted to add a creative touch to your PowerPoint presentations? 

Do you want to learn how to make your slides more visually appealing? 

Here's a Cool Tip: Fill a shape with a picture in Microsoft PowerPoint

Here's how to do it.

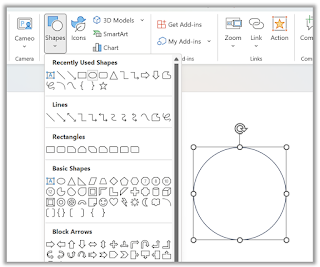
  • Add a shape to your document by going to the Insert tab and selecting Shapes. Choose the shape you want and click on the slide to add it.

Microsoft PowerPoint Insert Shape
fig. 1 - Insert Shape

  • Select the shape by clicking on it.
  • Go to the Shape Format tab that displays, click on Shape Fill in the Shape Styles section of the ribbon, and choose Picture.

Microsoft PowerPoint Shape Fill - Picture
fig. 2 - Shape Fill - Picture
  • Select the type of picture you want (such as From a File or Online Pictures) and then navigate to the picture you want and insert it.
  • The image that you picked will then fill the shape.

Microsoft PowerPoint Shape Fill - Picture
fig. 3 - Shape Fill - Picture
  • You can adjust how the image is formatted within the shape using two actions: Fill or Fit.
    • Click the image within the shape and go to the Picture Format tab that appears.
    • Click the arrow below Crop in the Size section of the ribbon and choose either Fill or Fit.
    • When you “Fill” a shape with an image, this adjusts the picture size to match the shape’s height or width, whichever is greatest. 
    • When you “Fit” a shape with an image, this adjusts the picture size so that both the height and width match the shape.
That's it!

Please LIKE and SHARE OneCoolTip.com!


READ MORE

OneCoolTip.com
Cool Tech Tips for a Cooler Life!

#PowerPoint #Microsoft #Tutorial #Design #TechTip #OneCoolTip @Microsoft 

Monday, May 22, 2023

How to Create Graphics and Illustrations Using PowerPoint

Microsoft PowerPoint
Are you tired of spending hours creating artwork and design elements for your projects? 

Here's a Cool Tip: Look no further than Microsoft PowerPoint! 

This versatile tool is not just for presentations - it can also be used to create artwork and designs in just a few simple steps. 

This can save you the cost and complexity of buying more complicated and expensive software.

Here's how to use PowerPoint as a simple solution for creating artwork, text and design elements for normal computer users.

  • Open PowerPoint.
  • Select a blank slide.
  • Click on the Insert tab and select Shapes to add shapes to your slide.
  • You can also add text by clicking on the Insert tab and selecting Text Box.
  • To add images or pictures, click on the Insert tab and select Pictures.
  • Right-mouse click any object to Format.  Change the color of lines and fill.  Change the size and pattern for any line or object.
  • As you can see in fig. 1 below,  a snip of an Excel sheet was brought into PowerPoint, red boxes drawn around key areas, and a large red arrow was added.  Then this image was snipped, saved and then brought into a final document.
  • You can also use PowerPoint's built-in design templates to create professional-looking designs for your artwork.
PowerPoint as Graphics Editor Example
fig. 1 - Use PowerPoint to Compose Graphics
  • Use the Windows Snipping Tool (shortcut is Shift+Windows+S keyboard shortcut) to select your new artwork.  Save the image for future use as well.
  • You can also save the PowerPoint deck for future use if you need to modify the image.

Enjoy!

Please LIKE and SHARE OneCoolTip.com!


READ MORE


OneCoolTip.com
http://www.onecooltip.com
Cool Tech Tips for a Cooler Life!


#PowerPoint #Artwork #DesignElements #DigitalArt #GraphicDesign #OneCoolTip #TechTip #Microsoft @Microsoft 


Wednesday, May 3, 2023

Unlock PowerPoint's Dual-Slide Editing with This Time-Saving Trick!

Microsoft PowerPoint
Do you need to be able to view or edit two different slides of the same PowerPoint at the same time?

With this Cool Tip, you can.

Use the View, New Window feature in Microsoft PowerPoint.

Opening a new window view in Microsoft PowerPoint can be a great way to organize, compare and edit different slides of your presentation. 

This is especially useful when you have more than one monitor.

Here's how to do it:
  • Open Microsoft PowerPoint.
  • Open the presentation you want to work with.
  • Click the View tab on the ribbon at the top of the screen.
  • In the Window group, click the New Window button. 
  • This will open a new window with the same  PowerPoint presentation.

Microsoft PowerPoint View New Window
fig. 1  Microsoft PowerPoint View New Window

  • You can now move and resize the windows as needed. 
  • To switch between the windows, click the View tab again and select the window you want to work with from the Switch Window.
  • Now you can make changes in one window and compare it with the other window side by side.

Tips:
-This works best when using more than one monitor.
-You can also use the Arrange All button in the Window group to automatically arrange all open windows on your screen.
-If you have multiple windows open, you can use the Switch Windows button to quickly switch between them.

By using this feature you can easily work with multiple slides of your presentation at the same time, which can save you time and make your work more efficient.


Please LIKE and SHARE OneCoolTip.com!


READ MORE

OneCoolTip.com
http://www.onecooltip.com
Cool Tech Tips for a Cooler Life!


#Microsoft @Microsoft #PowerPoint #TechTips #OneCoolTip #View

Wednesday, April 5, 2023

How to Use the Presentation Pointer in Microsoft PowerPoint

Are you tired of fumbling around with your mouse during presentations? 

Do you want to make your presentations more engaging and interactive? 

If so, you’re in luck! 

There's a Cool Tip on how to use the presentation pointer in Microsoft PowerPoint to make your presentations more dynamic and engaging.

Here's how to do it:

To use your mouse as a laser pointer:

  • Go into Slide Show mode.
    • Press the Slide Show icon at the bottom right corner
Microsoft Power Point Slide Show
  • Press and hold the Ctrl key then Left-Click the mouse mouse.
  • A red dot will appear on the screen

Power Point Pointer
Red Dot Pointer
  • Move the red dot around the screen with the mouse to highlight key points on your slide

That's it.


Please Like and Share OneCoolTip.com!

READ MORE


OneCoolTip.com
Cool Tech Tips for a Cooler Life!


#PowerPointTips #PresentationSkills #PresentationPointer #MicrosoftPowerPoint #Microsoft #OneCoolTip @Microsoft

Wednesday, March 15, 2023

How to Convert Any Microsoft Office File to a PDF

PDF
Do you need to send someone a Word document but they don't have Microsoft Word?

Don't panic.

You can send them a PDF.

PDFs are a great way to share your documents online. 

They keep the original formatting, layout and fonts of your files, regardless of what device or software you use to view them. 

Here's how to create PDFs from your Microsoft Office files, such as Word, Excel or PowerPoint.
  • Open your Office file and click on File then Save As.
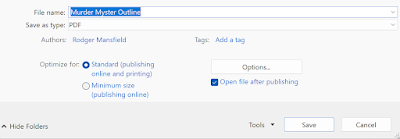
  • Choose a location where you want to save your PDF file and select PDF from the drop-down menu next to Save as type.
Save as PDF
  • Click on More Options and select Optimize for - Standard (online and printing) or - Minimum size (publishing online)
Save as PDF More Options
  • Click on Save and wait for your PDF file to be created.

That’s it! 

You’ve just converted your Office file to a PDF file. 

You can now share it with anyone you want or store it on your device for future use. You can also open it with any PDF reader or editor of your choice.

Please LIKE and SHARE OneCoolTip.com!

READ MORE

OneCoolTip.com
Cool Tech Tips for a Cooler Life!

#Microsoft #MicrosoftOffice #PDF #Word #Excel #PowerPoint #PDFConverter #OfficeTips #OneCoolTip

Monday, March 13, 2023

How to Show or Hide the Ribbon in Office

Microsoft 365
Where's the ribbon?

That's often the question when using Microsoft Office.

The ribbon is a set of toolbars at the top of the window in Office programs, for example, Word, Excel, PowerPoint, designed to help you quickly find the commands that you need to complete a task. 

But a common problem that users encounter is that the ribbon can appear and seemingly disappear on a whim.

Office Ribbon Menu Bar
Microsoft Office Ribbon

Here is a Cool Tip on how to master the Office ribbon.

Expand or collapse the ribbon

You can toggle between having the ribbon expanded or collapsed in multiple ways.

If the ribbon is collapsed, expand it by doing one of the following:

  • Double-click any of the ribbon tabs.

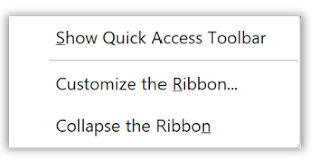
  • Right-click any of the ribbon tabs, and then select Collapse the ribbon.

Collapse the Ribbon
  • Press CTRL+F1.

If the ribbon is expanded, collapse it by doing one of the following:

  • Double-click any of the ribbon tabs.
  • Right-click any of the ribbon tabs, and then select Collapse the ribbon
Collapse the Ribbon
Collapse the Ribbon

  • Right-click Ribbon display options in the lower right of the ribbon, and then select Collapse the ribbon.
  • Press CTRL+F1.

Show Ribbon options

  • When the ribbon is visible, in the lower-right corner of the ribbon, click the Ribbon Display Options icon or the down caret icon.
Ribbon Display Options
  • Choose a state for the ribbon:

    • Full-screen mode hides the ribbon for the best view of your document, and only shows the ribbon when you select More , or press the ALT key.
    • Show tabs only shows only the ribbon tabs, so you see more of your document, and you can still quickly switch among the tabs.
    • Always show Ribbon keeps all the tabs and commands on the ribbon visible all the time.

If the ribbon isn't visible at all

If the ribbon isn’t visible at all (no tabs are showing), the state is set to Full-screen mode

Select More  or the three dot icon at the top right of the screen. This will temporarily restore the ribbon.

When you return to the document, the ribbon will be hidden again. To keep the ribbon displayed, select a different state from the Ribbon Display Options menu.

That's it!

Please LIKE and SHARE OneCoolTip.com!

READ MORE


OneCoolTip.com
Cool Tech Tips for a Cooler Life!


#Microsoft #Office #OfficeTips #RibbonControl #OneCoolTip #HowTo #OfficeTricks  @Microsoft

Monday, March 6, 2023

Link Like a Pro: Use This Cool Tip to Add Hyperlinks

Do you find yourself constantly copying and pasting website links into your Microsoft documents? 

Did you know that there's a Cool Tip to insert links using a keyboard shortcut? 
    • Use Control + K as a keyboard shortcut to quickly insert a hyperlink address in Microsoft Word, Excel, and PowerPoint.
Here's how to do it:
  • First, highlight the text that you want to turn into a link.
  • Press the Control + K keys on your keyboard. 
    • This will open the Insert Hyperlink dialog box.
  • In the Address field, type or paste the URL of the website you want to link to.
  • Click OK to insert the link into your document.

Insert Hyperlink Example

That's it!  You've just saved yourself precious time.

This shortcut works in all recent versions of Microsoft Word, Excel, and PowerPoint as well as many other Windows programs.

Enjoy!

Please Like and Share OneCoolTip.com!

READ MORE

Monday, January 9, 2023

Draw a Perfect Straight Line, Square or Circle with This Cool Tip

Shapes
When using Microsoft Word, Excel, Outlook or PowerPoint, you can add shapes, such as boxes, circles, and arrows, to your documents, email messages, slide shows, and spreadsheets. 

But how do you get a perfect circle rather than an oval?  Or a square rather than a rectangle?  Or a straight line rather than a jagged one?

The secret Cool Tip is to press and hold the SHIFT key when dragging the mouse to create the shape.

Press Shift Key to draw perfect line square circle

Here's how to do it:

  • On the Insert tab, click Shapes
  • Click the shape icon you want to draw, click anywhere in the workspace and drag to place the shape.
  • To create a perfect line, square or circle (or constrain the dimensions of other shapes), press and hold Shift key while you drag to create the shape.


If you like OneCoolTip, please Like and Share!


READ MORE


OneCoolTip.com
http://www.onecooltip.com
Cool Tech Tips for a Cooler Life!

#Shift #microsoft #word #excel #powerpoint


Friday, December 11, 2015

3 Top Tips When You're Frustrated Using a PC

One Cool Tip - http://www.onecooltip.com
Using a computer is often frustrating.

Perhaps its new software or just existing software where the desired feature just isn't obvious.

Software continues to add more and more features, menus change or disappear and simple commands don't seem so obvious any more.

Here are 3 top tips for figuring out how to solve simple issues.

F1 is Your Friend

Pressing the F1 key is the easy way to access the Help section of most software.  On some PCs, you'll need to press the blue Fn (Function) key to access the F1 function.  Microsoft has extensive help tools accessible from F1 that include the ability to search for common features, issues and also view video tutorials.

Common Keyboard Shortcuts

Most PC programs utilize standard keyboard shortcuts.  For example, if you are using Word and can't find the Print function, don't worry.  Pressing the Ctrl + P keys will bring up the Print screen.

A few other Ctrl key combinations:

Ctrl + C to Copy selected text,
Ctrl + X to Cut selected text and
Ctrl + V to Paste text from the clipboard.

Ctrl + F will bring up a Search form in many programs and web browsers.  Looking for specific text on a webpage or within a Word document? Use the the Ctrl + F to find it quickly.

And don't forget that pressing the the ESC key can exit most screens.

Google It

When you are really stuck, try a Google search.  Using the above issue of how to print in Microsoft Word, a search in Google for "Microsoft Word Print" returns the answer, including an enhanced Google spotlight of the instructions to be able to print from within Microsoft Word.


And finally, don't forget to check One Cool Tip's library of cool tips around key topics:  Google, Windows 10, Chrome, Microsoft Word, Microsoft Power Point, Microsoft Excel, and Microsoft Outlook.  There's a whole list of Cool Tip tops on the right-hand side of One Cool Tip.

Enjoy!


READ MORE

OneCoolTip.com
Cool Tech Tips for a Cooler Life!


#Windows #restart #reboot #PC #computer #help #F1 #Microsoft

Friday, October 23, 2015

How to Insert a Screenshot in Microsoft Power Point, Excel, Word or Outlook

We've told you before how the Windows Snipping app is great for adding screenshots to a document.

And the Windows 10 version is even better with a delayed timer.

But Microsoft Office products, Power Point, Excel, Word and Outlook, also have a built-in tool to insert screenshots.

Here's how to do it.

  1. Click the "Insert" menu on the Office Ribbon.  Then select "Screenshot".
  2. To add the entire window, click the thumbnail view of the available windows.
  3. To add part of a window, click "Screen Clipping".  Press and hold the left mouse button to select the screen area to capture.


That's it.  It's easy to add an entire screen or just a part into your presentation, document, spreadsheet or email.

Enjoy!