Wednesday, March 13, 2024

Fortify Your Files: A Step-by-Step Guide to Ransomware Protection on Windows

Discover how to safeguard your digital life by enabling and configuring ransomware protection settings in Windows, ensuring your files remain secure from malicious threats.

By Rodger Mansfield, Editor
March 13, 2024


Windows Security
Have you ever considered the security of your digital files? 

What measures are you taking to protect your personal data from ransomware attacks?

In today’s digital age, it’s not just about having antivirus software; it’s about being proactive in your defense strategies.

Here's a Cool Tip.  Be sure to set the Ransomware protection in Windows.

Ransomware is a type of malicious software designed to block access to a computer system or encrypt files until a sum of money is paid. 

It often spreads through phishing emails or by unknowingly visiting an infected website. 

Ransomware attacks can lead to significant data loss and require costly solutions to restore the affected systems.

The ransomware settings in Windows, specifically the Controlled folder access feature, provide a layer of protection against ransomware attacks. 

Windows Wednesday

When enabled, it monitors changes that apps make to files in protected folders. 

If an app that is not on the whitelist tries to make changes, you’ll receive a notification about the suspicious activity. 

This helps prevent unauthorized encryption of your files by ransomware, which could otherwise lock you out until a ransom is paid.

Here's how to do it.

To find the Windows Security app on your Windows 10 or Windows 11 system, you can follow these steps:
  • Click on the Start button or press the Windows key on your keyboard.
  •  Type “Windows Security” into the search bar.
  • Click on the Windows Security app from the search results to open it.
  • Click on “Virus & threat protection” to access the ransomware protection settings.
Or
  • Click on the Start button, then select the gear-shaped Settings icon, or press Windows key + I.
  • In the Settings window, click on “Update & Security”.
  • On the left-hand side, click on “Windows Security”.
  • Click on “Virus & threat protection” to access the ransomware protection settings.
Windows Ransomware Setting
fig. 1 - Windows Ransomware Setting


  • Scroll down to the ‘Ransomware Protection’ section and click on ‘Manage Ransomware Protection’.
  • Turn on the toggle for ‘Controlled Folder Access’ to activate the feature.
  • By default, folders like Documents, Pictures, Videos, and Desktop are protected. You can add more folders by clicking on ‘Protected Folders’.
  • If you have trustworthy apps that need to access protected folders, you can allow them by clicking on ‘Allow an app through Controlled Folder Access’.
  • To see which apps have been blocked from accessing protected folders, you can check the ‘Block history’.
  • Ensure that your Windows Security app and your operating system are up to date to have the latest security protections.
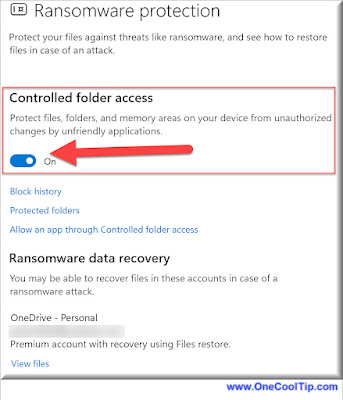
Windows Ransomware Setting - Controlled Folders
fig. 2 - Windows Ransomware Setting - Controlled Folders


These settings are not on by default.

Making these changes provides an additional layer of defense against ransomware and ensures that your important files are not held hostage by cybercriminals.

Imagine you’re working on a critical project with tight deadlines. 

Suddenly, a ransomware attack encrypts all your files, demanding payment for their release. 

With ransomware settings enabled, your work would be secure, and productivity uninterrupted.

By following these steps, you can take control of your digital security and protect your files from ransomware. 

Remember, in the fight against cyber threats, knowledge is your best defense.


Please LIKE and SHARE OneCoolTip.com!
Visit the OneCoolTip YouTube Channelhttps://www.youtube.com/@onecooltip

Do you have a Cool Tip or question? Email us at
onecooltip.com@gmail.com


READ MORE


Rodger Mansfield, a seasoned tech expert, is the mastermind behind OneCoolTip.com, where he serves as both writer and editor. With a keen eye for simplifying complex tech, Rodger delivers practical advice that empowers readers to navigate the digital world with confidence. Dive into OneCoolTip.com for a treasure trove of savvy tips and tricks that keep you one step ahead in tech.


OneCoolTip.com
Cool Tech Tips for a Cooler Life!


#Microsoft #Windows @Microsoft #Cybersecurity #RansomwareProtection #WindowsSecurity #DataSafety #MalwareDefense #WindowsWednesday #TechTips #OneCoolTip @OneCoolTip 

Tuesday, March 12, 2024

Discover the Secrets in Your Photos with iPhone’s Visual Look Up

This powerful iPhone feature can identify objects, landmarks, plants, and more within your pictures. Learn how to use it like a pro!

By Rodger Mansfield, Editor
March 12, 2024


iPhone Visual Look Up
Have you ever looked at a photo on your iPhone and wondered, "What kind of flower is that?", "What is that animal?" or  
"Where is that famous building?" 

Here's a Cool Tip.  Use Visual Look Up on your iPhone images.

Your iPhone has a hidden gem called Visual Look Up that can answer these questions and more.

Visual Look Up is like having a tiny encyclopedia inside your phone. 

It uses advanced image recognition to analyze your photos and provide information from the web and Apple's Siri Knowledge database.

Here's how to use Visual Look Up on your iPhone:
  1. Open the Photos app and find the image you want to analyze.
  2. Tap the "Info" button (it looks like a lowercase "i" inside a circle).
  3. Look for a sparkle icon next to the Info button. If you see it, Visual Look Up can identify something in your photo!
  4. Tap the sparkle icon, and then tap "Look Up".
  5. Tap the results to learn more.
Visual Look Up puts information at your fingertips, making it a great tool for travelers, students, or anyone with a curious mind.

The feature's accuracy depends on how clearly the object is depicted in your photograph.

Let's see it in action! 

Imagine you're hiking in the Mexican jungle and come across an animal. 

With Visual Look Up, you can find out if it's potentially dangerous

iPhone Visual Look Up
fig. 1 - iPhone Visual Look Up


iPhone Visual Look Up - Results
fig. 2 - iPhone Visual Look Up - Results


iPhone Visual Look Up - Details
fig. 3 - iPhone Visual Look Up - Details

What can Visual Look Up do?
  • Identify plants and animals: Snap a picture of a curious flower or an adorable dog breed and get instant information.
  • Learn about landmarks: Get historical details and interesting facts about famous buildings and monuments.
  • Translate text: Visual Look Up can even translate text within a photo into different languages.


Visual Look Up is a surprisingly powerful tool tucked away in your iPhone. 

With a few taps, you can uncover interesting insights and information about the world captured in your photos. 

Give it a try the next time you're curious about a photo - you might be surprised by what you learn!


Please LIKE and SHARE OneCoolTip.com!
Visit the OneCoolTip YouTube Channelhttps://www.youtube.com/@onecooltip

Do you have a Cool Tip or question? Email us at
onecooltip.com@gmail.com


READ MORE

Rodger Mansfield, a seasoned tech expert, is the mastermind behind OneCoolTip.com, where he serves as both writer and editor. With a keen eye for simplifying complex tech, Rodger delivers practical advice that empowers readers to navigate the digital world with confidence. Dive into OneCoolTip.com for a treasure trove of savvy tips and tricks that keep you one step ahead in tech.


OneCoolTip.com
Cool Tech Tips for a Cooler Life!


#Apple @Apple #iPhone #VisualLookUp #AI #iOS #techtips #phototips #mobilephotography #TechTips #OneCoolTip @OneCoolTip 

Monday, March 11, 2024

Unclutter Your Word Documents: Mastering the Control + Space Shortcut

Discover the simplicity of removing unwanted formatting in Microsoft Word with the quick and easy Control + Space shortcut.

By Rodger Mansfield, Editor
March 11, 2024


Have you ever found yourself wrestling with a stubbornly formatted document, wishing for a magic wand to strip away the chaos and start fresh? 

What if I told you that your keyboard holds the power to declutter your document in an instant?

Here's a Cool Tip.  Unlock the secret to effortless document formatting with our guide to the Control + Space command in Word.


Here's how to do it.
  1. Click and drag your mouse over the text from which you want to remove formatting.
  2. Press Control + Space on your keyboard. The selected text will revert to the default formatting.
  3. Ensure that all unwanted formatting is removed.
  4.  If not, repeat the process or use additional shortcuts like Control + Shift + N for normal style.
Control Space Removes Formatting
fig. a - Control Space Removes Formatting

This shortcut saves time by removing formatting with a single keystroke and helps maintain a uniform look throughout your document.

Embrace the Control + Space shortcut to swiftly eliminate unwanted formatting and enhance your document editing efficiency. 

It’s the secret weapon for a polished, professional look.

Start using Control + Space today and witness the transformation in your document management. 

It’s not just a shortcut; it’s a step towards impeccable documents.


Please LIKE and SHARE OneCoolTip.com!
Visit the OneCoolTip YouTube Channelhttps://www.youtube.com/@onecooltip

Do you have a Cool Tip or question? Email us at
onecooltip.com@gmail.com


READ MORE


Rodger Mansfield, a seasoned tech expert, is the mastermind behind OneCoolTip.com, where he serves as both writer and editor. With a keen eye for simplifying complex tech, Rodger delivers practical advice that empowers readers to navigate the digital world with confidence. Dive into OneCoolTip.com for a treasure trove of savvy tips and tricks that keep you one step ahead in tech.


OneCoolTip.com
Cool Tech Tips for a Cooler Life!


#Microsoft #Word #MicrosoftWord @MicrosoftWord #MicrosoftWordTips #EditingTips #KeyboardShortcuts #ProductivityHacks #BackToWorkMonday #TechTips #OneCoolTip @OneCoolTip 

Sunday, March 10, 2024

Tired of Boring Fonts? Spice Up Your Google Docs with These Easy Steps

Upgrade your documents and express your creativity! This Cool Tip shows you how to find and add exciting new fonts to Google Docs.


By Rodger Mansfield
March 10, 2024


Google Docs
Does your go-to font feel a little lackluster? 

Wish you could inject some pizazz into those reports or presentations? 

Here's a Cool Tip.  Add new fonts to your Google Docs.

Google Docs is a powerful, cloud-based word processing software that's part of the Google Workspace suite of productivity tools (formerly known as G Suite). 

And it has a hidden treasure trove of fonts waiting to be unleashed. 

Transform your documents from humdrum to head-turning!

Here's how to do it.
  1. Go to Google Docs.
  2. Open a document or create a new one.
  3. Click the font name at the top.
  4. Click More fonts at the bottom of the list.
  5. Search for fonts or browse for new fonts.
  6. Select the fonts you want to use.
  7. Click OK.
  8. Your new fonts are available in the drop-down menu.

Google Docs - More Fonts
fig. 1 - Google Docs - More Fonts

You can also filter by type, such as display features or handwriting. 

Unique fonts let you match your document to your mood or message and lets your documents stand out from the crowd with bold headings or a playful font throughout.

The right font can make your proposals or reports look polished and impressive.

The right font conveys professionalism, sets the tone (formal or fun), and makes your work stand out

But avoid going overboard because simple and readable fonts are best.

Google Docs gives you the power to customize your documents with a dazzling array of fonts. 

Ready to transform your next document? 

Explore Google Docs' font library and get creative!


Please LIKE and SHARE OneCoolTip.com!
Visit the OneCoolTip YouTube Channelhttps://www.youtube.com/@onecooltip

Do you have a Cool Tip or question? Email us at
onecooltip.com@gmail.com


READ MORE


Rodger Mansfield, a seasoned tech expert, is the mastermind behind OneCoolTip.com, where he serves as both writer and editor. With a keen eye for simplifying complex tech, Rodger delivers practical advice that empowers readers to navigate the digital world with confidence. Dive into OneCoolTip.com for a treasure trove of savvy tips and tricks that keep you one step ahead in tech.


OneCoolTip.com
Cool Tech Tips for a Cooler Life!


#GoogleDocs @GoogleDocs #fonts #creativity #designtips #documentdesign #TechTips #OneCoolTIp @OneCoolTip 

Saturday, March 9, 2024

Unlock the Power of Voice: Mastering ChatGPT's Read Aloud Feature

Enhancing Your Digital Experience with AI-Powered Text-to-Speech

Discover how ChatGPT's Read Aloud feature can transform your text-to-voice experience. This guide provides easy steps to master this innovative tool, enhancing both accessibility and convenience.


By Rodger Mansfield, Editor
March 9, 2024


Have you ever wished for an easier way to consume lengthy articles or need a helping hand to make text-based content more accessible? 

What if you could turn any text into engaging, spoken audio with just a few clicks? 

Here's a Cool Tip.   Use the new Read Aloud feature of ChatGPT.

ChatGPT's Read Aloud feature is a game-changer in AI-driven voice technology.

Read Aloud in the context of ChatGPT refers to a feature that employs text-to-speech (TTS) technology to audibly read out the responses generated by ChatGPT. 

This functionality enhances the user experience by providing an auditory version of the text responses, which can be particularly beneficial for users with visual impairments, reading difficulties, or those who prefer listening over reading.

It's been available on mobile devices but is now available on the web.

And you don't have to be a paying ChatGPT Plus subscriber to use the feature!


ChatGPT Read Aloud Example
fig. 1 - ChatGPT Read Aloud Example

Here's how to do it.
  1. Open ChatGPT on your preferred platform (web, mobile app, etc.).
    1. For the web, go to: https://chat.openai.com/ .
    2. ChatGPT for iOS
    3. ChatGPT for Android
  2. Compose your query or message to ChatGPT
  3. Press Send Message.
  4. Click or tap the Read Aloud button to enable voice narration.

Enhances accessibility for visually impaired users, facilitates multitasking, and aids in language learning.

Imagine a visually impaired user engaging with ChatGPT to learn about a complex topic. 

The Read Aloud feature not only makes this possible but also enjoyable, demonstrating a blend of technology and accessibility.

ChatGPT's Read Aloud feature is not just a tool; it's a bridge to a more inclusive, accessible, and efficient digital experience. 

Tap into the convenience of ChatGPT's Read Aloud feature today. 

Transform your reading into listening with just a click – try it now and elevate your digital interactions!


Please LIKE and SHARE OneCoolTip.com!
Visit the OneCoolTip YouTube Channelhttps://www.youtube.com/@onecooltip

Do you have a Cool Tip or question? Email us at
onecooltip.com@gmail.com


READ MORE


Rodger Mansfield, a seasoned tech expert, is the mastermind behind OneCoolTip.com, where he serves as both writer and editor. With a keen eye for simplifying complex tech, Rodger delivers practical advice that empowers readers to navigate the digital world with confidence. Dive into OneCoolTip.com for a treasure trove of savvy tips and tricks that keep you one step ahead in tech.


OneCoolTip.com
Cool Tech Tips for a Cooler Life!


#ChatGPT #VoiceTech #AIRevolution #AccessibilityMatters #TechSavvy #LearningWithAI #TechTips #OneCoolTip @OneCoolTip 

Friday, March 8, 2024

Discover the Hypnotic World of FallingFalling.com: A Journey Through Color and Sound

Dive into the mesmerizing depths of FallingFalling.com, an artistic exploration that challenges your visual and auditory senses. Experience the simplicity and complexity of this digital masterpiece.

By Rodger Mansfield, Editor
March 8, 2024

Have you ever found yourself hypnotized by a simple concept turned into a digital art form? 
What if there was a website that could offer you an escape into a world of endless color and sound
Here's a Cool Tip.  Visit FallingFalling.com.
FallingFalling.com features a continuous loop of colored rectangles that cascade down the screen, accompanied by a calming soundtrack. 
The site showcases a simple yet captivating form of digital art. 
It’s designed to offer a hypnotic experience as you watch the endless flow of colors and listen to the ambient sounds
Here's how to do it.
  1. Open your preferred web browser.
  2. Navigate to fallingfalling.com
  3. Hit enter and prepare to be immersed.

FallingFalling.com

fig. 1 - FallingFalling.com

FallingFalling is a  unique digital experience that stimulates creativity and thought.
And it offers a break from the conventional web browsing.
Whether you’re looking for inspiration, a mental break, or just curious about digital art, this site is a must-visit. 
Remember, sometimes the simplest things can be the most profound.

Please LIKE and SHARE OneCoolTip.com!
Visit the OneCoolTip YouTube Channel: https://www.youtube.com/@onecooltip
Do you have a Cool Tip or question?  Email us at onecooltip.com@gmail.com.

READ MORE

Rodger Mansfield, a seasoned tech expert, is the mastermind behind OneCoolTip.com, where he serves as both writer and editor. With a keen eye for simplifying complex tech, Rodger delivers practical advice that empowers readers to navigate the digital world with confidence. Dive into OneCoolTip.com for a treasure trove of savvy tips and tricks that keep you one step ahead in tech.


OneCoolTip.com
Cool Tech Tips for a Cooler Life!

#DigitalArt #CreativeEscape #ColorAndSound #ArtisticWebsite #FallingFallingExperience #FridayFunday #TechTips #OneCoolTip @OneCoolTip 

Thursday, March 7, 2024

Upgrade Your Presentations With OneNote's Overlooked Laser Pointer

Streamline your presentations and captivate your audience with OneNote's hidden gem – the "Pen As Laser Pointer" feature.

By Rodger Mansfield, Editor
March 7, 2024


Have you ever fumbled with a laser pointer during a presentation, struggling to keep the beam steady?

Do you wish you could seamlessly highlight key points on your slides without breaking your flow? 

Here's a Cool Tip.  Use Microsoft OneNote's "Laser Pointer" feature.

Microsoft 365 OneNote, commonly known as OneNote, is a digital note-taking app that’s part of the Microsoft 365 suite. 

It provides a versatile platform for users to capture ideas, notes, research, and information in a digital format. 

OneNote’s flexibility makes it a valuable tool for individuals and teams in various environments, from personal use to professional and educational settings. 

It’s particularly useful for keeping all your notes synchronized across devices, making it easy to access and update your information wherever you are. 

Here is how to use it.
  • Launch Microsoft 365 OneNote and access the presentation you want to deliver.
  • In the OneNote ribbon, click the "Draw" tab to reveal your digital inking tools.
  • If Laser Pointer is visible, select it.
  • If Laser Pen is not visible, click "+Add Pen".
  • Select "Laser Pointer".
  • Select a Color, default is Red.
  • Use the Laser Pointer to draw on screen. The drawing disappears after a few seconds.  

Microsoft OneNote - Laser Pen
fig. 1 - Microsoft OneNote - Laser Pen

Using OneNote's Laser Pen guide your audience's attention effortlessly while maintaining a natural presentation style.

No more awkward interruptions while searching for or fiddling with a physical laser pointer.


Microsoft OneNote - Laser Pointer Example
fig. 2 - Microsoft OneNote - Laser Pointer Example

Teachers, business professionals and conference speakers will find this a useful feature:
  • Enhance classroom lectures by dynamically highlighting concepts on a presentation.
  • Emphasize key charts and figures during meetings or pitches.
  • Direct your audience's attention with precision during large-scale presentations.
Be sure to choose a high-contrast ink color for optimal visibility against your slides.

Transform your presentations with OneNote's "Laser Pointer" feature – highlight information, boost engagement, and deliver with confidence.

It offers a seamless, integrated way to highlight crucial information, boost your engagement, and elevate your delivery.

Enjoy!


Please LIKE and SHARE OneCoolTip.com!
Visit the OneCoolTip YouTube Channelhttps://www.youtube.com/@onecooltip

Do you have a Cool Tip or question? Email us at
onecooltip.com@gmail.com


READ MORE


Rodger Mansfield, a seasoned tech expert, is the mastermind behind OneCoolTip.com, where he serves as both writer and editor. With a keen eye for simplifying complex tech, Rodger delivers practical advice that empowers readers to navigate the digital world with confidence. Dive into OneCoolTip.com for a treasure trove of savvy tips and tricks that keep you one step ahead in tech.


OneCoolTip.com
Cool Tech Tips for a Cooler Life!


#Microsoft365 #OneNote #Presentations #ProductivityHacks #DigitalTools #TechTips #OneCoolTip @OneCoolTip 

Wednesday, March 6, 2024

Missing Your ‘Show Desktop’ Button? Here’s How to Get It Back in Windows 11!

Effortlessly reset your taskbar and bring back the ‘Show Desktop’ icon with our straightforward Cool Tip, tailored for both newcomers and seasoned Windows 11 users.


By Rodger Mansfield, Editor
March 6, 2024


Have you ever noticed how a small change can throw off your entire routine? 

Are you missing the ‘Show Desktop’ icon after the latest Windows 11 update?

Want to know how to get it back and why it matters?

Here is a Cool Tip.  Reset the Show Desktop option.

The 2024-02 Cumulative Update Preview for Windows 11 Version 23H2, identified as KB5034848, changed Taskbar and the System Tray functionality.

The update moves the Copilot icon to the far right side of the system tray, and turns off by default the ‘Show Desktop’ feature at the taskbar’s rightmost corner.

The “Show Desktop” option is a feature in Windows operating systems that allows users to quickly minimize all open windows and view the desktop with a single click or gesture. 

This feature is typically represented by a small button or area at the far right of the taskbar. 

When activated, it minimizes all open applications, providing immediate access to the desktop where files, folders, and shortcuts are located. 

It’s a convenient way to clear the screen without closing any programs, allowing for easy access to desktop items or simply a clean workspace.

Want to re-add the Show Desktop option?

Here is how to do it.
  • Open ‘Settings’ via the Start menu or by pressing Win + I.
  • Navigate to ‘Personalization’ and select ‘Taskbar’.
  • In the ‘Taskbar behaviors’ section, find and enable the option ‘Show desktop on the far right’.
Taskbar Setting to Show Desktop
fig. 1 - Taskbar Setting to Show Desktop

To show the desktop, just click in the taskbar space on the far right.
fig. 2 - Click in This Space to Show Desktop

Unfortunately, when the Show Desktop is turned on, the Copilot icon disappears.

To invoke Copilot, press WIN + C as a keyboard shortcut.

Copilot can also be disabled from the taskbar by right-clicking, selecting "Taskbar settings," and toggling off Copilot (preview).


Turn Off Copilot from Taskbar
fig. 3 - Turn Off Copilot from Taskbar

Quick desktop access improves multitasking and is a familiar tool for long-time Windows users.

With these simple steps, you can reclaim the ‘Show Desktop’ icon and maintain your productivity. Embrace the new while preserving the familiar with Windows 11’s latest update.

This update is slowly rolling out to all Windows 11 users so you'll see these changes in the coming weeks.

Enjoy!


Please LIKE and SHARE OneCoolTip.com!
Visit the OneCoolTip YouTube Channelhttps://www.youtube.com/@onecooltip

Do you have a Cool Tip or question? Email us at
onecooltip.com@gmail.com


READ MORE


Rodger Mansfield, a seasoned tech expert, is the mastermind behind OneCoolTip.com, where he serves as both writer and editor. With a keen eye for simplifying complex tech, Rodger delivers practical advice that empowers readers to navigate the digital world with confidence. Dive into OneCoolTip.com for a treasure trove of savvy tips and tricks that keep you one step ahead in tech.


OneCoolTip.com
Cool Tech Tips for a Cooler Life!

#Microsodt @Microsoft #Windows @Windows #Windows11Taskbar or #DesktopShortcut #Windows11Update #TaskbarTips #ShowDesktopReturn #UserFriendlyComputing #TechTips #OneCoolTip @OneCoolTip