Saturday, January 20, 2024

How to Add Pronouns to iPhone Contacts

iPhone Pronouns
Ever heard someone say, "My pronouns are..." after introducing themselves? 

It's a simple way to ensure people address you in a way that aligns with their gender identity. 

Here's a Cool Tip.  Apple's Contacts app now lets you add pronouns to your own contact card and those of your contacts. 

Introducing yourself and others just got easier thanks to the latest iOS update!

Here's how to do it.
  • Open the Contacts app.
  • Locate any contact (or create a new contact).
  • Tap "Edit".
  • In the edit menu, tap "Add Pronouns.

iPhone Contacts Add Prnouns
fig. 1 - Add Pronouns - iPhone Contact App

  • Choose your language.
  • Type in the preferred pronouns (e.g., he/his, she/her, they/them, ze/zir).

iPhone Contact Pronoun Entry
fig. 2 - Add Pronouns - iPhone Contact App


  • Tap "Add"
  • Tap "Done"
iPhone pronouns are more than just a cool tech feature; they're a step towards a more mindful and accepting society.

Join the pronoun revolution and let your iPhone be your voice for inclusivity!

That's it!

Have you tried it yet?

What do you think?

Let us know in the comments below.


Please LIKE and SHARE OneCoolTip.com!
Visit the OneCoolTip YouTube Channelhttps://www.youtube.com/@onecooltip

Do you have a Cool Tip or question? Email us at
onecooltip.com@gmail.com


READ MORE

OneCoolTip.com
Cool Tech Tips for a Cooler Life!

#Apple @Apple #iPhone #iPhonePronouns #InclusiveTech #GenderIdentity #RespectEveryone #ShareYourPronouns #iOS17 #TechTips #OneCoolTip @OneCoolTip 

Friday, January 19, 2024

Travel Through Time and Music with Radiooooo

Have you ever wished to travel back in time and experience the music of different eras? 

Or perhaps, explore the diverse musical landscapes of various countries? 

Here's a Cool Tip.  Listen with Radiooooo.com.   

Radiooooo.com is a unique platform that lets you listen to music by country and by decade.  

Here's how to do it.

Getting started with Radiooooo is as simple as visiting their website or downloading their app from the App Store or Google Play. Once you’re in, you’ll be greeted with an interactive map and a timeline. Here’s how you can navigate this musical time machine:

  • Go to https://radiooooo.com/
  • Click on "Continue in Basic Mode" or "Join Radiooooo".
  • Click on any country on the map.
  • Select any decade from the 1900s to today.
  • Press play.
  • Sit back and let yourself be carried away by the music.
  • Use the History, Play and Next buttons to control Radiooooo.
Radiooooo offers a unique way to discover music. 

You can explore by decade and region, not just by genre. 

This can lead to some exciting discoveries, like a 1970s rock band from Japan or a 1920s jazz artist from Brazil.

In a world where most music platforms focus on the latest hits, Radiooooo stands out as a treasure chest for those who wish to discover great music. 

So why not take a trip with Radiooooo today?

Have you tried it yet?

Let us know in the comments below.

Enjoy!

Please LIKE and SHARE OneCoolTip.com!
Visit the OneCoolTip YouTube Channelhttps://www.youtube.com/@onecooltip

Do you have a Cool Tip or question? Email us at
onecooltip.com@gmail.com


READ MORE

OneCoolTip.com
Cool Tech Tips for a Cooler Life!

#Radiooooo #MusicStreaming #TimeMachine #MusicDiscovery #TimeTravelMusic #DiscoverHiddenGems #FridayFunDay #TechTips #OneCoolTip @OneCoolTip 

Thursday, January 18, 2024

Ditch Dull Texts, Everywhere You Go: Mastering Gmail's Emoji Reply on Web & Mobile

Gmail logo
Ever feel your emails and texts lack emoji sparkle? 

Wish you could send a quick "thumbs up" or "heart eyes" without resorting to dry words? 

Well, Gmail's got your back (and fingers!), both on web and mobile apps! 

Here's a Cool Tip.  Use the Gmail Reply Emoji feature.

Here's how to do it.

On Mobile App:
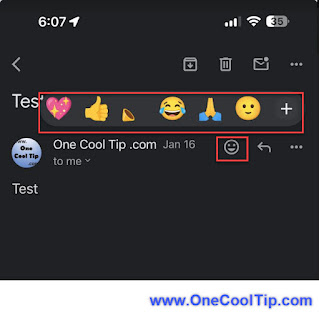
  • Open any email
  • Look for the dedicated emoji button depending on your device and select it.
  • Browse the emoji keyboard and choose your perfect symbol. 
  • Tap "Send," and your emoji flies away, bringing a smile to the recipient's face (hopefully!).
Mobile App Gmail Reply Emoji
fig. 1 - Mobile App Gmail Reply Emoji


On the Web:
  • Open any email
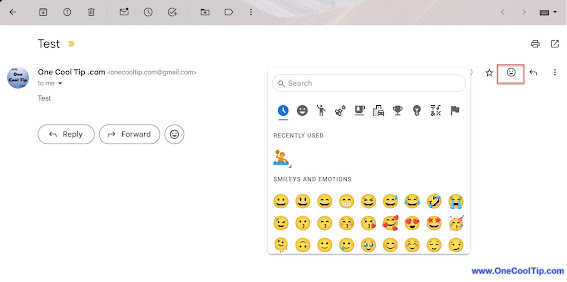
  • Look for the smiley icon next to the "Reply" button. 
  • Click it to unleash the emoji magic! ✨
  • Choose your perfect emoji from the vibrant palette. Classics like smiley faces and thumbs up, or fun options like animals, food, and activities - find the symbol that captures your sentiment.
  • Hit "Reply," and your chosen emoji shines below the email thread, visible to both you and the recipient. It's a quick, fun way to acknowledge, react, or simply add a touch of lightheartedness.

Web Gmail Reply Emoji
fig. 2 - Web Gmail Reply Emoji

Emojis bridge the gap between text and genuine emotion, fostering a more personal and engaging communication style, whether in emails or texts.

A single emoji can convey volumes, saving you time and effort over lengthy explanations.

Like any good thing, emoji overuse can lose its charm. Choose them strategically to avoid diluting their impact.

Be mindful of context. In formal situations, too many emojis might be deemed unprofessional.

So, ditch the dull and embrace the expressive! 

Gmail's Emoji Reply empowers you to communicate with clarity, personality, and a touch of fun, wherever you are.   

Enjoy!

Have you tried it yet?

Let us know in the comments below.


READ MORE

Please LIKE and SHARE OneCoolTip.com!
Visit the OneCoolTip YouTube Channelhttps://www.youtube.com/@onecooltip

Do you have a Cool Tip or question? Email us at
onecooltip.com@gmail.com


OneCoolTip.com
Cool Tech Tips for a Cooler Life!


#Google @Google #Gmail #GmailEmoji #TextingHacks #EmojiCommunication #ExpressYourself #TechTips #OneCoolTip @OneCoolTip 
Wednesday, January 17, 2024

Never Decipher Laundry Tags Again: iOS 17's Laundry Look Up is a Wash Day Game Changer!

iOS17
Have you ever wondered how to make your laundry chores easier? 

Confused by cryptic laundry symbols? 

Say goodbye to squinting at tags and guessing wash settings! 

Here's a Cool Tip.  Use Visual Lookup in iOS17 for Laundry,

iOS 17 empowers you with Visual Look Up for laundry care, a hidden gem that transforms your iPhone into a garment-guru. 

So, ditch the deciphering dramas and join me as we explore this life-saving feature for all laundry-wrangled souls!

Here's how to do it.
  • Update to iOS 17 if needed.
  • Snap a Close-Up on the laundry tag, ensuring all symbols are clear.

iOS17 Laundry Look Up Image
fig. 1 - iOS17 Laundry Lookup Image
  • Navigate to the captured image.
  • Swipe up on the photo or tap the "i" icon within a circle at the bottom.
  • Watch for the "Look Up Laundry Care" option and tap it.
iOS17 Look Up Laundry Care
fig. 2 - iOS17 Look Up Laundry Care

  • iPhone identifies individual symbols and displays their meanings right beside them.
iOS17 Look Up Laundry Care Results
fig. 3 - Look Up Laundry Care Results


iOS 17's Visual Look Up for laundry care is a simple yet transformative feature, empowering you to conquer wash day with confidence. 

Visual Look Up handles it all:
  • From delicate fabrics to bleach warnings.
  • No more shrinking sweaters or faded colors – follow the accurate guidance!
  • Wash with newfound assurance, knowing you're treating your clothes right.

No more deciphering dilemmas or garment-ruining guessing games! 

So, unleash your inner laundry master and embrace the freedom of knowing your clothes are always in good hands.

Have you tried it yet?

Let us now in the comments below.

Enjoy!


READ MORE

Please LIKE and SHARE OneCoolTip.com!
Visit the OneCoolTip YouTube Channelhttps://www.youtube.com/@onecooltip

Do you have a Cool Tip or question? Email us at
onecooltip.com@gmail.com


OneCoolTip.com
Cool Tech Tips for a Cooler Life!

#Apple @Apple #iOS17 #LaundryLife #TechHacks #LaundryTips #AppleLife #WashDayWin #NoMoreSymbols #VisualLookUp #Clotheswhisperer #TechTip #OneCoolTip @OneCoolTip 

Tuesday, January 16, 2024

Shake Away Desktop Chaos with Windows 11's Hidden Multitasking Hack

Windows 11 Logo
Ever found your desktop cluttered with numerous open windows? 

Ever wished for a magic wand to instantly minimize all but one? 

Here's a Cool Tip.  Use the Window Shake.

Windows 11 introduces a nifty feature called the “Title Bar Window Shake” that does exactly that.

The Title Bar Window Shake feature is a boon for multitaskers.

It allows you to quickly declutter your workspace and focus on one window without having to manually minimize each window. 

Just grab and hold a windows title bar to minimize all other windows.

But first, you need to enable the feature.

Here's how to do it.
  1. Press the Windows + I key on your keyboard to open the settings application.
  2. Under the system settings, scroll down and click on "System".
  3. Click on the “Multitasking” option.
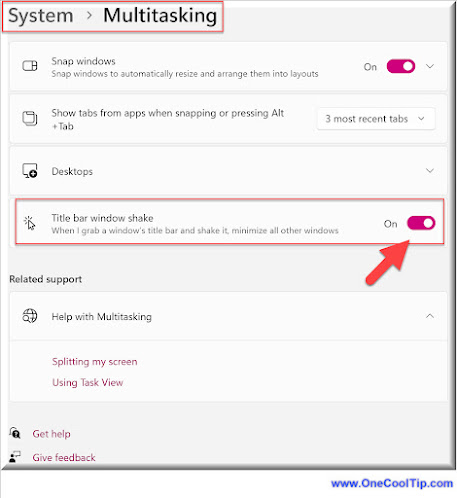
  4. Toggle On the “Title Bar Window Shake” option to enable this feature.

Windows 11 Title Bar Shake Setting
fig. 1 - Windows 11 Title Bar Shake Setting

Imagine you’re working on a report in Word, with multiple reference documents open. 

Your desktop is a sea of windows. 

With the Title Bar Window Shake feature, just grab the title bar of your Word document, give it a shake, and voila! 


Shake it Up!

fig. 2 - Shake it up!

All other windows are minimized, leaving you to focus on your report.

This feature is disabled by default in Windows 11, but can be easily enabled following the steps above.

The Title Bar Window Shake feature is a powerful tool in Windows 11 that enhances your multitasking efficiency. 

So why wait? 

Give your desktop a shake-up today!

Did you try it?

Let us know in the comments below.

Enjoy!


Please LIKE and SHARE OneCoolTip.com!
Visit the OneCoolTip YouTube Channelhttps://www.youtube.com/@onecooltip


READ MORE


OneCoolTip.com
Cool Tech Tips for a Cooler Life!

#Microsoft @Microsoft #Windows11 #TitleBarWindowShake #Aero  #productivityhacks #remoteworktips #windows11life #Windows11Features #Windows11Tutorial #TechTips @TechTips 

Monday, January 15, 2024

How to Delete a Page in Microsoft Word

Microsoft Word logo
Have you ever found yourself struggling to delete an unwanted page in Microsoft Word? 

Are you tired of wrestling with stubborn blank pages that just won’t go away? 

Here's a Cool Tip.  Use the Control + G keyboard shortcut.

This method can be particularly useful when dealing with stubborn blank pages or when you want to delete a page without manually selecting all the content.

However, it’s always good to remember to double-check before deleting to ensure you don’t accidentally remove important information.

Back to Work Monday

Here's how to do it.
  • Click anywhere on the page you want to delete.
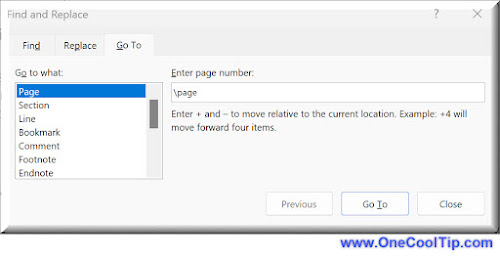
  • Press Ctrl + G on your keyboard to open the “Go To” tab.
    • On a Mac, use Option + Command + G.
  • In the “Enter page number” box, type “\page”.
  • Press the Go to button.
  • Press Close button.
  • Press the Delete key to remove the page.

Microsoft Word Page Delete

fig. 1 - Microsoft Word Page Delete

Knowing how to delete a page in Microsoft Word is a valuable skill that can save you time and frustration. 

Whether you’re using Word for Windows or Mac, the process is simple and easy to learn. 

So why wait? Start mastering Microsoft Word today!

Have you tried this yet?

Let us know in the comments below.

Enjoy!


Please LIKE and SHARE OneCoolTip.com!
Visit the OneCoolTip YouTube Channelhttps://www.youtube.com/@onecooltip


READ MORE

OneCoolTip.com
Cool Tech Tips for a Cooler Life!


#Microsoft @Microsoft #Word #MicrosoftWord #WordTips #WordTutorial #BacktoworkMonday #TechTips #OneCoolTip @OneCoolTip 
Sunday, January 14, 2024

Facebook's Link History: Convenience or Privacy Threat? Here's What You Need to Know

Facebook
Have you ever wondered how to make the most out of your Facebook experience? 

Have you heard about Facebook’s new Link History feature and wondered how it could enhance your social media journey?

Here's a Cool Tip.  Turn it off.

Facebook has recently introduced a new feature called Link History. 

This feature is designed to make navigating its mobile app even simpler by creating a repository of all the links you have clicked on while using the Facebook mobile app. 

But how does it work, and how can you use it to your advantage?

Here's how to do it.
  • Accessing Link History: 
    • Tap the profile icon at the bottom right of the Facebook app. 
    • Scroll down, 
    • Tap Settings & privacy. 
    • Tap Link History.
  • Turning Link History On/Off: 
    • Open any link inside the app to launch the Facebook mobile browser. 
    • Tap the three-dot menu in the bottom right 
    • Select "Go to Settings".
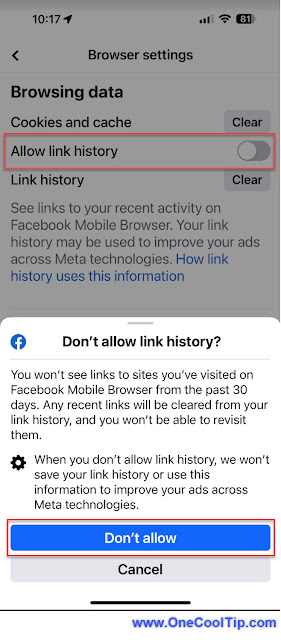
    • Toggle "Allow link history" to off.
    • In popup screen, select "Don't allow"

Turn Off Facebook Link History

fig. 1 - Turn Off Facebook Link History

The Link History feature is being touted as a useful tool for consumers, allowing users to find and revisit links that they’ve been to before. 

However, if users allow Link History, Facebook uses the information to improve the ads seen across the app. 

While this might enhance the ad experience, it also raises privacy concerns.

Facebook’s new Link History feature can be a powerful tool for enhancing your social media experience, allowing you to easily revisit previously clicked links. 

However, it’s essential to be aware of the privacy implications and make an informed decision about whether to use this feature. 

Remember, the choice is always in your hands!

Please LIKE and SHARE OneCoolTip.com!
Visit the OneCoolTip YouTube Channelhttps://www.youtube.com/@onecooltip


READ MORE

OneCoolTip.com
Cool Tech Tips for a Cooler Life!

#Meta #Facebook #LinkHistory #SocialMediaTips #OnlinePrivacy #PrivacyMatters, #DigitalDetox, #DataTransparency #TechTips #OneCoolTip @OneCoolTip 

Saturday, January 13, 2024

Is Perplexity the Google Killer? Demystifying the Jeff Bezos-Backed AI Assistant

Feeling lost in the information labyrinth of the internet? 

Drowning in a sea of irrelevant search results? 

You're not alone. 

Here's a Cool Tip.  Try using Perplexity, the revolutionary AI assistant backed by tech titan Jeff Bezos.

The new AI promises to reshape the way we interact with information. 

Here's how to do it.
  • Web: Navigate  to Perplexity's website, https://www.perplexity.ai/,  and create an account or explore as a guest.
  • Mobile App: Download the Perplexity app for iOS or Android and follow the on-screen prompts to set up your profile.
  • Enter your search query.
Forget clunky keyword searches. Perplexity thrives on open-ended questions. 

Ask anything from "Why is the moon red tonight?" to "Explain the intricacies of quantum mechanics."


Perplexity Example - Why is Moon Red?
fig. 1 - Perplexity Example - Why is Moon Red?


Unlike robotic search engines, Perplexity engages in a conversational exchange. 

Ask follow-up questions, refine your inquiry, and witness the AI dynamically adapt its response.

Perplexity delves deep into its vast knowledge base, powered by cutting-edge natural language processing, to deliver comprehensible human-written answers directly to your screen. 

No more sifting through endless blue links!

The basic service is free to use.

A Perplexity Pro plan for $20 month provides additional capabilities.

Enjoy!

Please LIKE and SHARE OneCoolTip.com!
Visit the OneCoolTip YouTube Channelhttps://www.youtube.com/@onecooltip


READ MORE

OneCoolTip.com
Cool Tech Tips for a Cooler Life!

#Perplexity #AI #PerplexityAI #JeffBezos #SearchRevolution #NoMoreBlueLinks #AIAssistant #FutureofKnowledge #AskAnything #TechTips #OneCoolTip @OneCoolTip


Friday, January 12, 2024

Unleash the Purr-fect Entertainment: A Guide to Cat TV

Diego
Are you a cat owner looking for ways to keep your feline friend entertained? 

Have you ever wondered if there’s a way to bring the outside world to your indoor cat? 

Here's a Cool Tip.  Play CatTV for your feline friends.

Cat TV provides visual stimulation, which can be especially beneficial for indoor cats.

The moving images can encourage your cat to interact, providing a form of exercise.

It can serve as a distraction, particularly useful if you need to keep your cat occupied.

Friday Funday

Here's how to do it.
  • Navigate to the YouTube website or app on your device.
  • Type “Cat TV” into the search bar and press Enter.
  • Browse through the results and select a channel or video that seems appealing. 
  • Play the video and observe your cat’s reaction. Some cats may be instantly captivated, while others might take a few tries with different videos.

Here is a popular Cat TV to watch.


Additional Tips:
  • Some cats might become overstimulated by the constant movement and sounds.  
  • Not all cats may be interested in watching TV.
  • Cat TV on YouTube can be a wonderful tool for providing enrichment and entertainment for your feline friends. 
  • While it may not appeal to every cat, it’s certainly worth trying out. 

Remember, the key is to observe your cat’s reaction and choose videos that they respond positively to.

Start your cat's YouTube adventure today!

Enjoy!

And let us know what your cat thinks of these videos in the comments below.


Please LIKE and SHARE OneCoolTip.com!
Visit the OneCoolTip YouTube Channelhttps://www.youtube.com/@onecooltip


READ MORE

OneCoolTip.com
Cool Tech Tips for a Cooler Life!


#CatTV #YouTubeForCats #CatEnrichment, #FelineFun #TechTips #OneCoolTip #YouTube 

Thursday, January 11, 2024

Stop the Hovering Hints: How to Turn Off Inline Text Predictions on iPhone

Have you ever tap out a text and feel like your iPhone is reading your mind a little too closely? 

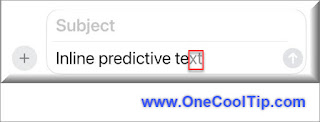
Those hovering word suggestions hovering above your keyboard - the ones you accidentally tap all the time - are called inline text predictions

While helpful in theory, they can sometimes be more distracting than insightful.

Tired of the unwanted auto-complete?


Inline Predictive Text Example

fig. 1 - Inline Predictive Text Example

Here's  Cool Tip.  Turn off Inline Text Prediction in iOS 17.

Here's how to do it.
  • Update your iPhone to the latest version of iOS (17.2).
  • Open the Settings app on your iPhone.
  • Scroll down and tap "General."
  • Tap "Keyboard." (You might need to tap "Keyboard Settings" on older iPhones.)
  • Under "Predictive Text," toggle off the "Show Predictions Inline" switch.

iPhone Inline Predict Text Setting

fig. 2 - iPhone Inline Predict Text Setting

That's it!

No more accidentally tapping the wrong suggestion or fighting against the auto-complete.

So, say goodbye to the unwelcome word whispers and hello to a clean, distraction-free typing experience. 

By taking a few simple steps, you can reclaim your keyboard and unleash your inner wordsmith (without any unwanted autocomplete interference).

Enjoy!

Please LIKE and SHARE OneCoolTip.com!
Visit the OneCoolTip YouTube Channelhttps://www.youtube.com/@onecooltip

READ MORE


OneCoolTip.com
Cool Tech Tips for a Cooler Life!


#Apple @Apple #iPhone #iphonetips #iOS17 #keyboardhacks #predictivetext #autocompleteoff #typefreely #TechTips #OneCoolTip @OneCoolTip