Have you ever wondered if there’s a way to do it digitally?
Here's a Cool Tip. Add your signature to any Word document.
There are several techniques to do this.
Here's how to do it.
Drawing Your Name
- Open your Word document.
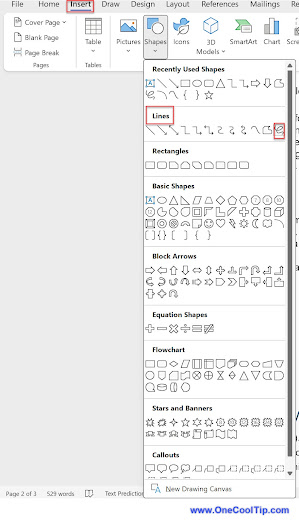
- Click on the “Insert” tab in the toolbar.
- Select “Shapes”, then choose the “Scribble” tool under “Lines”.
- Use your mouse or touchpad to draw your signature.
- Adjust the size and position of the signature as needed.
 |
fig. 1 - Microsoft Word - Insert Scribble |
Adding a digital signature to your Word documents has several benefits.
It’s quick, easy, and saves you the hassle of printing, signing, and scanning the document.
However, it might not be as legally binding as a handwritten signature in some jurisdictions.
Always check the legal requirements in your area.
 |
fig. 2 - Microsoft Word - Add Signature Example |
Of course, your signature can look better if you use a touch screen or stylus to write your name.
Another technique is to add a digital image of your signature to your document.
Adding a Signature Image
- Write your signature using a black pen on a white piece of paper.
- Scan or take a photo of the image.
- Crop as needed.
- Save your signature image as a .JPG or .PNG file.
- Copy and paste the image into Word or use the Insert, Picture, This Device command from Word to add your image to your document.
 |
fig. 3 - John Hancock Signature |
This "scribble" approach and digital image are quick and easy solutions to adding your signature to documents and email.
But what if you need someone else to sign your document?
We'll cover how to insert a signature line or add a digital service to your document in a future Cool Tip.
That's it.
Enjoy!
Please LIKE and SHARE OneCoolTip.com!
Visit the OneCoolTip YouTube Channel: https://www.youtube.com/@onecooltip
READ MORE
OneCoolTip.com
#Microsoft @Microsoft #Word #MicrosoftWord #DigitalSignature #TechTips #ProductivityHacks #BackToWorkMonday #OneCoolTip @OneCoolTip


No comments:
Post a Comment