Thursday, September 7, 2023

How to Unlock the Power of the Windows Character Map

Have you ever needed to type a special character, such as the British pound sign (£), but didn’t know how to do it on your keyboard? 

What about other special characters?

How to do you insert characters that don't appear on the regular keyboard?

Here's a Cool Tip:  Windows Character Map.

Here's how to do it.
  • Click on the Start menu and type Character Map in the search bar. 
  • Click on the Character Map app to open it.
  • Once the Character Map is open, you can browse through the available characters by scrolling through the list.
  • To copy a character, simply click on it to select it, then click the Select button. This will add the character to the Characters to copy field at the bottom of the window. 
  • Once you have selected all the characters you want to copy, click the Copy button to copy them to your clipboard.
  • Now you can switch to your document in Microsoft Word (or any other program) and paste the copied characters by pressing Ctrl + V or right-clicking and selecting Paste.
Windows Character Map
fig. 1 - Windows Character Map


Windows Character Map is a powerful tool that can help you find and insert special characters into your documents. 

By following these simple steps, you can unlock its full potential and make your writing more expressive and engaging.

Enjoy!


Please LIKE and SHARE OneCoolTip.com!


READ MORE

OneCoolTip.com
Cool Tech Tips for a Cooler Life!

#Microsoft #Windows #WindowsCharacterMap #SpecialCharacters #MicrosoftWord #WindowsTips #TechTips #OneCoolTip @OneCoolTip @Microsoft @Windows 

Wednesday, September 6, 2023

How to Insert a Picture in a Cell in Microsoft Excel

Microsoft Excel
Have you ever wanted to insert a picture into a cell in Microsoft Excel, but didn’t know how? 

Do you want to make your spreadsheets more visually appealing and engaging? 

Is this even possible?

Here's a Cool Tip:  Use the New Insert Picture Inside Cell feature.

That's right.

You can now insert pictures inside an Excel cell and not just on top of it.

Previously, you could only insert a picture on top of cells.

This new feature is now available in the latest version of Microsoft Excel in Microsoft365.

Here's how to do it:
  • Open the worksheet where you want to insert the picture.
  • Select the cell where you want to insert the picture.
  • Click on the Insert tab in the ribbon at the top of the screen.
  • Click on the Pictures button in the Illustrations group.
  • Select Place in Cell.
  • Select where to Insert Picture From

Insert Picture in Cell in Microsoft Excel

fig. 1 - Insert Picture In Cell in Microsoft Excel
  • Navigate to the location of the picture and select it.
  • Click on the Insert button to insert the picture into the selected cell.

Picture Inside Cell in Excel

fig. 2 - Picture Inside Cell in Microsoft Excel

That's it!

Enjoy!


Please LIKE and SHARE OneCoolTip.com!


READ MORE

OneCoolTip.com
Cool Tech Tips for a Cooler Life!


Microsoft #Excel #MicrosoftExcel #ExcelTips #Spreadsheet #DataVisualization #TechTips #OneCoolTip @OneCoolTip @Microsoft #YouTube

Tuesday, September 5, 2023

How to Quickly Create Different Types of Lines in Microsoft Word

Microsoft Word
Have you ever wanted to quickly add a line to your document or email, but didn’t want to go through the hassle of finding the right tool or button? 

Did you know that you can easily create different types of lines using the autocomplete feature in both Microsoft Word and Outlook? 

Here's a Cool Tip:  Use the AutoFormat Feature in Microsoft Word and Outlook.

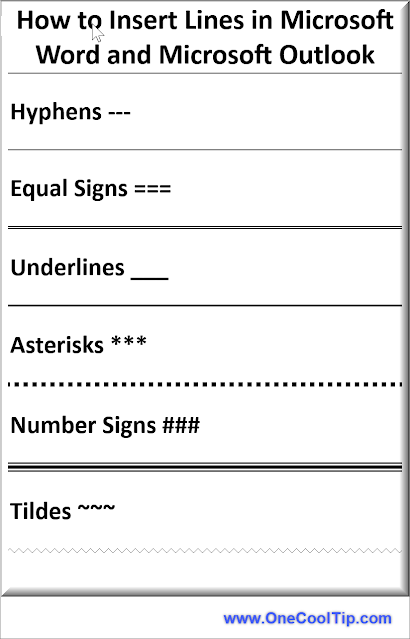
To create different types of lines using autocomplete, all you need to do is type at least three characters at the left margin of a new line and then press Enter. 

The result will be a line based on the characters you typed. Here are the characters you can use and the lines they create:
  • Three hyphens (—) create a plain single line
  • Three equal signs (===) create a plain double line
  • Three underline symbols (___) create a bold single line
  • Three asterisks (***) create a broken or dotted line
  • Three number signs (###) create a triple line with a thick center
  • Three tildes (~~~) create a wavy line

Insert Line in Microsoft Word and Outlook


This is a quicker step versus using Insert --> Shapes --> Lines command from the Home menu.

Enjoy!


Please LIKE and SHARE OneCoolTip.com!


READ MORE


OneCoolTip.com
Cool Tech Tips for a Cooler Life!


#Microsoft #Word #MicrosoftWord #Outlook #Autocomplete #ProductivityTips #TechTips #OneCoolTip @OneCoolTip @Microsoft 

Monday, September 4, 2023

Try This Easter Egg in Windows 11 Notepad

Did you know that there's a hidden Easter egg in Windows 11 Notepad? 

Here's a Cool Tip:  Spin the gear icon in the top-right corner of the window. 

It's a fun little distraction.

The gear icon opens the Notepad settings, where you can change things like the font, the text size, and the line spacing.

Here's how to do it:
  • Open Notepad.
  • Click on the gear icon in the top-right corner of the window.
  • Hold down the mouse button and drag the gear icon around.

Gear Spin Notepad
fig. 1 - Spin The Gear - Windows 11 Notepad


You can also spin the gear icon by right-clicking on it.

If you want to spin the gear icon really fast, you can use the scroll wheel on your mouse.

Enjoy

Please LIKE and SHARE OneCoolTip.com!


READ MORE

OneCoolTip.com
Cool Tech Tips for a Cooler Life!

#Microsoft #Windows #windows11 #notepad #easteregg #fun #TechTips #OneCoolTip @OneCoolTip @Microsoft 

Sunday, September 3, 2023

Microsoft to Remove WordPad from Windows: What You Need to Know

Are you a fan of the classic WordPad app that has been a part of Windows for nearly 30 years?

If so, you may be disappointed to hear that Microsoft is planning to remove WordPad from future Windows releases.

Microsoft is no longer updating WordPad and plans to remove the word processor from a future release of Windows. 

The software giant will recommend Microsoft Word, its paid word processor that has always been far more feature-rich than the basic WordPad app.

So, what can you do if you’re a fan of WordPad? 

There are plenty of alternatives available for you to choose from. 

Some popular alternatives include LibreOffice Writer, Google Docs, and even the lowly text-only NotePad app. 

When choosing an alternative to WordPad, it’s important to consider your specific needs. 

Do you need a word processor with advanced formatting options? 

Or do you prefer a simple app for taking notes? 

Make sure to research the features of each app before making a decision.


Microsoft NotePad
fig. 1 - Microsoft NotePad


While it may be sad to see WordPad go, there are plenty of alternatives available for users. 

Make sure to choose an app that meets your needs and don’t be afraid to try out a few different options before settling on one.

Enjoy!

Please LIKE and SHARE OneCoolTip.com!


READ MORE


OneCoolTip.com
Cool Tech Tips for a Cooler Life!


#Microsoft #Word #WordPad #Windows #Technology #WordProcessor #GoogleDocs LibreOfficeWriter #TechTips #OneCoolTip @Microsoft @OneCoolTip

Saturday, September 2, 2023

How to Use the New Copy Video Frame Feature

Google Chrome
Have you ever wanted to capture a specific frame from a video? 

Maybe you're taking notes on a lecture video, or you want to share a funny moment with your friends. 

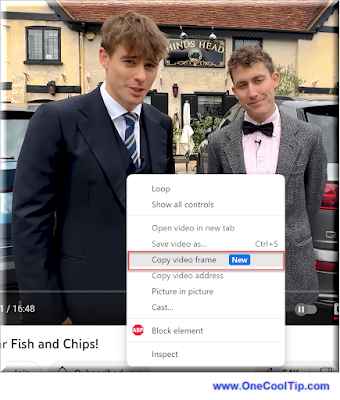
Here's a Cool Tip:  Use the new Copy Video Frame feature.

This new feature works in Chromium browsers such as Google Chrome and Microsoft Edge.

Copy Video Frame

fig. 1 - Copy Video Frame

Here's how to use the new Copy Video Frame feature:
  • Open the video you want to capture a frame from in Google Chrome or Microsoft Edge..
  • Pause the video at the frame you want to capture.
  • Right-click on the video and select Copy Video Frame.
    • If you are capturing from YouTube, you need to right-click twice to see the option.
That's it! 

The frame will be copied to your clipboard. 

You can then paste it into any document or image editor.

Here are some additional tips for using the Copy Video Frame feature:
  • The feature works on YouTube and other websites that use the YouTube player.
  • The frame will be copied in the same resolution as the video.
  • You can also use the Copy Video Frame feature to capture frames from videos that are embedded in other websites.

The new Copy Video Frame feature is a handy tool for anyone who wants to capture specific frames from videos. 


Enjoy!

Please LIKE and SHARE OneCoolTip.com!

ps.  If you are looking for a fun YouTube channel, check out Jolly.

READ MORE

OneCoolTip.com
Cool Tech Tips for a Cooler Life!


#Google #Chrome #Microsoft #Edge #YouTube #googlechrome #copyvideoframe #videoscreenshot #howto #TechTips #OneCoolTip @Google @Chrome @ Microsoft @OneCoolTip  

Friday, September 1, 2023

Ride the Digital Wave: How to Play the Surf Game in Microsoft Edge

Microsoft Edge
Ever felt like catching a wave while browsing the web? 

Did you know that Microsoft Edge has a hidden gem that lets you do just that? 

Here's a Cool Friday Funday Cool Tip: Play The Surf game in Microsoft Edge

Here's how you can start surfing on Microsoft Edge:
  • Open your Microsoft Edge browser.
  • Type  edge://surf in the address bar and press Enter.
  • The game interface will open.

Microsoft Edge Surf Game

fig. 1 - Microsoft Edge Surf Game


The Surf game offers three different modes for a variety of ways to pass the time.  

Switch between these modes via the game settings menu in the top right corner:
  • Endless mode: See how far you can go while avoiding obstacles and the Kraken.
  • Time Trial mode: Challenge yourself to reach the end of the course as fast as you can.
  • Zig Zag mode: Surf through as many gates as you can in a row.

If you prefer a more relaxed pace or need extra time to pull off those surfing moves, enable reduced speed mode to slow down the game speed.

The Surf game supports keyboard, mouse, touch, and controllers, so you can play the game your way. 

As an added bonus, you can play the Surf game in other browsers:  Edge Surf Game.

Enjoy!


Please LIKE and SHARE OneCoolTip.com!


READ MORE

OneCoolTip.com
Cool Tech Tips for a Cooler Life!

#Microsoft #Edge #MicrosoftEdge #EdgeSurfGame #DigitalSurfing #TechTips #OneCoolTip @Microoft @OneCoolTip

Thursday, August 31, 2023

Unlock the Power of PowerPoint: How to Merge Shapes

Microsoft PowerPoint
Have you ever wanted to create a unique shape in PowerPoint, but couldn’t find the right one in the built-in library? 

Did you know that you can merge existing shapes to create new, custom shapes?

Here's a Cool Tip:  PowerPoint Merge Shapes feature.  

To merge shapes in PowerPoint, follow these steps:

  • Insert the shapes you want to merge by going to the Insert tab
  • Select Shapes found in the Illustrations group.
  • Draw your shapes by clicking and dragging your cursor.
  • Make sure the shapes are overlapping.
  • Select both of the shapes that you want to merge by holding the Ctrl key while clicking each shape in turn.
  • A new tab will appear on the top ribbon menu—the Shape Format tab. 
  • Select that tab.
  • In the Insert Shapes group, click the Merge Shapes button.
  • From the drop-down menu that appears, select your desired merge type.

    PowerPoint Merge Shapes Union
    fig. 1 - PowerPoint Merge Shapes - Union

    • Your selected objects will merge based on the choice you selected.

    PowerPoint Merge Shape Created
    fig. 2 - PowerPoint Merge Shape Created

    That’s it! 

    You can experiment with different merge types and shapes to create a wide variety of custom objects.

    If you’re using an older version of PowerPoint, such as PowerPoint 2007, you may need to enable the Merge Shapes command within the Office Ribbon or Quick Access Toolbar. 

    You can also use Edit Points to modify a shape.

    Enjoy!

    Please LIKE and SHARE OneCoolTip.com!

    READ MORE


    OneCoolTip.com
    Cool Tech Tips for a Cooler Life!

    #Microsoft #PowerPoint @Microsoft  #MergeShapes #CustomShapes #TechTips #OneCoolTip @OneCoolTip 

    Wednesday, August 30, 2023

    How to Capture a Full Page in Microsoft Edge

    Microsoft Edge
    Have you ever wanted to capture a screenshot of an entire webpage, but didn't know how? 

    Do you find yourself scrolling and taking multiple screenshots to capture the entire page? 

    Here's a Cool Tip:  Microsoft Edge Full Page Capture

    Microsoft Edge has a built-in feature that allows you to easily capture full-page screenshots in JPEG format.

    Here's how to do it:
    • Open the Microsoft Edge browser on your Windows 10/11 or Mac computer
    • Go to the web page that you want to capture.
    • Scroll all the way to the bottom of the page to make sure that the Web Capture feature loads all images in the article. 
    • Press and hold the three dots icon in the top-right corner.
    • Click the Web Capture button from the toolbar. 
    Microsoft Edge Web Capture

    fig. 1 - Microsoft Edge Web Capture

    • Select the Full Page option.
    • You'll see the Web Capture menu. 
    • Once you're done, click the save button (which looks like a floppy disk) from the toolbar. 
    • Microsoft Edge will instantly download the full-page JPEG image to the default download folder on your computer.

    That's it! 

    You now have a full-page screenshot of your desired webpage.


    Please LIKE and SHARE OneCoolTip.com!

    READ MORE

    OneCoolTip.com
    Cool Tech Tips for a Cooler Life!

    #Microsoft @Microsoft #Edge #MicrosoftEdge #WebCapture #FullPageScreenshot #TechTips #OneCoolTip @OneCoolTip


    Tuesday, August 29, 2023

    How to Use Windows Clipboard History

    Windows 11
    Have you ever copied something important, only to accidentally overwrite it with something else before pasting?

     Have you ever wished you could access your clipboard history and retrieve something you copied earlier? 

    Here's a Cool Tip:  Use the Windows Clipboard History

    With Windows 10 and Windows 11 you can use Windows Clipboard History and the keyboard shortcut Windows key + V on both operating systems to make your life easier.

    Here's how to do it:

    Windows 10 - Enable Clipboard History
    • Open the Settings app by clicking on the Start menu and selecting the gear icon.
    • Click on System, then select Clipboard from the left-hand menu.
    • Under Clipboard history, toggle the switch to On.
    Windows 11 - Enable Clipboard History
    • Open the Settings app by clicking on the Start menu and selecting the gear icon.
    • Click on System, then select Clipboard.
    • Under Clipboard history, toggle the switch to On.

    Windows System Clipboard Option Screen
    fig. 1 - Windows System Clipboard Option Screen

    If you want to sync your copies across devices, set that On as well.

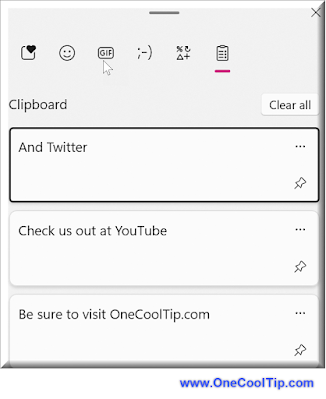
    Now that Clipboard History is enabled, you can access it by pressing the Windows key + V on your keyboard. 

    Windows Clipboard History
    fig. 2 - Windows Clipboard History


    This will bring up a small window showing your clipboard history, with the most recent item at the top. 

    You can scroll through the list and click on an item to paste it into your current application.


    Enjoy!

    Please LIKE and SHARE OneCoolTip.com!


    READ MORE

    OneCoolTip.com
    Cool Tech Tips for a Cooler Life!

    #Microsoft  #Windows10 #Windows11 #ClipboardHistory #KeyboardShortcut #WindowsKeyV #TechTips #OneCoolTip @Microsoft @OneCoolTip