Tuesday, August 15, 2023

How to Use Google Chrome to Search Multiple Search Engines

Google Chrome
Do you ever find yourself switching between different search engines to find the information you need? 

If so, you're not alone. 

Many people use multiple search engines for different purposes. 

For example, you might use Google or Yahoo for general searches, and DuckDuckGo for privacy-focused searches.

Here's a Cool Tip: Use the Google Chrome Omnibox to search multiple search engines.

The Omnibox, the address bar, is more than just a search bar. 

It's a powerful tool that can help you save time and be more productive.

Here's how to do it.

  • Use the Omnibox to search multiple search engines
    • Type the URL for the search engine in the address bar.
      • For example, duckduckgo.com  (or other search engine).
    • Press the Tab key.
    • Enter your search query.
    • Press Enter.
    • Google will display search results from that search engine.

Search Search Engines in Google Chrome
fig. 1 - Search Search Engines in Google Chrome


The Google Chrome Omnibox is a powerful tool that can help you save time and be more productive. 

Enjoy!


Please Like and Share OneCoolTip.com!


READ MORE


OneCoolTip.com
Cool Tech Tips for a Cooler Life!


#Google #Chrome #googlechrome #omnibox #search #searchengines #techtips #OneCoolTip @Google

Monday, August 14, 2023

Say Goodbye to Duplicates: How to Remove Duplicate Data in Excel

Microsoft Excel
Are you tired of dealing with duplicate data in your Excel spreadsheets? 

Do you want to learn how to quickly and easily remove duplicates from your data? 

Here's a Cool Tip:  Remove Duplicates in Excel

Here's how to do it.
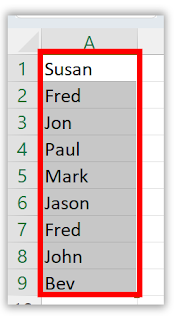
  • Select the range of cells that contains the duplicate values you want to remove 

Select Columns of Data
fig. 1 - Select Columns of Data

  • Click the Data tab in the Excel ribbon
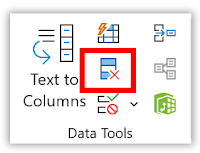
  • Click the Remove Duplicates button in the Data Tools group 
Excel Remove Duplicates
fig. 2 - Remove Duplicates

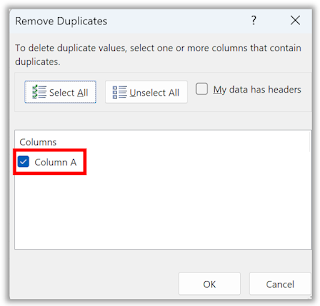
  • In the Remove Duplicates dialog box, check or uncheck the columns where you want to remove the duplicates 
Excel Select Columns to Remove Duplicates
fig. 3 - Select Columns to Remove Duplicates

  • Click OK.
Excel Remove Duplicates Alert
fig. 4 - Excel Remove Duplicates Alert

With these simple steps, you can quickly and easily remove duplicate data from your Excel spreadsheets. 

You can also turn on the Filter feature to help you find and remove duplicates more easily.


Enjoy!

Please Like and Share OneCoolTip.com!

READ MORE

OneCoolTip.com
Cool Tech Tips for a Cooler Life!


#Microsot #Excel #ExcelTips #DataCleaning #NoMoreDuplicates #TechTips #OneCoolTip @OneCoolTip @Excel @Microsoft

Sunday, August 13, 2023

How to Clean Up Your Gmail Storage

Gmail logo
Do you ever feel like your Gmail inbox is overflowing with messages? 

And do you ever wonder if some of those messages are taking up valuable storage space? 

Have you received an alarming email from Google that you are running out of storage space?

Gmail Almost Out of Storage
fig. 1 - Gmail Almost Out of Storage Warning


Many people have Gmail accounts that are full of old emails, many of which have large file attachments.

Here's a Cool Tip:  Delete Emails with large attachments.

These large file attachments can eat up a lot of storage space, which can eventually lead to your Gmail account reaching its limit. 

When this happens, you won't be able to receive new emails until you free up some space.

Or pay Google for more storage space.

Here are the steps on how to clean up your Gmail storage by searching for large file attachments:
  • Log in to your Gmail account.
  • In the search bar, type the following: has:attachment larger:10MB.
  • This will search your inbox for all emails with attachments that are larger than 10MB.
  • Review the results
  • Download to your computer and/or delete any emails that you no longer need.
  • Items in the Gmail trash will be deleted after 39 days but you can empty if you want to clear up space immediately.
  • Repeat until you've freed up enough storage space.

Do this clean up on a regular basis to keep you Gmail account lean and clean!

This will help to prevent your Gmail account from reaching its limit and make it easier for you to find the emails that you need.

Enjoy!

Please LIKE and SHARE OneCoolTip.com!

READ MORE

OneCoolTip.com
Cool Tech Tips for a Cooler Life!

#google @Google #gmail #email #storage #productivity #tech #techtips #OneCoolTip @OneCoolTip

Saturday, August 12, 2023

How to Hide, View, and Unhide Folders in Windows 11

Windows 11
Do you have sensitive information on your computer that you want to keep private? 

Do you share a computer with others and want to keep some files or folders hidden from view? 

Here's a Cool Tip:  Hide Folders in Windows 11


How to Hide Folders in Windows 11

Hiding a folder in Windows 11 is a simple process. Here are the steps to follow:
  • Find the folder that you wish to hide and right-click it.
  • Click on Properties or press Alt + Enter.
  • At the bottom of the properties box, check the Hidden box and click OK.
  • You’ll be prompted to decide on how you’d like the changes to apply. Click Apply changes to the folder only or Apply changes to this folder, subfolders, and files based on preference.
  • Click OK to save your changes.
  • Your folder will now be hidden from view.
Windows 11 Folder Properties
fig. 1 - Windows 11 Folder Properties


How to View Hidden Folders in Windows 11

To view hidden folders in Windows 11, follow these steps:
  • Press WIN + E to launch the File Explorer.
  • Click on View and then select Show in the drop-down menu.
  • At the bottom of the menu, click on Hidden.
  • Your hidden folders will now be visible and accessible in their original location.
  • Uncheck Hidden before closing File Explorer.
Windows 11 File Explorer View Hidden Items
fig. 2 - Windows 11 File Explorer View Hidden Items


How to Unhide Folders in Windows 11

To unhide a folder in Windows 11, follow these steps:
  • Set File Explorer to show hidden files and folders again by going to View > Show > Hidden items from the toolbar.
  • Right-click the hidden file or folder (it will be grayed out) and select Properties.
  • When the item’s properties window comes up, select the General tab, uncheck the Hidden tab, and click OK.
  • Your folder will now be unhidden and visible again.

Hiding, viewing, and unhiding folders in Windows 11 is a simple process that can help you keep your sensitive information private and secure. 

It’s important to note that while hiding folders can help keep your sensitive information private, it is not a foolproof method of protection. Hidden folders can still be accessed by someone who knows how to view hidden files and folders. 

Enjoy!

Please LIKE and SHARE OneCoolTip.com!


READ MORE

OneCoolTip.com
Cool Tech Tips for a Cooler Life!


#Microsoft #Windows #Windows11 #TechTips #ComputerSecurity #Privacy #OneCoolTip @Microsoft

Friday, August 11, 2023

The Useless Web: A Fun Way to Waste Time

Have you ever found yourself with nothing to do and nowhere to go? 

Do you sometimes feel like you need a break from the daily grind? 

If so, then checkout this FridayFunday Cool Tip: TheUselessWeb

This website is a collection of some of the most pointless, yet entertaining websites on the internet.

To get started, simply visit theuselessweb.com and click on the Please button. 

theuselessweb
fig. 1 - theuselessweb


This will take you to a random website that is guaranteed to be completely useless. 

Some of these websites include a virtual cow that you can tip over, a page that plays Shia LaBeouf yelling “Just do it!” on loop, and a site that lets you virtually pop bubble wrap.

Enjoy!

Please LIKE and SHARE OneCoolTip.com!


READ MORE


OneCoolTip.com
Cool Tech Tips for a Cooler Life!

#theuselessweb #timewaster #funnywebsites #pointlessfun #techtips #FridayFunday #OneCoolTip #cool #coolwebsite

Thursday, August 10, 2023

Bing Chat AI now available on Chrome

Bing Chat
Have you ever wanted to use Bing Chat AI but didn’t want to switch to using Microsoft's Edge browser?

Or on a mobile device, you would have to use the Bing app? 

Here's a Cool Tip:  Bing Chat is now available using Chrome.

Bing Chat is a conversational AI chatbot feature for Bing's search engine. 

It launched in February 2023 and allows users to interact with an AI chatbot instead of typing search queries. 

Microsoft has recently announced that its AI-powered Bing Chat is now available on other browsers such as Chrome.

This means that you can now use Bing Chat AI on your preferred browser, without having to switch to Microsoft Edge or download a separate app.

Bing Chat has been available in separate Android and iOS mobile apps since late February,

 
Bing Chat Ai Chrome

fig. 1 - Bing Chat AI Chrome


Here's how to use Bing Chat in Chrome: 

  • Open Chrome
  • Go to bing.com
  • Click the Chat icon near the top-left of the web page
  • Type out your question or prompt and send it
  • Wait for a response, then respond in turn if desired 

This new feature is rolling out to users and platforms over the coming weeks.

While you can use Bing Chat AI on your preferred platform, the best service will be provided on Microsoft Edge. 

For instance, Chrome’s Bing supports five messages per conversation versus the 30 in Microsoft Edge. 

And Bing in Chrome has a character limit of 2,000, while Edge supports 4,0002.

That's it.

Enjoy!
 
Please LIKE and SHARE OneCoolTip.com!

READ MORE

OneCoolTip.com
Cool Tech Tips for a Cooler Life!

#Microsoft #Bing #Chat #AI #BingChatAI #Edge #Chrome #Safari #iPhone #MobileBrowsers #Google  #techtips #OneCoolTip @Google @Microsoft 

Wednesday, August 9, 2023

How to Change the Background Theme in Gmail

Gmail Logo
Do you find your Gmail inbox to be a bit too plain?
If so, you're not alone.

Many people find that a change of scenery can help them stay focused and productive.

Here's a Cool Tip: Change the background theme in Gmail.

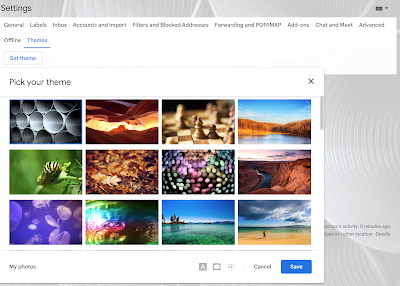
For the PC web version of Gmail and the mobile apps, you can choose from a variety of pre-made themes, or you can upload your own photo.

Set Gmail Background Theme
fig. 1 - Set Gmail Background Theme

Here's how to change the background theme in Gmail on a computer:

  • On your computer, open Gmail.
  • At the top right, click Settings.
  • Next to "Theme," click View all.
  • In the theme window, select a theme.
    • For the default theme, select Default.
    • For Dark theme, select Dark.
    • For a pre-uploaded theme, select any theme.
  • When available, at the bottom of the theme window, you also can change the theme.
    • To change the text background, click Text Background.
    • To make the corners darker, click Vignette.
    • To blur background theme, click Blur.
  • Click Save.

I'll cover how to make the change on mobile in a later post.

That's it!

Enjoy.

Please LIKE and SHARE OneCoolTip.com!

READ MORE

OneCoolTip.com
Cool Tech Tips for a Cooler Life!

#gmail #google #backgroundtheme #productivity #personalization #technology #techtips #OneCoolTip @Google 

Tuesday, August 8, 2023

How to Grammar Check Your Google Search Queries

Google
Do you ever worry about making grammar mistakes in your online writing? 

If so, you're not alone. 

Millions of people make grammar mistakes every day, and it can be embarrassing to have your mistakes pointed out by others.

But what happens if you make a grammar mistake when searching Google?

Here's a Cool Tip:  Use the new Google Search Grammar Check.

Google Search has recently added a new feature that allows you to grammar check your search queries.

Here's how to do it.  

Just type your search query into Google and then add "Grammar Check" (without the quotes) at the end.

Let's say you want to search for "the affect of the law."


Google Search Grammar Check
fig. 1 - Google Search Grammar Check


Google will correctly respond to ask if you mean "The effect of the law".

That's because "affect" is a verb and "effect" is a noun.

Click the blue suggestion and Google will perform the search again with the correct grammar.

Enjoy!

Please LIKE and SHARE OneCoolTip.com!


READ MORE


OneCoolTip.com
Cool Tech Tips for a Cooler Life!


#Google #Search #Grammar #googlesearch #grammarcheck #writing #english #education #technology #productivity #TechTips #OneCoolTip @Google 

Monday, August 7, 2023

How to Customize Your Microsoft Word Status Bar for Increased Productivity

Microsoft Word
Are you tired of constantly scrolling through menus to find the information you need while working on a document in Microsoft Word? 

Did you know that you can customize Microsoft Word to display the information you need at a glance? 

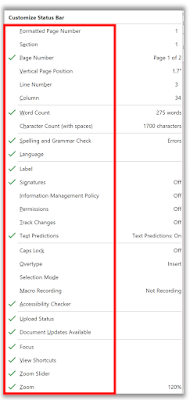
Here's a Cool Tip: Customize the Status Bar in Microsoft Word to increase your productivity and make your work easier.

The Status Bar is located at the bottom of the document window and displays information about your document, such as what page you are currently viewing, how many words are in your document, and whether any proofing errors were found. 
Customize Status Bar - Microsoft Word
fig. 1 - Customize Status Bar - Microsoft Word

You can easily customize the Status Bar by adding or removing information from it.

Here’s how to customize the Status Bar in Microsoft Word:
  • Right-click anywhere on the Status Bar.
  • A “Customize Status Bar” menu will open.
  • Items that have check marks next to them display on the Status Bar.
  • Click the tick-box to select the items you want to see in the status bar.
  • Click to deselect the items you want to remove.
  • The status bar immediately reflects your choice.
Some useful options to consider adding to your Status Bar include:
  • Vertical Page Position: shows you precisely where the cursor is at any given moment.
  • Track Changes: shows whether Track Changes is On or Off.
  • Line Number: helps in some large documents, or when collaborating with someone who wants to direct your attention to a specific place in the document.
  • Collaborative tools: for those using later versions, or free versions of Word, which allow for synchronous or real-time editing among several authors.

Customizing the Status Bar can help you work more efficiently and effectively in Microsoft Word. 

Give it a try and see how it can improve your productivity!

Enjoy!

Please LIKE and SHARE OneCoolTip.com!


READ MORE

OneCoolTip.com
Cool Tech Tips for a Cooler Life!


#Microsoft #Word #MicrosoftWord #Productivity #StatusBar #Customization #TechTips #OneCoolTip @Microsoft 

Sunday, August 6, 2023

How to Hide the Blue Checkmark Icon on Twitter X

Do you have a blue checkmark on Twitter? 

Are you concerned about your privacy? 

Do you worry about being harassed or trolled? 

Here's a Cool Tip:  Hide Your Blue Checkmark!
The blue checkmark is a symbol of verification on Twitter X, indicating that the account has been authenticated by Twitter as belonging to a real person or organization. 

X (formerly known as Twitter) opened up the blue checkmark to users who subscribe to Twitter X Blue earlier this year.

Here's how to hide the blue checkmark icon.

On a PC:
  • Go to your Twitter X home page.
  • Click on More
  • Click on Settings and Support.
  • Click on Settings and Privacy.
  • Click on Blue
  • Click on Early Access to select new. features
  • Click Profile customization  LINK
  • Check/Uncheck the box next to Hide or Un-Hide your blue checkmark.

Hide Twitter X Blue Checkmark
fig. 1 - Hide Twitter X Blue Checkmark


On a mobile device (iPhone/Android):
  • Open the X Twitter app.
  • Tap on your profile icon.
  • Tap on Blue.
  • Tap on Preferences.
  • Tap on Verification, 
  • Tap on Blue Checkmark.
  • Toggle the switch off to hide your blue checkmark.

Twitter X Hide Blue Checkmark Mobile
fig. 1 - Twitter X Hide Blue Checkmark Mobile

Note:
  • If you hide your blue checkmark, it will still be visible to some people.
  • You can always choose to show your blue checkmark again at any time by following the same steps above and toggling the switch on.

Ultimately, the decision of whether or not to hide your blue checkmark is up to you. 

There are pros and cons to both hiding and showing your blue checkmark, so you need to weigh the factors that are most important to you before making a decision.

Enjoy!

Please LIKE and SHARE OneCoolTip.com!


READ MORE


OneCoolTip.com
Cool Tech Tips for a Cooler Life!


#Twitter #X #twitterblue #ElonMusk  @ElonMusk #bluecheckmark #hidebluecheckmark #twitterprivacy #twittersafety #harassment #trolling #anonymity #personalinformation #privacy #safety #anonymity #trolls #harassment #TechTips #OneCoolTip