Thursday, May 11, 2023

Harnessing the Power of Google Fit: Your Guide to Better Health Tracking

Do you feel overwhelmed when picking a health app?

What if there was a tool that could help you seamlessly manage your fitness journey, make sense of your health data, and contribute positively to your wellbeing? 

Here's a Cool Tip: Google Fit.

Google Fit is a free health-tracking platform that can help you live a healthier and more active life. 

It is a health-tracking platform developed by Google for Android, Wear OS, and iOS (iPhone). 

fig. 1 Google Fit

Google Fit employs sensors in a user's mobile device or activity tracker to record physical fitness activities (such as walking or cycling), which are measured against the user's fitness goals to provide a comprehensive view of their health.

Get started with Google Fit:
  • Account Set-up: Once installed, open the app, and sign in to your Google account. If you don't have one, you'll need to create it.
  • Personal Details: Enter your personal details like height, weight, and gender. This information helps Google Fit tailor its tracking to your specific needs.
  • Setting Goals: Next, you'll be prompted to set your fitness goals. Google Fit uses two main metrics: "Move Minutes" and "Heart Points." Move Minutes track any activity, while Heart Points track more intense exercise.
  • Navigating the Google Fit Interface:  Google Fit's interface is simple and user-friendly. Here are the key features:
    • Home: This tab shows your daily progress towards your Move Minutes and Heart Points goals. It also displays other data like steps taken, calories burned, and distance traveled.
    • Journal: This is your fitness diary. It logs all your activities, including manually logged workouts, recorded activities from connected apps, and Google Fit's automatic tracking.
    • Profile: Here, you can review your stats, adjust goals, and manage connected apps and devices.

Google Fit is a powerful tool that can make tracking and understanding your health and fitness data much easier. Whether you're an avid runner


Here's how to get the free Google Fit app:

Please LIKE and SHARE OneCoolTip.com!


READ MORE


OneCoolTip.com
Cool Tech Tips for a Cooler Life!

#GoogleFit #HealthTracking #FitnessGoals #DigitalHealth #FitTech #FitnessApp #HealthyLifestyle #WearOS #ExerciseRoutine #TechTips #OneCoolTip #Google @Google 

Wednesday, May 10, 2023

How to Use Google Chrome Price Tracking Feature to Get the Best Deals

Google Chrome
Have you ever found yourself constantly refreshing a webpage to see if the price of your desired product has dropped? 

Or maybe you've missed out on a massive discount because you didn't check the product in time? 

Welcome to the club. 

But what if you could have a personal assistant to track these price changes for you? 

Here's a Cool Tip, use Google Chrome's Price Tracking feature. 

Designed to revolutionize your online shopping experience, this tool is your new ally in the quest for the best deals. 

Here's how to use Google Chrome price tracking:

  • Open the Google Chrome browser
  • Go to the product page for the item you want to track.
  • In the address bar, click the Track price button.
  • A confirmation box will appear. 
  • Click Done to confirm.

Chrome Price Track
fig. 1  Google Chrome Price Tracking

Google Chrome will now track the price of the product. 

If the price drops, you'll be notified via email or a notification in the browser.

Here are some tips for using Google Chrome price tracking:

  • Only track products that you're actually interested in buying. Otherwise, you'll just end up with a bunch of notifications for products you don't care about.
  • Be patient. It may take some time for the price of the product to drop.
  • Compare prices from different retailers. Google Chrome will track the price of the product on all of the retailers it finds. This way, you can be sure you're getting the best possible price.
  • Google Chrome price tracking is a great way to save money on your online purchases. By using this feature, you can be sure you're getting the best possible price on the items you want to buy.

Google Chrome price tracking is a valuable tool that can help you save money on your online purchases. 

Enjoy!

Please LIKE and SHARE OneCoolTip.com!

READ MORE


OneCoolTip.com
Cool Tech Tips for a Cooler Life!

#GoogleChrome #PriceTracking #OnlineShopping #SmartShopping #SaveMoney #ChromeFeatures #Ecommerce #DealAlerts #TechTips #BrowserTools #TechTip #OneCoolTip #Google @Google 

Tuesday, May 9, 2023

How to Use Google Keep to Stay Organized and Productive

Google Keep
How many times have you forgotten an important appointment? 

Lost track of a great idea? 

Or had to scramble to find a piece of information you needed?

If you answered "more times than I can count," you're not alone.

The good news is that there's a Cool Tip: Google Keep.

Google Keep is a free note-taking app that is available on all major platforms, including Android, iOS, Windows, and macOS. 

It is a great way to keep track of your thoughts, ideas, and to-do lists. 

Google Keep is simple to use and has a variety of features that make it a powerful note-taking tool.

Here are some of the things you can do with Google Keep:
  • Create text notes, lists, and drawings.
  • Add color coding, labels, and reminders to your notes.
  • Share notes with others.
  • Set up a location reminder so that you get notified when you arrive at a certain place.
  • Integrate Google Keep with other Google apps, such as Gmail and Calendar.

Google Keep
fig. 1 Google Keep


Here is a quick tutorial on how to use Google Keep:
  • To create a note, open the Google Keep app and tap the button in the bottom right corner.
  • Enter your note in the text field.
  • To add a list, tap the List button.
  • To add a drawing, tap the Drawing button.
  • To color code your note, tap the three dots in the top right corner and select Color.
  • To add a label to your note, tap the three dots in the top right corner and select Label.
  • To add a reminder to your note, tap the three dots in the top right corner and select Reminder.
  • To share your note with others, tap the three dots in the top right corner and select Share.
  • To archive your note, tap the three dots in the top right corner and select Archive.
Here are some tips for using Google Keep:
  • Use color coding to organize your notes.
  • Use labels to group your notes together.
  • Add reminders to your notes so that you don't forget about them.
  • Share your notes with others so that you can collaborate on projects.
  • Use the Google Keep Chrome extension to take notes on the web.
  • Use the Google Keep widget on your Android or iOS device to quickly add notes.
Google Keep is a powerful note-taking tool that is easy to use. 

With its variety of features, Google Keep can help you stay organized and productive.

Please LIKE and SHARE OneCoolTip.com!

READ MORE

OneCoolTip.com
Cool Tech Tips for a Cooler Life!

#googlekeep #notetaking #productivity #organization #howto #guides #tutorials #bestpractices #tips #tricks #OneCoolTip #TechTip #Google #Keep @Google 

Monday, May 8, 2023

Unleashing the Power in Excel: The Ultimate Keyboard Shortcut

Microsoft Excel
Do you get lost in large Excel spreadsheets?

This Cool Tip is your key to getting to where you need to be quickly.

Ctrl+G is a handy shortcut opens up the 'Go To' dialog box, allowing users to quickly navigate through a workbook.

Ctrl+G, or Control+G, is a keyboard shortcut in Excel that opens the 'Go To' dialog box. 

This feature lets you quickly jump to a specific cell, range, or even named ranges within your workbook. 

The Go To dialog box can also be accessed by pressing F5 or navigating to the Home tab and clicking on Find & Select > Go To.

Using Ctrl+G: Step by Step
  • Press Ctrl+G to open the 'Go To' dialog box.
  • Enter the cell reference or range you want to navigate to, such as A1 or A1:B10.
  • Click OK or press Enter to navigate to the specified location.
Microsoft Excel Go To
fig. 1   Microsoft Excel Go To screen


That's it!

Please LIKE and SHARE OneCoolTip.com!

Saturday, May 6, 2023

How to Set Your Startup Pages in Google Chrome

Google Chrome
When you start Chrome, do you always have to take a few minute to open all of your favorite websites?

You don't have to do that,

Here's a Cool Tip.

Change your Chrome settings to set the tabs you want to open whenever you launch Chrome.

And it can be more than one page.

Here's how to do it.

  • Open Chrome
  • Open tabs for each page you want to open on startup.
  • Arrange tabs in order by dragging them into the correct order.
  • Go to the three dot icon in the top right corner of Chrome
  • Select Settings
  • Select On Startup
  • Select Open a Specific Page or Set of Pages

On Startup Chrome

That's it!

Now when you launch Chrome, all of your desired pages will start so you don't have to do it again.

Please LIKE and SHARE OneCoolTip.com!

READ MORE

OneCoolTip.com
Cool Tech Tips for a Cooler Life!


#GoogleChrome #TechTips #Startup #OneCoolTip #Google @Google


Friday, May 5, 2023

Dive into the World of Feeding Koi

Koi Pond
Do you like watching fish?

Do you like feeding fish?

If so, you're going to enjoy this Friday Funday Cool Tip.

So, get ready to immerse yourself in this mesmerizing, interactive experience that's perfect for relaxation, education, or simply a delightful break from everyday life

Feed the Koi Fish at the Koi Pond:  https://koipond.fish/

  • Use your mouse (PC) or finger (mobile) to drop koi food around the pond!

Koi Pond Fish
fig. 1  Feed the Koi Fish

Koi Pond is a captivating online destination that offers relaxation, inspiration, and education for anyone who appreciates the beauty and tranquility of koi ponds. 

Whether you're an experienced aquarist or simply looking for a soothing escape from everyday stress, this website is a must-visit. 

So, why wait? 

Dive into the enchanting world of koi 


Please LIKE and SHARE OneCoolTip.com!


READ MORE


OneCoolTip.com
http://www.onecooltip.com
Cool Tech Tips for a Cooler Life!


#KoiPond #KoiFish #AquariumHobby #Relaxation #VirtualExperience #KoiPondDesign #Aquarist #FishEnthusiast #FridayFunday #OneCoolTip

Thursday, May 4, 2023

Share with Siri

Apple Siri
Did you know you can use Siri, Apple's Voice Assistant, to share photos to contacts?

You can with this Cool Tip.

To share a photo or your screenshot with a contact:
  • Go to the photo or screen you want to share
  • Say Hey Sirishare this with… and then add the name of your contact.
  • If there is more than one phone number for that contact, Siri will ask you which one you want to send it to.
  • Siri will share the photo or screenshot with your contact!

That's it.

READ MORE


#Apple @Apple #iPhone #Siri #photo

Wednesday, May 3, 2023

Unlock PowerPoint's Dual-Slide Editing with This Time-Saving Trick!

Microsoft PowerPoint
Do you need to be able to view or edit two different slides of the same PowerPoint at the same time?

With this Cool Tip, you can.

Use the View, New Window feature in Microsoft PowerPoint.

Opening a new window view in Microsoft PowerPoint can be a great way to organize, compare and edit different slides of your presentation. 

This is especially useful when you have more than one monitor.

Here's how to do it:
  • Open Microsoft PowerPoint.
  • Open the presentation you want to work with.
  • Click the View tab on the ribbon at the top of the screen.
  • In the Window group, click the New Window button. 
  • This will open a new window with the same  PowerPoint presentation.

Microsoft PowerPoint View New Window
fig. 1  Microsoft PowerPoint View New Window

  • You can now move and resize the windows as needed. 
  • To switch between the windows, click the View tab again and select the window you want to work with from the Switch Window.
  • Now you can make changes in one window and compare it with the other window side by side.

Tips:
-This works best when using more than one monitor.
-You can also use the Arrange All button in the Window group to automatically arrange all open windows on your screen.
-If you have multiple windows open, you can use the Switch Windows button to quickly switch between them.

By using this feature you can easily work with multiple slides of your presentation at the same time, which can save you time and make your work more efficient.


Please LIKE and SHARE OneCoolTip.com!


READ MORE

OneCoolTip.com
http://www.onecooltip.com
Cool Tech Tips for a Cooler Life!


#Microsoft @Microsoft #PowerPoint #TechTips #OneCoolTip #View

Tuesday, May 2, 2023

Unlock the Power of Google Chrome: How to Use It as a Text Editor

Google Chrome
Are you looking for a lightweight and versatile text editor that won't take up valuable space on your computer? 

Look no further than Google Chrome! 

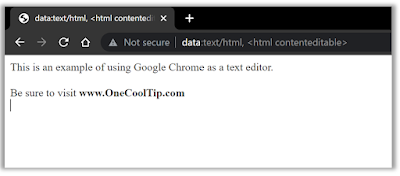
While it's primarily known as a web browser, Chrome can also function as a powerful text editor, complete with formatting tools. 

Whether you're a developer, writer, or just looking for a simple way to edit text files, this guide has got you covered.

Here's how to do it.
  • Open a new tab in Chrome
  • Enter data:text/html, <html contenteditable> in the addressbar.
  • Start typing!
Note:  You can bookmark the page for when you next need a text editor.

Google Chrome as Text Editor
fig.1 Google Chrome as a Text Editor

If you want to keep the text or prevent its loss if you close the tab, be sure to save it.  

Here's how:
  • Press CTRL+S.
  • Select location, 
  • Enter filename 
  • Select Save As Type - Webpage Single File or Webpage Complete.
  • Click Save
Note: The file will be saved as an html file that can be reopened by Chrome or other web brosers (and for that matter, Microsoft Word).

Please LIKE and SHARE OneCoolTip.com!

READ MORE

OneCoolTip.com
Cool Tech Tips for a Cooler Life!


#GoogleChrome #TextEditor #WebDevelopment #Productivity #TechTips #SyntaxHighlighting #WebDesign #ContentCreation #Writing #CodeEditing #HTML #CSS #JavaScript #TechTricks #WebBrowsers #TextFormatting #TechBlog #TechTips #OneCoolTip #Google @Google

Monday, May 1, 2023

Get Your Formatting Right with Gridlines and Ruler in Microsoft Word

Microsoft Word
Are you tired of spending hours formatting your document in Microsoft Word, only to find that it's still not aligned correctly? 

Do you struggle to maintain consistency throughout your document? 

Are you looking for a way to format your document with precision and ease? 

Here's a Cool Tip: Use gridlines and ruler in Microsoft Word

Say goodbye to formatting woes and hello to precise document design.

By default, the gridlines and ruler are not visible in Microsoft Word. 

However, you can easily view them by following these steps:

  • Click on the View tab in the Ribbon.
  • Click on the Gridlines checkbox to show the gridlines in your document.
  • Click on the Ruler checkbox to show the ruler in your document.

Added Cool Tips:  Use the keyboard shortcuts Ctrl + G to show or hide the gridlines and Ctrl + R to show or hide the ruler.

Microsoft Word View Gridlines and Ruler
fig. 1 Turn on Ruler and Gridlines for more precise alignment

Once you have enabled the gridlines and ruler in your document, you can use them to format your document accurately. 

  • Align text: You can use the ruler to set margins, indents, and tabs to align text in your document. You can drag the markers on the ruler to set the desired margins, indents, and tabs.

  • Align objects: You can use the gridlines to align objects such as images, shapes, and tables in your document. You can drag the objects to align them with the gridlines or use the Align options in the Ribbon to align them precisely.

  • Measure distance: You can use the ruler to measure the distance between the elements in your document. You can drag the cursor on the ruler to measure the distance between the elements.


Gridlines and ruler can be useful tools for formatting your document accurately in Microsoft Word.


Please LIKE and SHARE OneCoolTip.com!


READ MORE


OneCoolTip.com
Cool Tech Tips for a Cooler Life!


#MicrosoftWord #DocumentDesign #Gridlines #Ruler #Formatting #Precision #TechTips #WritingTips #Productivity #OfficeTips #DocumentFormatting #TechTricks #WordProcessing #ProfessionalDocuments #SocialMediaTips #ContentCreation #ContentMarketing #TechTips #OneCoolTip @Microsoft