Monday, May 8, 2023

Unleashing the Power in Excel: The Ultimate Keyboard Shortcut

Microsoft Excel
Do you get lost in large Excel spreadsheets?

This Cool Tip is your key to getting to where you need to be quickly.

Ctrl+G is a handy shortcut opens up the 'Go To' dialog box, allowing users to quickly navigate through a workbook.

Ctrl+G, or Control+G, is a keyboard shortcut in Excel that opens the 'Go To' dialog box. 

This feature lets you quickly jump to a specific cell, range, or even named ranges within your workbook. 

The Go To dialog box can also be accessed by pressing F5 or navigating to the Home tab and clicking on Find & Select > Go To.

Using Ctrl+G: Step by Step
  • Press Ctrl+G to open the 'Go To' dialog box.
  • Enter the cell reference or range you want to navigate to, such as A1 or A1:B10.
  • Click OK or press Enter to navigate to the specified location.
Microsoft Excel Go To
fig. 1   Microsoft Excel Go To screen


That's it!

Please LIKE and SHARE OneCoolTip.com!

Saturday, May 6, 2023

How to Set Your Startup Pages in Google Chrome

Google Chrome
When you start Chrome, do you always have to take a few minute to open all of your favorite websites?

You don't have to do that,

Here's a Cool Tip.

Change your Chrome settings to set the tabs you want to open whenever you launch Chrome.

And it can be more than one page.

Here's how to do it.

  • Open Chrome
  • Open tabs for each page you want to open on startup.
  • Arrange tabs in order by dragging them into the correct order.
  • Go to the three dot icon in the top right corner of Chrome
  • Select Settings
  • Select On Startup
  • Select Open a Specific Page or Set of Pages

On Startup Chrome

That's it!

Now when you launch Chrome, all of your desired pages will start so you don't have to do it again.

Please LIKE and SHARE OneCoolTip.com!

READ MORE

OneCoolTip.com
Cool Tech Tips for a Cooler Life!


#GoogleChrome #TechTips #Startup #OneCoolTip #Google @Google


Friday, May 5, 2023

Dive into the World of Feeding Koi

Koi Pond
Do you like watching fish?

Do you like feeding fish?

If so, you're going to enjoy this Friday Funday Cool Tip.

So, get ready to immerse yourself in this mesmerizing, interactive experience that's perfect for relaxation, education, or simply a delightful break from everyday life

Feed the Koi Fish at the Koi Pond:  https://koipond.fish/

  • Use your mouse (PC) or finger (mobile) to drop koi food around the pond!

Koi Pond Fish
fig. 1  Feed the Koi Fish

Koi Pond is a captivating online destination that offers relaxation, inspiration, and education for anyone who appreciates the beauty and tranquility of koi ponds. 

Whether you're an experienced aquarist or simply looking for a soothing escape from everyday stress, this website is a must-visit. 

So, why wait? 

Dive into the enchanting world of koi 


Please LIKE and SHARE OneCoolTip.com!


READ MORE


OneCoolTip.com
http://www.onecooltip.com
Cool Tech Tips for a Cooler Life!


#KoiPond #KoiFish #AquariumHobby #Relaxation #VirtualExperience #KoiPondDesign #Aquarist #FishEnthusiast #FridayFunday #OneCoolTip

Thursday, May 4, 2023

Share with Siri

Apple Siri
Did you know you can use Siri, Apple's Voice Assistant, to share photos to contacts?

You can with this Cool Tip.

To share a photo or your screenshot with a contact:
  • Go to the photo or screen you want to share
  • Say Hey Sirishare this with… and then add the name of your contact.
  • If there is more than one phone number for that contact, Siri will ask you which one you want to send it to.
  • Siri will share the photo or screenshot with your contact!

That's it.

READ MORE


#Apple @Apple #iPhone #Siri #photo

Wednesday, May 3, 2023

Unlock PowerPoint's Dual-Slide Editing with This Time-Saving Trick!

Microsoft PowerPoint
Do you need to be able to view or edit two different slides of the same PowerPoint at the same time?

With this Cool Tip, you can.

Use the View, New Window feature in Microsoft PowerPoint.

Opening a new window view in Microsoft PowerPoint can be a great way to organize, compare and edit different slides of your presentation. 

This is especially useful when you have more than one monitor.

Here's how to do it:
  • Open Microsoft PowerPoint.
  • Open the presentation you want to work with.
  • Click the View tab on the ribbon at the top of the screen.
  • In the Window group, click the New Window button. 
  • This will open a new window with the same  PowerPoint presentation.

Microsoft PowerPoint View New Window
fig. 1  Microsoft PowerPoint View New Window

  • You can now move and resize the windows as needed. 
  • To switch between the windows, click the View tab again and select the window you want to work with from the Switch Window.
  • Now you can make changes in one window and compare it with the other window side by side.

Tips:
-This works best when using more than one monitor.
-You can also use the Arrange All button in the Window group to automatically arrange all open windows on your screen.
-If you have multiple windows open, you can use the Switch Windows button to quickly switch between them.

By using this feature you can easily work with multiple slides of your presentation at the same time, which can save you time and make your work more efficient.


Please LIKE and SHARE OneCoolTip.com!


READ MORE

OneCoolTip.com
http://www.onecooltip.com
Cool Tech Tips for a Cooler Life!


#Microsoft @Microsoft #PowerPoint #TechTips #OneCoolTip #View

Tuesday, May 2, 2023

Unlock the Power of Google Chrome: How to Use It as a Text Editor

Google Chrome
Are you looking for a lightweight and versatile text editor that won't take up valuable space on your computer? 

Look no further than Google Chrome! 

While it's primarily known as a web browser, Chrome can also function as a powerful text editor, complete with formatting tools. 

Whether you're a developer, writer, or just looking for a simple way to edit text files, this guide has got you covered.

Here's how to do it.
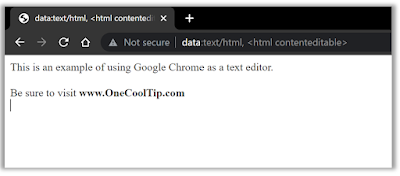
  • Open a new tab in Chrome
  • Enter data:text/html, <html contenteditable> in the addressbar.
  • Start typing!
Note:  You can bookmark the page for when you next need a text editor.

Google Chrome as Text Editor
fig.1 Google Chrome as a Text Editor

If you want to keep the text or prevent its loss if you close the tab, be sure to save it.  

Here's how:
  • Press CTRL+S.
  • Select location, 
  • Enter filename 
  • Select Save As Type - Webpage Single File or Webpage Complete.
  • Click Save
Note: The file will be saved as an html file that can be reopened by Chrome or other web brosers (and for that matter, Microsoft Word).

Please LIKE and SHARE OneCoolTip.com!

READ MORE

OneCoolTip.com
Cool Tech Tips for a Cooler Life!


#GoogleChrome #TextEditor #WebDevelopment #Productivity #TechTips #SyntaxHighlighting #WebDesign #ContentCreation #Writing #CodeEditing #HTML #CSS #JavaScript #TechTricks #WebBrowsers #TextFormatting #TechBlog #TechTips #OneCoolTip #Google @Google

Monday, May 1, 2023

Get Your Formatting Right with Gridlines and Ruler in Microsoft Word

Microsoft Word
Are you tired of spending hours formatting your document in Microsoft Word, only to find that it's still not aligned correctly? 

Do you struggle to maintain consistency throughout your document? 

Are you looking for a way to format your document with precision and ease? 

Here's a Cool Tip: Use gridlines and ruler in Microsoft Word

Say goodbye to formatting woes and hello to precise document design.

By default, the gridlines and ruler are not visible in Microsoft Word. 

However, you can easily view them by following these steps:

  • Click on the View tab in the Ribbon.
  • Click on the Gridlines checkbox to show the gridlines in your document.
  • Click on the Ruler checkbox to show the ruler in your document.

Added Cool Tips:  Use the keyboard shortcuts Ctrl + G to show or hide the gridlines and Ctrl + R to show or hide the ruler.

Microsoft Word View Gridlines and Ruler
fig. 1 Turn on Ruler and Gridlines for more precise alignment

Once you have enabled the gridlines and ruler in your document, you can use them to format your document accurately. 

  • Align text: You can use the ruler to set margins, indents, and tabs to align text in your document. You can drag the markers on the ruler to set the desired margins, indents, and tabs.

  • Align objects: You can use the gridlines to align objects such as images, shapes, and tables in your document. You can drag the objects to align them with the gridlines or use the Align options in the Ribbon to align them precisely.

  • Measure distance: You can use the ruler to measure the distance between the elements in your document. You can drag the cursor on the ruler to measure the distance between the elements.


Gridlines and ruler can be useful tools for formatting your document accurately in Microsoft Word.


Please LIKE and SHARE OneCoolTip.com!


READ MORE


OneCoolTip.com
Cool Tech Tips for a Cooler Life!


#MicrosoftWord #DocumentDesign #Gridlines #Ruler #Formatting #Precision #TechTips #WritingTips #Productivity #OfficeTips #DocumentFormatting #TechTricks #WordProcessing #ProfessionalDocuments #SocialMediaTips #ContentCreation #ContentMarketing #TechTips #OneCoolTip @Microsoft 

Sunday, April 30, 2023

Simplify Your Life with Alexa's New Timed Commands

Alexa
Do you know you can turn off or turn on lights using Alexa with a Timer?

You can now ask Alexa to turn your connected smart home devices on or off at a set amount of time.

You can say “Alexa, turn off the bedroom lamp in 15 minutes” or “Alexa, turn on the front porch at 5 p.m.” 

Previously, the device would just turn on or off.

This is a great upgrade to the Alexa digital home assistant.

Check it out!

Man Calling out to Alexa

Please LIKE and SHARE OneCoolTip.com!

READ MORE

OneCoolTip.com
Cool Tech Tips for a Cooler Life!

#Amazon #Alexa #smarthome #digitalassistant @Amazon 

Saturday, April 29, 2023

How to Make the Apple Watch Text Bigger, Brighter and Bolder

Apple Watch Face
Are you tired of squinting at your Apple Watch's display in bright sunlight? 

Or maybe you find the screen too bright in dimly lit rooms? 

Whatever your preference, adjusting the brightness and display settings on your Apple Watch is simple and easy to do. 

In this Cool Tip, we'll show you how to change the Apple Watch's brightness and display settings directly from the watch itself, as well as from your iPhone.

Changing Brightness and Display Settings on Apple Watch

  • Press the Digital Crown to access the Home screen.
  • Open the Settings app.
  • Tap Display & Brightness.
Apple Watch Settings
  • To adjust the brightness, tap the Brightness icons to increase or decrease brightness.
  • To change text size, tap Text Size then tap the text icons to increase or decrease text size.
  • To bold text, tap Bold to toggle the setting.
Apple Watch Display Brightness Settings

Changing Brightness and Display Settings on iPhone

  • Open the Watch app on your iPhone.
  • Tap My Watch, then tap Display & Brightness.
iPhone Watch Settings
  • To adjust the brightness, swipe the Brightness slider left or right.
  • To adjust Text Size, slide the Text Size slider left or right.
  • To bold text, tap Bold to toggle the setting.
iPhone Watch Display Brightness Settings

Changing the brightness and display settings on your Apple Watch is a quick and easy process, whether you prefer to make adjustments directly from the watch or from your iPhone. 

With just a few simple steps, you can customize your watch to suit your personal preferences and ensure that you can always see the information you need.

Enjoy!

Please LIKE and SHARE OneCoolTip.com!

READ MORE


OneCoolTip.com
Cool Tech Tips for a Cooler Life!

#AppleWatch #Watch #DisplaySettings #Brightness #Adjustments #Customization #SmartWatches #TechTips #iOS #WatchOS #iPhoneTips @TechTips #OneCoolTip #Apple @Apple

Friday, April 28, 2023

What was the Top Song on the Day You were Born? Find Out!

Are you tired of singing the same old "Happy Birthday" song every year? 

If so, this Friday Funday Cool Tip has you covered.

Playback.fm Birthday Song

This Friday Funday site is a fun and unique way to celebrate birthdays. 

You can discover which song was at the top of the charts on the day you were born.

It's easy to use, simply enter your birth date, and the site will generate a video featuring the top song on that day in history. 

Happy Birthday Song PlaybackFM

That's it.

Enjoy!


Please LIKE and SHARE OneCoolTip.com!


READ MORE


OneCoolTip.com
Cool Tech Tips for a Cooler Life!


#BirthdaySongGenerator #Playbackfm #MusicTimeline #HappyBirthday  #BirthdayFun  #MusicHistory #BirthYearTrivia #TechTip #OneCoolTip