Showing posts with label Microsoft Excel. Show all posts

Thursday, May 25, 2023

The Secret Shortcut You Need to Know About the Excel Formula Bar!

Microsoft Excel
Are you tired of scrolling left and right to view long formulas in Microsoft Excel? 

Do you want to learn a quick and easy way to expand the formula bar? 

Expanding the formula bar in Microsoft Excel is a useful trick that can help you view long formulas without having to scroll left and right. 

There are two ways to expand the formula bar in Excel. 

  • The first way is to hover your mouse near the bottom of the formula bar until you see an up-and-down white arrow
    • Click that arrow and drag down until the bar gets big enough to accommodate the entire formula. 
  • The second way is to use a keyboard shortcut: Press Ctrl + Shift + U.
Microsoft Excel Formula Bar
fig. 1 - Expand the Excel Formula Bar


Please LIKE and SHARE OneCoolTip.com!

READ MORE

OneCoolTip.com
Cool Tech Tips for a Cooler Life!

#Microsoft #Excel #MicrosoftExcel @Microsoft #ExcelTips, #ExcelTricks, #ExcelShortcuts, #MicrosoftExcel, and #SpreadsheetHacks #TechTip #OneCoolTip 

Monday, May 8, 2023

Unleashing the Power in Excel: The Ultimate Keyboard Shortcut

Microsoft Excel
Do you get lost in large Excel spreadsheets?

This Cool Tip is your key to getting to where you need to be quickly.

Ctrl+G is a handy shortcut opens up the 'Go To' dialog box, allowing users to quickly navigate through a workbook.

Ctrl+G, or Control+G, is a keyboard shortcut in Excel that opens the 'Go To' dialog box. 

This feature lets you quickly jump to a specific cell, range, or even named ranges within your workbook. 

The Go To dialog box can also be accessed by pressing F5 or navigating to the Home tab and clicking on Find & Select > Go To.

Using Ctrl+G: Step by Step
  • Press Ctrl+G to open the 'Go To' dialog box.
  • Enter the cell reference or range you want to navigate to, such as A1 or A1:B10.
  • Click OK or press Enter to navigate to the specified location.
Microsoft Excel Go To
fig. 1   Microsoft Excel Go To screen


That's it!

Please LIKE and SHARE OneCoolTip.com!

Monday, April 24, 2023

Boost Your Excel Productivity with this Cool Status Bar Tip!

Microsoft Excel logo
Are you looking for ways to improve your Excel productivity and efficiency? 

Check out this very Excel Cool Tip.

The status bar in Excel is a powerful tool that can help you quickly calculate and analyze data. 

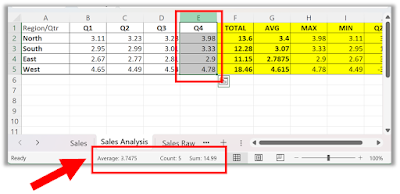
It displays a variety of information about your worksheet, including the average, count, and sum of selected cells.

Here are some steps to use Excel status bar:
  • Select the range of cells you want to analyze.
  • Look at the status bar at the bottom of the window to see the average, count, and sum of these cells.
  • To quickly change the workbook view, use the three view shortcuts on the status bar.

Microsoft Excel Status Bar
fig.1 Microsoft Excel Status Bar

  • You can also customize your status bar by right-clicking anywhere on it 
  • Select the items you want to see.  
  • For example, minimum and maximum.

Customize Microsoft Excel Status Bar

fig. 2 Customize Microsoft Excel Status Bar


That's it!

Please LIKE and SHARE OneCoolTip.com!

READ MORE

OneCoolTip.com
Cool Tech Tips for a Cooler Life!


#Microsoft #Excel #ExcelTips #ExcelStatusbar #DataAnalysis #TechTip #OneCoolTip @Microsoft

Monday, April 17, 2023

How AI is Changing the Way We Work: An Example for Bing Chat AI, Excel and Data Analysis

As AI, in all of its forms, becomes more prevalent, we will all find practical examples to use these powerful tools in our professional and personal lives.

But is it all just hyperbole?

A modern day "fluff" PR stunt to promote a brand and make someone rich before it all crashes and burns?

Maybe, it's too soon to tell.

But let's look at an example with AI that's available today with Microsoft Bing Chat.

As a reminder, Bing Chat uses ChatGPT to power its AI feature.

In this case, a beginning Excel user is tasked with performing data analysis on sales data for the previous year, by quarter and by region.

Let's see what Bing Chat can do.

I asked Bing Chat to review the sales data table and provide the Microsoft Excel formulas for meaningful results.

Bing Chat Request for Sales Analysis

fig. 1  Bing Chat Request for Sales Analysis


Bing Chat returned the following:

Bing Chat Excel Sales Data Analysis
fig. 2   Bing Sales Analysis Results


Not too bad.

The formulas worked to add additional content for Totals, Averages, Minimums, Maximums and Quarter over Quarter Percentages.

Following the formula examples provided by Bing Chat, I added the formulas and the Excel table now shows these results.  

Bing Chat Excel Results
fig. 3  Excel Sales Data updated to Bing Chat AI examples.

Can more be done?

AI is designed to allow users to engage in conversations.  

I asked Bing Chat for more examples.

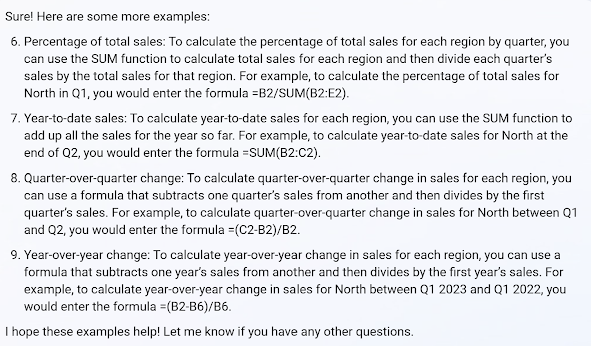
Bing Chat Examples - More
fig. 4   Bing 

The results provided more analysis that could be added to the data table, including Percentage of Total Sales, Year-to-date Sales, Quarter-over-quarter change, and Year-over-year change.

In this simple example, a user could get a good start on their work assignment.

A more experienced Excel user would knows these capabilities and how to use them in Excel.

But this is a good example of what is possible.

And playing further with this example would bring more depth to the analysis.

AI is improving and it will play a greater role in our professional and personal lives.


Please LIKE and SHARE OneCoolTip.com!


READ MORE

OneCoolTip.com
Cool Tech Tips for a Cooler Life!


#AI #Bing #BingChat #ChatGPT #Microsoft #Excel #Data #Analysis #Sales


Wednesday, March 15, 2023

How to Convert Any Microsoft Office File to a PDF

PDF
Do you need to send someone a Word document but they don't have Microsoft Word?

Don't panic.

You can send them a PDF.

PDFs are a great way to share your documents online. 

They keep the original formatting, layout and fonts of your files, regardless of what device or software you use to view them. 

Here's how to create PDFs from your Microsoft Office files, such as Word, Excel or PowerPoint.
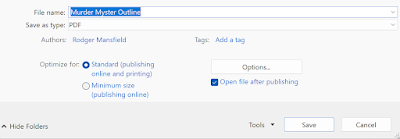
  • Open your Office file and click on File then Save As.
  • Choose a location where you want to save your PDF file and select PDF from the drop-down menu next to Save as type.
Save as PDF
  • Click on More Options and select Optimize for - Standard (online and printing) or - Minimum size (publishing online)
Save as PDF More Options
  • Click on Save and wait for your PDF file to be created.

That’s it! 

You’ve just converted your Office file to a PDF file. 

You can now share it with anyone you want or store it on your device for future use. You can also open it with any PDF reader or editor of your choice.

Please LIKE and SHARE OneCoolTip.com!

READ MORE

OneCoolTip.com
Cool Tech Tips for a Cooler Life!

#Microsoft #MicrosoftOffice #PDF #Word #Excel #PowerPoint #PDFConverter #OfficeTips #OneCoolTip

Monday, March 13, 2023

How to Show or Hide the Ribbon in Office

Microsoft 365
Where's the ribbon?

That's often the question when using Microsoft Office.

The ribbon is a set of toolbars at the top of the window in Office programs, for example, Word, Excel, PowerPoint, designed to help you quickly find the commands that you need to complete a task. 

But a common problem that users encounter is that the ribbon can appear and seemingly disappear on a whim.

Office Ribbon Menu Bar
Microsoft Office Ribbon

Here is a Cool Tip on how to master the Office ribbon.

Expand or collapse the ribbon

You can toggle between having the ribbon expanded or collapsed in multiple ways.

If the ribbon is collapsed, expand it by doing do one of the following:

  • Double-click any of the ribbon tabs.

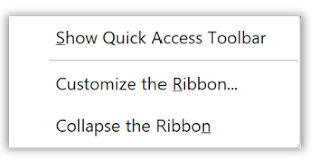
  • Right-click any of the ribbon tabs, and then select Collapse the ribbon.

Collapse the Ribbon
  • Press CTRL+F1.

If the ribbon is expanded, collapse it by doing do one of the following:

  • Double-click any of the ribbon tabs.
  • Right-click any of the ribbon tabs, and then select Collapse the ribbon
Collapse the Ribbon
Collapse the Ribbon

  • Right-click Ribbon display options in the lower right of the ribbon, and then select Collapse the ribbon.
  • Press CTRL+F1.

Show Ribbon options

  • When the ribbon is visible, in the lower-right corner of the ribbon, click the Ribbon Display Options icon or the down caret icon.
Ribbon Display Options
  • Choose a state for the ribbon:

    • Full-screen mode hides the ribbon for the best view of your document, and only shows the ribbon when you select More , or press the ALT key.
    • Show tabs only shows only the ribbon tabs, so you see more of your document, and you can still quickly switch among the tabs.
    • Always show Ribbon keeps all the tabs and commands on the ribbon visible all the time.

If the ribbon isn't visible at all

If the ribbon isn’t visible at all (no tabs are showing), the state is set to Full-screen mode

Select More  or the three dot icon at the top right of the screen. This will temporarily restore the ribbon.

When you return to the document, the ribbon will be hidden again. To keep the ribbon displayed, select a different state from the Ribbon Display Options menu.

That's it!

Please LIKE and SHARE OneCoolTip.com!

READ MORE


OneCoolTip.com
Cool Tech Tips for a Cooler Life!


#Microsoft #Office #OfficeTips #RibbonControl #OneCoolTip #HowTo #OfficeTricks  @Microsoft

Monday, March 6, 2023

Link Like a Pro: Use This Cool Tip to Add Hyperlinks

Do you find yourself constantly copying and pasting website links into your Microsoft documents? 

Did you know that there's a Cool Tip to insert links using a keyboard shortcut? 
    • Use Control + K as a keyboard shortcut to quickly insert a hyperlink address in Microsoft Word, Excel, and PowerPoint.
Here's how to do it:
  • First, highlight the text that you want to turn into a link.
  • Press the Control + K keys on your keyboard. 
    • This will open the Insert Hyperlink dialog box.
  • In the Address field, type or paste the URL of the website you want to link to.
  • Click OK to insert the link into your document.

Insert Hyperlink Example

That's it!  You've just saved yourself precious time.

This shortcut works in all recent versions of Microsoft Word, Excel, and PowerPoint as well as many other Windows programs.

Enjoy!

Please Like and Share OneCoolTip.com!

READ MORE

Monday, February 20, 2023

How to Master Microsoft Excel's Flash Fill Feature

Microsoft Cool Tip Logo
One cool tech tip for using Microsoft Excel is to use the "Flash Fill" feature. 

This feature allows you to quickly split, combine, or format data without using complicated formulas or macros.

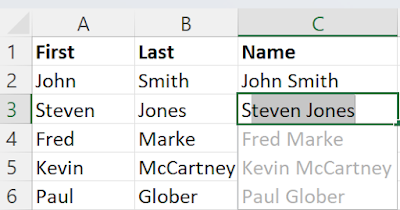
For example, let's say you have two column of names, First and Last and you want to join them into one new column. 

Instead of manually copying and pasting the data into the one new column and adding a space between the names, you can use Flash Fill to automate the process.

Here's how to do it:

  • Start by typing the first and last name in the third column of the first row, next to the last name.
  • Type the First name in the next row.
  • Excel will automatically recognize the pattern and suggest the combines names in the list.
  • Press Enter to confirm the suggestion.
  • The rest of the names will automatically be entered.

You can use Flash Fill for many other data manipulation tasks, such as formatting dates or removing duplicates. 

This feature can save you a lot of time and effort, especially when working with large data sets.

Microsoft Excel Flash Fill Example
Microsoft Excel Flash Fill 

Enjoy!

Please Like and Share OneCoolTip!


READ MORE


OneCoolTip.com
Cool Tech Tips for a Cooler Life!

#Microsoft #Excel #FlashFill @Microsoft 

Tuesday, January 31, 2023

Unlock the Power of Your Data: Master the Microsoft Excel Data Filter in Just a Few Easy Steps!

For many long-time Microsoft Excel users, new features have been added that they might not know about.  

Do you know how to use the Data Filter option so that you can filter your spreadsheet to only show the data that you want to view?

In the example below, we want to only view the Sales Agents from the NE Region.

Here's how to do it:

  • Select the data you want to filter.
  • Go to the "Data" tab in the ribbon.    The "Sort & Filter" section will be visible.

  • Select "Filter".

  • Click on the drop-down arrow in the header cell of the column you want to filter.  In this case, it's Column A named "Region".  We'll only select "NE" by selecting that option and de-selecting all others.


  • Choose the filter criteria and select "OK"  Now only rows where the Region has "NE" in the column cell will be visible in the list.

  • To remove the filter, go to "Sort & Filter" and select "Clear".

  • The list will return all data again.

That's it!  

You can also filter more than one column at a time to obtain the dataset you want to view.

And if you If you like OneCoolTip, please Like and Share!


READ MORE

#Microsoft #Excel #data #filter

Tuesday, January 24, 2023

Be the Microsoft Excel Hero with These Spacebar Secrets

Microsoft Excel
Do you know the power of the mighty spacebar when using Microsoft Excel?

The spacebar is a useful tool that can speed up selecting data in your spreadsheets.

Here's how to do it:

  • Press and hold the Ctrl and Spacebar to select an entire column in a worksheet.
Microsoft Excel selected column
  • Press and hold the Shift and Spacebar to select an entire row in a worksheet.
Microsoft Excel selected row
  • Press and hold the Ctrl and Shift and Spacebar to select the entire worksheet.
  • If the worksheet contains data, press and hold Ctrl and Shift and Spacebar to select the current region. 
Microsoft Excel selected table
  • Press Ctrl and Shift and Spacebar a second time to select the current region and its summary rows. 
  • Press Ctrl and Shift and Spacebar a third time to select the entire worksheet.
  • When you select an object, pressing Ctrl and Shift and Spacebar selects all objects on a worksheet.
  • Press Alt and Spacebar to display the Control menu for the Excel window.
Enjoy!

If you like OneCoolTip, please Like and Share!

Monday, January 16, 2023

How to Open a New Window View in Microsoft Excel

Microsoft Excel
Are your Microsoft Excel documents so large that you can't see what happens when you change data?

Opening a new window view in Microsoft Excel can be a great way to organize and compare different parts of your spreadsheet. 

This can be useful when your Excel document is large and you want to see how changes in one part of the document affects another part.

Here's how to do it:
  • Open Microsoft Excel
  • Open the spreadsheet you want to work with.
  • Click the View tab on the ribbon at the top of the screen.
  • In the Window group, click the New Window button. This will open a new window with the same spreadsheet.
Microsoft Excel New Window
  • You can now move and resize the windows as needed. 
  • To switch between the windows, click the View tab again and select the window you want to work with from the Switch Window.
  • Now you can make changes in one window and compare it with the other window side by side.

Tips:
-This works best when using more than one monitor.
-You can also use the Arrange All button in the Window group to automatically arrange all open windows on your screen.
-If you have multiple windows open, you can use the Switch Windows button to quickly switch between them.

By using this feature you can easily work with multiple parts of your spreadsheet at the same time, which can save you time and make your work more efficient.

If you like OneCoolTip, please Like and Share!

READ MORE

OneCoolTip.com
http://www.onecooltip.com
Cool Tech Tips for a Cooler Life!


#Microsoft #Excel #NewWindow 


Monday, January 9, 2023

Draw a Perfect Straight Line, Square or Circle with This Cool Tip

Shapes
When using Microsoft Word, Excel, Outlook or PowerPoint, you can add shapes, such as boxes, circles, and arrows, to your documents, email messages, slide shows, and spreadsheets. 

But how do you get a perfect circle rather than an oval?  Or a square rather than a rectangle?  Or a straight line rather than a jagged one?

The secret Cool Tip is to press and hold the SHIFT key when dragging the mouse to create the shape.

Press Shift Key to draw perfect line square circle

Here's how to do it:

  • On the Insert tab, click Shapes
  • Click the shape icon you want to draw, click anywhere in the workspace and drag to place the shape.
  • To create a perfect line, square or circle (or constrain the dimensions of other shapes), press and hold Shift key while you drag to create the shape.


If you like OneCoolTip, please Like and Share!


READ MORE


OneCoolTip.com
http://www.onecooltip.com
Cool Tech Tips for a Cooler Life!

#Shift #microsoft #word #excel #powerpoint


Friday, December 11, 2015

3 Top Tips When You're Frustrated Using a PC

One Cool Tip - http://www.onecooltip.com
Using a computer is often frustrating.

Perhaps its new software or just existing software where the desired feature just isn't obvious.

Software continues to add more and more features, menus change or disappear and simple commands don't seem so obvious any more.

Here are 3 top tips for figuring out how to solve simple issues.

F1 is Your Friend

Pressing the F1 key is the easy way to access the Help section of most software.  On some PCs, you'll need to press the blue Fn (Function) key to access the F1 function.  Microsoft has extensive help tools accessible from F1 that include the ability to search for common features, issues and also view video tutorials.

Common Keyboard Shortcuts

Most PC programs utilize standard keyboard shortcuts.  For example, if you are using Word and can't find the Print function, don't worry.  Pressing the Ctrl + P keys will bring up the Print screen.

A few other Ctrl key combinations:

Ctrl + C to Copy selected text,
Ctrl + X to Cut selected text and
Ctrl + V to Paste text from the clipboard.

Ctrl + F will bring up a Search form in many programs and web browsers.  Looking for specific text on a webpage or within a Word document? Use the the Ctrl + F to find it quickly.

And don't forget that pressing the the ESC key can exit most screens.

Google It

When you are really stuck, try a Google search.  Using the above issue of how to print in Microsoft Word, a search in Google for "Microsoft Word Print" returns the answer, including an enhanced Google spotlight of the instructions to be able to print from within Microsoft Word.


And finally, don't forget to check One Cool Tip's library of cool tips around key topics:  Google, Windows 10, Chrome, Microsoft Word, Microsoft Power Point, Microsoft Excel, and Microsoft Outlook.  There's a whole list of Cool Tip tops on the right-hand side of One Cool Tip.

Enjoy!


READ MORE

OneCoolTip.com
Cool Tech Tips for a Cooler Life!


#Windows #restart #reboot #PC #computer #help #F1 #Microsoft