Thursday, November 2, 2023

How to Move the Address Bar in Chrome for iPhone

Chrome Logo for iPhone
Do you have difficulty reaching the address bar at the top of the screen when using Chrome on your iPhone? 

You're not alone. 

Here's a Cool Tip.  Move the address bar to the bottom of the screen, where it would be easier to reach with one thumb.

Google has finally released a new Chrome feature for iOS that allows you to move the address bar to the bottom of the screen, or back to the top if you prefer.

Sorry Android users.

The main benefit of moving the address bar to the bottom of the screen is that it makes it easier to reach with one thumb. 

This is especially useful for people with larger iPhones, or for people with limited mobility in their hands.

Here's how to do it.
  1. Open Chrome on your iPhone.
  2. Long-press on the address bar.
  3. Tap "Move address bar to bottom."
  4. To move the address bar back to the top of the screen, follow the same steps, but tap "Move address bar to top" instead.

Move Chrome Address bar on iPhone

fig. 1 - Move Chrome Address Bar on iPhone


You can configure the new Chrome feature to move the address bar to the bottom of the screen in the Chrome settings app. 
  1. Open the Chrome settings app.
  2. Tap "Address bar."
  3. Under "Position," tap "Bottom."
  4. You can also move the address bar to the top of the screen from this menu.
Chrome Address bar Setting iPhone

fig. 2 - Chrome Address Bar Setting iPhone


The new Chrome feature to move the address bar to the bottom of the screen is a welcome addition for iOS users. 

It makes Chrome easier to use for people with larger iPhones, or for people with limited mobility in their hands. 

That's it!

Enjoy!


Please LIKE and SHARE OneCoolTip.com!
Visit the OneCoolTip YouTube Channelhttps://www.youtube.com/@onecooltip


READ MORE

OneCoolTip.com
Cool Tech Tips for a Cooler Life


#Google @Google #Chrome #iOS #iPhone #Apple @Apple #AddressBar #Bottom #Top #NewFeature #HowTo #TechTips #OneCoolTip @OneCoolTip

Wednesday, November 1, 2023

How to Rename Files on Windows and Macs

Have you ever found yourself lost in a sea of ambiguously named files on your computer? 

Ever wished there was a quick and easy way to rename them without going through a series of clicks? 

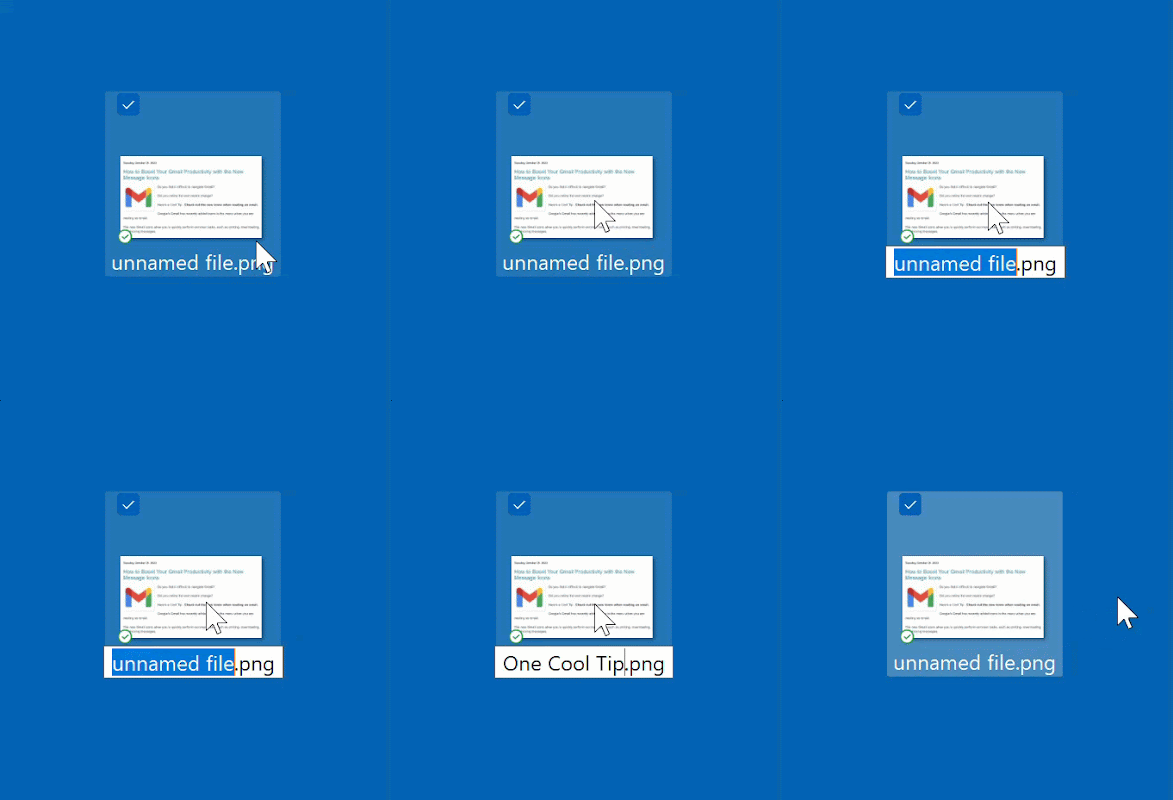
Here's a Cool Tip for Windows.  Use the F2 key.

Here's how to do it.


On Windows:
  1. Navigate to the file you want to rename.
  2. Click on the file to select it.
  3. Press the F2 key.
  4. Type the new name for your file.
  5. Press Enter to save the new name.
Renaming files using these methods is quick and efficient, saving you valuable time. 


Rename Windows File F2

fig. 1 - Rename Windows with File F2


On Mac:
  1. Navigate to the file you want to rename.
  2. Click on the file to select it.
  3. Press the Return key.
  4. Type the new name for your file.
  5. Press Enter to save the new name.
That's it.

Enjoy.

Please LIKE and SHARE OneCoolTip.com!
Visit the OneCoolTip YouTube Channelhttps://www.youtube.com/@onecooltip

READ MORE

#Microsoft @Microsoft #Apple @Apple #Mac #Macintosh #TechTips, #FileManagement, #WindowsGuide, #MacGuide #OneCoolTip @OneCoolTip 

Tuesday, October 31, 2023

How to Boost Your Gmail Productivity with the New Message Icons

Gmail
Do you find it difficult to navigate Gmail?

Did you notice the cool recent change?

Here's a Cool Tip.  Check out the new icons when reading an email.

Google's Gmail has recently added icons to the menu when you are reading an email.

The new Gmail icons allow you to quickly perform common tasks, such as printing, downloading, and moving messages.

Here's how to see them.
  1. Go to Gmail, www.gmail.com
  2. Double-click to open and read an email in your Inbox.
  3. Click on the three dots in the top right corner of the Gmail message window. This will open a menu with all of the available icons.

New Gmail Icons
fig. 1 - New Gmail Message Icons

The new Gmail icons are a great way to improve your productivity and get the most out of your Gmail account.

Enjoy!


Please LIKE and SHARE OneCoolTip.com!
Visit the OneCoolTip YouTube Channelhttps://www.youtube.com/@onecooltip


READ MORE

OneCoolTip.com
Cool Tech Tips for a Cooler Life


#Google @Google #Gmail @Gmail #GmailTips #NewGmailIcons #GmailProductivity #GmailFeatures #GmailUpdates #TechTips #OneoolTip @OneCoolTip 

Monday, October 30, 2023

How to Quickly Create a Table in Microsoft Word

Have you ever wondered how to create a table quickly in Microsoft Word ?

Maybe there's a quick keyboard shortcut?

How about an "old school" trick?

Here's a Cool Tip.  Use simple ASCII characters.

Here's how to do it.
  1. Open Microsoft Word. 
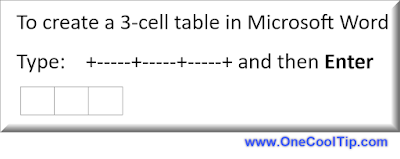
  2. Type a plus sign (+) followed by a series of minus signs (-) and end with another plus sign (+). 
  3. For example, to create a 3 cell table, type: +-----+-----+-----+ and then Enter.

Create a Table in Microsoft Word

fig. 1 Create a Table in Microsoft Word Using + and -s


    4. Just follow the pattern to create a table with more columns.
    5. Click into the last cell and press Tab key to create a new row.

Creating tables with ASCII characters is quick and easy. 

It’s also a fun way to impress your colleagues with your Word prowess!

Enjoy!

Please LIKE and SHARE OneCoolTip.com!
Visit the OneCoolTip YouTube Channelhttps://www.youtube.com/@onecooltip

READ MORE


OneCoolTip.com
Cool Tech Tips for a Cooler Life


#Microsoft @Microsoft #Word #MicrosoftWord #WordTips #ASCII #Productivity #TechTips #OneCoolTip @OneCoolTip 

Sunday, October 29, 2023

How to Use Google’s New ‘About This Image’ Feature

Have you ever come across an image online that looked too good to be true? 

Or maybe you saw a photo that was used in a misleading or false context? 

How can you tell if an image is reliable or not?

Here's a Cool Tip.  Use Google's New About This Image feature.

Google  recently launched a new feature called About This Image that can help you find more information about the images you see on the web. 

This feature can help you check the credibility, context, and origin of an image, as well as whether it was generated or manipulated by artificial intelligence.

Here's how to do it.

From the three-dot menu in Google Search: 
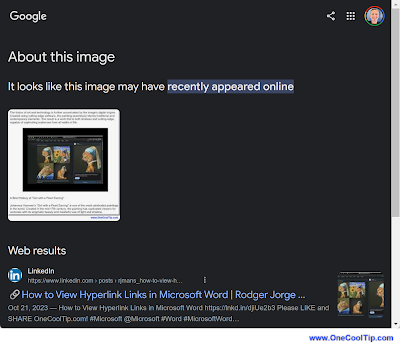
When you come across an image on Google Images or Google Search page, tap the three-dot menu on the top right corner and select About This Image. 

Google will then tell you the background of the image so that you can check its credibility and context1.


Google About This Image
fig. 1 - Google About This Image


The About This Image feature provides you with four types of information about an image:
  1. When did Google first index the image and similar ones: This can help you determine how old the image is and whether it was published before or after a certain event.
  2. Where it may have first appeared: This can help you find the original source of the image and whether it is credible or not.
  3. Where else it’s been seen online: This can help you see how the image has been used on other websites, such as news, social media, and fact-checking sites. You can also compare how different sources present the same image and whether they are consistent or contradictory.
  4. Image metadata: This is information that image creators and publishers have added to an image, such as the title, description, author, date, location, etc. It also includes fields that may indicate whether AI has generated or enhanced the image. All Google AI-generated images have this markup in the original file.
Google About This Image Results
fig. 2 - Google About This Image Results


The ‘About This Image’ feature has several benefits for users:
  • It can help you spot fake images and misinformation by providing you with more context and sources about an image.
  • It can help you verify the authenticity and accuracy of an image by showing you when and where it was first published and how it has been used online.
  • It can help you find more information and related content about an image by showing you other websites that have displayed it.
  • It can help you give credit to the original creator or publisher of an image by showing you their name and website.
About This Image can help you find more information about the images you see on the web.

Be sure to check it out.

Enjoy!


Please LIKE and SHARE OneCoolTip.com!
Visit the OneCoolTip YouTube Channelhttps://www.youtube.com/@onecooltip


READ MORE


OneCoolTip.com
Cool Tech Tips for a Cooler Life


#Google @Google #Images #GoogleImages #Search #AboutThisImage #TechTips #OneCoolTIp @OneCoolTip

Saturday, October 28, 2023

How to Share Your Location and ETA with Google Maps

Google Maps
Ever felt the frustration of trying to describe your location when you're lost? 

Or the anxiety of making someone wait because you're stuck in traffic and they have no clue where you are? 

What if you could share your exact location and Estimated Time of Arrival (ETA) with just a tap on your smartphone? 

Here's a Cool Tip.  Use Google Maps.

Here's how to do it.

Sharing Your Location:
  • Open Google Maps 
  • Make sure you're signed in to your Google account.
  • Turn on your location services if it’s not already enabled.
  • Located at the top right corner, tap on your profile picture.
  • Choose Location Sharing.
  • Select New Share
  • Choose how long you want to share your location and whom to share it with.
  • Tap Share to send your location.

Google Maps Share Location
fig. 1 - Google Maps Share Location


Sharing Your ETA:
  • Enter your destination and start the navigation.
  • Tap on '↑': Locate the upwards arrow at the bottom of the screen or the Estimated Time.
  • Choose Share trip progress.
  • Select Contacts.
  • Tap on the Send button.

Enjoy!

Please LIKE and SHARE OneCoolTip.com!
Visit the OneCoolTip YouTube Channelhttps://www.youtube.com/@onecooltip


READ MORE

OneCoolTip.com
Cool Tech Tips for a Cooler Life


#Google #Maps @Google #GoogleMaps #LocationSharing #TimeManagement #TechTips #Navigation #TechTips #OneCoolTip @OneCoolTip 

Friday, October 27, 2023

How to Launch an Asteroid

Have you ever wondered what would happen if an asteroid hit Earth? 

What would happen if an asteroid hit where you live?

Here's a Friday Funday Cool Tip.  Find out with the Asteroid Launcher at Neal.Fun!

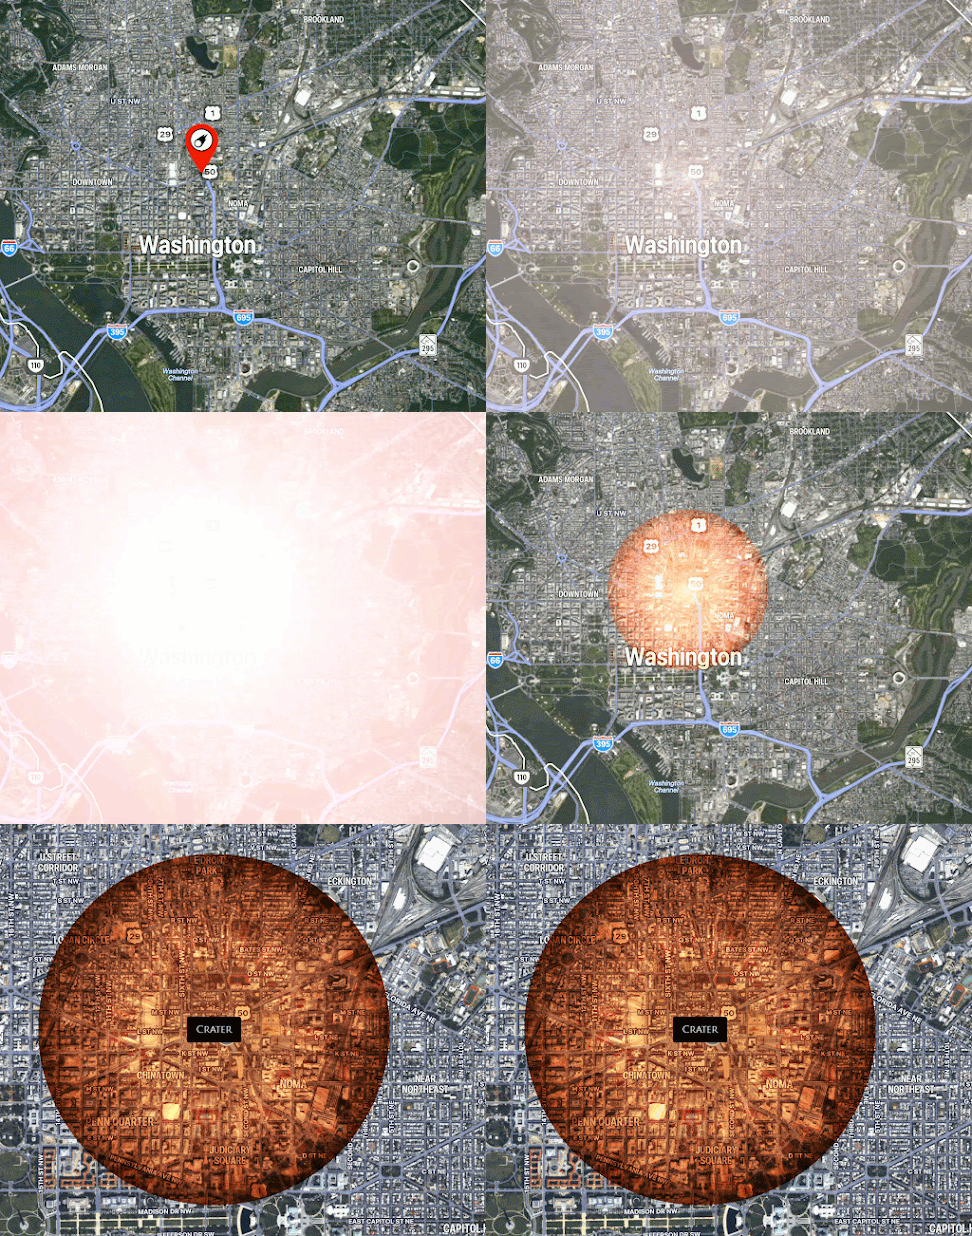
This interactive simulator lets you launch asteroids of different sizes and compositions at Earth, and see the devastating effects of their impact. 

It's a fun and educational way to learn about the dangers of asteroids, and to see how different factors like size, speed, and angle of impact can affect the severity of an impact event.

Steps to use the Asteroid Launcher:
  1. Go to Neal.Fun.
  2. Choose the size, composition, and speed of your asteroid.
  3. Adjust the impact.
  4. Select ground zero and click to select an impact location.
  5. Click the Launch Asteroid button.
  6. Watch the destruction unfold!

Launch an Asteroid - Washington DC
fig. 1 - Launch an Asteroid - Washington DC


The Asteroid Launcher is a fun and educational way to learn about the dangers of asteroids and how different factors can affect the severity of an impact event. 

It's also a great way to destroy the world (or just play around)!

Enjoy!

Please LIKE and SHARE OneCoolTip.com!
Visit the OneCoolTip YouTube Channelhttps://www.youtube.com/@onecooltip

READ MORE

OneCoolTip.com
Cool Tech Tips for a Cooler Life


#Asteroid #AsteroidLauncher #NealFun #Space #Astronomy #Science #FridayFunday #TechTips #OneCoolTip @OneCoolTip