Monday, May 22, 2023

How to Create Graphics and Illustrations Using PowerPoint

Microsoft PowerPoint
Are you tired of spending hours creating artwork and design elements for your projects? 

Here's a Cool Tip: Look no further than Microsoft PowerPoint! 

This versatile tool is not just for presentations - it can also be used to create artwork and designs in just a few simple steps. 

This can save you the cost and complexity of buying more complicated and expensive software.

Here's how to use PowerPoint as a simple solution for creating artwork, text and design elements for normal computer users.

  • Open PowerPoint.
  • Select a blank slide.
  • Click on the Insert tab and select Shapes to add shapes to your slide.
  • You can also add text by clicking on the Insert tab and selecting Text Box.
  • To add images or pictures, click on the Insert tab and select Pictures.
  • Right-mouse click any object to Format.  Change the color of lines and fill.  Change the size and pattern for any line or object.
  • As you can see in fig. 1 below,  a snip of an Excel sheet was brought into PowerPoint, red boxes drawn around key areas, and a large red arrow was added.  Then this image was snipped, saved and then brought into a final document.
  • You can also use PowerPoint's built-in design templates to create professional-looking designs for your artwork.
PowerPoint as Graphics Editor Example
fig. 1 - Use PowerPoint to Compose Graphics
  • Use the Windows Snipping Tool (shortcut is Shift+Windows+S keyboard shortcut) to select your new artwork.  Save the image for future use as well.
  • You can also save the PowerPoint deck for future use if you need to modify the image.

Enjoy!

Please LIKE and SHARE OneCoolTip.com!


READ MORE


OneCoolTip.com
http://www.onecooltip.com
Cool Tech Tips for a Cooler Life!


#PowerPoint #Artwork #DesignElements #DigitalArt #GraphicDesign #OneCoolTip #TechTip #Microsoft @Microsoft 


Sunday, May 21, 2023

How to Survive the End of Windows 10

Microsoft Windows 10
Are you still using Windows 10? 

If so, you might want to pay attention to this Cool Tip. 

Microsoft announced that Windows 10 will reach its end of life on October 14, 2025. 

What does this mean for you? 

Windows 10 End of Life October 14 2025
fig. 1 - Microsoft Windows 10 End of Life
- October 14, 2025

Circle this date on your calendar!  

Why?

After this date, Microsoft will no longer provide security updates or support for the operating system.

The final version is 22H2, released on October 10, 2022.

And until then, Microsoft will not release any major updates or enhancements to Windows 10.

To check if your current Windows 10 PC can run Windows 11, download the PC Health Check app once it becomes available. 


The app will provide an indication if and when your PC is eligible for the update.

If your PC can't be updated, you'll need to consider buying a new PC with Windows 11 pre-installed.

But wait... change is constant.

Windows 12 is expected to be released near the end of 2024.

So whatever you do, keep your system up-to-date, make back-ups regularly, and update your anti-virus protection!

And don't forget to create your personal Disaster Recovery Plan!

Enjoy!


Please LIKE and SHARE OneCoolTip.com!

READ MORE

OneCoolTip.com
http://www.onecooltip.com
Cool Tech Tips for a Cooler Life!


#Windows10 #Windows11 #Microsoft #EndOfLife #PCHealthCheck #news @Microsoft #technews #MicrosoftWindows #MicrosoftWindows10 #MicrosoftWindows11 #WindowsPCUpgrade 

Saturday, May 20, 2023

How to Use ChatGPT iPhone App: Your Personal AI Assistant in Your Pocket!

ChatGPT
Are you tired of searching the internet for answers to your questions? 

Do you wish you had a personal assistant to help you find the information you need? 

Here's a Cool Tip:  Check out the new official ChatGPT iPhone app! 

The official ChatGPT iPhone app is a powerful tool that can help you get answers to your questions quickly and easily. 

Whether you’re looking for information on a particular topic or just want to chat with an AI assistant, the ChatGPT iPhone app is the perfect solution

Here's how to use it.

  • Download the official ChatGPT app from the iPhone App Store. 
    • The app is compatible with iOS 16.1 or later.
  •  Once downloaded, open the app and log in to your OpenAI account
    • If you don;t have an account, you can sign up for one.
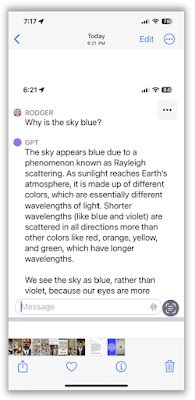
  • After logging in, you can start using the app by typing your query in the send a message box and tapping the send icon.
  • ChatGPT will output its answer to your query.
  • To access the ChatGPT settings, tap the menu icon (three lines) for the sidebar menu.

ChatGPT iPhone App
fig.1 - ChatGPT iPhone app


Note:  You can also use the voice to text feature to speak your request.  Just click the sound icon, say your request and tap to stop recording.  Your request will be turned into text.  Click the send icon to send your request to ChatGPT.

fig. 2 - Voice to Text ChatGPT iPhone app

Android owners will need to wait a bit longer for an app.  ChatGPT says that an Android app is coming "soon".

Enjoy!

Please LIKE and SHARE OneCoolTip.com!

READ MORE


#ChatGPT #iPhoneApp #AIAssistant #OpenAI #PersonalAssistant #PocketAI #TechTip #OneCOolTip #Apple @apple #iphone 

Friday, May 19, 2023

How to Travel the World with Radio Garden

Radio Garden
Have you ever wondered what people are listening to in different parts of the world? 

Do you want to discover new music, news, culture, or languages from across the globe? 

If so, check out this Cool Friday Funday Tip:  Radio Garden.

Radio Garden is an interactive map of live radio stations that lets you tune in to any place on Earth.

Radio Garden United States
fig. 1 - Radio Garden 0 United States Map


Here's how to use Radio Garden:

  • Go to Radio Garden: http://radio.garden/
  • Use your mouse to move the interactive map around the world.
  • Scroll in to view more local stations.
  • Click any dot to hear that station.


Enjoy!

Please LIKE and SHARE OneCoolTip.com!


READ MORE


OneCoolTip.com
Cool Tech Tips for a Cooler Life!


#FridayFunday #RadioGarden #TechTip #OneCOolTip

Thursday, May 18, 2023

How to Use Google Bard's New Export Feature

Google Bard

Have you ever had an amazing conversation with Bard, only to forget what you talked about? 

Or maybe you want to share your conversation with a friend, but you don't know how to do it.

Here's a Cool Tip: Bard Export.

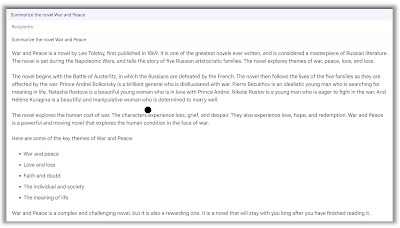
Bard, Google's new experimental AI tool, now has a new export feature that allows you to save your conversations with Bard to a variety of formats, including Google Docs and Gmail. 

This can be a great way to save your work, share it with others, or use it as a starting point for further research or writing.

Here's how to  use Google Bard's Export feature:

  • Start a conversation with Bard: http://bard.google.com
  • Once you have received the response you want to export, click on the Share icon in the bottom right corner of the chat window.
  • From the Share menu, select the format you want to export your conversation to.

fig. 1 - Export Bard Results

Your conversation will be saved in the selected format. You can then open it in your preferred application to view or edit it.

Google Bard Export to Gmail
fig. 2 - Google Bard Export to Gmail

Here are some additional Cool Tips for using Google Bard's export feature:

  • You can export multiple conversations at once by selecting them all before clicking on the Share icon.
  • You can also export a specific section of a conversation by selecting it before clicking on the Share icon.

Get creative and start using Google Bard's export feature to save your work and share it with others.

Please LIKE and SHARE OneCoolTip.com!

READ MORE


OneCoolTip.com
Cool Tech Tips for a Cooler Life!

#Google #Bard #googlebard #AI @Google #TechTip #OneCoolTip

Wednesday, May 17, 2023

How to Use BOLD Text in iPhone Messages

Apple Message App
Want to be BOLD in your iPhone text Messages?

There's a Cool Tip to make it happen.

But you need to go Old School mobile phone.

By default, iPhone Messages does not show a Subject field for text messages. 

However, you can change this setting in the Messages app.

The Subject line will be the first line of your message and it will be BOLD.

To change the setting for subject fields in iPhone Messages, follow these steps:
  • Open the Settings app on your iPhone.
  • Tap Messages.
  • Scroll down and tap Show Subject Field.
  • Toggle the switch to On.

iPhone Message Subject Line
fig. 1 - Change Message Setting
to Show Subject Field


Once you have turned on the setting for subject fields, you will be able to enter a subject line when you send a new text message and it will appear BOLD.

iPhone Message Bold Example
fig. 2 Bold Subject Line Message


Enjoy! 

Please LIKE and SHARE OneCoolTip.com!


READ MORE


OneCoolTip.com
Cool Tech Tips for a Cooler Life!

#iPhone #iOS #iMessage #Subject #Message #SMS #textmessage #text #Apple @apple 


Tuesday, May 16, 2023

Use the Force Grogu. Use the Force!

Baby Yoda Grogu
Are you a fan of Star Wars? 

Do you love Grogu?

Then check out this Cool Tip.

Grogu, also known as Baby Yoda, is the surprise break-out star of The Mandalorian Star Wars TV show on Disney+.

Grogu uses the power The Force to get himself out of trouble and to save the lives of the Mandalorians.

Now he can use The Force on Google search results.

Here's how to do it.

  • Go to Google
  • Type in Baby Yoda, Grogu or The Mandalorian in the search bar.
  • Baby Yoda will appear in the lower right-hand corner of the Google search page results. 
  • Click on Grogu to watch him use The Force to move the search results.

Grogu Baby Yoda Uses The Force on Google Search Results
fig. 1 Grogu, AKA Baby Yoda,
Uses The Force on Google Search Results

That's it.

Enjoy!

Please LIKE and SHARE OneCoolTip.com!

READ MORE


OneCoolTip.com
Cool Tech Tips for a Cooler Life!


#StawWars #Disney @Grogu #BabyYoda #TheForce #Force #Search #EasterEgg #Google @Google 
#MaytheFourthBeWithYou #MayTheForceBeWithYou #TheMandalorian #Mando

Monday, May 15, 2023

How to Save Time and Effort with Microsoft Quick Parts

Microsoft Word
Do you often find yourself typing the same text over and over again in your emails and documents? 

Do you wish there was a way to insert reusable pieces of content with just a few clicks? 

If so, try this Cool Tip: Microsoft Quick Parts.

Quick Parts is a feature that allows you to create, store, and insert snippets of text, graphics, fields, and document properties into your Microsoft Word and Microsoft Outlook files. 

Microsoft Outlook

Y
ou can use Quick Parts to speed up repetitive tasks, such as adding directions, signatures, meeting notes, and more.

There are different types of building blocks, such as AutoText, Document Property, Field, and Header

AutoText is the most common type of building block that stores text and graphics. 

For example, you can create an AutoText entry for your email signature and insert it into any email with a few clicks.

Quick Parts are not limited to text and graphics. 

You can also use them to insert fields that display dynamic information, such as dates, page numbers, document titles, and more. 

You can also use them to insert document properties that store metadata about your file, such as author name, company name, keywords, and more.

How to Create a Quick Part


  • Select the text or graphic that you want to save as a Quick Part. You can select any amount of content, from a single word to a whole paragraph or table.

Select Text
fig. 1 - Select Text to Save as Quick Parts

  • On the Insert tab, in the Text group, click Quick Parts.
  • Click Save Selection to Quick Part Gallery.
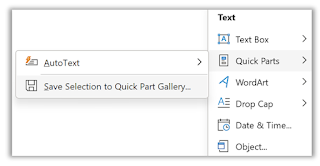
Save Selection to Quick Parts Gallery
fig. 2 - Save Selection to Quick Parts Gallery

  • In the Create New Building Block dialog box, give your Quick Part a name and choose a gallery where you want to store it. You can also add a description, category, and options for how you want it to be inserted.
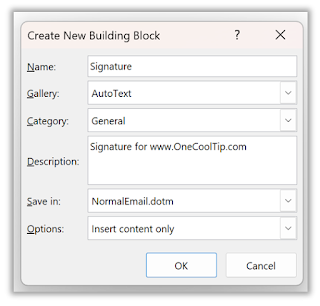
Save New Building Block
fig. 3 - Save New Building Block

  • Click OK.

Your Quick Part is now saved and ready to use.


How to Insert a Quick Part

Inserting a Quick Part is even easier than creating one. 

Just follow these steps:

  1. Place your cursor where you want to insert the Quick Part.
  2. On the Insert tab, in the Text group, click Quick Parts.
  3. Select the Quick Part that you want to insert from the gallery.

Alternatively, you can type the name of the Quick Part and press F3 to insert it automatically.


How to Modify a Quick Part

If you want to change the content or properties of a Quick Part, you can do so by following these steps:

  1. Insert the Quick Part that you want to modify into your file.
  2. Make the changes that you want to apply.
  3. Select the modified content.
  4. On the Insert tab, in the Text group, click Quick Parts.
  5. Click Save Selection to Quick Part Gallery.
  6. In the Create New Building Block dialog box, choose the same name and gallery as the original Quick Part.
  7. Click OK.

You will be asked if you want to overwrite the existing Quick Part. Click Yes.

Your Quick Part is now updated with the changes.


How to Delete a Quick Part

If you no longer need a Quick Part, you can delete it by following these steps:

  1. On the Insert tab, in the Text group, click Quick Parts.
  2. Click Building Blocks Organizer.
  3. In the Building Blocks Organizer dialog box, select the Quick Part that you want to delete from the list.
  4. Click Delete.
  5. Click Yes to confirm.

Your Quick Part is now deleted from the gallery.


Cool Tips for Using Quick Parts


  • Use descriptive names for your Quick Parts so that you can easily find them in the gallery or type them with F3.
  • Use categories to organize your Quick Parts by topic or purpose.
  • Use keyboard shortcuts to create and insert Quick Parts faster. 
  • For example:
    • Press Alt+F3 to create a new Quick Part from selected content.
    • Press Ctrl+F3 to copy selected content to the Spike (a special clipboard that stores multiple items).
    • Press Ctrl+Shift+F3 to paste all


That's it!

Enjoy.

Please LIKE and SHARE OneCoolTip.com!


READ MORE


OneCoolTip.com
Cool Tech Tips for a Cooler Life!


#QuickParts #MicrosoftWord #MicrosoftOutlook #Outlook #Microsoft @Microsoft #Word #TechTip #OneCoolTIp




Sunday, May 14, 2023

Your Pet Deserves to be Royalty, Let AI Paint Their Portrait!

AI Cat Prince
Do you treat your pets like royalty?

They rule your house?

Would you like a royal painter to paint their pictures?

You can.

Here's a Cool Tip.

Let AI create a picture of your pet.

Since many pets can appear similar, with creative descriptions, you may be able to get a good representation of your favorite pets.

Here's how:

  • Go to Bing.com.
  • Login with your Microsoft account.
    • Create a new one if needed.
  • Select Images from the top men.
  • Select Create Images at the top right corner.
  • To create an image, enter a description such as:
    • "Create a renaissance painting of a gray and black tabby cat dressed as a prince"
    • "Create a renaissance painting of an orange and white tabby cat dressed as a princess"
  • Bing will show you four versions of your description.

Bing AI Cat Prince Four Princes
fig. 1  Bing AI Cat Princes - Four Princes

Bing AI Cat Princesses Four Princesses
fig. 2 Bing AI Cat Princesses - Four Princesses 
  • Select one of the pictures and then select to share of download to your PC.
Some extra Cool Tips:
  • Bing Image Creator allows users to generate AI images with DALL·E. Given a text prompt, the AI will generate a set of images matching that prompt.
  • Bing provides credits to create the images.  Use your Bing Rewards for more credits.
  • It works best when you're highly descriptive. 
  • Get creative and add details:
    •  adjectives, 
    • locations, 
    • even artistic styles such as digital art, photorealistic or in the style of Van Gogh
  • For best results, try this format:
    • ADJECTIVE, NOUN, VERB, STYLE

That's it!

Enjoy

Please LIKE and SHARE OneCoolTip.com!

READ MORE


OneCoolTip.com
Cool Tech Tips for a Cooler Life!

#AI #painting #cat #dog #royalty #pet #petportrait #petpainting #Bing #ImageCreator #TechTip #OneCoolTip #Microsoft @Microsoft