Showing posts with label Microsoft PowerPoint. Show all posts

Wednesday, March 15, 2023

How to Convert Any Microsoft Office File to a PDF

PDF
Do you need to send someone a Word document but they don't have Microsoft Word?

Don't panic.

You can send them a PDF.

PDFs are a great way to share your documents online. 

They keep the original formatting, layout and fonts of your files, regardless of what device or software you use to view them. 

Here's how to create PDFs from your Microsoft Office files, such as Word, Excel or PowerPoint.
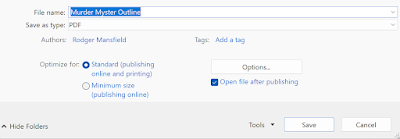
  • Open your Office file and click on File then Save As.
  • Choose a location where you want to save your PDF file and select PDF from the drop-down menu next to Save as type.
Save as PDF
  • Click on More Options and select Optimize for - Standard (online and printing) or - Minimum size (publishing online)
Save as PDF More Options
  • Click on Save and wait for your PDF file to be created.

That’s it! 

You’ve just converted your Office file to a PDF file. 

You can now share it with anyone you want or store it on your device for future use. You can also open it with any PDF reader or editor of your choice.

Please LIKE and SHARE OneCoolTip.com!

READ MORE

OneCoolTip.com
Cool Tech Tips for a Cooler Life!

#Microsoft #MicrosoftOffice #PDF #Word #Excel #PowerPoint #PDFConverter #OfficeTips #OneCoolTip

Monday, March 13, 2023

How to Show or Hide the Ribbon in Office

Microsoft 365
Where's the ribbon?

That's often the question when using Microsoft Office.

The ribbon is a set of toolbars at the top of the window in Office programs, for example, Word, Excel, PowerPoint, designed to help you quickly find the commands that you need to complete a task. 

But a common problem that users encounter is that the ribbon can appear and seemingly disappear on a whim.

Office Ribbon Menu Bar
Microsoft Office Ribbon

Here is a Cool Tip on how to master the Office ribbon.

Expand or collapse the ribbon

You can toggle between having the ribbon expanded or collapsed in multiple ways.

If the ribbon is collapsed, expand it by doing do one of the following:

  • Double-click any of the ribbon tabs.

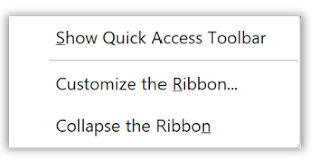
  • Right-click any of the ribbon tabs, and then select Collapse the ribbon.

Collapse the Ribbon
  • Press CTRL+F1.

If the ribbon is expanded, collapse it by doing do one of the following:

  • Double-click any of the ribbon tabs.
  • Right-click any of the ribbon tabs, and then select Collapse the ribbon
Collapse the Ribbon
Collapse the Ribbon

  • Right-click Ribbon display options in the lower right of the ribbon, and then select Collapse the ribbon.
  • Press CTRL+F1.

Show Ribbon options

  • When the ribbon is visible, in the lower-right corner of the ribbon, click the Ribbon Display Options icon or the down caret icon.
Ribbon Display Options
  • Choose a state for the ribbon:

    • Full-screen mode hides the ribbon for the best view of your document, and only shows the ribbon when you select More , or press the ALT key.
    • Show tabs only shows only the ribbon tabs, so you see more of your document, and you can still quickly switch among the tabs.
    • Always show Ribbon keeps all the tabs and commands on the ribbon visible all the time.

If the ribbon isn't visible at all

If the ribbon isn’t visible at all (no tabs are showing), the state is set to Full-screen mode

Select More  or the three dot icon at the top right of the screen. This will temporarily restore the ribbon.

When you return to the document, the ribbon will be hidden again. To keep the ribbon displayed, select a different state from the Ribbon Display Options menu.

That's it!

Please LIKE and SHARE OneCoolTip.com!

READ MORE


OneCoolTip.com
Cool Tech Tips for a Cooler Life!


#Microsoft #Office #OfficeTips #RibbonControl #OneCoolTip #HowTo #OfficeTricks  @Microsoft

Monday, March 6, 2023

Link Like a Pro: Use This Cool Tip to Add Hyperlinks

Do you find yourself constantly copying and pasting website links into your Microsoft documents? 

Did you know that there's a Cool Tip to insert links using a keyboard shortcut? 
    • Use Control + K as a keyboard shortcut to quickly insert a hyperlink address in Microsoft Word, Excel, and PowerPoint.
Here's how to do it:
  • First, highlight the text that you want to turn into a link.
  • Press the Control + K keys on your keyboard. 
    • This will open the Insert Hyperlink dialog box.
  • In the Address field, type or paste the URL of the website you want to link to.
  • Click OK to insert the link into your document.

Insert Hyperlink Example

That's it!  You've just saved yourself precious time.

This shortcut works in all recent versions of Microsoft Word, Excel, and PowerPoint as well as many other Windows programs.

Enjoy!

Please Like and Share OneCoolTip.com!

READ MORE

Monday, January 9, 2023

Draw a Perfect Straight Line, Square or Circle with This Cool Tip

Shapes
When using Microsoft Word, Excel, Outlook or PowerPoint, you can add shapes, such as boxes, circles, and arrows, to your documents, email messages, slide shows, and spreadsheets. 

But how do you get a perfect circle rather than an oval?  Or a square rather than a rectangle?  Or a straight line rather than a jagged one?

The secret Cool Tip is to press and hold the SHIFT key when dragging the mouse to create the shape.

Press Shift Key to draw perfect line square circle

Here's how to do it:

  • On the Insert tab, click Shapes
  • Click the shape icon you want to draw, click anywhere in the workspace and drag to place the shape.
  • To create a perfect line, square or circle (or constrain the dimensions of other shapes), press and hold Shift key while you drag to create the shape.


If you like OneCoolTip, please Like and Share!


READ MORE


OneCoolTip.com
http://www.onecooltip.com
Cool Tech Tips for a Cooler Life!

#Shift #microsoft #word #excel #powerpoint


Friday, December 11, 2015

3 Top Tips When You're Frustrated Using a PC

One Cool Tip - http://www.onecooltip.com
Using a computer is often frustrating.

Perhaps its new software or just existing software where the desired feature just isn't obvious.

Software continues to add more and more features, menus change or disappear and simple commands don't seem so obvious any more.

Here are 3 top tips for figuring out how to solve simple issues.

F1 is Your Friend

Pressing the F1 key is the easy way to access the Help section of most software.  On some PCs, you'll need to press the blue Fn (Function) key to access the F1 function.  Microsoft has extensive help tools accessible from F1 that include the ability to search for common features, issues and also view video tutorials.

Common Keyboard Shortcuts

Most PC programs utilize standard keyboard shortcuts.  For example, if you are using Word and can't find the Print function, don't worry.  Pressing the Ctrl + P keys will bring up the Print screen.

A few other Ctrl key combinations:

Ctrl + C to Copy selected text,
Ctrl + X to Cut selected text and
Ctrl + V to Paste text from the clipboard.

Ctrl + F will bring up a Search form in many programs and web browsers.  Looking for specific text on a webpage or within a Word document? Use the the Ctrl + F to find it quickly.

And don't forget that pressing the the ESC key can exit most screens.

Google It

When you are really stuck, try a Google search.  Using the above issue of how to print in Microsoft Word, a search in Google for "Microsoft Word Print" returns the answer, including an enhanced Google spotlight of the instructions to be able to print from within Microsoft Word.


And finally, don't forget to check One Cool Tip's library of cool tips around key topics:  Google, Windows 10, Chrome, Microsoft Word, Microsoft Power Point, Microsoft Excel, and Microsoft Outlook.  There's a whole list of Cool Tip tops on the right-hand side of One Cool Tip.

Enjoy!


READ MORE

OneCoolTip.com
Cool Tech Tips for a Cooler Life!


#Windows #restart #reboot #PC #computer #help #F1 #Microsoft

Friday, October 23, 2015

How to Insert a Screenshot in Microsoft Power Point, Excel, Word or Outlook

We've told you before how the Windows Snipping app is great for adding screenshots to a document.

And the Windows 10 version is even better with a delayed timer.

But Microsoft Office products, Power Point, Excel, Word and Outlook, also have a built-in tool to insert screenshots.

Here's how to do it.

  1. Click the "Insert" menu on the Office Ribbon.  Then select "Screenshot".
  2. To add the entire window, click the thumbnail view of the available windows.
  3. To add part of a window, click "Screen Clipping".  Press and hold the left mouse button to select the screen area to capture.


That's it.  It's easy to add an entire screen or just a part into your presentation, document, spreadsheet or email.

Enjoy!


Tuesday, October 6, 2015

New Smart Lookup in Microsoft Office 2016

Quickly Find What You Need to Know Without Leaving Word, Excel, Power Point or Outlook

Microsoft Office 2016 products have a great new search option, Smart Lookup.

Smart Lookup is a new feature that brings the power of Bing to users within the four Office 2016 applications.  Highlight search keywords and right-click to select Smart Lookup to display results in an "Insight" window within the application.

Office 2016 Smart Lookup

You can also select the keywords and then select the "Smart Lookup" in the Review menu on the Office Ribbon.

Smart Lookup Insights

Smart Lookup is also a part of the new Tell Me feature that we shared earlier.  Just enter keywords into the Tell Me box and select "Smart Lookup" from the dropdown list  to display information as well.


READ MORE

OneCoolTip.com
Cool Tech Tips for a Cooler Life!

#Microsoft #Word #SmartLookup #Smart #Lookup #Office2016

Monday, August 31, 2015

Use This Keyboard Shortcut to Access The Ribbon Menu Bar in Word, Excel, Power Point and Outlook

Microsoft Office logo
When using Microsoft Office products such as Excel, Word, Power Point and Outlook, you can save time with a very cool keyboard shortcut.

Press the ALT key to access any Ribbon command.

Block letters will appear next to each command on the Ribbon bar.

ALT keyboard shortcut Microsoft Office Word - One Cool Tip www.onecooltip.com

Pressing a subsequent letter such as H will display will display the Home submenu.

ALT keyboard shortcut Microsoft Office Word H - One Cool Tip www.onecooltip.com

Select the command you want by pressing the desired letter key.

To go back one level, press the ESC key.  And press ALT key to turn off this function.

Enjoy!


READ MORE

One Cool Tip.com
Cool Tech Tips for a Cooler Life!

#Microsoft #Excel #Word #PowerPoint #ALT #keyboard #shortcut

Friday, July 31, 2015

This PowerPoint Tip Will Make You the Focus

Microsoft Power Point
Who doesn't love PowerPoint?

You can really wow your audience with lots of graphics, bullets and even video.

Maybe too much.

But is your audience watching your screen more than you?

Sometimes you need to get the audience's attention to watch you and not the screen.

To do that, you'll want the screen to go dark.

 Press W or B to Make You the Focus

Pressing the W key will turn the presentation to a White screen and pressing the B key will turn the presentation to a black screen.  Use the arrow keys to resume forward or backward to the next slide.

Microsoft Power Point Black Screen

So make your dramatic selling point without the distraction of a PowerPoint slide.

You'll be the star of the show.

Enjoy!


READ MORE

#Microsoft #PowerPoint