Thursday, March 7, 2024

Upgrade Your Presentations With OneNote's Overlooked Laser Pointer

Streamline your presentations and captivate your audience with OneNote's hidden gem – the "Pen As Laser Pointer" feature.

By Rodger Mansfield, Editor
March 7, 2024


Have you ever fumbled with a laser pointer during a presentation, struggling to keep the beam steady?

Do you wish you could seamlessly highlight key points on your slides without breaking your flow? 

Here's a Cool Tip.  Use Microsoft OneNote's "Laser Pointer" feature.

Microsoft 365 OneNote, commonly known as OneNote, is a digital note-taking app that’s part of the Microsoft 365 suite. 

It provides a versatile platform for users to capture ideas, notes, research, and information in a digital format. 

OneNote’s flexibility makes it a valuable tool for individuals and teams in various environments, from personal use to professional and educational settings. 

It’s particularly useful for keeping all your notes synchronized across devices, making it easy to access and update your information wherever you are. 

Here is how to use it.
  • Launch Microsoft 365 OneNote and access the presentation you want to deliver.
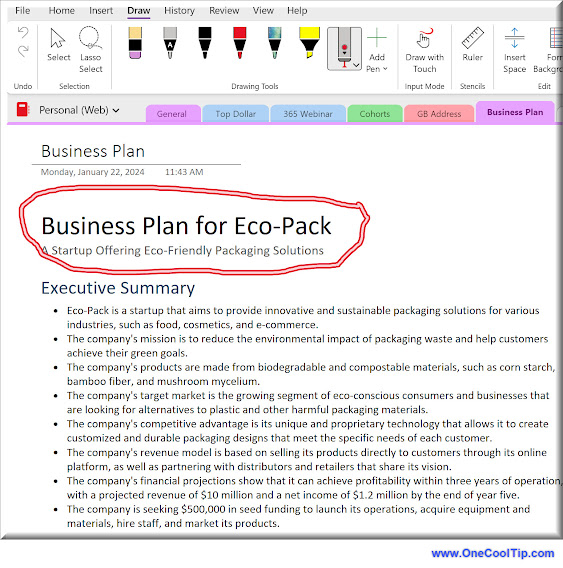
  • In the OneNote ribbon, click the "Draw" tab to reveal your digital inking tools.
  • If Laser Pointer is visible, select it.
  • If Laser Pen is not visible, click "+Add Pen".
  • Select "Laser Pointer".
  • Select a Color, default is Red.
  • Use the Laser Pointer to draw on screen. The drawing disappears after a few seconds.  

Microsoft OneNote - Laser Pen
fig. 1 - Microsoft OneNote - Laser Pen

Using OneNote's Laser Pen guide your audience's attention effortlessly while maintaining a natural presentation style.

No more awkward interruptions while searching for or fiddling with a physical laser pointer.


Microsoft OneNote - Laser Pointer Example
fig. 2 - Microsoft OneNote - Laser Pointer Example

Teachers, business professionals and conference speakers will find this a useful feature:
  • Enhance classroom lectures by dynamically highlighting concepts on a presentation.
  • Emphasize key charts and figures during meetings or pitches.
  • Direct your audience's attention with precision during large-scale presentations.
Be sure to choose a high-contrast ink color for optimal visibility against your slides.

Transform your presentations with OneNote's "Laser Pointer" feature – highlight information, boost engagement, and deliver with confidence.

It offers a seamless, integrated way to highlight crucial information, boost your engagement, and elevate your delivery.

Enjoy!


Please LIKE and SHARE OneCoolTip.com!
Visit the OneCoolTip YouTube Channelhttps://www.youtube.com/@onecooltip

Do you have a Cool Tip or question? Email us at
onecooltip.com@gmail.com


READ MORE


Rodger Mansfield, a seasoned tech expert, is the mastermind behind OneCoolTip.com, where he serves as both writer and editor. With a keen eye for simplifying complex tech, Rodger delivers practical advice that empowers readers to navigate the digital world with confidence. Dive into OneCoolTip.com for a treasure trove of savvy tips and tricks that keep you one step ahead in tech.


OneCoolTip.com
Cool Tech Tips for a Cooler Life!


#Microsoft365 #OneNote #Presentations #ProductivityHacks #DigitalTools #TechTips #OneCoolTip @OneCoolTip 

Wednesday, March 6, 2024

Missing Your ‘Show Desktop’ Button? Here’s How to Get It Back in Windows 11!

Effortlessly reset your taskbar and bring back the ‘Show Desktop’ icon with our straightforward Cool Tip, tailored for both newcomers and seasoned Windows 11 users.


By Rodger Mansfield, Editor
March 6, 2024


Have you ever noticed how a small change can throw off your entire routine? 

Are you missing the ‘Show Desktop’ icon after the latest Windows 11 update?

Want to know how to get it back and why it matters?

Here is a Cool Tip.  Reset the Show Desktop option.

The 2024-02 Cumulative Update Preview for Windows 11 Version 23H2, identified as KB5034848, changed Taskbar and the System Tray functionality.

The update moves the Copilot icon to the far right side of the system tray, and turns off by default the ‘Show Desktop’ feature at the taskbar’s rightmost corner.

The “Show Desktop” option is a feature in Windows operating systems that allows users to quickly minimize all open windows and view the desktop with a single click or gesture. 

This feature is typically represented by a small button or area at the far right of the taskbar. 

When activated, it minimizes all open applications, providing immediate access to the desktop where files, folders, and shortcuts are located. 

It’s a convenient way to clear the screen without closing any programs, allowing for easy access to desktop items or simply a clean workspace.

Want to re-add the Show Desktop option?

Here is how to do it.
  • Open ‘Settings’ via the Start menu or by pressing Win + I.
  • Navigate to ‘Personalization’ and select ‘Taskbar’.
  • In the ‘Taskbar behaviors’ section, find and enable the option ‘Show desktop on the far right’.
Taskbar Setting to Show Desktop
fig. 1 - Taskbar Setting to Show Desktop

To show the desktop, just click in the taskbar space on the far right.
fig. 2 - Click in This Space to Show Desktop

Unfortunately, when the Show Desktop is turned on, the Copilot icon disappears.

To invoke Copilot, press WIN + C as a keyboard shortcut.

Copilot can also be disabled from the taskbar by right-clicking, selecting "Taskbar settings," and toggling off Copilot (preview).


Turn Off Copilot from Taskbar
fig. 3 - Turn Off Copilot from Taskbar

Quick desktop access improves multitasking and is a familiar tool for long-time Windows users.

With these simple steps, you can reclaim the ‘Show Desktop’ icon and maintain your productivity. Embrace the new while preserving the familiar with Windows 11’s latest update.

This update is slowly rolling out to all Windows 11 users so you'll see these changes in the coming weeks.

Enjoy!


Please LIKE and SHARE OneCoolTip.com!
Visit the OneCoolTip YouTube Channelhttps://www.youtube.com/@onecooltip

Do you have a Cool Tip or question? Email us at
onecooltip.com@gmail.com


READ MORE


Rodger Mansfield, a seasoned tech expert, is the mastermind behind OneCoolTip.com, where he serves as both writer and editor. With a keen eye for simplifying complex tech, Rodger delivers practical advice that empowers readers to navigate the digital world with confidence. Dive into OneCoolTip.com for a treasure trove of savvy tips and tricks that keep you one step ahead in tech.


OneCoolTip.com
Cool Tech Tips for a Cooler Life!

#Microsodt @Microsoft #Windows @Windows #Windows11Taskbar or #DesktopShortcut #Windows11Update #TaskbarTips #ShowDesktopReturn #UserFriendlyComputing #TechTips #OneCoolTip @OneCoolTip 

Tuesday, March 5, 2024

Google Drive iOS Update Transforms Your Search Experience

Google Drive's iOS app receives a search functionality overhaul, with new filters and suggestions offering a streamlined way to find your files.

By Rodger Mansfield, Editor
March 5, 2024
 

Have you ever found yourself sifting through a cluttered Google Drive on your iPhone or iPad, desperately trying to locate that specific document? 

Do you wish you could pinpoint files by type, owner, or date faster? 

Here's a Cool Tip.  Use the newly improved search capability in Google Drive for iOS.

Here's how to do it.
  1. Ensure you have the latest version of the Google Drive app installed on your iOS device.
  2. Within Google Drive, tap the search bar at the top.
  3. Notice new drop-down menus below the search bar. These provide filters for "Type," "People," and "Modified."
  4. Select relevant filters to narrow down your results. 
  5. As you type in the search bar, Google Drive will intelligently suggest further filters.

The improved search capability offers:
  • Significantly faster file location
  • Improved organization for complex Google Drive accounts
  • Intuitive, user-friendly interface
Google Drive Search - iOS
fig. 1 - Google Drive Search - iOS

Imagine you need to find a spreadsheet your colleague shared with you last week.  

Rather than scrolling endlessly, filter by "File Type: spreadsheet" and "Last Modified: Last 7 Days." 

Your file should appear instantly.

The great news is this feature requires no additional configuration – it's enabled automatically with the update!

This iOS update makes Google Drive a more efficient and organized workspace. 

If you're an iPhone or iPad user who relies on Google Drive, this search enhancement will save you precious time and streamline your workflow.


Please LIKE and SHARE OneCoolTip.com!
Visit the OneCoolTip YouTube Channelhttps://www.youtube.com/@onecooltip

Do you have a Cool Tip or question? Email us at
onecooltip.com@gmail.com


READ MORE


Rodger Mansfield, a seasoned tech expert, is the mastermind behind OneCoolTip.com, where he serves as both writer and editor. With a keen eye for simplifying complex tech, Rodger delivers practical advice that empowers readers to navigate the digital world with confidence. Dive into OneCoolTip.com for a treasure trove of savvy tips and tricks that keep you one step ahead in tech.


OneCoolTip.com
Cool Tech Tips for a Cooler Life!


#Google @Google #GoogleDrive #iOS #search #productivity #organization #filemanagement  #TechTips #OneCoolTIp @OneCoolTip 

Monday, March 4, 2024

Create Like a Pro with Copilot Pro in Outlook

Step into the cockpit of your inbox with Copilot Pro and discover how the Draft and Coaching features can elevate your email game in Microsoft Outlook.

By Rodger Mansfield, Editor
March 4, 2024


Have you ever felt like you’re just winging it with your emails? 

Want to draft messages that hit the mark every time? 

Curious about how a virtual coach could up your email game?

Here's a Cool Tip.  Use Copilot Pro in Microsoft 365 Outlook.


Copilot Pro in Microsoft 365 Outlook is a premium AI feature that enhances your email experience by offering advanced capabilities such as summarizing long threads, suggesting replies, and assisting in drafting emails with the appropriate tone. 

It’s designed to streamline your inbox management and boost productivity within the Microsoft Outlook environment. 

To access Copilot Pro, you need a Microsoft 365 Personal or Family subscription1. 

It’s available on the web and in select Microsoft 365 apps on various platforms, including Windows, macOS, and iPadOS.


Here's how to use it.
  1. Ensure you have an active subscription to Microsoft 365 that includes Copilot Pro.
  2. Once the purchase is confirmed, Copilot Pro will be added to your Outlook.
  3. Find the Copilot Pro icon in the Outlook ribbon to start using its features.
  4. Use the ‘Draft’ feature to compose emails with AI-powered assistance, enhancing your writing efficiency.
  5. Try the ‘Coaching’ feature for real-time suggestions to improve your email communication style.

Using Copilot when creating emails simplifies email drafting.

It also offers personalized coaching for better communication and seamlessly integrates with Outlook’s interface.

Copilot Pro in Outlook Prompt
fig. 1 - Copilot Pro in Outlook - Prompt

        6. Just click the Generate button to generate a response.

Copilot Pro in Outlook - Draft Response
fig. 2 - Copilot Pro in Outlook - Draft Response


        7. Click Keep It to keep the draft response.

        8. Or click Discard.

        9. Add something to add, for example, "make it more formal" and click Regenerate.

But like all AI, it might take a few tries to get the hang of it.

With Copilot Pro’s Draft and Coaching features, you’re not just sending emails; you’re crafting communications like a seasoned pro. 

Don't have or can't afford the subscription to Copilot Pro?

No problem.


Embrace these tools and watch your email confidence soar!


Please LIKE and SHARE OneCoolTip.com!
Visit the OneCoolTip YouTube Channelhttps://www.youtube.com/@onecooltip

Do you have a Cool Tip or question? Email us at
onecooltip.com@gmail.com


READ MORE


Rodger Mansfield, a seasoned tech expert, is the mastermind behind OneCoolTip.com, where he serves as both writer and editor. With a keen eye for simplifying complex tech, Rodger delivers practical advice that empowers readers to navigate the digital world with confidence. Dive into OneCoolTip.com for a treasure trove of savvy tips and tricks that keep you one step ahead in tech.


OneCoolTip.com
Cool Tech Tips for a Cooler Life!


#Microsoft @Outlook #Outlook #CopilotPro #EmailLikeAPro #DraftAndCoach  #TechTips #BacktoWorkMonday #OneCoolTip @OneCoolTip

Sunday, March 3, 2024

Never Miss a Turn Again: Google Maps' Glanceable Directions

Tired of constantly unlocking your phone for directions? Google Maps' Glanceable Directions keeps essential navigation info on your screen at all times, streamlining your travels.

By Rodger Mansfield, Editor
March 3, 2024


Google Maps
Have you ever found yourself fumbling with your phone while walking, trying to view turn-by-turn directions in Google Maps? 

Or maybe as a driver, you wish you could keep an eye on the next turn without switching apps? 

Here's a Cool Tip.  Use Glanceable Directions.

Google Maps just made navigation a whole lot smoother with its Glanceable Directions feature.

Glanceable Directions provides key navigation information (like your ETA, distance to the next turn, and directional arrows) directly on your route overview screen or even your phone's lock screen. 

No more constantly unlocking your phone or switching to full navigation mode!

And it now works for both Android and iPhones.

Here's how to do it.
  • Make sure you have the latest version of Google Maps.
  • Open Google Maps and tap on your profile icon.
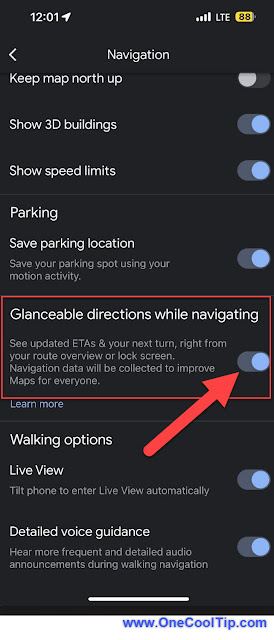
  • Navigate to Settings -> Navigation Settings
  • Enable "Glanceable directions while navigating"

Google Maps - Glanceable Directions Setting
fig. 1 - Google Maps - Glanceable Directions Setting

Why use Glanceable Directions?
  • Get vital directions with a simple glance at your phone.
  • Keep your eyes on the road or your surroundings instead of your phone screen.
  • Avoid the distraction and delay of repeatedly unlocking your phone.

Glanceable Directions Example
fig. 2 - Glanceable Directions Example


Google Maps' Glanceable Directions is a fantastic quality-of-life enhancement that simplifies navigation for drivers, walkers, and bikers alike. 

By following these simple steps, you'll transform the way you use Google Maps for getting around.

Upgrade your navigation experience today – give Google Maps' Glanceable Directions a shot on your next trip!


Please LIKE and SHARE OneCoolTip.com!
Visit the OneCoolTip YouTube Channelhttps://www.youtube.com/@onecooltip


READ MORE


Rodger Mansfield, a seasoned tech expert, is the mastermind behind OneCoolTip.com, where he serves as both writer and editor. With a keen eye for simplifying complex tech, Rodger delivers practical advice that empowers readers to navigate the digital world with confidence. Dive into OneCoolTip.com for a treasure trove of savvy tips and tricks that keep you one step ahead in tech.


OneCoolTip.com
Cool Tech Tips for a Cooler Life!


#Google @Google #googlemaps #directions #navigation #tech #travel #traveltips #gps #explore #TechTips #OneCoolTip @OneCoolTip 

Saturday, March 2, 2024

Speak Easy: Navigating Voice Typing on Windows

Step into the future of computing with Voice Typing on Windows 10 and 11. This beginner-friendly guide will show you how to command your PC with the power of speech, making typing a breeze.

By Rodger Mansfield
March 2, 2024

Voice Typing
Have you ever thought of dictating your thoughts to your computer and watching words magically appear on the screen? 

Imagine transforming your spoken words into written text with seamless precision.

Here's a Cool Tip.  Use Voice Typing in Windows.

Whether you’re drafting an email, jotting down notes, or crafting your next novel, Voice Typing on Windows 10 and 11 can make it happen. 

Here's how to do it.
  • Connect a microphone to your PC and ensure it’s recognized by Windows.
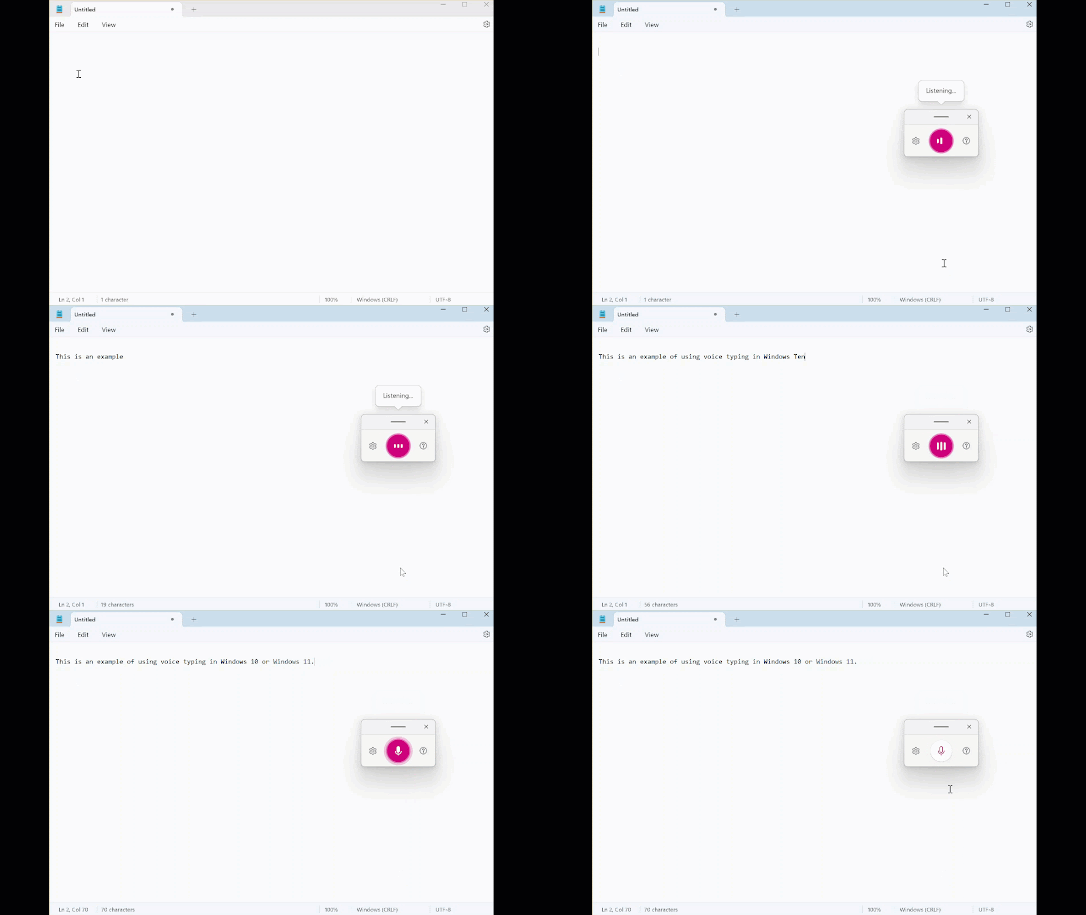
  • Activate Voice Typing with the shortcut Win + H.
  • Start speaking naturally to dictate text; pause briefly between sentences for best results.
  • Edit on the go with commands like “delete that” or “start a new line.”
  • Review the transcribed text and make any manual adjustments if needed.

Windows Voice Typing

fig. 1 - Windows Voice Typing in Windows


Voice Typing in Windows 10 and 11 is a game-changer for anyone looking to streamline their digital tasks. 

Voice Typing Enhances productivity by freeing up your hands for other tasks and offers greater accessibility for users with different abilities.

By embracing this intuitive feature, you’ll unlock a new dimension of convenience and accessibility in your daily computer use.

Enjoy!


Please LIKE and SHARE OneCoolTip.com!
Visit the OneCoolTip YouTube Channelhttps://www.youtube.com/@onecooltip


READ MORE


Rodger Mansfield, a seasoned tech expert, is the mastermind behind OneCoolTip.com, where he serves as both writer and editor. With a keen eye for simplifying complex tech, Rodger delivers practical advice that empowers readers to navigate the digital world with confidence. Dive into OneCoolTip.com for a treasure trove of savvy tips and tricks that keep you one step ahead in tech.


OneCoolTip.com
Cool Tech Tips for a Cooler Life!


#Microsoft @Microsoft #Windows #VoiceTypingWindows #SpeechToText#EffortlessTyping #AccessibilityWin #MicrosoftTips #TechEase #TechTips #OneCoolTip @OneCoolTip 

Friday, March 1, 2024

Witness Time Unfold: Your Guide to Google Earth Timelapse

Ready to see the world change before your eyes? Discover Google Earth Timelapse, a powerful tool for visualizing decades of planetary transformation.

By Rodger Mansfield, Editor
March 1, 2024


Google Earth
Has the glacier in your favorite national park retreated? 

Did that new city district seemingly sprout overnight? 

Here's a Friday Funday Cool Tip.  Use Google Earth Timelapse.

Google Earth Timelapse allows you to rewind or fast-forward time. 

Get ready to see the Earth evolve at your fingertips!

A feature within Google Earth showcasing 37 years of global satellite imagery in mesmerizing timelapse format.

It visualizes changes to the Earth's surface, allowing you to explore natural and human-made transformations with ease.

Friday Funday

Imagine watching the Amazon rainforest shrink over decades, or a coastal city explode outwards – all within seconds:
  • Climate change effects (glacial retreat, coastline change)
  • Urban development (city growth)
  • Natural events (impact of forest fires or floods)

That's the power of Google Earth Timelapse

Here's how to use it.
  1. Navigate to: https://earthengine.google.com/timelapse/
  2. Type a location in the search bar or explore featured locations on the map.
  3. Launch the timelapse and Google Earth will zoom in and start the timelapse sequence.
  4. Use the play/pause buttons and the timeline slider to control the speed or jump to specific years.


Google Earth Timelapse - Columbia Glacier Retreat

fig. 1 - Google Earth Timelapse - Columbia Glacier Retreat


Google Earth Timelapse provides a fascinating and accessible way to experience the dynamic nature of our planet. 

Embrace this tool to learn, understand, and be inspired by the changes shaping our world.

Ready to see the world change before your eyes? 

Visit Google Earth Timelapse now and start exploring!

Enjoy!


Please LIKE and SHARE OneCoolTip.com!
Visit the OneCoolTip YouTube Channelhttps://www.youtube.com/@onecooltip


READ MORE


Rodger Mansfield, a seasoned tech expert, is the mastermind behind OneCoolTip.com, where he serves as both writer and editor. With a keen eye for simplifying complex tech, Rodger delivers practical advice that empowers readers to navigate the digital world with confidence. Dive into OneCoolTip.com for a treasure trove of savvy tips and tricks that keep you one step ahead in tech.


OneCoolTip.com
Cool Tech Tips for a Cooler Life!


#Google @Google @GoogleEarth #GoogleEarth #environment #climatechange #geography #visualization #TechTips #OneCoolTip @OneCoolTip