Saturday, October 14, 2023

Unleash the Power of Microsoft Edge’s Task Manager

Microsoft Edge
Ever wondered why your Microsoft Edge browser is running slow? 

Or which tab is consuming most of your system’s resources? 

What if you could have a built-in tool within your browser that could answer all these questions? 

Intriguing, isn’t it? 

Here's a Cool Tip.  Use Microsoft Edge's built-in Task Manager. 

Microsoft Edge’s Task Manager is a powerful tool that allows you to manage resource-intensive tabs and extensions. 

It provides real-time data about the memory, CPU, and network usage of each tab or process. 

This can be particularly useful when you’re experiencing slow performance while browsing the web.

We've told you about the similar feature in Google Chrome.

Here's how to use it.
  • Open Microsoft Edge.
  • Click the ellipses button (three dots) in the upper-right corner of any Edge browser window.
  • In the menu that pops up, select More tools, then Browser task manager.
  • OR Use SHIFT + ESC keyboard shortcut to open the Task Manager.
  • Once the Browser Task Manager window opens, you’ll see a list of all tabs, processes, and extensions running in the browser.
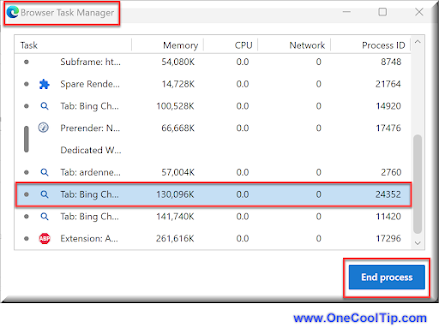
Microsoft Edge Task Manager
fig. 1 - Microsoft Edge Task Manager


Understanding the Data
The data for each tab or process is divided into five columns:

Task: Provides a concise list of all active tasks within the browser. This includes open tabs, extensions, browser components, and various other elements contributing to the browser’s functionality. It essentially gives a friendly name for each process. This can be particularly useful when you’re trying to identify which tab or process is consuming most of your system’s resources.

Memory: Shows how much system memory a tab or process is using in kilobytes.

CPU: Shows what percentage of your total CPU capacity (processing power) a tab or process is using.

Network: The Network column in Microsoft Edge’s Task Manager shows the amount of network bandwidth used by each tab or process. It reports data sent and received by each task, enabling users to monitor which tabs or extensions are actively engaging with online content. The data is displayed in bytes or kilobytes per second. This can be particularly useful when you’re trying to identify which tab or process is consuming most of your network resources.

Process ID: Shows the process ID of the tab or process, which is mostly useful for in-depth developer troubleshooting.

You can click on any column header to sort the tabs and processes by resource usage. 

For example, if you want to see which tabs are using the most memory, click on the “Memory” column header.

Managing Tabs and Processes
If a tab or process is taking up too much CPU, memory, or network bandwidth and becomes unresponsive, you can force it to close using Edge’s Browser Task Manager. 

Here's how to do it. 
  • Select the tab or process from the list.
  • Click on the End process button.
  • You can also manage multiple tabs at once. 
    • For example, if you have many tabs open and would like to close many of them at once, select them in a group within Task Manager and click End process. Just make sure you have any work in those tabs saved before you close them suddenly.

Now that you know how to use Microsoft Edge’s Task Manager, it’s time to put this knowledge into practice. 


Happy browsing!

Enjoy!

Please LIKE and SHARE OneCoolTip.com!

READ MORE


OneCoolTip.com
Cool Tech Tips for a Cooler Life


#Microsoft #Edge @Microsoft #MicrosoftEdge #TaskManager #TechTips #TechTutorial #Browser #BrowserTools #OneCoolTip @OneCoolTip #YouTube 

Friday, October 13, 2023

How to Play Google Tic-Tac-Toe

Do you love the classic game of Tic-Tac-Toe? 

Did you know that you can play it online for free?

Here's a Friday Funday Cool Tip.   Play Online with Google.

Here's how to do it.
  • Go to Google Tick-Tac-Toe.
  • Select the difficulty level you want to play at (easy, medium, or impossible or against a friend).
  • Place your symbol on the board by clicking on one of the empty squares.
  • Your opponent (Google) will then place their symbol on the board.
  • Continue taking turns placing your symbols on the board until one player has three of their symbols in a row (horizontally, vertically, or diagonally).
  • The player with three of their symbols in a row wins the game!
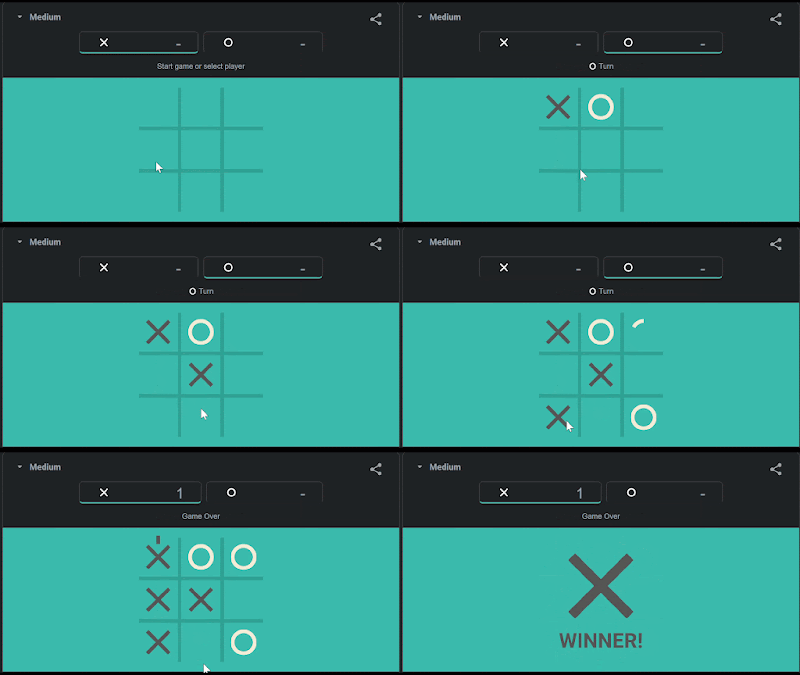
Google Tic-Tac-Toe GIF
fig. 1 - Google Tic-Tac-Toe

Google Tic-Tac-Toe is a fun and easy way to play the classic game of Tic-Tac-Toe online. 

It's free to play and you can choose your difficulty level. So what are you waiting for? Give it a try today!

Enjoy!


READ MORE

Please LIKE and SHARE OneCoolTip.com!
Never miss a Cool Tip: OneCoolTip Newsletter.

Do you have a Cool Tip or question? Email us at onecooltip.com@gmail.com


Rodger Mansfield, a seasoned tech expert, is the mastermind behind OneCoolTip.com, where he serves as both writer and editor. With a keen eye for simplifying complex tech, Rodger delivers practical advice that empowers readers to navigate the digital world with confidence. Dive into OneCoolTip.com for a treasure trove of savvy tips and tricks that keep you one step ahead in tech.


OneCoolTip.com
Cool Tech Tips for a Cooler Life!


#Google @Google #GoogleTicTacToe #TicTacToeOnline #GameReview #Technology #TechTips #FridayFunday #OneCoolTip @OneCoolTip 


Copyright © 2023 | www.OneCoolTip.com | All Rights Reserved

Thursday, October 12, 2023

Mastering the New Quick Settings Sound Mixer in Windows 11

Windows 11
Ever found yourself struggling to balance the audio levels between different applications on your computer? 

Have you wished for a more intuitive way to control the sound output of each app individually? 

Here's a Cool Tip.  Use the new Quick Settings Volume Mixer in Windows 11.

Microsoft has introduced an enhanced volume mixer in the September 2023 update. 

This new feature allows you to adjust audio levels for each app separately. 

Here's how to do it.
  • Open Through Keyboard Shortcut:
    • WIN + CTRL + V to open the new Quick Settings mixer.

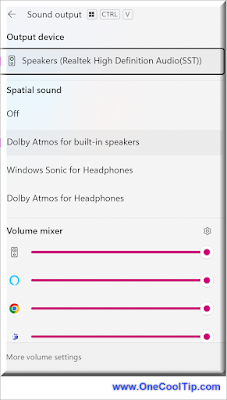
Windows 11 Volume Mixer Quick Setting
fig. 1 - Windows 11 Volume Mixer Quick Setting

From here, you can change volume for system sounds and specific applications.

  • Click More Volume Settings to open the System Sound window.
  • Click the Settings icon for More Mixer Settings.
You also can bring up the full Volume Mixer settings:
  • Open Through the Taskbar
    • Right-click on the volume icon in your taskbar and select Open Volume mixer.
  • Open Through Settings: 
    • Navigate to Settings> System > Sound > Volume mixer.

Enjoy!

Please LIKE and SHARE OneCoolTip.com!


READ MORE

OneCoolTip.com
Cool Tech Tips for a Cooler Life


#Microsoft @Microsoft #Windows11 #Windows11Update #SoundMixer #TechTutorial #WindowsTips #TechNews #TechTips #OneCoolTip @OneCoolTip 

Wednesday, October 11, 2023

How to Add Gmail Emails to Your Task List

Gmail
Do you ever find yourself overwhelmed by your inbox? 

Do you have important emails that you need to follow up on, but you keep forgetting about them? 

You are not alone.

Here's a Cool Tip.  Add your Gmail emails to your task list. 

Google Tasks is a task management application developed by Google.

It is designed to help users create, organize, and manage to-do lists and tasks efficiently.

Here's how to Add a Gmail Email to Tasks.
  • Open your Gmail account, https://mail.google.com/
  • From your inbox, click on the Tasks icon to open the Tasks panel on the right.

Add Task Panel to Gmail
fig. 1 - Add Task Panel to Gmail
  • Select the email you want to add to your task list.
  • Click the Add to tasks icon at the top of your inbox. If you don’t see this option, click on the More options icon (the three dots) and select “Add to tasks.”
Add Gmail to Task
fig. 2 - Add Gmail to Task

  • In the Add to Tasks window, you can customize the task by adding a title, due date, and notes.

Drag and Drop Method
  • From your inbox, open the Tasks panel on the right.
  • Drag and drop a message from your inbox to the Tasks panel.

Adding Gmail emails to your task list is a great way to stay organized and on top of your work. 

It's also a great way to ensure that you don't forget any important tasks.

Please LIKE and SHARE OneCoolTip.com!


OneCoolTip.com
Cool Tech Tips for a Cooler Life


#Google @Google #Gmail @Gmail #TaskList #Productivity #Technology #TechTips #OneCoolTip @OneCoolTip

Tuesday, October 10, 2023

How to Use the New ‘End Task’ Feature in Windows 11

Have you ever found yourself in a situation where an application on your computer is not responding, and you’re scrambling to find a way to close it? 

Or perhaps you’re a power user looking for more efficient ways to manage your applications? 

Here's a Cool Tip.  Use the New End Task Feature on the Windows Taskbar.

The latest update of Windows 11, released on September 26, 2023, introduces a handy new feature that allows users to end tasks directly from the taskbar. 

But before you can use it, you need to enable it.

Here's how to do it.

Turning the End Task Feature On
  • Right-click on the Start menu and select Settings.
  • In the Settings window, select System from the left panel.
  • Scroll down and click on For developers.
  • Toggle the End Task button
  • You’ve now enabled the End Task feature. 
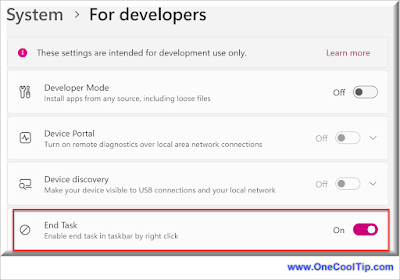
Windows 11 For Developers
fig.1 - Windows 11 For Developers - End Task

Using End Task
  • Right-click on any open app on your taskbar and select ‘End Task’ to kill its process. 
  • This is a much more efficient alternative to launching Task Manager and navigating to the Processes tab.
Windows End Task
fig. 2 - Windows End Task

The End Task feature is just one of many exciting updates introduced in the September 26, 2023 update of Windows 1115. 

Give this new feature a try and discover how it can streamline your Windows experience!

Enjoy!


Please LIKE and SHARE OneCoolTip.com!

READ MORE

OneCoolTip.com
Cool Tech Tips for a Cooler Life


#Microsoft @Microsoft #Windows11 #Windows #Windows11Update #EndTaskFeature #MicrosoftUpdates #TechTips #OneCoolTip @OneCoolTip  

Monday, October 9, 2023

How to View Hyperlink Links in Microsoft Word

Microsoft Word
Have you ever found yourself lost in a sea of hyperlinks while working on a Microsoft Word document? 

Ever wished there was a way to view and manage all those hyperlinks effortlessly?

Here's a Cool Microsoft Word Tip.  Alt + F9

Hyperlinks are a powerful tool for creating interactive documents, but they can also be a bit mysterious.

Alt + F9 toggles the  hyperlink view in Microsoft Word. 

This allows you to see the underlying field code for a hyperlink, which can be helpful for troubleshooting or customizing hyperlinks.

Here's how to do it.
  • Open the Microsoft Word document containing the hyperlinks you want to view.

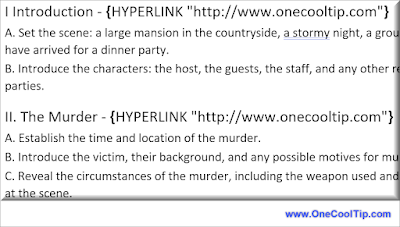
Microsoft Word Hyperlink
fig. 1 - Microsoft Word Hyperlink
  • Press Alt + F9.
  • This toggles the hyperlink view. 
Microsoft Word Hyperlink Alt + F9
fig. 2 - Microsoft Word Hyperlink Alt + F9
  • All hyperlinks in your document will be displayed in their raw format, showing the underlying URL instead of the display text.
  • To toggle back to regular view, press Alt + F9 again.

If you're editing a hyperlink, you can make changes to the field code directly in hyperlink view.

Enjoy!


Please LIKE and SHARE OneCoolTip.com!

READ MORE

OneCoolTip.com
Cool Tech Tips for a Cooler Life


#Microsoft @Microsoft #Word #MicrosoftWord #HyperlinkView #AltF9 #ALT+F9 #Technology #Productivity #TechTips #OneCoolTip @OneCoolTip #YouTube

Sunday, October 8, 2023

How to Set Search Engines for iPhone iOS17

What is your favorite search Engine?

Google?   Duck, Duck, Go?   YAHOO?

Do you want to use a different search engine on your iPhone, or set a different search engine for private browsing? 

Here's a Cool Tip.  Change your search engine setting in iOS 17.

This is a great way to improve your privacy and have more control over your search experience.

Here's how to do it.
  • Open the Settings app.
  • Scroll down and tap Safari.

iPhone Safari Search Settings
fig. 1 - iPhone Safari Search Settings

  • Under the Search section, tap Search Engine.
  • Choose a search engine from the list.
iPhone Search Engine
fig. 2 - iPhone Search Engine

  • Choose Safari to return.
  • To set a different search engine for private browsing, tap Private Search Engine.
  • Choose a search engine from the list.
iPhone Private Search Engine
Fig.3 - iPhone Private Search Engine

  • Use Default Search Engine (under Private Search Engine): This will use the same search engine for private browsing as you set for regular browsing.
You can choose from five different search engines: Google, Yahoo, Bing, DuckDuckGo, and Ecosia.

If you're concerned about your privacy, you may want to consider using a search engine like DuckDuckGo, which doesn't track your searches.

You can also change your search engine at any time by following the steps above.

Setting a search engine and private search engine for iPhone iOS17 is a great way to improve your privacy and have more control over your search experience. 


Enjoy!

Please LIKE and SHARE OneCoolTip.com!


READ MORE

OneCoolTip.com
Cool Tech Tips for a Cooler Life


#Apple #iPhone #iOS #iOS17 #SearchEngine #Privacy #iPhone #Technology #TechTips #OneCoolTip @OneCoolTip