Thursday, August 31, 2023

Unlock the Power of PowerPoint: How to Merge Shapes

Microsoft PowerPoint
Have you ever wanted to create a unique shape in PowerPoint, but couldn’t find the right one in the built-in library? 

Did you know that you can merge existing shapes to create new, custom shapes?

Here's a Cool Tip:  PowerPoint Merge Shapes feature.  

To merge shapes in PowerPoint, follow these steps:

  • Insert the shapes you want to merge by going to the Insert tab
  • Select Shapes found in the Illustrations group.
  • Draw your shapes by clicking and dragging your cursor.
  • Make sure the shapes are overlapping.
  • Select both of the shapes that you want to merge by holding the Ctrl key while clicking each shape in turn.
  • A new tab will appear on the top ribbon menu—the Shape Format tab. 
  • Select that tab.
  • In the Insert Shapes group, click the Merge Shapes button.
  • From the drop-down menu that appears, select your desired merge type.

    PowerPoint Merge Shapes Union
    fig. 1 - PowerPoint Merge Shapes - Union

    • Your selected objects will merge based on the choice you selected.

    PowerPoint Merge Shape Created
    fig. 2 - PowerPoint Merge Shape Created

    That’s it! 

    You can experiment with different merge types and shapes to create a wide variety of custom objects.

    If you’re using an older version of PowerPoint, such as PowerPoint 2007, you may need to enable the Merge Shapes command within the Office Ribbon or Quick Access Toolbar. 

    You can also use Edit Points to modify a shape.

    Enjoy!

    Please LIKE and SHARE OneCoolTip.com!

    READ MORE


    OneCoolTip.com
    Cool Tech Tips for a Cooler Life!

    #Microsoft #PowerPoint @Microsoft  #MergeShapes #CustomShapes #TechTips #OneCoolTip @OneCoolTip 

    Wednesday, August 30, 2023

    How to Capture a Full Page in Microsoft Edge

    Microsoft Edge
    Have you ever wanted to capture a screenshot of an entire webpage, but didn't know how? 

    Do you find yourself scrolling and taking multiple screenshots to capture the entire page? 

    Here's a Cool Tip:  Microsoft Edge Full Page Capture

    Microsoft Edge has a built-in feature that allows you to easily capture full-page screenshots in JPEG format.

    Here's how to do it:
    • Open the Microsoft Edge browser on your Windows 10/11 or Mac computer
    • Go to the web page that you want to capture.
    • Scroll all the way to the bottom of the page to make sure that the Web Capture feature loads all images in the article. 
    • Press and hold the three dots icon in the top-right corner.
    • Click the Web Capture button from the toolbar. 
    Microsoft Edge Web Capture

    fig. 1 - Microsoft Edge Web Capture

    • Select the Full Page option.
    • You'll see the Web Capture menu. 
    • Once you're done, click the save button (which looks like a floppy disk) from the toolbar. 
    • Microsoft Edge will instantly download the full-page JPEG image to the default download folder on your computer.

    That's it! 

    You now have a full-page screenshot of your desired webpage.


    Please LIKE and SHARE OneCoolTip.com!

    READ MORE

    OneCoolTip.com
    Cool Tech Tips for a Cooler Life!

    #Microsoft @Microsoft #Edge #MicrosoftEdge #WebCapture #FullPageScreenshot #TechTips #OneCoolTip @OneCoolTip


    Tuesday, August 29, 2023

    How to Use Windows Clipboard History

    Windows 11
    Have you ever copied something important, only to accidentally overwrite it with something else before pasting?

     Have you ever wished you could access your clipboard history and retrieve something you copied earlier? 

    Here's a Cool Tip:  Use the Windows Clipboard History

    With Windows 10 and Windows 11 you can use Windows Clipboard History and the keyboard shortcut Windows key + V on both operating systems to make your life easier.

    Here's how to do it:

    Windows 10 - Enable Clipboard History
    • Open the Settings app by clicking on the Start menu and selecting the gear icon.
    • Click on System, then select Clipboard from the left-hand menu.
    • Under Clipboard history, toggle the switch to On.
    Windows 11 - Enable Clipboard History
    • Open the Settings app by clicking on the Start menu and selecting the gear icon.
    • Click on Bluetooth & devices, then select Clipboard from the left-hand menu.
    • Under Clipboard history, toggle the switch to On.

    Windows System Clipboard Option Screen
    fig. 1 - Windows System Clipboard Option Screen

    If you want to sync your copies across devices, set that On as well.

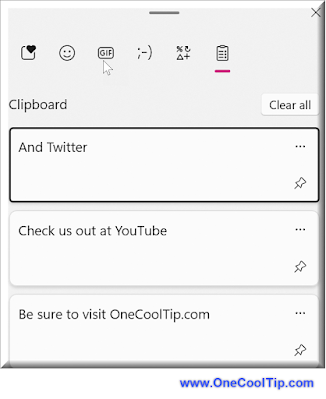
    Now that Clipboard History is enabled, you can access it by pressing the Windows key + V on your keyboard. 

    Windows Clipboard History
    fig. 2 - Windows Clipboard History


    This will bring up a small window showing your clipboard history, with the most recent item at the top. 

    You can scroll through the list and click on an item to paste it into your current application.


    Enjoy!

    Please LIKE and SHARE OneCoolTip.com!


    READ MORE

    OneCoolTip.com
    Cool Tech Tips for a Cooler Life!

    #Microsoft  #Windows10 #Windows11 #ClipboardHistory #KeyboardShortcut #WindowsKeyV #TechTips #OneCoolTip @Microsoft @OneCoolTip

    Monday, August 28, 2023

    Summing It Up: The Many Ways to Total in Microsoft Excel

    Microsoft Excel
    Have you ever found yourself needing to add up a long list of numbers? 

    Whether you’re balancing your checkbook or calculating the total cost of a project, summing a series of numbers is a common task. 

    But did you know that there are several ways to accomplish this? 

    Here's a Cool Tip:  Use the Excel keyboard shortcut.

    To total, or sum, a series of numbers in Excel, you can use several methods:

    Use Addition:
    • This is a very simple method to add the value of several cells containing numbers together. 
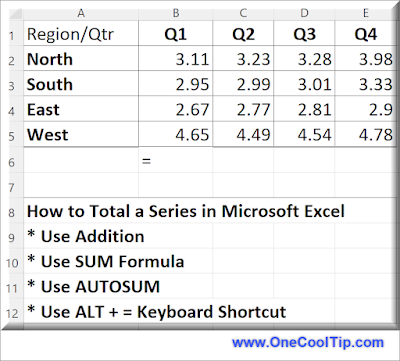
    • Use the Formula: =A1 + A2 + A3 + A4  where A1, A2, A3 and A4 are the cells containing the numbers you want to total.
    • This works for a few cells but is unwieldly for a large set of numbers.

    Use the SUM function:  
    • The SUM function is a built-in function in Excel that allows you to easily add up a range of cells. 
    • To use the SUM function, simply enter the formula =SUM(A1:A4) where A1:A4 is the range of cells containing the numbers you want to total.

    Use AutoSum: 
    • AutoSum is a tool in Excel that automatically selects a column or row of numbers and calculates their sum. 
    • To use AutoSum, select the cell where you want to display the sum, then click on the AutoSum button in the toolbar on your screen.

    Microsoft Excel Total Series
    fig. 1 - Microsoft Excel Total Series


    Super Cool Tip:

    Use the Excel Keyboard Shortcut ALT + = to sum a series of numbers in a column or a row.

    Enjoy!


    Please LIKE and SHARE OneCoolTip.com!


    READ MORE

    OneCoolTip.com
    Cool Tech Tips for a Cooler Life!

    #Microsoft #Excel #MicrosoftExcel #SUM #TechTips #OneCoolTip @Microsoft @MicrosoftExcel @OneCoolTip 

    Sunday, August 27, 2023

    Unleash Your Creativity with Microsoft Designer

    Microsoft Designer
    Are you tired of using the same old design templates for your projects? 

    Do you want to create stunning visuals, social media posts, invitations, and more with ease? 

    Here's a Cool Tip:  Check out the new preview Microsoft Designer.

    Microsoft Designer is a graphic design tool in Microsoft 365 that uses cutting-edge AI technology to help you unleash your creativity.

    The good news is that it is currently free in preview.

    Here's how to use it:
    • Access Microsoft Designer
      • Log in with your Microsoft account, 
      • Go to the Microsoft Designer website, https://designer.microsoft.com/,  or click on the Designer icon within the Microsoft Edge sidebar.
    • Get started with a prompt: 
      • To start creating with Microsoft Designer, simply describe what you want in the prompt box. 
      • Powered by generative AI technology, you’ll get one-of-a-kind images, including accompanying text and visuals, and design suggestions to meet your needs.
    • Customize your design: 
      • Once you have a design generated by the AI, you can customize it to your liking. 
      • Add your own images or text, change the layout or colors, and more.
    • Use advanced AI tools: 
      • Take advantage of Microsoft Designer’s advanced AI tools to enhance your design. 
      • Use the Replace background feature to instantly remove photo backgrounds and replace them with anything you can imagine. 
      • Get writing assistance and automatic layout suggestions for anything you add.
    • Create a Brand Kit: 
      • Make your creative consistent by creating a Brand Kit that lets you apply your colors and fonts consistently across designs.

    Here's a quick example to enter a prompt:

    • Create an Instagram post showcasing the benefits of visiting the tech website, www.onecooltip.com. 
    • Onecooltip offers technology tips.  
    • Use blue as the primary color to match the brand. 
    • Include an image of a person using the software on their computer in a creative workspace.

    Microsoft Designer suggested several options, including this one:

    Discover the Coolest Tech Tips - OneCoolTip.com
    fig. 1 - Example of Microsoft Designer output

    I then customized the text and saved the graphic to my local PC.

    So why not give Microsoft Designer a try and unleash your creative superpowers? 

    Get started today and see what amazing designs you can create!

    Enjoy!


    Please LIKE and SHARE OneCoolTip.com!


    READ MORE

    OneCoolTip.com
    Cool Tech Tips for a Cooler Life!

    #MicrosoftDesigner #GraphicDesign #Creativity #AI #TechTips #OneCoolTip @OneCoolTip  #Microsoft @Microsoft 
    Saturday, August 26, 2023

    How to Rearrange Apps in Google's Navigation Menu

    Google
    Do you use Google services like, search, gmail, photos and calendar on the web?

    Do you want to access them quickly and easily? 

    Here's a Cool Tip:  Rearrange the Google apps in the Navigation Menu.

    You can rearrange apps in Google's navigation menu in a few simple steps to place the apps you use the most at the top of the list. 

    Rearrange Google Navigation Menu

    fig. 1 - Rearrange Google Navigation Menu

    Here's how:
    • Sign into Google.com
    • Click the launcher icon in the upper-right corner.
    • Click on any of the programs listed.
    • Drag and drop them within the menu. 

    By following these simple steps, you can create a personalized menu that makes it easy to access the apps you use the most.

    Please LIKE and SHARE OneCoolTip.com!


    READ MORE

    OneCoolTip.com
    Cool Tech Tips for a Cooler Life!


    #google #navigationmenu #gmail #Googlephotos #Googlecalendar #Googlesearch #apps #rearrange #personalization  #productivity #efficiency #customization #TechTips #OneCoolTip @OneCoolTip @Google 

    Friday, August 25, 2023

    How to Bring Back the Classic DVD Screensaver with Google Search

    Do you remember the classic DVD screensaver? 

    The one with the bouncing logo that would never quite hit the corner of the screen? 

    Here's a Friday Funday Cool Tip:  

    Google has hidden a little easter egg that brings that screensaver back to life.


    Here's how to do it.

    • Go to Google.com
    • Search for DVD screensaver on Google. 
    • After a few seconds, the Google logo will pop out of the top left corner of the screen and start bouncing around. 
    • It will change colors each time it hits a corner.

    DVD Screensaver
    fig. 1 - Google DVD Screensaver

    The easter egg works on all desktop browsers, but it doesn't work on mobile devices.

    The Google Search DVD Screensaver easter egg is a fun way to bring back a little nostalgia. 

    It's also a great way to show off your Google skills to your friends and family.


    Please LIKE and SHARE OneCoolTip.com!


    READ MORE


    OneCoolTip.com
    Cool Tech Tips for a Cooler Life!

    #Google #googlesearch #easteregg #dvdscreensaver #nostalgia #fun #TechTips #OneCoolTip @OneCoolTip @Google