Sunday, September 24, 2023

How to Lock Google Drive Documents

Google Drive
Do you have any sensitive or important files in Google Drive that you don't want anyone else to edit or delete?

Maybe you just want to protect a document from yourself!

Here's a Cool Tip.  Use the New Document Lock Feature.

This new feature allows you to lock any file in Google Drive, so that only you can make changes to it. 

Here's how to do it.

  • Open the Google Drive website, https://drive.google.com/drive/
  • Go to the file that you want to lock.
  • Right-click on the file.
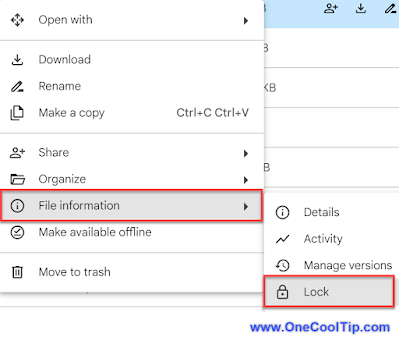
  • Select File information.
  • Under the Permissions section, click on the Lock button.
  • Confirm that you want to lock the file by clicking on the Lock button again.
  • Once a file is locked, no one else will be able to make any changes to it, even if they have edit access. 
  • To unlock a file, simply follow the same steps above and click on the Unlock button.
Lock Google Drive Doc
fig. 1 - Lock Google Drive Doc


The Google Drive lock file feature is a great way to protect your files from unauthorized access and accidental changes. By following the steps above, you can learn how to use this feature and keep your files safe.

Enjoy!

Please LIKE and SHARE OneCoolTip.com!

READ MORE


Rodger Mansfield, a seasoned tech expert, is the mastermind behind OneCoolTip.com, where he serves as both writer and editor. With a keen eye for simplifying complex tech, Rodger delivers practical advice that empowers readers to navigate the digital world with confidence. Dive into OneCoolTip.com for a treasure trove of savvy tips and tricks that keep you one step ahead in tech.


OneCoolTip.com
Cool Tech Tips for a Cooler Life!

#Google @Google #Drive  #GoogleDrive #lockfilefeature #howto #productivity #techtips #OneCoolTip @OneCoolTip 

Saturday, September 23, 2023

How to Set Multiple Timers in iOS 17

iOS 17
Do you ever need to use multiple timers at the same time? 

Maybe you're cooking a meal, doing laundry, and working on a project. 

Here's a Cool Tip: Try the new Multiple Timers Feature in iOS 17.


Here's how to do it.

iPhone
  • Open the Clock app.
  • Tap on the Timers tab.
  • Tap on the + (plus) button to create a new timer.
  • Set the duration of the timer and tap on Start.
  • Press the + (plus) sign to create a new timer.
  • You can have up to five timers running at the same time.

iOS Multiple Timers
fig. 1 - iOS Multiple Timers


Apple Watch
  • Open the Timers app.
  • Create and start a timer.
  • Press the + (plus) sign to create a new timer.
  • You can have up to five timers running at the same time.
Siri


To use Siri to set multiple timers in iOS 17, you can say something like:
  • "Hey Siri, set a timer for 10 minutes."
  • "Hey Siri, set a timer for 20 minutes called 'laundry.'"
  • "Hey Siri, set a timer for 30 minutes called 'cooking.'"
  • You can continue to give Siri instructions to set multiple timers. 
  • Siri will keep track of all of the timers that you set and will notify you when each timer expires.

Here are some examples of how to use Siri to control multiple timers:
  • "Hey Siri, pause the cooking timer."
  • "Hey Siri, resume the laundry timer."
  • "Hey Siri, how much time is left on the laundry timer?"
  • "Hey Siri, stop all timers."
  • You can also use Siri to view a list of all of your active timers. To do this, say "Hey Siri, show me my timers."

Multiple timers is a great new feature in iOS 17 that can help you boost your productivity.

Enjoy!

Please LIKE and SHARE OneCoolTip.com!


READ MORE

OneCoolTip.com
Cool Tech Tips for a Cooler Life


#Apple @Apple #iPhone #iOS #MultipleTimers #iOS17 #ClockApp #Productivity #TechTips #OneCoolTip @OneCoolTip


Friday, September 22, 2023

Use AI to Settle the Superman vs. Batman Debate

Ever wondered who would win in a fight between Superman and Batman? 

Have you ever wished you could settle this age-old debate once and for all? 

Here's a Cool Tip:  Let AI, Artificial Intelligence, help answer this question.

Here's how to do it:

  • Start by selecting the AI you want to use, for example, ChatGPT, Google Bard or  Microsoft Bing.
  • Formulate your question as an AI prompt. For example, "Superman vs. Batman. Who wins a fight?".
  • Ask your question to one or more AIs. 
  • Once you have responses from all AIs, analyze them to see which superhero they think would win in a fight.
S vs B
fig. 1 - Who Would Win?

Here's a Summary of the three big AIs to this question:

ChatGPT

In the comics, the two have fought multiple times, and the outcomes vary depending on the context. For instance, in Frank Miller's "The Dark Knight Returns," an older Batman dons a power suit and utilizes Kryptonite to even the odds against Superman. In other stories, Superman's sheer power and speed are just too much for Batman.

So, who would win depends largely on the circumstances of the fight and the interpretation of the characters at that specific time.

Google Bard

So, who would win in a fight between Superman and Batman? It really depends on the circumstances. If the fight is fair and square, Superman would almost certainly win. But if Batman has time to prepare, he could potentially find a way to defeat Superman.

Microsoft Bing

In terms of who would win in a fight, it ultimately depends on the circumstances and the strategies employed by each character. Batman’s resourcefulness, combat skills, and access to Kryptonite could potentially give him an edge over Superman. However, Superman’s superhuman strength and durability make him a formidable opponent.


AIs are not infallible and their responses are based on the information they have been trained on. 

They do not have personal opinions or biases.

So what other matchups should you check out?

  • Iron Man vs. Batman
  • Godzilla vs. King Kong
  • Avengers vs. Justice League
  • Lassie vs. Scooby Doo

So, are you ready to use artificial intelligence to settle the debate? 

Let us know!

Enjoy!

Please LIKE and SHARE OneCoolTip.com!


READ MORE

OneCoolTip.com
Cool Tech Tips for a Cooler Life


#AI #SupermanVsBatman #ChatGPT #GoogleBard #MicrosoftBing #Google #Microsoft @ChatGPT @Microsoft @Google #TechTips #FridayFunday #OneCoolTip @OneCoolTip
Thursday, September 21, 2023

Get More Done with the Google Bard Extension for Gmail and Google Docs

Google Docs
Do you spend too much time searching through your Gmail and Google Docs for important information? 

You're not alone. 

Here's a Cool Tip: Use the New Google Bard extension.

The Google Bard extension is a powerful AI-powered tool that can access your personal Gmail and Google Docs accounts to help you find the information you need quickly and easily. 

It can also help you with tasks like summarizing emails, generating creative content, and translating languages.

Here's how to do it.

  • Go to the Google Bard websitehttps://bard.google.com/
  • Sign in with your Google account.
  • Click the Extensions icon in the top right corner of the page.
  • Toggle the Google Workspace extension on.

Google Bard Extension Settings
fig. 1 - Google Bard Extension Settings

  • You will be prompted to grant Bard access to your Gmail and Google Docs accounts. 
  • Click Allow.

Once you have granted Bard access to your Gmail and Google Docs accounts, you can start using it to access your information and perform tasks.

It's important to note that your Google Workspace data won’t be used to train Bard’s public model and you can disable at any time.

To search for information in your Gmail and Google Docs accounts, type your query into the Bard search bar and press enter. 

Bard will then return a list of results from your Gmail and Google Docs accounts.

For example, if you type "search my gmail for STL City Park" into the Bard search bar, Bard will return a list of all emails that contain the phrase STL City Park.

Google Bard Gmail Search
fig. 2 - Google Bard Gmail Search

The Google Bard extension is a powerful AI-powered tool that can help you access your personal Gmail and Google Docs accounts to find the information you need quickly and easily. 

It can also help you with tasks like summarizing emails, generating creative content, and translating languages.

Enjoy!

Please LIKE and SHARE OneCoolTip.com!

READ MORE
OneCoolTip.com
Cool Tech Tips for a Cooler Life

#Google @Google #Bard #GoogleBard #GoogleAI #Gmail #GoogleDocs #Tech #Productivity #TechTips #OneCoolTip @OneCoolTip 
@stlCITYsc

Wednesday, September 20, 2023

How to Set Tab Colors in Microsoft Excel

Microsoft Excel
Do you find yourself lost in a sea of identical Excel tabs? 

Have you ever wished for a way to visually distinguish your data sets? 

Here's a Cool Tip: Color-Code Your Excel Tabs,

Setting tab colors makes it easier to see your different tabs.


Here's how to do it.
  • Launch Microsoft Excel
  • Open the spreadsheet where you want to color the tabs.
  • Click on the tab you want to color. This will make it the active tab.
  • Right-click on the tab
  • Select Tab Color from the context menu. 
    • This will open a dialog box with color options.
  • Select your desired color from the palette. 
    • The tab will instantly change to reflect your choice.
  • Repeat steps for any other tabs you wish to color.

Set Tab Color in Microsoft Excel
fig. 1 - Set Tab Color in Microsoft Excel


That's it!

Enjoy!

Please LIKE and SHARE OneCoolTip.com!


READ MORE


OneCoolTip.com
Cool Tech Tips for a Cooler Life


#Microsoft @Microsot #Excel #Tabs #Color #MicrosoftExcel #DataOrganization #TechTips #ProductivityHacks #OneCoolTip @OneCoolTip

Tuesday, September 19, 2023

Secret Trick to Text Photos Faster in iOS 17

iOS17
Do you want to text photos faster in iOS using iMessage?

Here's a Cool Tip:  Press and Hold.

That's right.

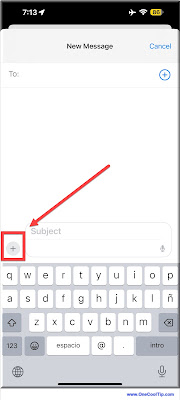
Press and Hold the Plus sign to insert photos into your iMessage.


Plus Sign in iOS17 iMessage
fig. 1 - Plus Sign in iOS17 iMessage

Normally, when you press the Plus sign, you have several options to choose from.

For example, Camera, Photos, Stickers, etc.

Insert Options iOS 17 iMessage
fig. 2 - Insert Options iOS 17 iMessage

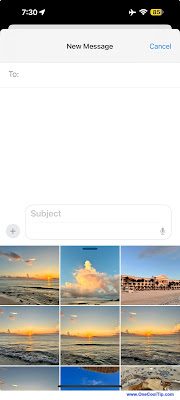
But, when you Press and Hold the Plus sign, you'll go directly to your photo album allowing you to select the photos you want to attach to your iMessage.

Press and Hold to Insert Photos in iOS 17
fig. 3 - Press and Hold + to Insert Photos in iOS 17


That's it!

Enjoy!

Please LIKE and SHARE OneCoolTip.com!


READ MORE


OneCoolTip.com
Cool Tech Tips for a Cooler Life

#Apple @apple #iOS17 #iMessage #photography #iphonetips #iphonephotography #techtips #OneCoolTip @OneCoolTip 
Monday, September 18, 2023

How to Master Split Screen in Microsoft Edge

Master the art of multitasking with our quick guide on splitting screens in Microsoft Edge, and transform your browsing experience into a more productive and efficient one.

By Rodger Mansfield, Editor
September 18, 2023

[Note: This Cool Updated 3/12/24 to reflect current steps to split screens in Microsoft Edge]

Microsoft Edge
Ever found yourself juggling between multiple tabs and wishing for a simpler way to view them all at once? 

Ever wondered if there’s a magic trick that could instantly organize your chaotic browser window? 

Here's a Cool Tip: Split the screens in Microsoft Edge.

Here's how to do it.
  1. Open Microsoft Edge and navigate to the page you want to split.
  2. Look for the Split Screen icon in the toolbar, which is usually located near the top-right corner of the browser window.
  3. Click on the Split Screen icon to divide your current tab into two separate screens.
  4. You can now navigate independently on each side of the split screen.
  5. To adjust the size of the screens, simply drag the slider in the middle to your preferred position.
  6. If you want to exit the split screen view, select the Close split screen (X) at the top right corner of the active screen.
Split Screen in Microsoft Edge
fig. 1 - Split Screen in Microsoft Edge


Enjoy!


Please LIKE and SHARE OneCoolTip.com!
Visit the OneCoolTip YouTube Channelhttps://www.youtube.com/@onecooltip

Do you have a Cool Tip or question? Email us at
onecooltip.com@gmail.com


READ MORE


Rodger Mansfield, a seasoned tech expert, is the mastermind behind OneCoolTip.com, where he serves as both writer and editor. With a keen eye for simplifying complex tech, Rodger delivers practical advice that empowers readers to navigate the digital world with confidence. Dive into OneCoolTip.com for a treasure trove of savvy tips and tricks that keep you one step ahead in tech.


OneCoolTip.com
Cool Tech Tips for a Cooler Life


#Microsoft @Microsoft #Edge #MicrosoftEdge #BrowserShortcuts #TechTips #ProductivityHacks #OneCoolTip @OneCoolTip