Showing posts with label WindowsWednesday. Show all posts

Wednesday, May 22, 2024

Unlock the Hidden Power of File Explorer with Alt+P

Unlock the Hidden Power of File Explorer with Alt+P.

Discover the transformative power of the Alt+P keyboard shortcut in Windows File Explorer and how it can streamline your file management for enhanced productivity.

By Rodger Mansfield, Technology Editor
May 22, 2024


Have you ever found yourself lost in the labyrinth of files and folders on your computer? 

Ever spend ages clicking through files just to see what's inside?

Do you crave a more efficient way to preview content without opening each file? 

Here's a Cool Tip.  Use the simple yet powerful shortcut: Alt+P.

In Windows, pressing Alt + P toggles the display of the preview pane in File Explorer. 


This allows you to view the contents of a selected file, such as an image or document, without having to open it in a separate application. 

It’s a handy shortcut for quickly viewing files and managing your documents more efficiently.

Here's how to do it.
  1. Open Windows File Explorer.
  2. Navigate to the folder containing your files.
  3. Select a file you wish to preview.
  4. Press Alt+P to toggle the Preview Pane.
  5. The selected file’s preview will appear on the right side of the window.
File Explorer Alt P
fig. 1 - File Explorer Alt P

This keyboard shortcut allows you to preview without opening files.

This saves time, enhances workflow and reduces the need for multiple windows.

Of course, you can always click the "Preview" in the top right of the screen too.

Found this tip helpful? 

Share your thoughts below and spread the word on social media to help others boost their productivity!


READ MORE

Please LIKE and SHARE OneCoolTip.com!
Never miss a Cool Tip: OneCoolTip Newsletter.

Do you have a Cool Tip or question? Email us at onecooltip.com@gmail.com


Rodger Mansfield, a seasoned tech expert, is the mastermind behind OneCoolTip.com, where he serves as both writer and editor. With a keen eye for simplifying complex tech, Rodger delivers practical advice that empowers readers to navigate the digital world with confidence. Dive into OneCoolTip.com for a treasure trove of savvy tips and tricks that keep you one step ahead in tech.


OneCoolTip.com
Cool Tech Tips for a Cooler Life!


#WindowsTips #FileExplorer #KeyboardShortcuts #ProductivityHacks #TechSavvy #WindowsWednesday #TechTips #OneCoolTip @OneCoolTip


Copyright © 2024 | www.OneCoolTip.com | All Rights Reserved

Wednesday, May 15, 2024

How to Connect Your iPhone or Android Device to Windows 11

How to Connect Your iPhone or Android Device to Windows 11

Discover the ultimate guide to effortlessly connect your iPhone and Android devices to Windows 11, enhancing your productivity and digital experience.

By Rodger Mansfield, Technology Editor
May 15, 2024

The Magic of Phone Link (Formerly Your Phone)


Windows Phone Link
Have you ever found yourself juggling multiple devices, wishing for a way to streamline your digital life? 

What if you could seamlessly integrate your iPhone or Android phone with your Windows 11 PC?

Here's a Cool Tip.  Connect your phone to Windows 11 using Phone Link.


Windows Phone Link, previously known as “Your Phone,” is an application that allows you to connect your Android or iPhone to your Windows PC. 

With Phone Link, you can enjoy a variety of convenient features, such as:

Syncing your smartphone with your Windows PC: Easily connect and manage your phone’s content from your computer.
  • Making and taking calls: Use your PC to handle phone calls without needing to pick up your phone.
  • Text messaging: Send and receive SMS and MMS messages directly from your PC.
  • Notification management: Check, pin, and dismiss your phone notifications on your computer.
  • Photo access: View and transfer up to the last 2,000 images from your phone’s camera roll to your PC.

The Android feature has been available and has more options.  

The iPhone feature was added in 2023 and has less capability.

The Phone Link app comes preinstalled on Windows 11 and can be downloaded from the Microsoft Store for Windows 10. 

It’s designed to make the transition between using your smartphone and PC seamless and efficient3. 

Whether you’re using an Android or an iPhone, Phone Link provides a unified experience to manage your mobile tasks on a larger screen.

Here's how to do it.

Connect Your iPhone in a Snap:
  1. Make sure your iPhone is running iOS 14 or later.
  2. Type ‘Phone Link’ in the Start menu and open the app.
  3. Select the iPhone option in the Phone Link app. A window with a QR code will appear.
  4. Point your iPhone’s camera at the QR code. A notification will pop up; click it to open an App Clip.
  5. Tap ‘Allow’ to let the App Clip access your iPhone’s Bluetooth.
  6. Follow the prompts to pair your devices. Ensure the six-digit code matches on both your PC and iPhone, then tap ‘Pair’ on both devices.

Connect Your Android Effortlessly:
  • Ensure your Android phone is running Android 7.0 or later.
  • Download the ‘Link to Windows’ app from the Google Play Store if it’s not pre-installed.
  • Search for ‘Phone Link’ on your PC and open the app.
  • Choose the Android option and scan the QR code displayed by the Phone Link app using your Android phone.
  • On your Android phone, customize the notification preferences and ensure settings like ‘Share notifications’ and ‘Sync Contacts’ are turned on.

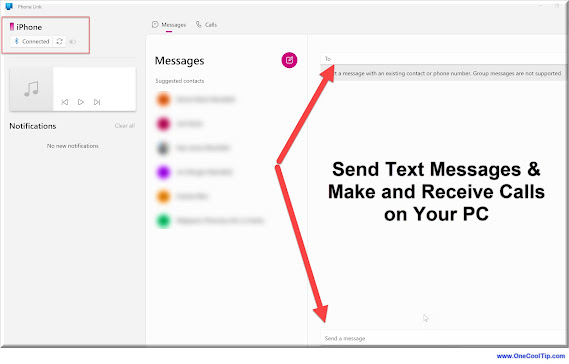
Connect Phone to Windows 11
fig. 1 - Connect Phone to Windows 11


Connecting your smart phone to Windows using the Phone Link app allows easy access to phone notifications, messages, and calls on your PC.

Bridge the gap between your mobile and desktop worlds, making multitasking a breeze and keeping you connected no matter the platform.

Have you tried this yet?

Let us know in the comments below.


READ MORE

Please LIKE and SHARE OneCoolTip.com!
Never miss a Cool Tip: OneCoolTip Newsletter.

Do you have a Cool Tip or question? Email us at onecooltip.com@gmail.com


Rodger Mansfield, a seasoned tech expert, is the mastermind behind OneCoolTip.com, where he serves as both writer and editor. With a keen eye for simplifying complex tech, Rodger delivers practical advice that empowers readers to navigate the digital world with confidence. Dive into OneCoolTip.com for a treasure trove of savvy tips and tricks that keep you one step ahead in tech.


OneCoolTip.com
Cool Tech Tips for a Cooler Life!


#Windows11Connectivity #iPhoneWindowsSync #AndroidPCIntegration #TechTips #OneCoolTip @OneCoolTip 


Copyright © 2024 | www.OneCoolTip.com | All Rights Reserved

Wednesday, May 8, 2024

How to Master File Tags in Windows to Organize Your Files

How to Master File Tags in Windows to Organize Your Files

Elevate your file organization with our expert tagging tips for Windows. Streamline your search and retrieval process with these advanced strategies.

By Rodger Mansfield, Technology Editor
May 8, 2024


Microsoft Windows 11
Are you maximizing the potential of file tags in Windows? 

Could your digital filing system use a boost to match your dynamic workflow?

Here's a Cool Tip.  Use tags to organize your files in Microsoft Windows.

File tags in Windows are keywords or terms that you can assign to files as part of their metadata. 

Windows Wednesday - OneCoolTip

Why Use Flags?

They serve as an organizational tool, allowing you to categorize files based on content, project, or any other system you find useful.

These tags help describe the contents of a file and make it easier to organize and locate files through search

How to Tag Your Files

Here's how to do it.
  1. Open File Explorer. Use Windows+E shortcut!
  2. Locate the file you want to tag.
  3. Right-click and select "Properties" to access the file’s properties menu.  Use Alt+ Ent shortcut!
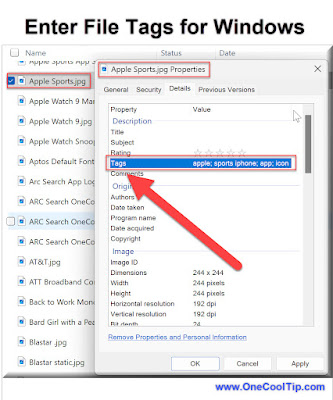
  4. Navigate to the Details Tab.
  5. Type your tags, separated by semicolons.
  6. Click Apply and OK to close the properties window.
Searching with file tags in Windows is a straightforward process that can greatly enhance your ability to quickly locate files. 

Enter File Tags for Windows
fig. 1 - Enter File Tags for Windows

Searching with Tags

Here's how to do it.
  1. Open File Explorer. Use Windows+E shortcut!
  2. Click on the search box located at the top right corner of the File Explorer window.
  3. Type "tag:" followed by the name of the tag you’re looking for. 
    • For example, if you’re searching for files tagged as ‘report’, type "tag:report" into the search box.
  4. To search for files with multiple tags, use operators like AND and OR
    • For instance, "tag:report AND tag:2024" will show files that have both ‘report’ and ‘2024’ tags.
By using tags in combination with the search functionality, you can quickly filter through your files and find exactly what you need without remembering the exact file name or location. 

This feature is especially useful for managing large collections of files and staying organized in a busy digital environment. 

With these advanced tagging techniques, you’re well on your way to a more organized and efficient digital environment. 

Remember to use consistent and relevant tags to make the most of this powerful organizational tool.

Start tagging today!


READ MORE


Please LIKE and SHARE OneCoolTip.com!
Never miss a Cool Tip: OneCoolTip Newsletter.

Do you have a Cool Tip or question? Email us at onecooltip.com@gmail.com


Rodger Mansfield, a seasoned tech expert, is the mastermind behind OneCoolTip.com, where he serves as both writer and editor. With a keen eye for simplifying complex tech, Rodger delivers practical advice that empowers readers to navigate the digital world with confidence. Dive into OneCoolTip.com for a treasure trove of savvy tips and tricks that keep you one step ahead in tech.


OneCoolTip.com
Cool Tech Tips for a Cooler Life!


#Microsoft #Windows #Windows11 #Windows10 #AdvancedWindowsTips #EfficientFileSearch #OrganizeWithTags #TechSavvy #WindowsWednesday#TechTips #OneCoolTip @OneCoolTip


Copyright © 2024 | www.OneCoolTip.com | All Rights Reserved

Wednesday, May 1, 2024

Three Cool Ways to Empty the Recycle Bin in Windows 11

Three Cool Ways to Empty the Recycle Bin in Windows 11

Declutter Your Digital Space and Reclaim Storage

Learn how to efficiently empty the Recycle Bin in Windows 11, freeing up valuable disk space and ensuring your deleted files are truly gone. Whether you’re a tech novice or a seasoned user, these step-by-step instructions will help you master this essential task.

By Rodger Mansfield, Technology Editor
May 1, 2024


Windows Recycle Bin
“Have you ever wondered where your deleted files go in Windows 11? 

They don’t vanish into thin air! 

Here's a Cool Tip.  Empty the Recycle Bin in Windows 11.

Welcome to the Recycle Bin—a digital purgatory where your discarded documents, photos, and cat memes await their final fate. 

But what if I told you that this seemingly mundane bin holds secrets to decluttering your digital life?

Here's how to empty the Recycle Bin in Windows 11

The Classic Approach: File Explorer
  1. Click on the Recycle Bin icon on your desktop.
  2. A File Explorer window opens, revealing the bin’s contents.
  3. Click the “Empty Recycle Bin” button on the Explorer’s command bar.
  4. Poof! Your deleted files are gone.

Empty Recycle Bin - Right Click
fig. 1 - Empty Recycle Bin - Open Recycle Bin


Context Menu Magic: Right-Click and Empty
  1. Right-click the Recycle Bin desktop icon.
  2. From the context menu, select “Empty Recycle Bin.”
  3. Confirm your action by clicking “Yes” in the dialog window.

fig. 2 - Empty Recycle Bin - Right Click


Streamlined Settings: The Storage Cleanup Route
  1. Press the Start button and type “Storage settings” in the search utility.
  2. Click the “Storage settings” result.
  3. Under “Temporary files,” deselect other checkboxes if you only want to empty the Recycle Bin.
  4. Select the Recycle Bin checkbox.
  5. Hit “Remove files” and confirm by clicking “Continue.”
Empty Recycle Bin - Temp Files
fig. 3 - Empty Recycle Bin - Temp Files


Emptying the Recycle Bin frees up storage, preventing it from becoming a digital hoarder’s paradise.

In the grand symphony of Windows 11, emptying the Recycle Bin is a humble yet crucial note. 

Embrace the art of decluttering, and let your digital canvas breathe. 

Ready to declutter? 

Try these methods today!

Remember, a tidy digital space is a happy digital space.


READ MORE

Please LIKE and SHARE OneCoolTip.com!
Never miss a Cool Tip: OneCoolTip Newsletter.

Do you have a Cool Tip or question? Email us at onecooltip.com@gmail.com


Rodger Mansfield, a seasoned tech expert, is the mastermind behind OneCoolTip.com, where he serves as both writer and editor. With a keen eye for simplifying complex tech, Rodger delivers practical advice that empowers readers to navigate the digital world with confidence. Dive into OneCoolTip.com for a treasure trove of savvy tips and tricks that keep you one step ahead in tech.


OneCoolTip.com
Cool Tech Tips for a Cooler Life!


#Windows11 @windwos #RecycleBin #Declutter #Windows #WindowsWednesday #TechTips #OneCoolTip @OneCoolTip 


Copyright © 2024 | www.OneCoolTip.com | All Rights Reserved

Wednesday, April 24, 2024

The Secret Windows Shortcut for Effortless Screen Sharing

The Secret Windows Shortcut for Effortless Screen Sharing

Discover the simplicity of casting media from your Windows PC to other devices using the Windows Key + K shortcut, a feature that enhances your viewing experience and productivity.

By Rodger Mansfield, Technology Editor
April 24, 2024


Windows Display
Have you ever found yourself juggling multiple devices, trying to present or share media seamlessly? 

Tired of cluttered cables while trying to share your screen?

Or perhaps you’ve wondered how to effortlessly project your latest presentation or video from your laptop to a larger screen? 

Here's a Cool Tip.  Use the Windows Key + K keyboard shortcut to cast to a device.

The Windows Key + K shortcut is your gateway to a streamlined media-sharing experience. 

What is the Windows Key + K Shortcut?

This handy shortcut opens the Windows "Connect" pane, allowing you to quickly cast your display to compatible devices, such as:
  • Smart TVs
  • Projectors with Miracast support
  • Wireless monitors
  • Other Windows PCs
But how does it work, and what can it do for you?

Windows Wednesday


Here's how to do it.
  1. Ensure your PC and the target device are connected to the same Wi-Fi network.
  2. Press the Windows Key + K to open the Connect pane.
  3. Your PC will search for wireless displays and audio devices.
  4. Select the device you want to cast to from the list.
  5. Follow any on-screen instructions to complete the connection.
  6. Once connected, your media will be displayed on the chosen device.
  7. Click "More Cast Settings" to open the Settings > System > Display screen for more Display settings.

Pro Cool Tip
  • In the Settings app (System > Display), you can customize your projection settings – choose whether to extend your display, duplicate it, or show content on only the second screen.


Windows Key + K to Cast
fig. 1 - Windows Key + K to Cast


This keyboard shortcut works for both Windows 10 and Windows 11.

There is no need for cables or additional software.

This is quick and easy to set up and is ideal for presentations, watching movies, or sharing photos.

Imagine preparing for a crucial business presentation. 

With a few keystrokes, you cast your slides onto the conference room’s smart TV, impressing your colleagues with your efficiency.

The Windows Key + K shortcut is your key to a more streamlined and connected Windows experience. 

Whether you're looking to improve your presentations, enhance your entertainment, or level up your productivity, this hidden gem is worth mastering.

Have you tried this shortcut yet?

Let us know in the comments below.

Enjoy!


READ MORE


Please LIKE and SHARE OneCoolTip.com!
Never miss a Cool Tip: OneCoolTip Newsletter.

Do you have a Cool Tip or question? Email us at onecooltip.com@gmail.com


Rodger Mansfield, a seasoned tech expert, is the mastermind behind OneCoolTip.com, where he serves as both writer and editor. With a keen eye for simplifying complex tech, Rodger delivers practical advice that empowers readers to navigate the digital world with confidence. Dive into OneCoolTip.com for a treasure trove of savvy tips and tricks that keep you one step ahead in tech.


OneCoolTip.com
Cool Tech Tips for a Cooler Life!


#Microsoft @Microsoft #Windows #WindowsTips #TechHacks #ScreenMirroring #WirelessProjection #SmartComputing #TechTips #WindowsWednesday #OneCoolTip @OneCoolTip 


(c) 2024 www.OneCoolTip.com

Wednesday, April 17, 2024

How to Print Documents to PDF format in Windows

How to Print Documents to PDF format in Windows

Discover the seamless process of converting and printing your documents to PDF format in Windows, ensuring your files are easily shareable and professionally presented.

By Rodger Mansfield, Technology Editor
April 17, 2024


PDF
Have you ever needed to share a document that looks the same on any device and platform? 

Have you wondered how to secure your documents for distribution? 

Here's a Cool Tip.  Use Microsoft Print to PDF in Windows.


Microsoft Print to PDF is a feature built into Windows that allows you to convert documents into PDF (Portable Document Format) files without the need for third-party software. 

This virtual printer enables you to create a PDF file from any application that has a print option.


The Microsoft Print to PDF feature first became available with the release of Windows 10. 

It was introduced as a built-in feature that allowed users to save documents as PDF files directly from the print dialog in any application that supported printing. 

This feature eliminated the need for third-party PDF printing software and has been a standard part of Windows 10 since its initial release.

Here's how to do it.
  1. Open the document you wish to convert in its native application (e.g., Microsoft Word).
  2. Click on ‘File’ and select ‘Print’.
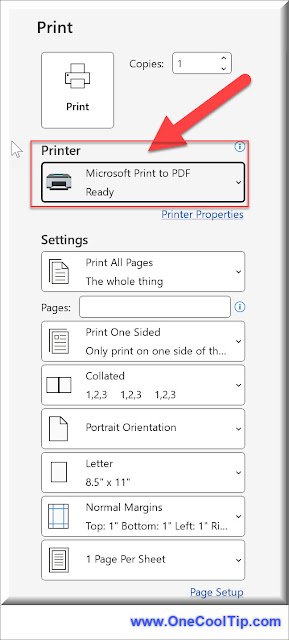
  3. In the Printer dropdown menu, choose ‘Microsoft Print to PDF’.
  4. Click ‘Print’, and you’ll be prompted to choose a location to save your new PDF.
  5. Name your file and click ‘Save’ to complete the process.

Microsoft Print to PDF
fig. 1 - Microsoft Print to PDF


PDFs are universally compatible across platforms and preserves the formatting of your original document.

Printing it to PDF ensures that it arrives intact, without any changes in layout or design.

Printing to PDF in Windows is a powerful tool for anyone needing to share documents widely. 

It’s a simple process that offers security and consistency, making it an essential skill for professionals and casual users alike.

Have you tried Microsoft Print to PDF yet?

If so, let us know in the comments.

Enjoy!


READ MORE


Please LIKE and SHARE OneCoolTip.com!
Never miss a Cool Tip: OneCoolTip Newsletter.

Do you have a Cool Tip or question? Email us at onecooltip.com@gmail.com


Rodger Mansfield, a seasoned tech expert, is the mastermind behind OneCoolTip.com, where he serves as both writer and editor. With a keen eye for simplifying complex tech, Rodger delivers practical advice that empowers readers to navigate the digital world with confidence. Dive into OneCoolTip.com for a treasure trove of savvy tips and tricks that keep you one step ahead in tech.


OneCoolTip.com
Cool Tech Tips for a Cooler Life!


#PrintToPDF #WindowsTips #DocumentConversion #TechSavvy #PDFGuide #TechTips #WindowsWednesday #OneCoolTip @OneCoolTip

(c) 2024 www.OneCoolTip.com

Wednesday, April 10, 2024

Master Your Alerts: Navigate Windows 11 Notifications Like a Pro!

Master Your Alerts: Navigate Windows 11 Notifications Like a Pro!

Discover the ins and outs of Windows 11’s Notification Center with our comprehensive guide. Learn to manage, customize, and optimize your alerts for a streamlined experience.

By Rodger Mansfield, Technology Editor
April 10, 2024


Have you ever found yourself overwhelmed by a barrage of notifications or missed an important alert? 

Are you making the most of Windows 11’s built-in capabilities?

Here's a Cool Tip.  Use Windows 11's Notification feature. 

Windows notifications are alerts that pop up on your screen to inform you about various activities on your computer. 

They can come from the operating system itself, like reminders for updates or security alerts, or from apps, such as new email notifications or social media updates. 

In Windows 11, these notifications are managed in the Notification Center, which is part of the taskbar. 


Here, you can customize which notifications you receive, how they appear, and when you don’t want to be disturbed by using Focus Assist. 

Notifications aim to keep you informed without needing to open each app to check for new messages or updates.

Let’s dive into how you can take control of your notifications and tailor them to fit your digital lifestyle.

Here's how to do it.
  1. Click on the date and time on the taskbar or press Windows key + N to open the Notification Center.
  2. Hover over a notification to reveal the ‘X’ to dismiss it or click to interact.
  3. Go to Settings > System > Notifications to adjust which apps can send you notifications and how they appear.
  4. Activate Focus Assist under Settings > System > Focus Assist to minimize distractions during work hours or while gaming.
Windows Notification

Stay informed with timely alerts and customize to reduce distractions.

But be careful to not to over customize. 

This can lead to missed important notifications.

By mastering Windows 11 notifications, you not only declutter your digital space but also ensure that you’re always in the loop with what matters most. 

With these tips, you’ll enhance your productivity and maintain control over your tech environment.

READ MORE


Please LIKE and SHARE OneCoolTip.com!
Visit the OneCoolTip YouTube Channelhttps://www.youtube.com/@onecooltip

Do you have a Cool Tip or question? Email us at
onecooltip.com@gmail.com


Rodger Mansfield, a seasoned tech expert, is the mastermind behind OneCoolTip.com, where he serves as both writer and editor. With a keen eye for simplifying complex tech, Rodger delivers practical advice that empowers readers to navigate the digital world with confidence. Dive into OneCoolTip.com for a treasure trove of savvy tips and tricks that keep you one step ahead in tech.


OneCoolTip.com
Cool Tech Tips for a Cooler Life!


#Microsoft #Windows  #Windows11 #TechSavvy #NotificationControl #ProductivityHacks #DigitalWellbeing #WindowsWednesday #TechTips #OneCoolTip @OneCoolTip 

(c) 2024 OneCoolTip.com

Wednesday, April 3, 2024

Unlock Peak Productivity with PowerToys for Windows 11

Discover the transformative power of PowerToys on Windows 11 with our comprehensive guide. Enhance your productivity and streamline your workflow with these powerful utilities.

By Rodger Mansfield, Technology Editor
April 3, 2024


Windows PowerToys
Have you ever felt that your Windows 11 experience could be more efficient? 

Are you looking to boost your productivity with tools designed by power users for power users?

Struggling with cluttered desktops and inefficient workflows? 

Here's a Cool Tip for the tech-savvy.  Use PowerToys for Windows 11.

PowerToys for Windows 11 is a collection of utilities designed to enable power users to tune and streamline their Windows experience for greater productivity. 

These utilities offer a variety of features such as advanced window management, key remapping, bulk file renaming, and more, allowing users to customize their system to better suit their workflow. 

PowerToys is available for both x64 and ARM64 system architectures and can be installed via the Microsoft Store or directly from GitHub.

In the fast-paced digital world, efficiency isn’t just a luxury; it’s a necessity. 


PowerToys for Windows 11 isn’t just a toolset; it’s a game-changer for the way we interact with our PCs.

Here's how to do it.
  1. Navigate to the Microsoft Store or GitHub to download and install PowerToys.
  2. Access the PowerToys settings through the system tray to customize each utility.
  3. Explore utilities like FancyZones for advanced window management, PowerRename for bulk file renaming, and Keyboard Manager for key remapping.
PowerToys offers a suite of utilities that can significantly enhance your Windows 11 experience. 

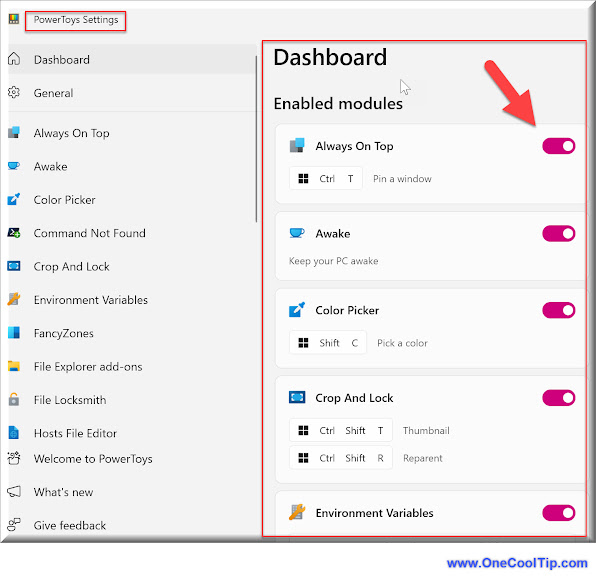
Windows PowerToys
fig. 1 - Windows PowerToys


Here are some popular PowerToys utilities for Windows 11.
  • Always On Top: This feature allows you to keep any window at the top. To activate it, simply select the desired window and press Ctrl + Windows key + T.

    Keep your most important application, like your email client or calendar, in view at all times, ensuring you never miss an important notification while multitasking.

  • Awake: With Awake, you can prevent your PC or monitor from going to sleep and ignore PC sleep settings.

    Ensure long-running tasks, such as large file downloads or video renders, are not interrupted by preventing your PC from going into sleep mode.

  • Peek: With Peek, you can preview any file simply by using Ctrl + Space shortcut.

    Quickly preview files without opening them fully, saving time when searching for specific documents or images.

  • PowerToys Run: PowerToys Run works as a quick launcher for files and applications, and you can start it instantly by using the Alt + Ctrl shortcut.

    Launch applications and find files instantly with a simple keyboard shortcut, streamlining your workflow and reducing the need for mouse navigation.

  • PowerRename: With this feature, you can rename multiple files easily.

    Simply select the files, right-click them, and choose the PowerRename option from the menu.

    Rename batches of files in one go, such as organizing photos from an event or reformatting document names for a project, saving time and maintaining consistency.

Each of these utilities has its own set of features and customization options that can significantly enhance your productivity on Windows 11.

However, it requires a learning curve and may not be necessary for casual users.

 PowerToys is an essential toolkit for anyone looking to optimize their Windows 11 experience. 

By following our guide, you can unlock new levels of efficiency and productivity.

Do you use PowerToys?

Let us know in the comments.

Enjoy!


READ MORE


Please LIKE and SHARE OneCoolTip.com!
Visit the OneCoolTip YouTube Channelhttps://www.youtube.com/@onecooltip

Do you have a Cool Tip or question? Email us at
onecooltip.com@gmail.com


Rodger Mansfield, a seasoned tech expert, is the mastermind behind OneCoolTip.com, where he serves as both writer and editor. With a keen eye for simplifying complex tech, Rodger delivers practical advice that empowers readers to navigate the digital world with confidence. Dive into OneCoolTip.com for a treasure trove of savvy tips and tricks that keep you one step ahead in tech.


OneCoolTip.com
Cool Tech Tips for a Cooler Life!


#Microsoft @Microsoft #Windows #Windows11 #PowerToys #ProductivityHacks #TechTips #MicrosoftUtilities #OneCoolTip @OneCoolTip 

(c) 2024 www.OneCoolTip.com