Showing posts with label Microsoft Word. Show all posts

Monday, November 20, 2023

How to Use Microsoft Word’s Researcher Feature

Have you ever found yourself toggling between your Microsoft Word document and your web browser, trying to juggle your writing and research simultaneously? 

What if there was a way to streamline this process, making your research accessible without ever leaving your Word document? 

Here's a Cool Tip.  Use the Microsoft Word Researcher feature.

The Researcher feature, available to Microsoft 365 subscribers, is a built-in tool in Microsoft Word that allows you to conduct web-based research directly within your Word document. 

Powered by Bing, it provides you with relevant topics and top sources including books, journals, websites, and images.

Here's how to use it.
  • Open your Word document.
  • Navigate to the “References” tab.
  • Click “Researcher” from the “Research” section of the ribbon.
  • In the search box that appears on the right, type a keyword for the topic you are researching and press Enter.
  • The Results pane will show a list of sources you can use in your document.
  • Choose a topic in the Results pane to explore in detail.
  • Click the plus sign on any result to begin an outline, add the result as a topic heading, and save a link to the result in a comment.
  • Add topic items to your document by clicking the plus sign next to the source title or the quote icon next to the text you want to cite.

Microsoft Word Researcher
fig. 1 - Microsoft Word Researcher


The Researcher feature can significantly reduce the time you spend researching your document, allowing you to focus more on writing. 

It also provides structured, safe, and credible information, making your research process more efficient.

That's it!

Enjoy.


Please LIKE and SHARE OneCoolTip.com!
Visit the OneCoolTip YouTube Channelhttps://www.youtube.com/@onecooltip


READ MORE


OneCoolTip.com
Cool Tech Tips for a Cooler Life


#Microsoft @Microsoft #Word #MicrosoftWord #WordTips #Productivity #WritingTips #TechTips #OneCoolTip @OneCoolTip  

Monday, October 30, 2023

How to Quickly Create a Table in Microsoft Word

Have you ever wondered how to create a table quickly in Microsoft Word ?

Maybe there's a quick keyboard shortcut?

How about an "old school" trick?

Here's a Cool Tip.  Use simple ASCII characters.

Here's how to do it.
  1. Open Microsoft Word. 
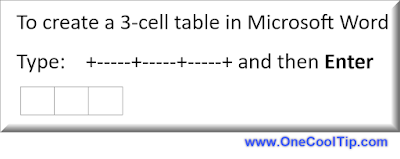
  2. Type a plus sign (+) followed by a series of minus signs (-) and end with another plus sign (+). 
  3. For example, to create a 3 cell table, type: +-----+-----+-----+ and then Enter.

Create a Table in Microsoft Word

fig. 1 Create a Table in Microsoft Word Using + and -s


    4. Just follow the pattern to create a table with more columns.
    5. Click into the last cell and press Tab key to create a new row.

Creating tables with ASCII characters is quick and easy. 

It’s also a fun way to impress your colleagues with your Word prowess!

Enjoy!

Please LIKE and SHARE OneCoolTip.com!
Visit the OneCoolTip YouTube Channelhttps://www.youtube.com/@onecooltip

READ MORE


OneCoolTip.com
Cool Tech Tips for a Cooler Life


#Microsoft @Microsoft #Word #MicrosoftWord #WordTips #ASCII #Productivity #TechTips #OneCoolTip @OneCoolTip 

Monday, October 23, 2023

Unleash the Power of Online Videos in Microsoft Word

Microsoft Word
Have you ever wanted to make your Microsoft Word documents more engaging and interactive? 

Are you tired of sending just links to videos in your documents? 

Here's a Back-To-Work-Monday Cool Tip.  Use the Insert Online Videos feature in Microsoft Word.

Insert Online Videos is a feature in Microsoft Word that allows you to embed videos from online sources, such as YouTube, Vimeo, and SlideShare.net, into your Word documents. 

This can be a great way to add multimedia content to your documents, such as instructional videos, product demos, or engaging presentations.

Here's how to do it.

Insert Online Videos in a Microsoft Word document.
  1. Open your web browser.
  2. Navigate to the video you want to embed
  3. Microsoft Word supports inserting videos from a number of sites including Vimeo, YouTube, and SlideShare.net.
  4. Copy the URL.
  5. Open the Word document where you want to insert the video.
  6. Click on the Insert tab in the ribbon.
  7. Click on Online Videos in the Media group.

Insert Online Video in Microsoft Word
fig. 1 - Insert Online Video in Microsoft Word

  1. In the Insert Video dialog box, paste the URL of the video you want to insert.
  2. Click on Insert.
Insert the Address of the Online Video
fig. 2 - Insert the Address of the Online Video


Your video is now part of your document.

Once your video is inserted, you can resize and reposition it as needed. 
  1. Select the video thumbnail (be careful not to select the Play button in the center). 
  2. Use the resizing handles to adjust the size of the video thumbnail. 
  3. You can also select different layout options to reposition your video.

Holly with a Pearl Earring Essay
fig. 3 - Holly with a Pearl Earring Essay


That's it!

Embedding online videos in Microsoft Word documents is a powerful way to enhance your content and engage your readers. 

A Bonus is that the Insert Online Videos feature is also available in Microsoft PowerPoint.

Checkout this OneCoolTip video for Inserting Online Videos


Enjoy!


Please LIKE and SHARE OneCoolTip.com!
Visit the OneCoolTip YouTube Channelhttps://www.youtube.com/@onecooltip


READ MORE

OneCoolTip.com
Cool Tech Tips for a Cooler Life


#Microsoft #Word #MicrosoftWord #PowerPoint #TechTips #DigitalTransformation #TechNews #Innovation #OnlineVideos #DocumentEditing #ProductivityTips #TechTips #BackToWorkMonday #OneCoolTip @OneCoolTip #YouTube @YouTube 

Monday, October 9, 2023

How to View Hyperlink Links in Microsoft Word

Microsoft Word
Have you ever found yourself lost in a sea of hyperlinks while working on a Microsoft Word document? 

Ever wished there was a way to view and manage all those hyperlinks effortlessly?

Here's a Cool Microsoft Word Tip.  Alt + F9

Hyperlinks are a powerful tool for creating interactive documents, but they can also be a bit mysterious.

Alt + F9 toggles the  hyperlink view in Microsoft Word. 

This allows you to see the underlying field code for a hyperlink, which can be helpful for troubleshooting or customizing hyperlinks.

Here's how to do it.
  • Open the Microsoft Word document containing the hyperlinks you want to view.

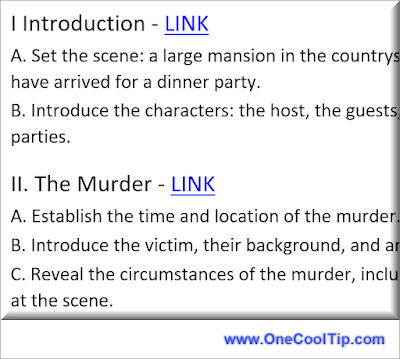
Microsoft Word Hyperlink
fig. 1 - Microsoft Word Hyperlink
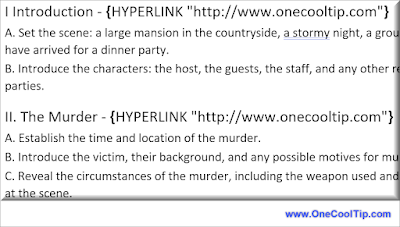
  • Press Alt + F9.
  • This toggles the hyperlink view. 
Microsoft Word Hyperlink Alt + F9
fig. 2 - Microsoft Word Hyperlink Alt + F9
  • All hyperlinks in your document will be displayed in their raw format, showing the underlying URL instead of the display text.
  • To toggle back to regular view, press Alt + F9 again.

If you're editing a hyperlink, you can make changes to the field code directly in hyperlink view.

Enjoy!


Please LIKE and SHARE OneCoolTip.com!

READ MORE

OneCoolTip.com
Cool Tech Tips for a Cooler Life


#Microsoft @Microsoft #Word #MicrosoftWord #HyperlinkView #AltF9 #ALT+F9 #Technology #Productivity #TechTips #OneCoolTip @OneCoolTip #YouTube

Monday, September 25, 2023

How to Use Keyboard Shortcuts for Bulleted Lists in Microsoft Word

Microsoft Word
Ever found yourself fumbling with the mouse while trying to create a bulleted list in Microsoft Word? 

Ever wished you could speed up the process and make your document formatting more efficient? 

Here's a Cool Tip.  Use the Bulleted List keyboard shortcuts.

Microsoft Word is a powerful word processing tool that offers a variety of features to enhance your document creation experience. 

One such feature is the ability to create Bulleted, Dashed, Lettered or Numbered lists using keyboard shortcuts. 

This not only speeds up your work but also makes the process smoother and more efficient.

Here's how to do it.

  • Open Microsoft Word
  • Open the document where you want to add the list.
  • Place your cursor at the point in the document where you want to start your list.
  • Start typing your list
    • For a bulleted list, type an asterisk (*) followed by a space at the beginning of a new line. 
    • Type - for a bulleted dash list.
    • For a numbered list, type 1 followed by a space. 
    • Type a or an A and a . for a lettered list.
    • Microsoft Word will automatically start a new bulleted, dashed, lettered or numbered list for you.
  • Press Enter to start a new line with a new bullet or number. 
  • When you want to end your list, press Enter twice.
Microsoft Word List Shortcuts
fig. 1 - Microsoft Word List Shortcuts


The more you use these shortcuts, the more natural they will feel, and the faster you’ll be able to format your documents in Microsoft Word.

So why wait? Start practicing these shortcuts today and take your Microsoft Word skills to the next level!

Enjoy!


Please LIKE and SHARE OneCoolTip.com!


READ MORE

OneCoolTip.com
Cool Tech Tips for a Cooler Life!


#Microsoft @Microsoft #Word  #MicrosoftWord #WordShortcuts #BulletedLists #TechTips #ProductivityHacks #TechTips #OneCoolTip @OneCoolTip

Saturday, September 16, 2023

Windows Super Secret Keyboard Shortcuts to Open Microsoft Applications

Microsoft Windows
Do you think you know Windows?

Do you know the super secret keyboard shortcuts to open Microsoft Applications?

There's even one to open the Microsoft-owned LinkedIn website.

Here's a Cool Tip:  Secret Microsoft Application Keyboard Shortcuts.

 
Here's how to do it.

  • Press and hold the Control + Shift + Alt + Windows + a letter from the list below for each application.
  • For example, L for LinkedIn.

Application

Windows Keyboard Shortcut

LinkedIn

CTRL + SHIFT + ALT + WIN + L

Word

CTRL + SHIFT + ALT + WIN + W

Excel

CTRL + SHIFT + ALT + WIN + X

PowerPoint

CTRL + SHIFT + ALT + WIN + P

Outlook

CTRL + SHIFT + ALT + WIN + O

Microsoft Teams

CTRL + SHIFT + ALT + WIN + T

OneDrive

CTRL + SHIFT + ALT + WIN + D

OneNote

CTRL + SHIFT + ALT + WIN + N


The keyboard shortcut to open LinkedIn on Windows is CTRL + SHIFT + ALT + WIN + L. 

This shortcut opens LinkedIn in your default browser. 

You can also use this shortcut to open other Office apps, including Word, Excel, PowerPoint, Outlook, Microsoft Teams, OneDrive and OneNote.

That's it!

Enjoy!


Please LIKE and SHARE OneCoolTip.com!

READ MORE


OneCoolTip.com
Cool Tech Tips for a Cooler Life


#Microsoft #keyboardshortcut #LinkedIn #Word #Excel #PowerPoint #Outlook #MicrosoftTeams #OneDrive #OneNote #techtips #OneCoolTip #Microsoft 

Monday, September 11, 2023

How to Master Formulas in Microsoft Word

Have you ever found yourself wishing you could perform calculations right within your Word document? 

Have you ever wondered how to make your tables in Word more dynamic and functional? 

Here's a Cool Tip:  Use the Formula feature in Microsoft Word.

That's right.

Formulas in Microsoft Word.

Microsoft Word offers a powerful feature that allows you to use formulas within tables, much like in Excel. 

Let's walk through  the process of using the formula function in Microsoft Word and explain the concept of positional arguments.


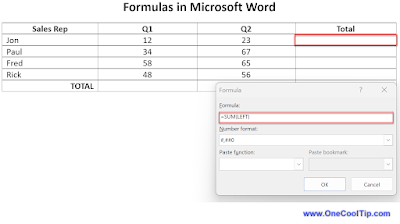
Formulas in Microsoft Word
fig. 1 - Formulas in Microsoft Word

Here's how to do it.
  • Insert a table into your Word document where you want to perform calculations.
  • Fill the cells with the data you want to calculate.
  • Click on the cell where you want the result of your calculation to appear. 
    • If the cell is not empty, delete its contents. 
  • Go to the Layout tab, in the Data group, and click on Formula.
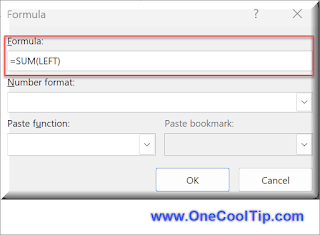
  • Begin your formula with an equal sign, followed by your chosen function.
Word Formula
fig. 2 - Word Formula
  • Enter a function in the Formula field, such as SUM, AVERAGE, COUNT, MAX, MIN, PRODUCT.
    • Click on Paste function to select a function.
  • Use Positional Arguments: In the parentheses that follow the function, add positional arguments like LEFT, RIGHT, ABOVE, BELOW
    • These refer to the relative position of the cells that you want to include in your calculation.
Notes:

  • Update Formula Results
    • The result of a formula is calculated when it is inserted and when the document containing the formula opens. You can also manually update the result of one or more specific formulas by selecting them and pressing F9.
  • Understanding Positional Arguments
    • Positional arguments are used to refer to cell positions relative to the cell containing the formula. For example, if you want to sum numbers in a column above a specific cell, you would use the argument ABOVE in your SUM function.
With these steps, you can now perform calculations right within your Word document. 

No more switching back and forth between Word and Excel for simple calculations!

Enjoy!


Please LIKE and SHARE OneCoolTip.com!


READ MORE

OneCoolTip.com
Cool Tech Tips for a Cooler Life


#Microsoft #Word #MicrosoftWord #FormulasInWord #WordTips #Productivity #TechTips #OneCoolTip @Microsoft @OneCoolTip

Tuesday, September 5, 2023

How to Quickly Create Different Types of Lines in Microsoft Word

Microsoft Word
Have you ever wanted to quickly add a line to your document or email, but didn’t want to go through the hassle of finding the right tool or button? 

Did you know that you can easily create different types of lines using the autocomplete feature in both Microsoft Word and Outlook? 

Here's a Cool Tip:  Use the AutoFormat Feature in Microsoft Word and Outlook.

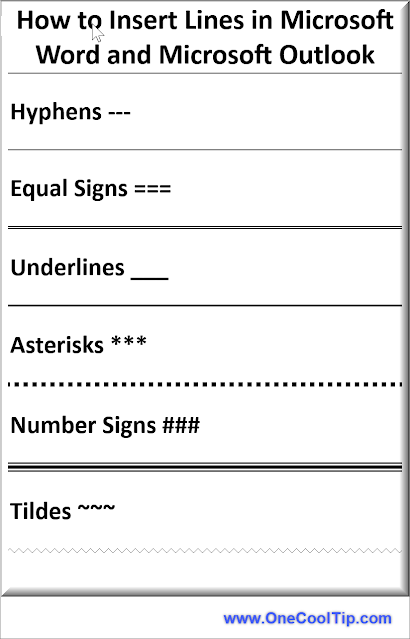
To create different types of lines using autocomplete, all you need to do is type at least three characters at the left margin of a new line and then press Enter. 

The result will be a line based on the characters you typed. Here are the characters you can use and the lines they create:
  • Three hyphens (—) create a plain single line
  • Three equal signs (===) create a plain double line
  • Three underline symbols (___) create a bold single line
  • Three asterisks (***) create a broken or dotted line
  • Three number signs (###) create a triple line with a thick center
  • Three tildes (~~~) create a wavy line

Insert Line in Microsoft Word and Outlook


This is a quicker step versus using Insert --> Shapes --> Lines command from the Home menu.

Enjoy!


Please LIKE and SHARE OneCoolTip.com!


READ MORE


OneCoolTip.com
Cool Tech Tips for a Cooler Life!


#Microsoft #Word #MicrosoftWord #Outlook #Autocomplete #ProductivityTips #TechTips #OneCoolTip @OneCoolTip @Microsoft 

Monday, August 7, 2023

How to Customize Your Microsoft Word Status Bar for Increased Productivity

Microsoft Word
Are you tired of constantly scrolling through menus to find the information you need while working on a document in Microsoft Word? 

Did you know that you can customize Microsoft Word to display the information you need at a glance? 

Here's a Cool Tip: Customize the Status Bar in Microsoft Word to increase your productivity and make your work easier.

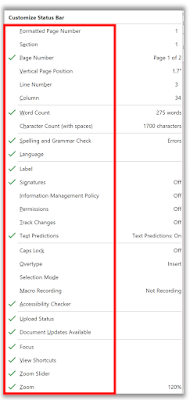
The Status Bar is located at the bottom of the document window and displays information about your document, such as what page you are currently viewing, how many words are in your document, and whether any proofing errors were found. 
Customize Status Bar - Microsoft Word
fig. 1 - Customize Status Bar - Microsoft Word

You can easily customize the Status Bar by adding or removing information from it.

Here’s how to customize the Status Bar in Microsoft Word:
  • Right-click anywhere on the Status Bar.
  • A “Customize Status Bar” menu will open.
  • Items that have check marks next to them display on the Status Bar.
  • Click the tick-box to select the items you want to see in the status bar.
  • Click to deselect the items you want to remove.
  • The status bar immediately reflects your choice.
Some useful options to consider adding to your Status Bar include:
  • Vertical Page Position: shows you precisely where the cursor is at any given moment.
  • Track Changes: shows whether Track Changes is On or Off.
  • Line Number: helps in some large documents, or when collaborating with someone who wants to direct your attention to a specific place in the document.
  • Collaborative tools: for those using later versions, or free versions of Word, which allow for synchronous or real-time editing among several authors.

Customizing the Status Bar can help you work more efficiently and effectively in Microsoft Word. 

Give it a try and see how it can improve your productivity!

Enjoy!

Please LIKE and SHARE OneCoolTip.com!


READ MORE

OneCoolTip.com
Cool Tech Tips for a Cooler Life!


#Microsoft #Word #MicrosoftWord #Productivity #StatusBar #Customization #TechTips #OneCoolTip @Microsoft 

Monday, July 24, 2023

Unlocking the Power of the ALT Key: How to Select Vertical Text in Microsoft Word

Microsoft Word
Have you ever found yourself spending too much time editing a list in Microsoft Word? 

Do you often need to delete or edit the beginning of each line in a list, especially when dealing with text pasted from another source? 

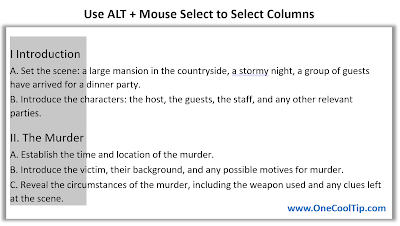
Here's a Cool Tip: Select vertical text.

Selecting vertical text in Microsoft Word is a simple process that can save you time and effort when editing your documents. 

Microsoft Word Select Vertical Text
fig. 1 - Microsoft Word Select Vertical Text


Here's how to do it.
  • All you have to do is hold down the Alt key while dragging the mouse pointer to select the text. 
  • Drag the mouse up and down until you get your desired text selection1.

This feature is especially useful when you need to delete or edit the beginning of each line in a list, or when dealing with text pasted from another source. 

You can make a vertical selection anywhere in the document, not just with lists.

Enjoy!

Please Like and Share OneCoolTip.com!


READ MORE

OneCoolTip.com
http://www.onecooltip.com
Cool Tech Tips for a Cooler Life!


#Microsoft #Word @Microsoft #MicrosoftWord #VerticalText #ALTkey #ProductivityTips #TechTips #OneCoolTip 

Tuesday, July 18, 2023

The Secret Menus in Microsoft Word

Microsoft Word
Do you want to find a quicker way to make formatting and editing changes in Microsoft Word?

Do you know there are secret menus that can help?

Here's a Cool Tip:  Context Menus (also called shortcut menu or Pop-up menu)

Rather than selecting a word and then moving your mouse to the top ribbon menu to make formatting or editing changes, you can use the context menus.

Microsoft Word Context Menu
fig. 1 - Microsoft Word Context Menu

Here's how to do it.

  • Click in any word and then right-mouse click. OR
  • Highlight and select a word or words you want to format or edit.
    • Cool Tip:  You can also double click a word to highlight it.  Triple click to highlight and select the paragraph.
    • You'll see the formatting menu appear.
    • To display the pop-up menu, right-mouse click.  You can make many other edits from this menu.
    • You can also use the Shift + F10 keyboard shortcut to display this menu wherever your cursor is at.
These two menus will let you make the most common formatting and editing changes.

That's it!

Enjoy!

Please Like and Share OneCoolTip.com!


READ MORE


OneCoolTip.com
http://www.onecooltip.com
Cool Tech Tips for a Cooler Life!

#Microsoft #Word #Edit #format #menu #TechTips #OneCoolTip

Monday, July 17, 2023

Say Goodbye to Calibri - Hello Aptos!

Do you use Microsoft Office?

If so, there's a change coming with the default font.

Microsoft has announced that it is replacing its default font, Calibri. 

This change comes after 15 years of Calibri being the default font for Microsoft Office. 

The new default font is called Aptos.

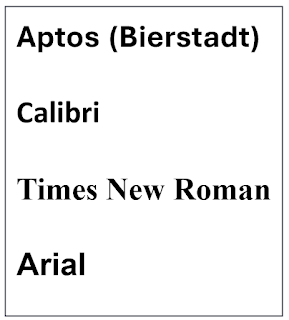
But here's a Cool Tip:  You can already ready use it since it's currently called Bierstadt

Microsoft Default Font Aptos
fig.1 - Microsoft New Default Font Aptos and Previous Fonts


The decision to choose Aptos as the new default font was based on user feedback, with Aptos striking a balance between professionalism and relatability.

The new font will gradually become the default across all Microsoft 365 apps and services for all users over the coming months. 

However, Calibri will still be pre-pinned at the top of a new font menu alongside its predecessors, Times New Roman and Arial.

Please Like and Share OneCoolTip.com!


READ MORE

OneCoolTip.com
http://www.onecooltip.com
Cool Tech Tips for a Cooler Life!


#Microsoft #Aptos #NewFont #DefaultFont #MicrosoftOffice #Office #Microsot365 #Word #Excel #PowerPoint #Outlook #TechTip #OneCoolTip @Microsoft 


Source: Microsoft Design

Monday, July 10, 2023

The Hidden Shortcut in Microsoft Word to Go Back

Microsoft Word
Have you ever found yourself lost in a sea of text while working on a document in Microsoft Word? 

Do you wish there was an easy way to navigate back to where you were before? 

Here's a Cool Tip: Shift + F5.

This handy shortcut allows you to quickly jump back to your last edit point, saving you time and frustration. 

No more scrolling through pages of text or using the Find function to locate where you left off. 

With Shift + F5, you can easily pick up right where you left off.

Microsoft Word - Shift + F5 to Go Back
fig.1 - Microsoft Word - Shift + F5 to Go Back

But that’s not all! 

This shortcut has even more functionality. Pressing Shift + F5 multiple times allows you to cycle through your last three edit points, giving you even more control over your workflow.

So why not give it a try? 

Next time you’re working in Microsoft Word, use the Shift + F5 shortcut to revolutionize your workflow and increase your productivity.

Please Like and Share OneCoolTip.com!


READ MORE


OneCoolTip.com
http://www.onecooltip.com
Cool Tech Tips for a Cooler Life!

#MicrosoftWord #Microsoft #word #Productivity #Workflow #Shortcut #techtip #OneCoolTip @Microsoft