Monday, August 21, 2023

How to Add Visual Flair to Your PowerPoint Presentations

Have you ever wanted to add some visual flair to your PowerPoint presentations? 

Do you want to make your slides more engaging and eye-catching? 

Here's a Back to Work Monday Cool Tip: Use the Insert Icons feature in Microsoft PowerPoint! 

Microsoft 365 doesn't have traditional clip art anymore, but as a subscriber you get several new kinds of high quality art in its place for free: high-resolution photographs, icons, cutout people, stickers, illustrations, and cartoon people.

Here's how to do it.
  • Open Microsoft PowerPoint and navigate to the slide where you want to insert an icon.
  • Click on the Insert tab in the ribbon menu at the top of the screen.
  • In the Illustrations group, click on Icons.
    • A window will pop up with a variety of icons to choose from. 
    • You can search for specific icons using the search bar at the top of the window, or browse through the categories on the left side of the window.
  • Once you’ve found an icon that you like, click on it to select it, and then click on the Insert button at the bottom of the window.
  • The icon will be inserted onto your slide, and you can use the formatting options in the ribbon menu to customize its size, color, and position.
  • If you want to insert other types of images, select another category such as Images.

Microsoft Power Point Insert Icons
fig. 1 - Microsoft PowerPoint Insert Icons Feature

With this feature, you can add visual interest to your presentations and make them more engaging for your audience.


That's it!

Enjoy!

Please LIKE and SHARE OneCoolTip.com!


READ MORE

OneCoolTip.com
Cool Tech Tips for a Cooler Life!

#PowerPoint #Microsoft #Icons #Presentations #Visuals #TechTips #OneCoolTip @OneCoolTip @Microsoft 

Sunday, August 20, 2023

How to Free Up Storage Space in Google Drive

Google Drive
Are you running out of storage space in your Google Drive? 

Google Drive is a cloud storage service that allows you to store files online and access them from anywhere. 

It also lets you share files with others, collaborate on projects, and create backups of your data.

Many people find that they have accumulated a lot of large files over time, such as videos, photos, and documents. 

These files can take up a lot of space, and if you're not careful, you could end up running out of storage and not being able to upload new files.

Every Google Account comes with 15 GB of storage that's shared across Google Drive, Gmail, and Google Photos. 

To avoid paying Google for extra storage space, you can clean up large files you no longer need.

Here's how to identify the files that are taking up the most space, so you can delete them or move them to another storage location:
  • Go to your Google Drive.
  • Click the Storage button in the left-hand column.
  • Google Drive will display a list of all your files, sorted by size, largest first.
  • You can now delete or move the large files that you no longer need.

Google Drive Storage
fig. 1 - Google Drive Storage


You can do this in the Google Drive app as well. 

Here's how to do it:
  • Open your Google Drive app and log in to your account.
  • Tap Files in the bottom-right corner of the screen.
  • Tap Name underneath My Drive near the top of the screen.
  • Tap Storage used. This will arrange your files from largest to smallest.
  • Tap the three dots ... next to the item you want to delete.
  • Tap Remove.

By following these steps, you can easily find large files in your Google Drive and free up storage space. 

This will help you keep your Google Drive organized and efficient. 

Check out the OneCoolTip video:


Please LIKE and SHARE OneCoolTip.com!

READ MORE

OneCoolTip.com
Cool Tech Tips for a Cooler Life!

#Google #Drive #googledrive #storage #freeupspace #filemanagement #tipsandtricks #TechTips #OneCoolTip @OneCoolTip @Google 

Saturday, August 19, 2023

Stop Apps from Scrolling in Windows Task Manager with This Cool Tip

Windows 11
Are you tired of apps scrolling automatically in the Windows Task Manager? 

This can be a frustrating problem, especially if you're trying to troubleshoot a performance issue.

Here's a Cool Tip:  Use the Control Key.

The Windows Task Manager is a system monitor utility that allows you to manage all the processes running on your computer. 

You can use Task Manager to:
  • View performance: View the overall performance of the system, or the performance per package or process
  • Manage processes: Order processes by usage to see what's taking up your computer's resources
  • Turn off software: Turn off software that takes up excessive resources on your PC to improve the running speed
  • Restart or shut down system: Restart or shut down the system when it is busy or unresponsive
  • Terminate applications: Terminate applications and processes
And with this Cool Tip you can use the Control key to pause the Task Manager screen.

This will stop apps from scrolling in the Windows Task Manager. 

Here's how to do it:
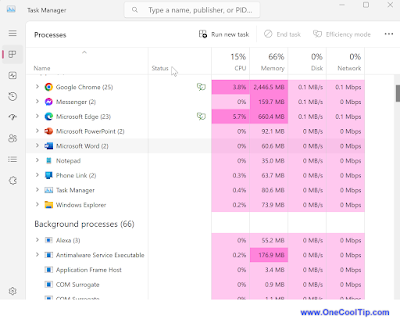
  • Open the Task Manager by pressing Ctrl+Shift+Escape.
  • Hold down the Control key while scrolling through the list of processes.
  • This will prevent the processes from scrolling automatically. You can release the Control key to resume scrolling.

Windows Task Manager
fig. 1 - Windows Task Manager


That's it!

Enjoy!

And Cool Tip Kudos to Jen Gentleman @Microsoft for sharing this Cool Tip this week.

Please LIKE and SHARE OneCoolTip.com!

READ MORE

OneCoolTip.com
Cool Tech Tips for a Cooler Life!


#windows #taskmanager #scrolling #controlkey #howto #techtips #troubleshooting #windows10 #windows11 #Microsoft @Microsoft #TechTips #OneCoolTip @OneCoolTip 

Friday, August 18, 2023

Take a Nostalgic Trip Back to Television's Golden Era!

My 80s TV
Do you miss the golden era of television? 

Are you longing for a blast from the past? 

Want to know how you can journey back to the vibrant and wild world of 1980s television with just a few clicks? 

Here's a Friday Funday Cool Tip: Buckle up and visit www.my80stv.com

The site www.my80stv.com is a virtual treasure trove of 80s television content. 


My 80s TV - The Smufs
fig. 1 - My 80s TV - The Smurfs

From timeless sitcoms to action-packed dramas, this site offers a curated selection of channels and shows that defined an entire generation.

It has a classic channel flipping feature, and you can even add authentic visual effects like static and screen curvature.

And you can also visit the 60s, 70s and 90s television channels on the site.

So what are you waiting for? 

Tune in now and take that unforgettable trip down memory lane!

Enjoy Friday Funday!

Please Like and Share OneCoolTip.com!


READ MORE

OneCoolTip.com
Cool Tech Tips for a Cooler Life!

#60s #70s #80s #90s #TV #Nostalgia #RetroTelevision #My80sTV #FridayFunday #TechTips #OneCoolTip @OneCoolTip 

Thursday, August 17, 2023

The Secret Truth of Turning Bluetooth Off on an iPhone

iPhone
Have you ever wondered what the difference is between turning Bluetooth off in the Control Center versus turning it off in the Settings app on your iPhone? 

Do you know which method is best for saving battery life or improving security? 

Here's a Cool Tip:  Turning Bluetooth OFF in the Control Center only disconnects Bluetooth.

How to turn off Bluetooth in the Control Center
  • To access the Control Center, swipe down from the top-right corner of your screen (or up from the bottom if you have an iPhone with a Home button). 
  • Once you’re in the Control Center, you’ll see a Bluetooth icon that looks like a “B” made out of triangles. 
  • Simply tap this icon to turn Bluetooth on or off.
iPhone Control Center
fig. 1 - iPhone Control Center

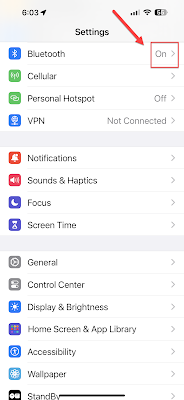
How to turn Bluetooth on and off using the Settings app. 
  • Open the Settings app and tap on “Bluetooth.” 
  • Toggle the switch next to “Bluetooth” to turn it on or off.

iPhone Settings
fig. 2 - iPhone Settings screen


So, what’s the difference between these two methods? 

When you turn Bluetooth off in the Control Center, it only disconnects any currently connected devices and stops your iPhone from connecting to new devices. 

However, it doesn’t actually turn Bluetooth off completely. 

This means that features like AirDrop and Handoff will still work, and your iPhone will still be able to connect to accessories like the Apple Watch or AirPods.

On the other hand, when you turn Bluetooth off in the Settings app, it completely turns off the Bluetooth radio. This means that no Bluetooth features will work until you turn it back on.

In terms of battery life and security, it’s generally best to turn Bluetooth off completely when you’re not using it. 

This can help save battery life and prevent unauthorized access to your device. 

However, if you frequently use features like AirDrop or Handoff, or if you have accessories like an Apple Watch or AirPods that need to stay connected, it might be more convenient to just turn Bluetooth off in the Control Center.

It’s up to you to decide which one works best for your needs.

Enjoy!

Please Like and Share OneCoolTip.com!


READ MORE

OneCoolTip.com
Cool Tech Tips for a Cooler Life!

#Apple #iPhone #Bluetooth #ControlCenter #Settings #TechTips #OneCoolTip @Apple

Wednesday, August 16, 2023

How to Remove Your Personal Information from Google Search Results

Google logo
Do you worry that your personal information is too easily accessible online? 

Have you found information is a Google search that you want removed?

In today's digital age, it's more important than ever to take steps to protect your privacy.

Here's a Cool Tip:  Request to remove your personal information from Google search results.

Google is the world's most popular search engine, and its search results can often be the first place people go to find information about you. 

By removing your personal information from Google search results, you can make it more difficult for people to find you online.

Here's how to remove personal information from Google search results: 

1. Find a page in search results that contains personally identifiable information
2. Tap the three-dot menu icon to bring up the “About this result” panel

Google Remove Results
fig. 1 - Google Remove Result

3. Click Remove result.
4. Google will take you to the removal request form 


Google Remove This Result
fig. 2 - Google Remove This Result

6. Select the reason why you would like to remove the search results.
7. Click the blue arrow to the right of your choice.
8. Follow the remaining steps and submit the request to Google 

You can only submit takedown requests for results pertaining to yourself or someone you officially represent. 

Google recommends that you contact websites hosting your information directly to request its removal from those sites. 


That's it.

Enjoy!


Please Like and Share OneCoolTip.com!

READ MORE


OneCoolTip.com
Cool Tech Tips for a Cooler Life!


#Google #privacy #onlineprivacy #dataprivacy #personalinformation #googlesearch #removepersonalinformation @Google 

Tuesday, August 15, 2023

How to Use Google Chrome to Search Multiple Search Engines

Google Chrome
Do you ever find yourself switching between different search engines to find the information you need? 

If so, you're not alone. 

Many people use multiple search engines for different purposes. 

For example, you might use Google or Yahoo for general searches, and DuckDuckGo for privacy-focused searches.

Here's a Cool Tip: Use the Google Chrome Omnibox to search multiple search engines.

The Omnibox, the address bar, is more than just a search bar. 

It's a powerful tool that can help you save time and be more productive.

Here's how to do it.

  • Use the Omnibox to search multiple search engines
    • Type the URL for the search engine in the address bar.
      • For example, duckduckgo.com  (or other search engine).
    • Press the Tab key.
    • Enter your search query.
    • Press Enter.
    • Google will display search results from that search engine.

Search Search Engines in Google Chrome
fig. 1 - Search Search Engines in Google Chrome


The Google Chrome Omnibox is a powerful tool that can help you save time and be more productive. 

Enjoy!


Please Like and Share OneCoolTip.com!


READ MORE


OneCoolTip.com
Cool Tech Tips for a Cooler Life!


#Google #Chrome #googlechrome #omnibox #search #searchengines #techtips #OneCoolTip @Google