Sunday, April 9, 2023

Explore the World from Your Browser with Google Earth!

Google Earth
Have you ever wanted to explore the world without leaving your home? 

Are you curious about what your hometown looks like from space?

Here's a Cool Tip: check out Google Earth on the Web.

Besides the Google Earth app (iPhone, AndroidPro-PC, Mac, Linux), Google Earth on the Web gives users easy access to most of the popular Google Earth features.

Here's how to use Google Earth on the Web:

  • Go to https://earth.google.com/web/
  • Click and drag the globe to spin it. Hold Shift at the same time to tilt.
  • Click Ctrl key to go to first-person perspective.
  • Scroll your mouse wheel to zoom in and out (alternatively, use the plus and minus icons in the bottom-right.)
  • As you get closer to the Earth, you’ll see the names of countries appear.

Google Earth on the Web

Google Earth Voyager

Google Earth’s Voyager is a showcase of interactive guided tours, quizzes, and layers that aim to help educate everyone about the world, locations near and far. 

Here’s how to use it:

  • Open Voyager on Google Earth.
  • Try selecting great Treks like El Capitan at Yosemite, or Tokyo's Heat Island Effect or Changing Forests or Fragile Beauty. 

Google Earth Web Voyager

  • View 3-D high-res images of the world’s most toured places, such as the Eiffel Tower in France or the Parthenon in Greece or the Gateway Arch in St. Louis Missouri. 

Google Earth Web Explore the World 3D
Explore the Word in 3D

  • Use navigation shortcuts to explore Google Earth even faster.

            Navigating Google Earth on the Web:
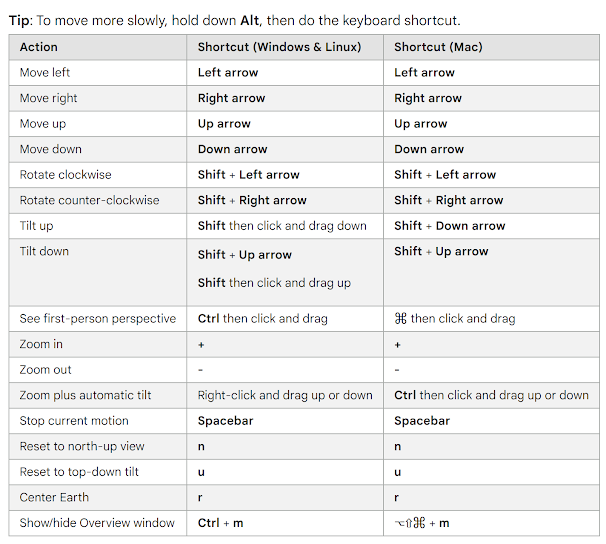
Google Earth Navigation
Source: Google


Enjoy!

Please Like and Share OneCoolTip.com!

READ MORE


OneCoolTip.com
Cool Tech Tips for a Cooler Life!

#GoogleEarth #ExploreTheWorld #WebBrowser #OneCoolTip #Google @Google

Friday, April 7, 2023

Move Files Between Devices with Ease Using This Cool Tip

Microsoft Edge
Are you tired of constantly emailing files to yourself or using a USB drive to transfer files between devices? 

Do you wish there was an easier way to move files between devices without having to navigate through multiple windows? 

Here's a Cool Tip.

Look no further than the Edge browser’s drop app feature! 

With this handy tool, you can easily move files from one device to another with just a few clicks.

Here are the steps to use the drop feature of the Edge browser to move files between devices logged into an account:
  • Ensure you are signed in to your Microsoft Account on both devices.
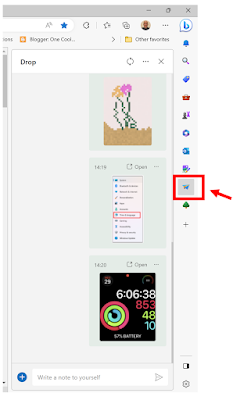
  • On your other machine, launch Microsoft Edge and click the Drop app button from the sidebar.
Microsoft Edge Drop App
  • Add the file to be moved - 
    • Click the + button to add a file or
    • Drag the file to the Drop App section.
  • The file you send and the comment (if any) will be readily available to open or download to your local machine.
  • On you local machine, open the Drop app to see your file.
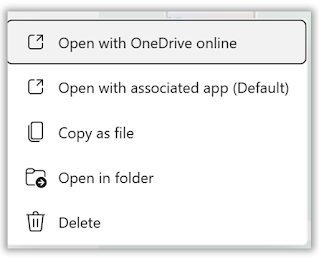
  • Click the three-dot button next to the shared file or right-mouse click to view other options.
Microsoft Edge Drop App File Options


That's it!  You've moved the file between devices without using email or USB.

Please Like and Share OneCoolTip.com!

READ MORE


OneCoolTip.com
Cool Tech Tips for a Cooler Life!


#EdgeBrowser #TechTips #DragAndDrop #Productivity #FileTransfer #OneCoolTip #Microsoft @Microsoft

How to Build a World: A Fun and Creative Cool Tip

Are you looking for a fun and creative way to spend your free time? 

Do you enjoy playing games that let you create your own world? 

If your answer is yes, then check out this Friday Funday Cool Tip:   Sandspiel.club

This web-based game allows you to experiment with sand and other materials to create different landscapes and structures. 

Here's how to start creating your own world.

  • Go to Sandspiel.club.
  • Click on the material you want to use and drag it to the screen. 
  • Add as much or as little of each material as you like. 
  • Mix different materials to create new colors and textures. 
    • When you mix sand and water, you'll get wet sand. 
    • If you mix sand and fire, you'll get glass.

Sandspiel
Sandspiel.club

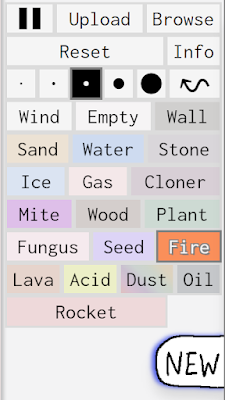
Aside from the materials, there are various tools that you can use to manipulate your creation. These include a brush, eraser, dropper, and fan. 

Sandspiel Tool
Sandspiel Tools

Enjoy your Friday Funday!


Please Like and Share OneCoolTip.com!


READ MORE


OneCoolTip.com
Cool Tech Tips for a Cooler Life!


#Sandspiel #TechTip #CreativePlay #WebGames #OneCoolTip #SandSpiel


Thursday, April 6, 2023

Is That a Petunia or a Pansy? How to Use Google Lens To Find Out

Google Lens
Have you ever seen a flower and wondered what it was called? 

Or a product and wanted to know where you could buy it? Google Lens can help!

Google Lens on Android and iPhone is a powerful tool that can help you identify objects, find information, and more. 

It's easy to use, and it can be a lifesaver in many situations.

On an Android, there's a dedicated Google Lens app from the Google Play store.

But let's look at the iPhone's Google App version.  

Here's how to do it

iPhone

  • Download and Open the Google App.
  • Tap the camera icon
  • Point your camera at something
  • Click Search with your camera
  • Click the circle button to take a photo and search
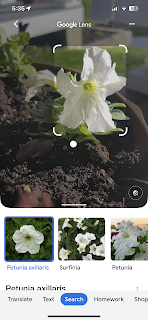
  • Google Lens will identify the flower and provide information about it.
Google Lens Search
Google Lens Search Result


That's it!  Try searching for other items, including translation.

Enjoy!


Please Like and Share OneCoolTip.com!

OneCoolTip.com
Cool Tech Tips for a Cooler Life!

#Google #Search #GoogleLens #HowTo #Technology #AI #MachineLearning #OneCoolTip @Google 

Wednesday, April 5, 2023

How to Use the Presentation Pointer in Microsoft PowerPoint

Are you tired of fumbling around with your mouse during presentations? 

Do you want to make your presentations more engaging and interactive? 

If so, you’re in luck! 

There's a Cool Tip on how to use the presentation pointer in Microsoft PowerPoint to make your presentations more dynamic and engaging.

Here's how to do it:

To use your mouse as a laser pointer:

  • Go into Slide Show mode.
    • Press the Slide Show icon at the bottom right corner
Microsoft Power Point Slide Show
  • Press and hold the Ctrl key then Left-Click the mouse mouse.
  • A red dot will appear on the screen

Power Point Pointer
Red Dot Pointer
  • Move the red dot around the screen with the mouse to highlight key points on your slide

That's it.


Please Like and Share OneCoolTip.com!

READ MORE


OneCoolTip.com
Cool Tech Tips for a Cooler Life!


#PowerPointTips #PresentationSkills #PresentationPointer #MicrosoftPowerPoint #Microsoft #OneCoolTip @Microsoft

Tuesday, April 4, 2023

Boost Your Productivity with Windows 11 Autocorrect

Windows 11
Are you tired of constantly correcting your typos and misspelled words? 

Do you want to save time and increase your productivity? 

Look no further than Windows 11 autocorrect! 

With just a few simple steps, you can set up autocorrect and text suggestions to help you type faster and more accurately. 

Or conversely, turn it off!

Here's how to do it:
  • Open the Settings app (or press Windows + I on the keyboard)
  • From the left navigation column, select Time & language.
Windows 11 Settings App
Select Time and Language
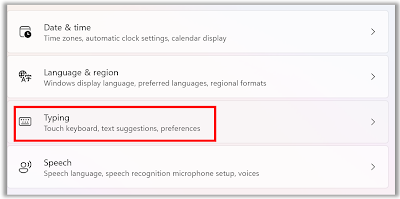
  • From there, on the right, click on Typing.
Windows 11 Typing Settings
Select Typing
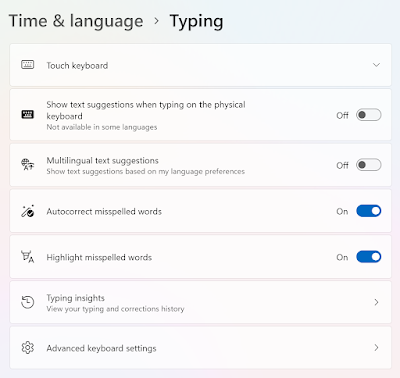
  • Turn on the toggles that say Autocorrect misspelled words and Highlight misspelled words.
Windows 11 Time and Language - Typing
Select Autocorrect misspelled words and Highlight misspelled words


That's it!

Please Like and Share OneCoolTip.com!

READ MORE

OneCoolTip.com
Cool Tech Tips for a Cooler Life!

#Windows11 #Autocorrect #Productivity #TextSuggestions #Efficiency #Microsoft #OneCoolTip @Microsoft 

Monday, April 3, 2023

How to Co-Author a File in Real Time in Microsoft 365: Collaborate with Ease

Microsoft 365
 Have you ever worked on a project with a group of people and found it difficult to coordinate everyone's contributions? 

Do you struggle with sending multiple versions of a document back and forth, trying to keep track of everyone's changes? 

If you answered yes to either of these questions, you're not alone. 

Collaborating on documents can be a headache but here's a Cool Tip: co-authoring

With co-authoring, multiple users can work on a document at the same time, seeing each other's changes in real-time. 

Here's how to use co-authoring in Microsoft 365 so you can collaborate more efficiently and get your projects done with ease.
  • Save the file in OneDrive.  
  • Share the file with others
    • To share the file with others, click the Share button in the top-right corner of the screen. 
    • Enter the email addresses of the people you want to share the file with. 
    • Set permissions to control who can view and edit the file.
  • Start co-authoring
    • You and your co-authors can see changes in real-time.
    • You can also communicate with your collaborators using the chat function, which is located on the right-hand side of the screen.
  • Save your changes
    • When you are finished, save and close the file.

The 
next time you have a project to collaborate on, try using co-authoring in Microsoft 365 and see how it can boost your productivity and teamwork.

Please Like and Share OneCoolTip.com!

READ MORE

OneCoolTip.com
Cool Tech Tips for a Cooler Life!

#Microsoft #OneCoolTip #Microsoft365 #Collaboration #RealTime #Productivity @Microsoft