Saturday, October 7, 2023

How to Use the New Windows 11 File Explorer Gallery

Windows 11 File Explorer
Ever wondered how to make the most out of your Windows 11 experience? 

Do you want to view and manage your stored photos?

Here's a Cool Tip.  Use the new Gallery view in File Explorer for Windows 11.


Windows 11 updated in September 2023 and File Explorer did too!

As part of the update, File Explorer has a new Gallery view of your images.

Here's how to do it.
  • Click on the folder icon on your taskbar or press Win + E on your keyboard to open File Explorer.
  • Select Gallery from the left-hand column.
Windows 11 File Explorer Gallery
fig. 1 - Windows 11 File Explorer Gallery

  • In the Gallery view, you can adjust how to view your images by changing the option under the View menu.
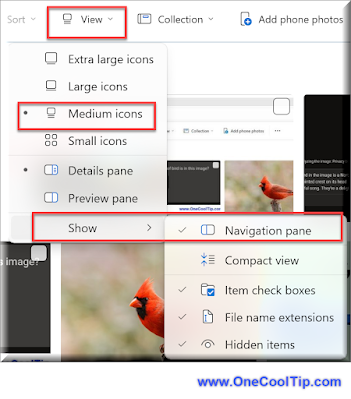
Windows 11 File Explorer View Options
fig. 2 - Windows 11 File Explorer View Options

  • To manage your files, right-click on a file or folder for options like Cut, Copy, Paste, Rename, and Delete. You can also drag and drop files into different folders.

With these steps, you can fully utilize the new File Explorer Gallery feature in Windows 11.

If you don't see the new Gallery feature, check that you have the latest version of File Explorer that was included in the September 26, 2023 update, 22H2.  Go to Start, search for Update and apply any update if needed.

Enjoy!


Please Like and Share OneCoolTip.com!


READ MORE


OneCoolTip.com
http://www.onecooltip.com
Cool Tech Tips for a Cooler Life!


#Microsoft @Microsoft #Windows11 #22H2 #FileExplorerGallery #TechTips #StepByStepGuide #OneCoolTip @OneCoolTip

Friday, October 6, 2023

How to Play the Google Maps Snake Game

Google Maps Snake Game
Do you like playing Snake?

Do you like Google Maps?

Here's a Cool Tip.

Play the Google Maps Snake Game.

It's a fun way to pass the time while you're waiting for directions or just exploring a new city.

To play the Google Maps Snake game, follow these steps:
  • Open Google Maps Snake at https://snake.googlemaps.com/ 
  • Click Start.
  • Select a City
  • Read the game instructions.
  • Select Got It.
  • Control the snake by using the arrow keys on your keyboard or by swiping on your mobile device. 
  • The goal is to eat as many food items as possible without hitting yourself or the walls.
Google Maps Snake City Screen
fig.1 - Google Maps Snake City Selection

Here are a few tips for winning the Google Maps Snake game:
  • Be careful when turning corners. It's easy to hit yourself if you're not careful.
  • Use the walls to your advantage. 
  • Don't be afraid to experiment. Try different strategies to see what works best for you.
The Google Maps Snake game is a fun and easy way to pass the time. 

With a little practice, you'll be able to beat your high score and become a Snake master.

Enjoy your Friday Funday!

Please LIKE and SHARE OneCoolTip.com!


READ MORE

OneCoolTip.com
Cool Tech Tips for a Cooler Life


#Google #Maps @Google #GoogleMaps #GoogleMapsSnake #SnakeGame #EasterEgg #TechTips #OneCoolTip @OneCoolTip 
Thursday, October 5, 2023

How to Ping Your Apple Watch from Your iPhone

iOS17
Have you ever misplaced your Apple Watch and couldn't find it? 

Did you set it down upstairs or downstairs?

Where is it?

Here's a Cool Tip.  Ping it.

iOS 17 includes a new feature that allows you to ping your Apple Watch from your iPhone.

This new feature is very simple to use. 

Here's how to do it.
  • Open the Control Center on your iPhone.
  • Tap on the Ping My Watch button.
  • Your Apple Watch will then emit a loud beep, making it easy to find.
iOS17 Ping My Watch
fig. 1 - iOS17 Ping My Watch


By default, the Ping My Watch button is not included in the Control Center. 

To add it, follow these steps:
  • Open the Settings app on your iPhone.
  • Tap on Control Center.
  • Under More Controls, tap on the + button next to Ping My Watch.

Control Center Settings
fig.2 - iOS17 Ping My Watch Setting

The new Ping My Watch feature in iOS 17 is a great way to quickly find your Apple Watch if you misplace it. 

OneCoolTip recommends adding the Ping My Watch button to your Control Center so that you can easily access it when you need it.


Enjoy!


Please LIKE and SHARE OneCoolTip.com!

READ MORE

OneCoolTip.com
Cool Tech Tips for a Cooler Life

#Apple @Apple #iPhone #iOS17 #AppleWatch #PingMyWatch #TechTips #OneCoolTip @OneCoolTip 
Wednesday, October 4, 2023

National Emergency Test: What You Need to Know

Are you prepared for the Integrated Public Alert and Warning System (IPAWS) national test on October 4, 2023

Don't Panic.

Here's a Cool Tip.  It's Only a Test.

IPAWS is a nationwide system that can be used to send emergency alerts to people's cell phones, radios, and televisions. 

The national test will be used to assess the readiness of IPAWS and to make sure that it is working properly.

FEMA Wireless Emergency Alert
fig. 1 - Wireless Emergency Alert


On October 4, 2023, at approximately 2:20 p.m. ET, you may receive a test alert on your cell phone. 

The alert will be loud and attention-grabbing, and it will say something like "THIS IS A TEST of the National Wireless Emergency Alert System. No action is required."

You may also receive a test alert on your radio or television. 

The alert will be similar to the one on your cell phone, but it will be delivered through the Emergency Alert System (EAS).

If you receive a test alert, there is no need to take any action. 

Just acknowledge the alert and move on.

The IPAWS national test is a good opportunity to test your emergency preparedness plan and to make sure that you are receiving emergency alerts properly.

Be Prepared!

Please LIKE and SHARE OneCoolTip.com!

Source: FEMA

READ MORE

OneCoolTip.com
Cool Tech Tips for a Cooler Life


#IPAWS #NationalTest #EmergencyAlerts #FEMA #TechTips #OneCoolTip @OneCoolTip

Tuesday, October 3, 2023

How to Use Google Keep's New Version History Feature

Google Keep
Ever made a typo in a Google Keep note and wished you could go back in time? 

Or maybe you've collaborated on a note with others and need to see how the content has changed over time. 

Here's a Cool Tip.   Google Keep Version History.

Google Keep is a free note-taking app developed by Google. 

Google Keep is a simple and easy-to-use app that is perfect for students, professionals, and anyone else who needs to keep track of their thoughts and ideas. 

Here's how to use the Version History feature.
  • Open the Google Keep web app at keep.google.com.
  • Click on the note you want to view the version history for.
  • Click on the three dots in the bottom right corner of the note.
Google Keep - More
fig. 1 - Google Keep - More
  • Select "Version history."
fig. 2 - Google Keep - Version History
  • This will show you a list of all the previous versions of the note, with the most recent version at the top. 
  • Choose a version and click Download.
Google Keep - Download
fig. 3 - Google Keep Download

  • Select where to save the download html file.
  • Go to your downloads and open the file

The new version history feature in Google Keep is a welcome addition, especially for users who collaborate on notes or need to track changes over time.

Enjoy!

Please LIKE and SHARE OneCoolTip.com!

READ MORE

OneCoolTip.com
Cool Tech Tips for a Cooler Life

#Google #Keep #GoogleKeep @Google #VersionHistory #NoteTaking #Productivity #TechTips #OneCoolTip @OneCoolTip 
Monday, October 2, 2023

How to Transpose Data in Microsoft Excel

Microsoft Excel
Have you ever found yourself in a situation where you needed to switch rows to columns or vice versa in your data? 

Ever wished for a magic wand that could instantly reorient your data to suit your needs? 


Here's a Cool Tip.  Microsoft Excel’s Transpose feature.

The Transpose feature in Excel is a tool that allows you to rotate your data by converting columns into rows, and rows into columns. 

This can be particularly useful when you want to restructure your data to make it easier to read or analyze. 

For example, if you have a dataset where the variables are in rows and observations are in columns, you might want to transpose the data so that each variable has its own column. 

This can make it easier to carry out further analysis, such as calculating descriptive statistics for each variable. 

The Transpose feature in Excel makes this process quick and easy, saving you the time and effort of manually rearranging your data.

Here's how to do it.
  • Select the data you want to transpose. 
  • Click and drag your mouse across the cells to select them.


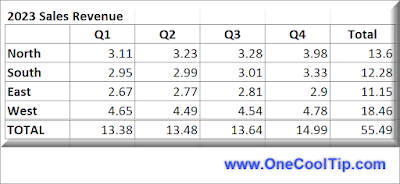
fig. 1 - Selected Data to Copy in Excel

  • Copy the selected data
  •  You can do this by right-clicking on the selected cells and choosing ‘Copy’, or simply by pressing Ctrl+C  keys (Cmd+C for Mac users).
  • Click on the cell where you want your transposed data to begin. 
    • This will be the top-left cell of your transposed data.
  • Right-click on the chosen cell and select ‘Paste Special’. 
    • A dialog box will appear.
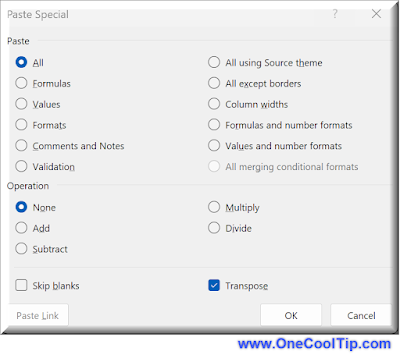
  • In the ‘Paste Special’ dialog box, look for the ‘Transpose’ option and check it. 
  • Click ‘OK’.

Microsoft Excel Transpose Window
fig. 2 - Microsoft Excel Paste Special - Transpose Window

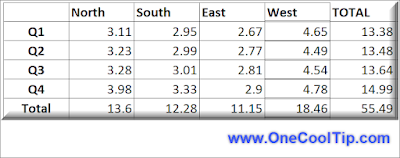
  • Your data has been transposed.

Transposed Data in Excel
fig. 3 - Transposed Data in Excel


Remember, if you have any formulas in your data, they will be adjusted to suit the new orientation. 

So, are you ready to take control of your data?

Enjoy!

Please LIKE and SHARE OneCoolTip.com!


READ MORE

OneCoolTip.com
Cool Tech Tips for a Cooler Life

#Microsoft #Excel @Microsoft #MicrosoftExcel #MicrosoftTranspose #DataManagement #ExcelTips #TechBlog #TechTips #OneCoolTip @OneCoolTip 

Sunday, October 1, 2023

Unleash the Power of Windows 11 Snipping Tool’s New Video Capture Feature

Snipping Tool
Ever wondered how to capture a video of your screen without downloading any additional software? 

Have you been looking for a way to record your screen right from your Windows 11 device? 

Here's a Cool Tip.  Use the new Windows 11 Snipping Tool Video capture feature.

The new Windows 11 Snipping Tool comes with a built-in video capture feature that’s easy to use and incredibly handy. 

Here's how to do it.
  • Open the Snipping Tool.
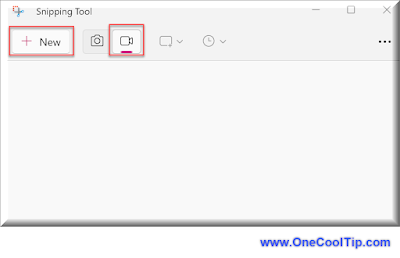
  • Click on the 'Record' icon
  • Select '+ New'
  • Choose your Capture Area
  • Click and drag your cursor to create a rectangle around the area you want to capture.
  • Click the ‘Record’ button to start capturing video. 
    • Everything within your selected area will be recorded.
  • When you’re done, click the ‘Stop’ button. 
  • Your video will automatically be saved in your Videos folder.
  • Navigate to your Videos folder to view your recording. From here, you can rename it, move it, or share it with others.

Windows 11 Snipping Tool Video Capture
fig. 1 - Windows 11 Snipping Tool Video Capture


Remember to turn off any notifications or other potential interruptions before you start recording to ensure a clean video capture. 

Also, consider closing any unnecessary applications or browser tabs for smoother performance.

So, are you ready to become a screen recording pro with the new Windows 11 Snipping Tool? It’s time to explore this feature and see how it can enhance your productivity!

Enjoy!

Please LIKE and SHARE OneCoolTip.com!


READ MORE


OneCoolTip.com
Cool Tech Tips for a Cooler Life


 #Windows11 #SnippingTool #ScreenRecording #TechTips #Microsoft #Windows @Microsoft #TechTips #OneCoolTip @OneCoolTip