Friday, August 18, 2023

Take a Nostalgic Trip Back to Television's Golden Era!

My 80s TV
Do you miss the golden era of television? 

Are you longing for a blast from the past? 

Want to know how you can journey back to the vibrant and wild world of 1980s television with just a few clicks? 

Here's a Friday Funday Cool Tip: Buckle up and visit www.my80stv.com

The site www.my80stv.com is a virtual treasure trove of 80s television content. 


My 80s TV - The Smufs
fig. 1 - My 80s TV - The Smurfs

From timeless sitcoms to action-packed dramas, this site offers a curated selection of channels and shows that defined an entire generation.

It has a classic channel flipping feature, and you can even add authentic visual effects like static and screen curvature.

And you can also visit the 60s, 70s and 90s television channels on the site.

So what are you waiting for? 

Tune in now and take that unforgettable trip down memory lane!

Enjoy Friday Funday!

Please Like and Share OneCoolTip.com!


READ MORE

OneCoolTip.com
Cool Tech Tips for a Cooler Life!

#60s #70s #80s #90s #TV #Nostalgia #RetroTelevision #My80sTV #FridayFunday #TechTips #OneCoolTip @OneCoolTip 

Thursday, August 17, 2023

The Secret Truth of Turning Bluetooth Off on an iPhone

iPhone
Have you ever wondered what the difference is between turning Bluetooth off in the Control Center versus turning it off in the Settings app on your iPhone? 

Do you know which method is best for saving battery life or improving security? 

Here's a Cool Tip:  Turning Bluetooth OFF in the Control Center only disconnects Bluetooth.

How to turn off Bluetooth in the Control Center
  • To access the Control Center, swipe down from the top-right corner of your screen (or up from the bottom if you have an iPhone with a Home button). 
  • Once you’re in the Control Center, you’ll see a Bluetooth icon that looks like a “B” made out of triangles. 
  • Simply tap this icon to turn Bluetooth on or off.
iPhone Control Center
fig. 1 - iPhone Control Center

How to turn Bluetooth on and off using the Settings app. 
  • Open the Settings app and tap on “Bluetooth.” 
  • Toggle the switch next to “Bluetooth” to turn it on or off.
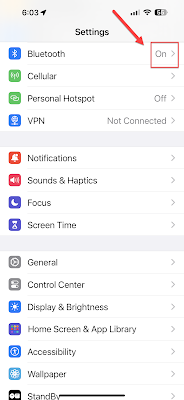
iPhone Settings
fig. 2 - iPhone Settings screen


So, what’s the difference between these two methods? 

When you turn Bluetooth off in the Control Center, it only disconnects any currently connected devices and stops your iPhone from connecting to new devices. 

However, it doesn’t actually turn Bluetooth off completely. 

This means that features like AirDrop and Handoff will still work, and your iPhone will still be able to connect to accessories like the Apple Watch or AirPods.

On the other hand, when you turn Bluetooth off in the Settings app, it completely turns off the Bluetooth radio. This means that no Bluetooth features will work until you turn it back on.

In terms of battery life and security, it’s generally best to turn Bluetooth off completely when you’re not using it. 

This can help save battery life and prevent unauthorized access to your device. 

However, if you frequently use features like AirDrop or Handoff, or if you have accessories like an Apple Watch or AirPods that need to stay connected, it might be more convenient to just turn Bluetooth off in the Control Center.

It’s up to you to decide which one works best for your needs.

Enjoy!

Please Like and Share OneCoolTip.com!


READ MORE

OneCoolTip.com
Cool Tech Tips for a Cooler Life!

#Apple #iPhone #Bluetooth #ControlCenter #Settings #TechTips #OneCoolTip @Apple

Wednesday, August 16, 2023

How to Remove Your Personal Information from Google Search Results

Google logo
Do you worry that your personal information is too easily accessible online? 

Have you found information is a Google search that you want removed?

In today's digital age, it's more important than ever to take steps to protect your privacy.

Here's a Cool Tip:  Request to remove your personal information from Google search results.

Google is the world's most popular search engine, and its search results can often be the first place people go to find information about you. 

By removing your personal information from Google search results, you can make it more difficult for people to find you online.

Here's how to remove personal information from Google search results: 

1. Find a page in search results that contains personally identifiable information
2. Tap the three-dot menu icon to bring up the “About this result” panel

Google Remove Results
fig. 1 - Google Remove Result

3. Click Remove result.
4. Google will take you to the removal request form 


Google Remove This Result
fig. 2 - Google Remove This Result

6. Select the reason why you would like to remove the search results.
7. Click the blue arrow to the right of your choice.
8. Follow the remaining steps and submit the request to Google 

You can only submit takedown requests for results pertaining to yourself or someone you officially represent. 

Google recommends that you contact websites hosting your information directly to request its removal from those sites. 


That's it.

Enjoy!


Please Like and Share OneCoolTip.com!

READ MORE


OneCoolTip.com
Cool Tech Tips for a Cooler Life!


#Google #privacy #onlineprivacy #dataprivacy #personalinformation #googlesearch #removepersonalinformation @Google 

Tuesday, August 15, 2023

How to Use Google Chrome to Search Multiple Search Engines

Google Chrome
Do you ever find yourself switching between different search engines to find the information you need? 

If so, you're not alone. 

Many people use multiple search engines for different purposes. 

For example, you might use Google or Yahoo for general searches, and DuckDuckGo for privacy-focused searches.

Here's a Cool Tip: Use the Google Chrome Omnibox to search multiple search engines.

The Omnibox, the address bar, is more than just a search bar. 

It's a powerful tool that can help you save time and be more productive.

Here's how to do it.

  • Use the Omnibox to search multiple search engines
    • Type the URL for the search engine in the address bar.
      • For example, duckduckgo.com  (or other search engine).
    • Press the Tab key.
    • Enter your search query.
    • Press Enter.
    • Google will display search results from that search engine.

Search Search Engines in Google Chrome
fig. 1 - Search Search Engines in Google Chrome


The Google Chrome Omnibox is a powerful tool that can help you save time and be more productive. 

Enjoy!


Please Like and Share OneCoolTip.com!


READ MORE


OneCoolTip.com
Cool Tech Tips for a Cooler Life!


#Google #Chrome #googlechrome #omnibox #search #searchengines #techtips #OneCoolTip @Google

Monday, August 14, 2023

Say Goodbye to Duplicates: How to Remove Duplicate Data in Excel

Microsoft Excel
Are you tired of dealing with duplicate data in your Excel spreadsheets? 

Do you want to learn how to quickly and easily remove duplicates from your data? 

Here's a Cool Tip:  Remove Duplicates in Excel

Here's how to do it.
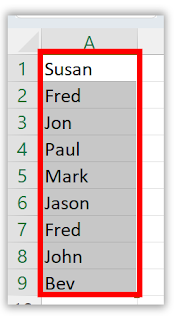
  • Select the range of cells that contains the duplicate values you want to remove 

Select Columns of Data
fig. 1 - Select Columns of Data

  • Click the Data tab in the Excel ribbon
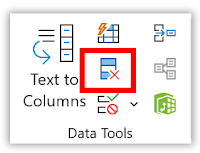
  • Click the Remove Duplicates button in the Data Tools group 
Excel Remove Duplicates
fig. 2 - Remove Duplicates

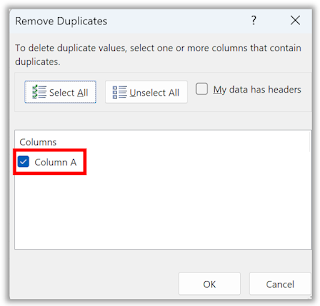
  • In the Remove Duplicates dialog box, check or uncheck the columns where you want to remove the duplicates 
Excel Select Columns to Remove Duplicates
fig. 3 - Select Columns to Remove Duplicates

  • Click OK.
Excel Remove Duplicates Alert
fig. 4 - Excel Remove Duplicates Alert

With these simple steps, you can quickly and easily remove duplicate data from your Excel spreadsheets. 

You can also turn on the Filter feature to help you find and remove duplicates more easily.


Enjoy!

Please Like and Share OneCoolTip.com!

READ MORE

OneCoolTip.com
Cool Tech Tips for a Cooler Life!


#Microsot #Excel #ExcelTips #DataCleaning #NoMoreDuplicates #TechTips #OneCoolTip @OneCoolTip @Excel @Microsoft

Sunday, August 13, 2023

How to Clean Up Your Gmail Storage

Gmail logo
Do you ever feel like your Gmail inbox is overflowing with messages? 

And do you ever wonder if some of those messages are taking up valuable storage space? 

Have you received an alarming email from Google that you are running out of storage space?

Gmail Almost Out of Storage
fig. 1 - Gmail Almost Out of Storage Warning


Many people have Gmail accounts that are full of old emails, many of which have large file attachments.

Here's a Cool Tip:  Delete Emails with large attachments.

These large file attachments can eat up a lot of storage space, which can eventually lead to your Gmail account reaching its limit. 

When this happens, you won't be able to receive new emails until you free up some space.

Or pay Google for more storage space.

Here are the steps on how to clean up your Gmail storage by searching for large file attachments:
  • Log in to your Gmail account.
  • In the search bar, type the following: has:attachment larger:10MB.
  • This will search your inbox for all emails with attachments that are larger than 10MB.
  • Review the results
  • Download to your computer and/or delete any emails that you no longer need.
  • Items in the Gmail trash will be deleted after 39 days but you can empty if you want to clear up space immediately.
  • Repeat until you've freed up enough storage space.

Do this clean up on a regular basis to keep you Gmail account lean and clean!

This will help to prevent your Gmail account from reaching its limit and make it easier for you to find the emails that you need.

Enjoy!

Please LIKE and SHARE OneCoolTip.com!

READ MORE

OneCoolTip.com
Cool Tech Tips for a Cooler Life!

#google @Google #gmail #email #storage #productivity #tech #techtips #OneCoolTip @OneCoolTip

Saturday, August 12, 2023

How to Hide, View, and Unhide Folders in Windows 11

Windows 11
Do you have sensitive information on your computer that you want to keep private? 

Do you share a computer with others and want to keep some files or folders hidden from view? 

Here's a Cool Tip:  Hide Folders in Windows 11


How to Hide Folders in Windows 11

Hiding a folder in Windows 11 is a simple process. Here are the steps to follow:
  • Find the folder that you wish to hide and right-click it.
  • Click on Properties or press Alt + Enter.
  • At the bottom of the properties box, check the Hidden box and click OK.
  • You’ll be prompted to decide on how you’d like the changes to apply. Click Apply changes to the folder only or Apply changes to this folder, subfolders, and files based on preference.
  • Click OK to save your changes.
  • Your folder will now be hidden from view.
Windows 11 Folder Properties
fig. 1 - Windows 11 Folder Properties


How to View Hidden Folders in Windows 11

To view hidden folders in Windows 11, follow these steps:
  • Press WIN + E to launch the File Explorer.
  • Click on View and then select Show in the drop-down menu.
  • At the bottom of the menu, click on Hidden.
  • Your hidden folders will now be visible and accessible in their original location.
  • Uncheck Hidden before closing File Explorer.
Windows 11 File Explorer View Hidden Items
fig. 2 - Windows 11 File Explorer View Hidden Items


How to Unhide Folders in Windows 11

To unhide a folder in Windows 11, follow these steps:
  • Set File Explorer to show hidden files and folders again by going to View > Show > Hidden items from the toolbar.
  • Right-click the hidden file or folder (it will be grayed out) and select Properties.
  • When the item’s properties window comes up, select the General tab, uncheck the Hidden tab, and click OK.
  • Your folder will now be unhidden and visible again.

Hiding, viewing, and unhiding folders in Windows 11 is a simple process that can help you keep your sensitive information private and secure. 

It’s important to note that while hiding folders can help keep your sensitive information private, it is not a foolproof method of protection. Hidden folders can still be accessed by someone who knows how to view hidden files and folders. 

Enjoy!

Please LIKE and SHARE OneCoolTip.com!


READ MORE

OneCoolTip.com
Cool Tech Tips for a Cooler Life!


#Microsoft #Windows #Windows11 #TechTips #ComputerSecurity #Privacy #OneCoolTip @Microsoft