Thursday, May 16, 2024

Unleash Your Creativity: How to Design a Unique Chrome Theme with AI

Unleash Your Creativity: How to Design a Unique Chrome Theme with AI

Google Chrome's new AI-powered theme generator lets you effortlessly create custom themes based on your preferences. Learn how to harness this innovative tool to personalize your browsing experience.

By Rodger Mansfield, Technology Editor
May 16, 2024


Google Chrome icon
Have you ever wished your Google Chrome browser reflected your personality or current mood? 

Maybe you're tired of the default theme or want a design that sparks creativity. 

Here's a Cool Tip.  Customize your Chrome Theme with AI.

Google's new feature allows you to generate custom themes that are uniquely yours. 

Ready to transform your browser into a visual masterpiece?

Here's how to do it.
  1. On your computer, open Chrome.
  2. At the bottom right of a New Tab page, select "Customize Chrome".
  3. Select "Change theme".
  4. Select "Create with AI".
  5. Under “Create theme with AI”:
  6. Choose from a list of popular subjects.
  7. Under “Add optional details”:
  8. Select a style you prefer. The styles in the list have a thumbnail image to give you an insight on what they may look like.
  9. Choose a mood from the list.
  10. Choose a color from the options provided. 
  11. Select Create.
  12. A set of themes are generated by AI.
  13. Select a theme to apply to the New Tab page.

Create a Chrome Theme from AI
fig. 1 - Create a Chrome Theme from AI


Chrome AI Theme
fig. 2 - Chrome AI Theme

The process to create an AI theme is easy, even for non-designers.

The AI generates a wide range of visually appealing themes.

Imagine you're a nature lover. 

You could create a calming theme with watercolor landscapes. 

If you're a fan of retro aesthetics, an 80s-inspired neon theme could be your perfect match. The possibilities are virtually endless!

Google Chrome's AI theme generator is a fantastic tool for those who want to personalize their browsing experience. 

While it may not offer complete control, it opens up a world of creative possibilities. 

So why settle for the default theme when you can have a browser that truly reflects your unique style? 

Give it a try and let your creativity run wild!


READ MORE

Please LIKE and SHARE OneCoolTip.com!
Never miss a Cool Tip: OneCoolTip Newsletter.

Do you have a Cool Tip or question? Email us at onecooltip.com@gmail.com


Rodger Mansfield, a seasoned tech expert, is the mastermind behind OneCoolTip.com, where he serves as both writer and editor. With a keen eye for simplifying complex tech, Rodger delivers practical advice that empowers readers to navigate the digital world with confidence. Dive into OneCoolTip.com for a treasure trove of savvy tips and tricks that keep you one step ahead in tech.


OneCoolTip.com
Cool Tech Tips for a Cooler Life!


#Google #Chrome #ChromeThemes #AIArt #CustomizeChrome #PersonalizeYourBrowser #TechTips #OneCoolTip @OneCoolTip


Copyright © 2024 | www.OneCoolTip.com | All Rights Reserved

Wednesday, May 15, 2024

How to Connect Your iPhone or Android Device to Windows 11

How to Connect Your iPhone or Android Device to Windows 11

Discover the ultimate guide to effortlessly connect your iPhone and Android devices to Windows 11, enhancing your productivity and digital experience.

By Rodger Mansfield, Technology Editor
May 15, 2024

The Magic of Phone Link (Formerly Your Phone)


Windows Phone Link
Have you ever found yourself juggling multiple devices, wishing for a way to streamline your digital life? 

What if you could seamlessly integrate your iPhone or Android phone with your Windows 11 PC?

Here's a Cool Tip.  Connect your phone to Windows 11 using Phone Link.


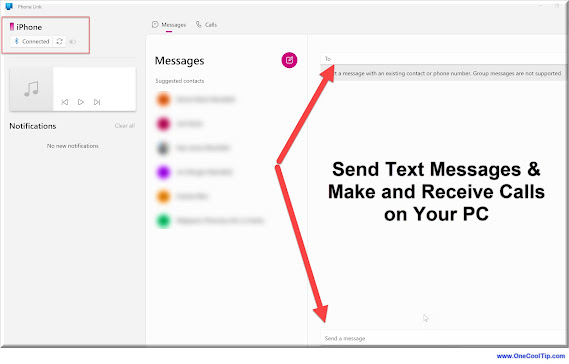
Windows Phone Link, previously known as “Your Phone,” is an application that allows you to connect your Android or iPhone to your Windows PC. 

With Phone Link, you can enjoy a variety of convenient features, such as:

Syncing your smartphone with your Windows PC: Easily connect and manage your phone’s content from your computer.
  • Making and taking calls: Use your PC to handle phone calls without needing to pick up your phone.
  • Text messaging: Send and receive SMS and MMS messages directly from your PC.
  • Notification management: Check, pin, and dismiss your phone notifications on your computer.
  • Photo access: View and transfer up to the last 2,000 images from your phone’s camera roll to your PC.

The Android feature has been available and has more options.  

The iPhone feature was added in 2023 and has less capability.

The Phone Link app comes preinstalled on Windows 11 and can be downloaded from the Microsoft Store for Windows 10. 

It’s designed to make the transition between using your smartphone and PC seamless and efficient3. 

Whether you’re using an Android or an iPhone, Phone Link provides a unified experience to manage your mobile tasks on a larger screen.

Here's how to do it.

Connect Your iPhone in a Snap:
  1. Make sure your iPhone is running iOS 14 or later.
  2. Type ‘Phone Link’ in the Start menu and open the app.
  3. Select the iPhone option in the Phone Link app. A window with a QR code will appear.
  4. Point your iPhone’s camera at the QR code. A notification will pop up; click it to open an App Clip.
  5. Tap ‘Allow’ to let the App Clip access your iPhone’s Bluetooth.
  6. Follow the prompts to pair your devices. Ensure the six-digit code matches on both your PC and iPhone, then tap ‘Pair’ on both devices.

Connect Your Android Effortlessly:
  • Ensure your Android phone is running Android 7.0 or later.
  • Download the ‘Link to Windows’ app from the Google Play Store if it’s not pre-installed.
  • Search for ‘Phone Link’ on your PC and open the app.
  • Choose the Android option and scan the QR code displayed by the Phone Link app using your Android phone.
  • On your Android phone, customize the notification preferences and ensure settings like ‘Share notifications’ and ‘Sync Contacts’ are turned on.

Connect Phone to Windows 11
fig. 1 - Connect Phone to Windows 11


Connecting your smart phone to Windows using the Phone Link app allows easy access to phone notifications, messages, and calls on your PC.

Bridge the gap between your mobile and desktop worlds, making multitasking a breeze and keeping you connected no matter the platform.

Have you tried this yet?

Let us know in the comments below.


READ MORE

Please LIKE and SHARE OneCoolTip.com!
Never miss a Cool Tip: OneCoolTip Newsletter.

Do you have a Cool Tip or question? Email us at onecooltip.com@gmail.com


Rodger Mansfield, a seasoned tech expert, is the mastermind behind OneCoolTip.com, where he serves as both writer and editor. With a keen eye for simplifying complex tech, Rodger delivers practical advice that empowers readers to navigate the digital world with confidence. Dive into OneCoolTip.com for a treasure trove of savvy tips and tricks that keep you one step ahead in tech.


OneCoolTip.com
Cool Tech Tips for a Cooler Life!


#Windows11Connectivity #iPhoneWindowsSync #AndroidPCIntegration #TechTips #OneCoolTip @OneCoolTip 


Copyright © 2024 | www.OneCoolTip.com | All Rights Reserved

Tuesday, May 14, 2024

Unlock the Secret iPhone Copy/Paste Trick for Stunning Photos in Seconds

Unlock the Secret iPhone Copy/Paste Trick for Stunning Photos in Seconds

Discover the hidden gem in your iPhone's photo editor: the copy/paste edit function. Effortlessly apply your favorite filters and adjustments to multiple photos, saving time and achieving a flawless, consistent look

By Rodger Mansfield, Technology Editor
May 14, 2024


Have you ever wished you could effortlessly replicate your photo editing magic across multiple images on your iPhone? 

Tired of recreating the same adjustments over and over again? 

Here's a Cool Tip.  Use the iPhone's often-overlooked "copy/paste edits" feature.

This game-changer is perfect for photography enthusiasts and social media mavens alike.

Why Copy/Paste Edits?

Imagine this: You've spent time perfecting a photo—adjusting brightness, contrast, shadows, and applying the ideal filter. 

Now, you have a batch of photos taken in similar lighting that would look fantastic with the same adjustments. 

Instead of editing each one individually, the copy/paste function allows you to apply your masterpiece edits instantly.

Here's how to do it.
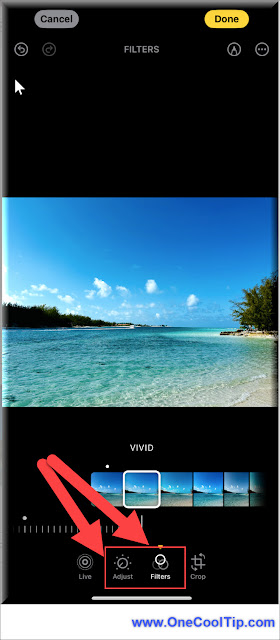
  1. Open a photo and make all edits.  This will be your master version
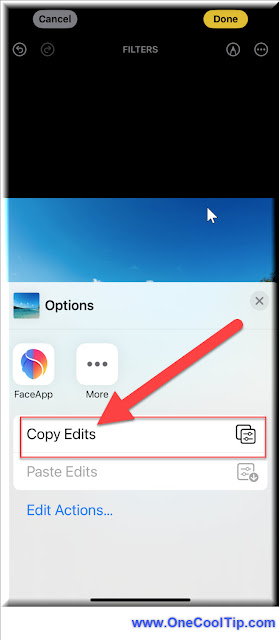
  2. Once you're satisfied, tap the three-dot icon (top right).
  3. Select "Copy Edits."
  4. Select "Done"
  5. Navigate back to your photo library.
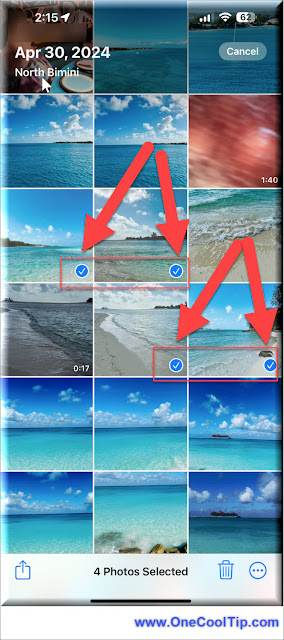
  6. Tap "Select," and choose the photos you want to edit.
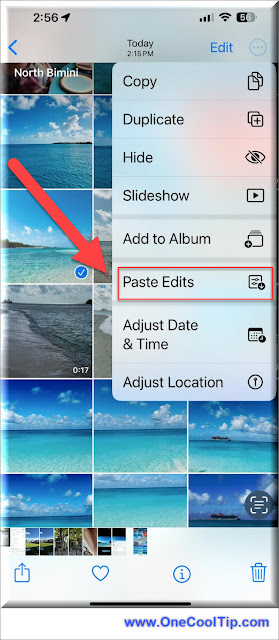
  7. Tap the three-dot icon again and choose "Paste Edits.
  8. Voila!   Your edits are now applied to all selected photos.

Edit Master
fig. 1 - Edit Master Photo


Select Copy Edits
fig. 2 - Select "Copy Edits"


Select Photos
fig. 3 - Select More Photos


Select Past Edits
fig. 4 - Select Past Edits


This tip is ideal for bulk editing, especially with photos taken in similar conditions.

You can achieve a cohesive look across your photo collection.

Let's say you've captured a stunning sunset and used the "Vivid" filter with some additional tweaks. Now you have several other photos from that evening.  

Copy/paste those edits, and instantly, your entire sunset series has a unified, breathtaking vibe.

In the world of iPhone photo editing, the copy/paste edit function is a hidden powerhouse. 

It allows you to elevate your photography game effortlessly, streamline your workflow, and curate a visually stunning photo collection. 

Next time you find yourself with a batch of photos that could use a touch of your editing magic, remember this simple trick.

Enjoy!


READ MORE

Please LIKE and SHARE OneCoolTip.com!
Never miss a Cool Tip: OneCoolTip Newsletter.

Do you have a Cool Tip or question? Email us at onecooltip.com@gmail.com


Rodger Mansfield, a seasoned tech expert, is the mastermind behind OneCoolTip.com, where he serves as both writer and editor. With a keen eye for simplifying complex tech, Rodger delivers practical advice that empowers readers to navigate the digital world with confidence. Dive into OneCoolTip.com for a treasure trove of savvy tips and tricks that keep you one step ahead in tech.


OneCoolTip.com
Cool Tech Tips for a Cooler Life!


#Apple @Apple #iPhone #iPhonePhotography #Instagram #PhotoEditingHacks #iOStips #MobilePhotography #BatchEdit #TechTip #OneCoolTip @OneCoolTip


Copyright © 2024 | www.OneCoolTip.com | All Rights Reserved

Monday, May 13, 2024

Share Excel Sheet Views & Supercharge Team Productivity

Share Excel Sheet Views & Supercharge Team Productivity

Discover the seamless way to share specific data views in Excel for the Web, enhancing collaboration and focusing team efforts where it matters most.

By Rodger Mansfield, Technology Editor
May 12, 2024


Microsoft Excel
Have you ever found yourself lost in a sea of data, struggling to direct your team’s attention to the right figures in Excel? 

Or perhaps you’ve wished for a way to share just a slice of your spreadsheet without revealing the whole pie?

Here's a Cool Tip.  Use the New Share Sheet View in Excel for the Web.

Sheet Views in Microsoft Excel are a powerful feature that allows users to create personalized views of a spreadsheet without affecting how others see the data. 

Sheet Views are particularly useful in collaborative environments where multiple users need to work on the same data set but focus on different aspects of it. 

They enhance productivity by allowing each user to work independently within the same shared workbook.


Back to Work Monday


Creating a Sheet View in Microsoft Excel is a simple process that allows you to personalize your data analysis experience. 


Here’s how to do it:


Create Sheet View

  1. Open Your Excel Workbook.
    • Make sure it’s saved on OneDrive or SharePoint Online for Excel for the Web.
  2. Go to the View Tab
    • In the ribbon, find the Sheet View section.
  3. Click on New Sheet View
    • This will enable you to set up filters and sorts without affecting other users.
  4. Apply filters, sort orders, or hide columns to focus on the data you need.
  5. Save Your Sheet View:.
  6. Duplicate, delete, or switch between Sheet Views using the options in the Sheet View box.


Create and Manage Sheet Views - Excel for the Web
fig. 1 - Create and Manage Sheet Views - Excel for the Web

Remember, any changes you make in a Sheet View won’t disrupt others’ views of the spreadsheet, making it an excellent tool for collaborative work environments.


The new feature, Share Sheet Views in Excel for the Web, is a significant enhancement for users who manage large or complex workbooks. 

  • It allows users to share links to specific Sheet Views within a workbook.
  • Users can direct others’ attention to a particular subset of the workbook’s contents.

This feature simplifies the process of collaborative data analysis and decision-making by providing a straightforward way to share and view specific data points within a complex dataset.

Here's how to do it.
  1. Open a workbook in Excel for the Web.
  2. Navigate to the View tab.
  3. Select an existing Sheet View or create a new one.
  4. Right-click on any cell or the sheet tab and choose Copy Link To Sheet View.
  5. Click the Close button in the Link to Sheet message.
  6. Share the link via email, Teams chat, or any other communication platform.

Copy Link to Share Sheet View - Excel for the Web
fig. 2 - Copy Link to Share Sheet View - Excel for the Web


Sharing a Sheet View allows focused collaboration on specific data subsets and streamlines communication with direct links to increase productivity.

It also helps to avoid confusion over data points.

Remember that users need access to the workbook to view the shared Sheet View.

And over-reliance on specific views may lead to overlooking other important data.

Have you tried this new feature yet?

If so, let us know in the comments.


READ MORE

Please LIKE and SHARE OneCoolTip.com!
Never miss a Cool Tip: OneCoolTip Newsletter.

Do you have a Cool Tip or question? Email us at onecooltip.com@gmail.com


Rodger Mansfield, a seasoned tech expert, is the mastermind behind OneCoolTip.com, where he serves as both writer and editor. With a keen eye for simplifying complex tech, Rodger delivers practical advice that empowers readers to navigate the digital world with confidence. Dive into OneCoolTip.com for a treasure trove of savvy tips and tricks that keep you one step ahead in tech.


OneCoolTip.com
Cool Tech Tips for a Cooler Life!


#Microsoft @Microsoft #ExcelTips #CollaborationHacks #Microsoft365 @Microsoft365 #DataSharing #SpreadsheetPro #TechTips #OneCoolTip @OneCoolTip


Copyright © 2024 | www.OneCoolTip.com | All Rights Reserved

Sunday, May 12, 2024

Math Made Easy: Your Complete Guide to Using PhotoMath with Google (Web & Mobile)

Math Made Easy: Your Complete Guide to Using PhotoMath with Google (Web & Mobile)

Stumped by a math problem? PhotoMath, the popular math solver app, is now integrated with Google and available as a standalone app. This Cool Tip will show you how to use it on the web, Google app, and your phone, making math homework a breeze.

By Rodger Mansfield, Technology Editor
May 12, 2024


Ever wished you could point your phone at a math problem and instantly get the answer? 

Do you struggle helping your children with their math homework?

Here's a Cool Tip.  Use Google with the built-in Photomath technology..

It's easier than ever to use thanks to its integration with Google. 

Whether you're on your computer, using the Google app, or have the PhotoMath app installed, solving math problems is just a snapshot away.

Using PhotoMath on the Web (Google Search)
  1. Open your web browser such as Chrome.
  2. Go to www.Google.com.
  3. Enter the math problem directly into the search bar or use Google Lens to take a picture of it.
  4. If Google recognizes a math problem, a "Solve" button will appear. Click it!
  5. PhotoMath will process the problem and display the answer, along with step-by-step instructions on how to solve it.

Google Photomath on Web
fig. 1 - Google PhotoMath on Web


Using PhotoMath within the Google App (Mobile)
  1. Launch the Google app on your smartphone.
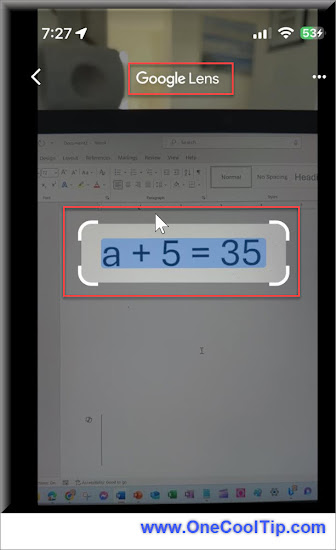
  2. Tap the Lens icon in the search bar.
  3. Point your camera at the math problem.
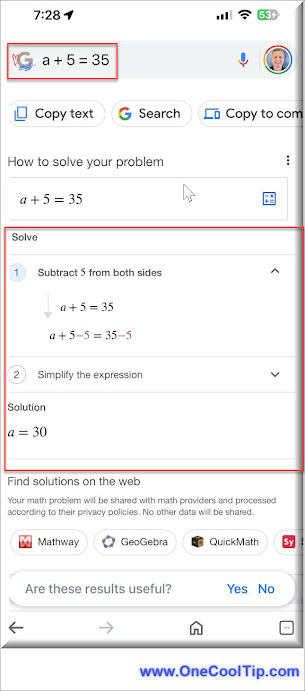
  4. Tap "Solve" or "Homework": Google will automatically detect the problem and offer to solve it using PhotoMath.
Google PhotoMath on Mobile - Google Lens
fig. 2 - Google PhotoMath on Mobile - Google Lens


Google PhotoMath on Mobile - Solve
fig. 3 - Google PhotoMath on Mobile - Solve


Using the PhotoMath App (Mobile)
  • Install the PhotoMath app from the App Store (iOS) or Google Play Store (Android).
  • Launch the app.
  • Point your camera at the math problem.
  • PhotoMath will instantly recognize and solve the problem, providing a step-by-step breakdown.

Google PhotoMath App - Lens
fig. 4 - Google PhotoMath App - Lens


Google PhotoMath App - Solve
fig. 5 - Google PhotoMath App - Solve


Advantages of Using PhotoMath are many including:
  • Get instant solutions, saving valuable time.
  • Step-by-step explanations help you learn the process.
  • Covers a wide range of math topics, from basic to advanced.
  • Available on multiple platforms – web, Google app, and standalone app.

Students can use PhotoMath to check homework answers, understand confusing concepts, and study for exams.

And parents can help their children with math homework without needing to be math experts themselves.

PhotoMath is a game-changer for anyone who struggles with math. 

Its integration with Google and availability as a standalone app make it incredibly convenient to use. 

While it shouldn't replace learning core math concepts, it's a powerful tool that can make math more approachable and less frustrating.

Have you tried using PhotoMath?

If so, let us know in the comments below.


READ MORE


Please LIKE and SHARE OneCoolTip.com!
Never miss a Cool Tip: OneCoolTip Newsletter.

Do you have a Cool Tip or question? Email us at onecooltip.com@gmail.com


Rodger Mansfield, a seasoned tech expert, is the mastermind behind OneCoolTip.com, where he serves as both writer and editor. With a keen eye for simplifying complex tech, Rodger delivers practical advice that empowers readers to navigate the digital world with confidence. Dive into OneCoolTip.com for a treasure trove of savvy tips and tricks that keep you one step ahead in tech.


OneCoolTip.com
Cool Tech Tips for a Cooler Life!


#PhotoMath #Google #MathSolver #MathHelp #HomeworkHelp #StudyTips #MathMadeEasy #OnlineLearning #TechTools #Education #TechTips #OneCoolTip @OneCoolTip 


Copyright © 2024 | www.OneCoolTip.com | All Rights Reserved

Saturday, May 11, 2024

Urgent Chrome Security Alert: Update NOW to Patch Zero-Day Exploit (CVE-2024-4671)

Urgent Chrome Security Alert: Update NOW to Patch Zero-Day Exploit (CVE-2024-4671)

Google has released a critical security update for Chrome to address a zero-day vulnerability actively exploited by hackers. 

Update your browser to version 124.0.6367.201/.202 IMMEDIATELY.

By Rodger Mansfield, Technology Editor
May 11, 2024


Have you updated your Google Chrome browser recently? 

If not, you may be at risk. Google has issued an urgent security patch to address a zero-day vulnerability actively exploited by cybercriminals. 

Here's a Cool Tip.  Update Chrome Immediately!

What is a Zero-Day Exploit?

A zero-day exploit is a software vulnerability that hackers discover and exploit before the software developer can release a patch. 

This makes them incredibly dangerous because there's no defense against them until a fix is available.

The CVE-2024-4671 Vulnerability

The vulnerability in question, tracked as CVE-2024-4671, exists in Chrome's Visuals component. 

It's a "use-after-free" issue that can potentially allow attackers to execute malicious code on your device remotely. 

This could lead to data theft, malware installation, or other harmful actions.

Why You Need to Update Immediately

This zero-day exploit is already being used in the wild, meaning your computer is at risk if you haven't updated Chrome. 

While Google hasn't released details about the attacks, the urgency of the update indicates the threat is serious.

Here's how to do it.
  1. Launch your Google Chrome browser.
  2. In the top right corner, click the three vertical dots.
  3. Hover over "Help" and click "About Google Chrome."
  4. Chrome will automatically check for updates and install them if available.
  5. After the update is installed, click "Relaunch" to restart Chrome.
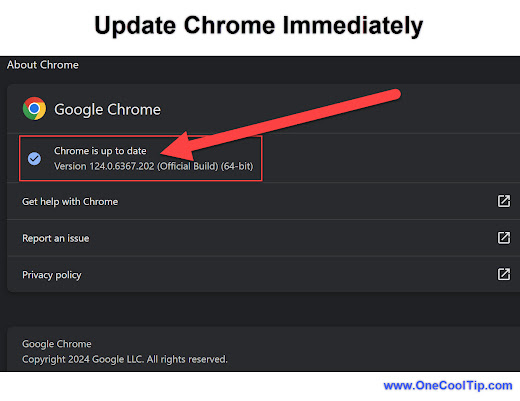
Update Chrome Immediately
fig. 1 - Update Chrome Immediately


The Benefits of Updating Go Beyond Security
  • Enhanced Security: Protect yourself from this specific exploit and other potential threats.
  • Improved Performance: Updates often include bug fixes and optimizations for a smoother experience.
  • New Features: Some updates bring exciting new functionalities to your browser.

A similar zero-day exploit was discovered in Chrome earlier this year (CVE-2024-0519). 

Hackers used it to gain unauthorized access to sensitive information and crash unpatched browsers. 

Conclusion

Updating your Google Chrome browser is a simple yet crucial step to protect yourself from cyber threats. 

Don't delay—update now to version 124.0.6367.201/.202 and safeguard your digital life. 

Remember, cybersecurity is an ongoing battle, and staying updated is your best defense.


READ MORE

Please LIKE and SHARE OneCoolTip.com!
Never miss a Cool Tip: OneCoolTip Newsletter.

Do you have a Cool Tip or question? Email us at onecooltip.com@gmail.com


Rodger Mansfield, a seasoned tech expert, is the mastermind behind OneCoolTip.com, where he serves as both writer and editor. With a keen eye for simplifying complex tech, Rodger delivers practical advice that empowers readers to navigate the digital world with confidence. Dive into OneCoolTip.com for a treasure trove of savvy tips and tricks that keep you one step ahead in tech.


OneCoolTip.com
Cool Tech Tips for a Cooler Life!


#Chrome @Chrome #Google @Google #ChromeUpdate #ZeroDayExploit #Cybersecurity #OnlineSafety #ProtectYourData #TechTips #OneCoolTip @OneCoolTip 


Copyright © 2024 | www.OneCoolTip.com | All Rights Reserved

Friday, May 10, 2024

Dive into the World of Sharks with the OCEARCH Shark Tracker

Dive into the World of Sharks with the OCEARCH Shark Tracker

Get up close and personal with the ocean's apex predators! The OCEARCH Shark Tracker offers a fascinating window into shark movements, behaviors, and their vital role in our marine ecosystems.

By Rodger Mansfield, Technology Editor
May 10, 2024


OCEARCH icon
Ever wondered where sharks go when they disappear into the ocean's vastness?  

Have questions about these fascinating creatures and their role in our world? 

Here's a Cool Tip.  Visit the groundbreaking OCEARCH Shark Tracker.

What is the OCEARCH Shark Tracker?

At its heart, it's a data-driven platform.  

OCEARCH researchers tag sharks with specialized trackers that transmit location, depth, and other key data. 

This information is then visualized on an interactive map – available directly on OCEARCH's website .

Friday Funday

How to Use the Shark Tracker

Here's how to do it.
  1. Go to https://www.ocearch.org/tracker/.
  2. See the real-time locations of tagged sharks around the globe.
  3. Click on individual shark icons to learn their names, species, size, and even see photos.
  4. Watch as sharks traverse vast distances, revealing their migration patterns.
OCEARCH Shark Tracking
fig. 1 - OCEARCH Shark Tracker


Why It Matters: Science and Conservation

The OCEARCH Shark Tracker isn't just cool – it's a crucial tool:
  • Understanding Sharks: The data helps researchers unravel shark behaviors, breeding grounds, and the threats they face.
  • Protecting Oceans: Informed conservation efforts become possible. OCEARCH partners with schools and the public to foster ocean stewardship.
  • Example: A tagged great white shark named Mary Lee famously traveled thousands of miles along the Eastern US coast, providing invaluable insights for researchers.
The OCEARCH Shark Tracker is free and designed to be accessible to all – students, educators, and ocean enthusiasts alike.

Besides the web, find the mobile apps:  

Join the Ocean Adventure

The OCEARCH Shark Tracker transforms how we connect with the underwater world.  

See sharks not as monsters, but as key pieces of a delicate ecosystem.  

And remember, by protecting them, we protect the oceans they call home.


READ MORE


Please LIKE and SHARE OneCoolTip.com!
Never miss a Cool Tip: OneCoolTip Newsletter.

Do you have a Cool Tip or question? Email us at onecooltip.com@gmail.com


Rodger Mansfield, a seasoned tech expert, is the mastermind behind OneCoolTip.com, where he serves as both writer and editor. With a keen eye for simplifying complex tech, Rodger delivers practical advice that empowers readers to navigate the digital world with confidence. Dive into OneCoolTip.com for a treasure trove of savvy tips and tricks that keep you one step ahead in tech.


OneCoolTip.com
Cool Tech Tips for a Cooler Life!


#OCEARCH @OCEARCH #sharks #oceans #conservation #TechTips #FridayFunday #OneCoolTip @OneCoolTip


Copyright © 2024 | www.OneCoolTip.com | All Rights Reserved