Sunday, November 5, 2023

How to Use Layers in Microsoft Paint

Microsoft Windows 11 Paint
Have you ever wished for a simple tool that could help you create complex designs? 

Have you ever wanted to experiment with layers without having to navigate the intricacies of professional software like Photoshop? 

Here's a Cool Tip.  Check out the new layers feature in  Microsoft Paint for Windows 11.

Microsoft has recently introduced a layers feature in its Paint application for Windows 11.

This feature, typically found in more complex software like Photoshop and Gimp, allows users to stack multiple images, text, and graphics on top of each other, which can then be manipulated individually.

Here's how to do it.

  • Open Paint on Windows 11.
  • Click the Layers button in the command bar.
Microsoft Paint
fig. 1 - Microsoft Paint Layers

  • Click the Plus (+) button (Ctrl + Shift + N) to create a new layer.
  • Insert an image or create a shape with the tools available in Paint.
  • Drag the layers to change their order and bring a layer forward or backward.
  • Right-click the layer and choose the “Delete layer” option to remove it from the file.
  • Right-click the layer from the right pane and choose the “Duplicate layer” to create another instance of the same element.
  • Right-click the layer and select the “Hide layer” to work on another layer.
  • Right-click the layer and choose the “Merge down” option to combine the layer with the layer immediately below it.
Microsoft Windows 11 Paint Options

fig. 2 - Microsoft Windows 11 Paint Options


  • Each layer can have its own paint object(s).
  • For example, in this example, each layer has its own object: background, Person and Text.
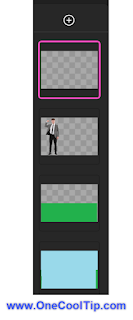
Microsoft Paint - Each Layer Has Its Own Object

fig. 3 - Microsoft Paint - Each Layer Has Its Own Object
  • Click the Save button.


Microsoft Paint with Layers Example

fig. 4 - Microsoft Paint with Layers Example


Enjoy!


Please LIKE and SHARE OneCoolTip.com!
Visit the OneCoolTip YouTube Channelhttps://www.youtube.com/@onecooltip

READ MORE


OneCoolTip.com
Cool Tech Tips for a Cooler Life!

#Microsoft @Microsoft #Windows @Microsoft #technology #tech #innovation #technews #gadgets #Windows11 #MicrosoftPaint #layers #digitalart #TechTips #OneCoolTip @OneCoolTip 


Saturday, November 4, 2023

New iOS 17 Feature Makes iMessage Apps More Customizable Than Ever

iOS17
Do you find yourself constantly scrolling through your iMessage apps to find the one you're looking for? 

If so, you're not alone. 

Here's a Cool Tip.   Customize the order of your iMessage apps.

With iOS 17, Apple has introduced a new feature that makes it easier than ever to customize your iMessage app drawer.

You can rearrange your iMessage apps to put your most-used apps at the top of the list. 

You can even add more apps to the top row, so you can have all of your favorite apps within easy reach.

Here's how to do it.
  1. Open the iMessage app and start any conversation.
  2. Tap the "+" button next to the text input field.
  3. Swipe up to see all of your iMessage apps.
  4. Tap and hold on the app you want to move, and then drag it to the desired location.
  5. Release your finger to drop the app in its new location.
Rearrange iMessage Apps

fig. 1 - Rearrange iMessage Apps


The main benefit of rearranging your iMessage apps is that it makes it easier to find the apps you use the most. 

This can save you time and frustration, especially if you have a lot of iMessage apps installed.

Enjoy!

Please LIKE and SHARE OneCoolTip.com!
Visit the OneCoolTip YouTube Channelhttps://www.youtube.com/@onecooltip

READ MORE

OneCoolTip.com
Cool Tech Tips for a Cooler Life


#Apple @Apple #iPhone #iOS #iOS17 #iMessage #iMessageApps #TechnologyTips #ProductivityTips #TechTips #OneCoolTip @OneCoolTip 

Friday, November 3, 2023

Visit the British Museum from the Comfort of Your Own Home

Have you ever dreamed of visiting the British Museum, one of the world's largest and most comprehensive museums? 

But maybe you don't have the time or money to travel to London. 

Or perhaps you're simply not comfortable visiting a crowded museum?

Here's a Friday Funday Cool Tip.  Visit the British Museum with a virtual tour!

Here's how to do it.
  1. Go to the British Museum Virtual Tour: https://g.co/arts/MsDFrrfLGngeXu3f7
  2. Use the mouse or arrows to move around the gallery
  3. Or select one of the items from the bottom row of the screen
  4. Click on objects to learn more about them
Bust of Ramesses - British Museum

fig. 1 - Bust of Ramesses - British Museum

The British Museum virtual tour is a great way to explore the museum's vast collection of objects from around the world.

Here are just a few of the items you can see:
  • The Rosetta Stone in the Egyptian Sculpture Gallery
  • The Parthenon Sculptures in the Greek and Roman Galleries
  • The Assyrian Lion Hunt Reliefs in the Assyrian Northwest Palace Gallery
  • The Lewis Chessmen in the Room of Enlightenment Gallery
  • The Mildenhall Treasure in the Early Medieval Gallery
  • The Sutton Hoo Ship Burial in the Early Medieval Gallery
  • The Lindow Man in the Britain in the Roman World Gallery
  • The Staffordshire Hoard in the Anglo-Saxon and Viking Gallery
  • The Hoa Hakananai'a in the Oceania Gallery
  • The Benin Bronzes in the Africa Gallery
  • The Chinese Jade in the China Gallery
  • The Japanese Prints in the Japan Gallery
  • You can also explore the museum's extensive Prints and Drawings collection, which includes works by Old Masters such as Dürer and Michelangelo, as well as new and exciting contemporary pieces.

In addition to the virtual galleries, the British Museum also offers a variety of virtual visits and events. 

For example, you can take a virtual tour of the museum's Egyptian Sculpture Gallery, or learn about the history of Greek temples in a live interactive workshop.

You can learn more about the world famous British Museum on their full website: https://www.britishmuseum.org/

Enjoy!
 
Please LIKE and SHARE OneCoolTip.com!
Visit the OneCoolTip YouTube Channelhttps://www.youtube.com/@onecooltip


READ MORE


OneCoolTip.com
Cool Tech Tips for a Cooler Life

#BritishMuseum #VirtualTour #MuseumFromHome #Culture #History #Art #Travel #FridayFunday #TechTips #OneCoolTip @OneCoolTip

Thursday, November 2, 2023

How to Move the Address Bar in Chrome for iPhone

Chrome Logo for iPhone
Do you have difficulty reaching the address bar at the top of the screen when using Chrome on your iPhone? 

You're not alone. 

Here's a Cool Tip.  Move the address bar to the bottom of the screen, where it would be easier to reach with one thumb.

Google has finally released a new Chrome feature for iOS that allows you to move the address bar to the bottom of the screen, or back to the top if you prefer.

Sorry Android users.

The main benefit of moving the address bar to the bottom of the screen is that it makes it easier to reach with one thumb. 

This is especially useful for people with larger iPhones, or for people with limited mobility in their hands.

Here's how to do it.
  1. Open Chrome on your iPhone.
  2. Long-press on the address bar.
  3. Tap "Move address bar to bottom."
  4. To move the address bar back to the top of the screen, follow the same steps, but tap "Move address bar to top" instead.

Move Chrome Address bar on iPhone

fig. 1 - Move Chrome Address Bar on iPhone


You can configure the new Chrome feature to move the address bar to the bottom of the screen in the Chrome settings app. 
  1. Open the Chrome settings app.
  2. Tap "Address bar."
  3. Under "Position," tap "Bottom."
  4. You can also move the address bar to the top of the screen from this menu.
Chrome Address bar Setting iPhone

fig. 2 - Chrome Address Bar Setting iPhone


The new Chrome feature to move the address bar to the bottom of the screen is a welcome addition for iOS users. 

It makes Chrome easier to use for people with larger iPhones, or for people with limited mobility in their hands. 

That's it!

Enjoy!


Please LIKE and SHARE OneCoolTip.com!
Visit the OneCoolTip YouTube Channelhttps://www.youtube.com/@onecooltip


READ MORE

OneCoolTip.com
Cool Tech Tips for a Cooler Life


#Google @Google #Chrome #iOS #iPhone #Apple @Apple #AddressBar #Bottom #Top #NewFeature #HowTo #TechTips #OneCoolTip @OneCoolTip

Wednesday, November 1, 2023

How to Rename Files on Windows and Macs

Have you ever found yourself lost in a sea of ambiguously named files on your computer? 

Ever wished there was a quick and easy way to rename them without going through a series of clicks? 

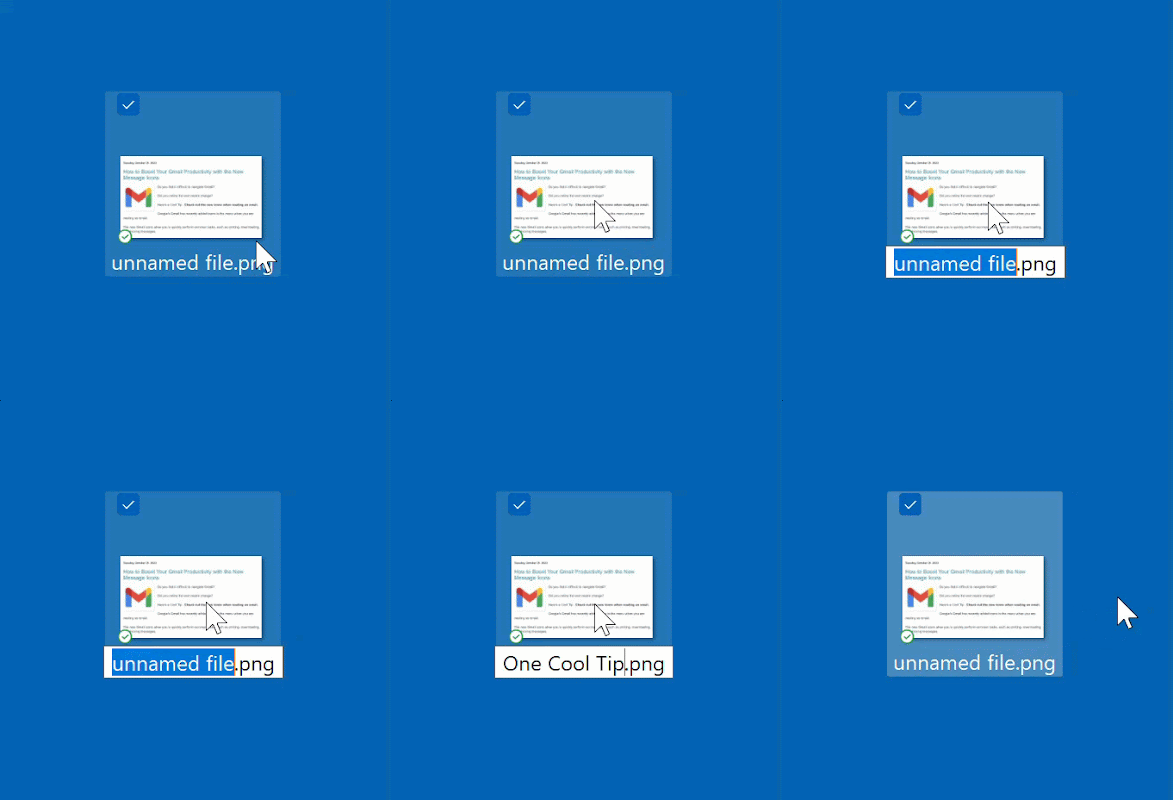
Here's a Cool Tip for Windows.  Use the F2 key.

Here's how to do it.


On Windows:
  1. Navigate to the file you want to rename.
  2. Click on the file to select it.
  3. Press the F2 key.
  4. Type the new name for your file.
  5. Press Enter to save the new name.
Renaming files using these methods is quick and efficient, saving you valuable time. 


Rename Windows File F2

fig. 1 - Rename Windows with File F2


On Mac:
  1. Navigate to the file you want to rename.
  2. Click on the file to select it.
  3. Press the Return key.
  4. Type the new name for your file.
  5. Press Enter to save the new name.
That's it.

Enjoy.

Please LIKE and SHARE OneCoolTip.com!
Visit the OneCoolTip YouTube Channelhttps://www.youtube.com/@onecooltip

READ MORE

#Microsoft @Microsoft #Apple @Apple #Mac #Macintosh #TechTips, #FileManagement, #WindowsGuide, #MacGuide #OneCoolTip @OneCoolTip 
Tuesday, October 31, 2023

How to Boost Your Gmail Productivity with the New Message Icons

Gmail
Do you find it difficult to navigate Gmail?

Did you notice the cool recent change?

Here's a Cool Tip.  Check out the new icons when reading an email.

Google's Gmail has recently added icons to the menu when you are reading an email.

The new Gmail icons allow you to quickly perform common tasks, such as printing, downloading, and moving messages.

Here's how to see them.
  1. Go to Gmail, www.gmail.com
  2. Double-click to open and read an email in your Inbox.
  3. Click on the three dots in the top right corner of the Gmail message window. This will open a menu with all of the available icons.

New Gmail Icons
fig. 1 - New Gmail Message Icons

The new Gmail icons are a great way to improve your productivity and get the most out of your Gmail account.

Enjoy!


Please LIKE and SHARE OneCoolTip.com!
Visit the OneCoolTip YouTube Channelhttps://www.youtube.com/@onecooltip


READ MORE

OneCoolTip.com
Cool Tech Tips for a Cooler Life


#Google @Google #Gmail @Gmail #GmailTips #NewGmailIcons #GmailProductivity #GmailFeatures #GmailUpdates #TechTips #OneoolTip @OneCoolTip 

Monday, October 30, 2023

How to Quickly Create a Table in Microsoft Word

Have you ever wondered how to create a table quickly in Microsoft Word ?

Maybe there's a quick keyboard shortcut?

How about an "old school" trick?

Here's a Cool Tip.  Use simple ASCII characters.

Here's how to do it.
  1. Open Microsoft Word. 
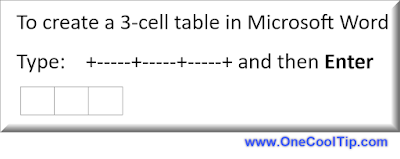
  2. Type a plus sign (+) followed by a series of minus signs (-) and end with another plus sign (+). 
  3. For example, to create a 3 cell table, type: +-----+-----+-----+ and then Enter.

Create a Table in Microsoft Word

fig. 1 Create a Table in Microsoft Word Using + and -s


    4. Just follow the pattern to create a table with more columns.
    5. Click into the last cell and press Tab key to create a new row.

Creating tables with ASCII characters is quick and easy. 

It’s also a fun way to impress your colleagues with your Word prowess!

Enjoy!

Please LIKE and SHARE OneCoolTip.com!
Visit the OneCoolTip YouTube Channelhttps://www.youtube.com/@onecooltip

READ MORE


OneCoolTip.com
Cool Tech Tips for a Cooler Life


#Microsoft @Microsoft #Word #MicrosoftWord #WordTips #ASCII #Productivity #TechTips #OneCoolTip @OneCoolTip