Have you ever wanted to experiment with layers without having to navigate the intricacies of professional software like Photoshop?
Here's a Cool Tip. Check out the new layers feature in Microsoft Paint for Windows 11.
Microsoft has recently introduced a layers feature in its Paint application for Windows 11.
This feature, typically found in more complex software like Photoshop and Gimp, allows users to stack multiple images, text, and graphics on top of each other, which can then be manipulated individually.
Here's how to do it.
- Open Paint on Windows 11.
- Click the Layers button in the command bar.
| fig. 1 - Microsoft Paint Layers |
- Click the Plus (+) button (Ctrl + Shift + N) to create a new layer.
- Insert an image or create a shape with the tools available in Paint.
- Drag the layers to change their order and bring a layer forward or backward.
- Right-click the layer and choose the “Delete layer” option to remove it from the file.
- Right-click the layer from the right pane and choose the “Duplicate layer” to create another instance of the same element.
- Right-click the layer and select the “Hide layer” to work on another layer.
- Right-click the layer and choose the “Merge down” option to combine the layer with the layer immediately below it.
 |
fig. 2 - Microsoft Windows 11 Paint Options |
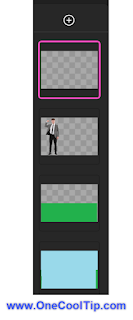
- Each layer can have its own paint object(s).
- For example, in this example, each layer has its own object: background, Person and Text.
 |
| fig. 3 - Microsoft Paint - Each Layer Has Its Own Object |
- Click the Save button.
Enjoy!
Please LIKE and SHARE OneCoolTip.com!
Visit the OneCoolTip YouTube Channel: https://www.youtube.com/@onecooltip
READ MORE
- How to Enable Dark Mode in Microsoft Paint
- How to Master Snap Layouts in Windows 11
- How to Adjust Windows 11 Sound Volume with This Cool Tip
OneCoolTip.com
Cool Tech Tips for a Cooler Life!
#Microsoft @Microsoft #Windows @Microsoft #technology #tech #innovation #technews #gadgets #Windows11 #MicrosoftPaint #layers #digitalart #TechTips #OneCoolTip @OneCoolTip


No comments:
Post a Comment