Monday, September 11, 2023

How to Master Formulas in Microsoft Word

Have you ever found yourself wishing you could perform calculations right within your Word document? 

Have you ever wondered how to make your tables in Word more dynamic and functional? 

Here's a Cool Tip:  Use the Formula feature in Microsoft Word.

That's right.

Formulas in Microsoft Word.

Microsoft Word offers a powerful feature that allows you to use formulas within tables, much like in Excel. 

Let's walk through  the process of using the formula function in Microsoft Word and explain the concept of positional arguments.


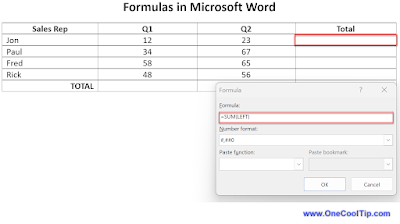
Formulas in Microsoft Word
fig. 1 - Formulas in Microsoft Word

Here's how to do it.
  • Insert a table into your Word document where you want to perform calculations.
  • Fill the cells with the data you want to calculate.
  • Click on the cell where you want the result of your calculation to appear. 
    • If the cell is not empty, delete its contents. 
  • Go to the Layout tab, in the Data group, and click on Formula.
  • Begin your formula with an equal sign, followed by your chosen function.
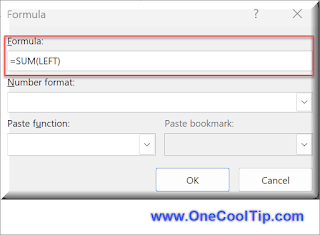
Word Formula
fig. 2 - Word Formula
  • Enter a function in the Formula field, such as SUM, AVERAGE, COUNT, MAX, MIN, PRODUCT.
    • Click on Paste function to select a function.
  • Use Positional Arguments: In the parentheses that follow the function, add positional arguments like LEFT, RIGHT, ABOVE, BELOW
    • These refer to the relative position of the cells that you want to include in your calculation.
Notes:

  • Update Formula Results
    • The result of a formula is calculated when it is inserted and when the document containing the formula opens. You can also manually update the result of one or more specific formulas by selecting them and pressing F9.
  • Understanding Positional Arguments
    • Positional arguments are used to refer to cell positions relative to the cell containing the formula. For example, if you want to sum numbers in a column above a specific cell, you would use the argument ABOVE in your SUM function.
With these steps, you can now perform calculations right within your Word document. 

No more switching back and forth between Word and Excel for simple calculations!

Enjoy!


Please LIKE and SHARE OneCoolTip.com!


READ MORE

OneCoolTip.com
Cool Tech Tips for a Cooler Life


#Microsoft #Word #MicrosoftWord #FormulasInWord #WordTips #Productivity #TechTips #OneCoolTip @Microsoft @OneCoolTip

Sunday, September 10, 2023

How to Use the New Waze Alien Theme

Waze
Are you a fan of space aliens?

Here's a Cool Tip: The New Alien theme in the Waze app!

This theme lets you customize your car icon and navigation voice to make it look and sound like you're driving a spaceship.


Waze Alien Theme
fig. 1 - Waze Alien Theme

Here's how to do it:
  • Open the Waze app on your mobile phone.
  • Tap on the hamburger menu (three lines) in the top left corner.
  • Select Settings.
  • Tap on Voice & sound.
  • Under Waze voice, select English (US)  - Alien.
  • Go back to Settings
  • Tap on Map display.
  • Under Car icon, select Ghost Car.

The Aliens theme is a fun and creative way to customize your Waze experience.

Whether you're a fan of aliens or just looking for a way to add a little bit of fun to your commute, the Aliens theme is a great option.

Enjoy!

Please LIKE and SHARE OneCoolTip.com!

READ MORE


OneCoolTip.com
Cool Tech Tips for a Cooler Life!

#waze #aliens #theme #navigation #driving #technology #customization #fun #creative #google #TechTips #OneCoolTip @OneCoolTip

Saturday, September 9, 2023

How to Enable Dark Mode in Microsoft Paint

Microsoft Paint
Do you find yourself squinting at your screen at night while using Microsoft Paint? 

If so, you're not alone. 

The light-colored interface can be harsh on the eyes, especially in low-light conditions.

Here's a Cool Tip:  Set MS Paint to the New Dark Mode in Windows 11

This Cool Tip makes Paint easier on your eyes inverting the colors of the interface, making it much easier to see in the dark.

How to Enable Dark Mode in Microsoft Paint
fig. 1 - How to Enable Dark Mode in Microsoft Paint

Here's how to do it:
  • Ensure you have the latest version of Paint from the Microsoft App Store.
    • The version that supports dark mode is 11.2304.17.02 or greater. 
    • If you need the newer version, go to the Start Menu, and search for the Microsoft Store App.
  • Open Paint.
  • Click on the Settings gear icon in the top-right corner.
  • Select App theme.
  • Choose Dark.
  • Select the back arrow to return to the home screen.
Cool Tip:
  • You can also enable dark mode for all of your Windows apps, including Windows 10, by going to Settings > Personalization > Colors and selecting Dark under Choose your mode.

That's it! 


Enjoy!


Please LIKE and SHARE OneCoolTip.com!


READ MORE

OneCoolTip.com
Cool Tech Tips for a Cooler Life!


#Microsoft @Microsoft #microsoftpaint #darkmode #dark #mode #windows10 #windows11 #techtips #howto #TechTips #OneCoolTip @OneCoolTip 

Friday, September 8, 2023

Waddle on Over to the Saint Louis Zoo Penguin Cam

STL Zoo Penguins
Do you love penguins? 

If so, you'll be excited to know that you can watch them live from the comfort of your own home! 

And without the smell!

Here's a Friday Funday Cool Tip:  Watch the Penguins Online at The Saint Louis Zoo

Here's how to do it.
  • Go to the Saint Louis Zoo website, https://stlzoo.org/
  • Click on the Animals tab.
  • Scroll down to the Live Animal Webcams section.
  • Click on the Penguin Webcam link.
  • Watch the cute penguins! 
    • You can watch the penguins swimming, diving, and playing. 
    • You can also see the zookeepers feeding and cleaning the penguins' habitat.

Saint Louis Zoo Penguin Web Cam
fig. 1 - Saint Louis Zoo Penguin Web Cam


The penguin cam is available 24 hours a day, 7 days a week. 

However, the camera is only live from 9 am CT to 5pm CT.  

Previously recorded video is shown at other times. 

The Saint Louis Zoo penguin cam is a great way to learn about these fascinating creatures. 


Enjoy!

Please LIKE and SHARE OneCoolTip.com!

READ MORE

OneCoolTip.com
Cool Tech Tips for a Cooler Life!

#SaintLouisZoo #PenguinCam #Animals #LiveStream #Nature #Education #TechTips #FridayFunday #OneCoolTip @OneCoolTip 

Thursday, September 7, 2023

How to Unlock the Power of the Windows Character Map

Have you ever needed to type a special character, such as the British pound sign (£), but didn’t know how to do it on your keyboard? 

What about other special characters?

How to do you insert characters that don't appear on the regular keyboard?

Here's a Cool Tip:  Windows Character Map.

Here's how to do it.
  • Click on the Start menu and type Character Map in the search bar. 
  • Click on the Character Map app to open it.
  • Once the Character Map is open, you can browse through the available characters by scrolling through the list.
  • To copy a character, simply click on it to select it, then click the Select button. This will add the character to the Characters to copy field at the bottom of the window. 
  • Once you have selected all the characters you want to copy, click the Copy button to copy them to your clipboard.
  • Now you can switch to your document in Microsoft Word (or any other program) and paste the copied characters by pressing Ctrl + V or right-clicking and selecting Paste.
Windows Character Map
fig. 1 - Windows Character Map


Windows Character Map is a powerful tool that can help you find and insert special characters into your documents. 

By following these simple steps, you can unlock its full potential and make your writing more expressive and engaging.

Enjoy!


Please LIKE and SHARE OneCoolTip.com!


READ MORE

OneCoolTip.com
Cool Tech Tips for a Cooler Life!

#Microsoft #Windows #WindowsCharacterMap #SpecialCharacters #MicrosoftWord #WindowsTips #TechTips #OneCoolTip @OneCoolTip @Microsoft @Windows 

Wednesday, September 6, 2023

How to Insert a Picture in a Cell in Microsoft Excel

Microsoft Excel
Have you ever wanted to insert a picture into a cell in Microsoft Excel, but didn’t know how? 

Do you want to make your spreadsheets more visually appealing and engaging? 

Is this even possible?

Here's a Cool Tip:  Use the New Insert Picture Inside Cell feature.

That's right.

You can now insert pictures inside an Excel cell and not just on top of it.

Previously, you could only insert a picture on top of cells.

This new feature is now available in the latest version of Microsoft Excel in Microsoft365.

Here's how to do it:
  • Open the worksheet where you want to insert the picture.
  • Select the cell where you want to insert the picture.
  • Click on the Insert tab in the ribbon at the top of the screen.
  • Click on the Pictures button in the Illustrations group.
  • Select Place in Cell.
  • Select where to Insert Picture From

Insert Picture in Cell in Microsoft Excel

fig. 1 - Insert Picture In Cell in Microsoft Excel
  • Navigate to the location of the picture and select it.
  • Click on the Insert button to insert the picture into the selected cell.

Picture Inside Cell in Excel

fig. 2 - Picture Inside Cell in Microsoft Excel

That's it!

Enjoy!


Please LIKE and SHARE OneCoolTip.com!


READ MORE

OneCoolTip.com
Cool Tech Tips for a Cooler Life!


Microsoft #Excel #MicrosoftExcel #ExcelTips #Spreadsheet #DataVisualization #TechTips #OneCoolTip @OneCoolTip @Microsoft #YouTube

Tuesday, September 5, 2023

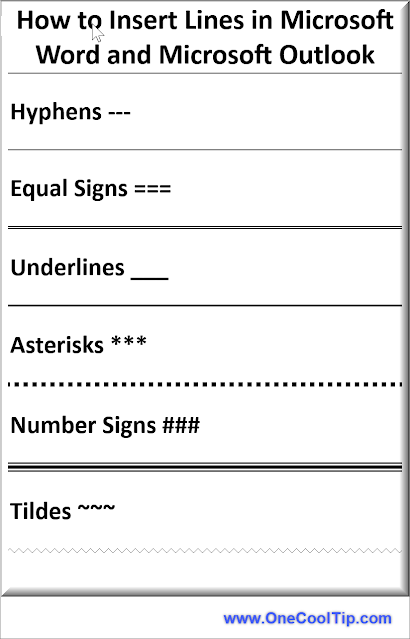
How to Quickly Create Different Types of Lines in Microsoft Word

Microsoft Word
Have you ever wanted to quickly add a line to your document or email, but didn’t want to go through the hassle of finding the right tool or button? 

Did you know that you can easily create different types of lines using the autocomplete feature in both Microsoft Word and Outlook? 

Here's a Cool Tip:  Use the AutoFormat Feature in Microsoft Word and Outlook.

To create different types of lines using autocomplete, all you need to do is type at least three characters at the left margin of a new line and then press Enter. 

The result will be a line based on the characters you typed. Here are the characters you can use and the lines they create:
  • Three hyphens (—) create a plain single line
  • Three equal signs (===) create a plain double line
  • Three underline symbols (___) create a bold single line
  • Three asterisks (***) create a broken or dotted line
  • Three number signs (###) create a triple line with a thick center
  • Three tildes (~~~) create a wavy line

Insert Line in Microsoft Word and Outlook


This is a quicker step versus using Insert --> Shapes --> Lines command from the Home menu.

Enjoy!


Please LIKE and SHARE OneCoolTip.com!


READ MORE


OneCoolTip.com
Cool Tech Tips for a Cooler Life!


#Microsoft #Word #MicrosoftWord #Outlook #Autocomplete #ProductivityTips #TechTips #OneCoolTip @OneCoolTip @Microsoft