Monday, November 20, 2023

How to Use Microsoft Word’s Researcher Feature

Have you ever found yourself toggling between your Microsoft Word document and your web browser, trying to juggle your writing and research simultaneously? 

What if there was a way to streamline this process, making your research accessible without ever leaving your Word document? 

Here's a Cool Tip.  Use the Microsoft Word Researcher feature.

The Researcher feature, available to Microsoft 365 subscribers, is a built-in tool in Microsoft Word that allows you to conduct web-based research directly within your Word document. 

Powered by Bing, it provides you with relevant topics and top sources including books, journals, websites, and images.

Here's how to use it.
  • Open your Word document.
  • Navigate to the “References” tab.
  • Click “Researcher” from the “Research” section of the ribbon.
  • In the search box that appears on the right, type a keyword for the topic you are researching and press Enter.
  • The Results pane will show a list of sources you can use in your document.
  • Choose a topic in the Results pane to explore in detail.
  • Click the plus sign on any result to begin an outline, add the result as a topic heading, and save a link to the result in a comment.
  • Add topic items to your document by clicking the plus sign next to the source title or the quote icon next to the text you want to cite.

Microsoft Word Researcher
fig. 1 - Microsoft Word Researcher


The Researcher feature can significantly reduce the time you spend researching your document, allowing you to focus more on writing. 

It also provides structured, safe, and credible information, making your research process more efficient.

That's it!

Enjoy.


Please LIKE and SHARE OneCoolTip.com!
Visit the OneCoolTip YouTube Channelhttps://www.youtube.com/@onecooltip


READ MORE


OneCoolTip.com
Cool Tech Tips for a Cooler Life


#Microsoft @Microsoft #Word #MicrosoftWord #WordTips #Productivity #WritingTips #TechTips #OneCoolTip @OneCoolTip  

Sunday, November 19, 2023

Reclaim Your Privacy: How to Disable Sharing to Facebook and Instagram on Threads

Meta Threads
Are you concerned about your online privacy?

In today's interconnected world, where social media platforms seamlessly integrate, it's easy to lose control over how your personal content is shared. 

Threads, the new social networking app from Meta, is no exception. 

By default, your Threads posts may be shared with your other Meta accounts, including Facebook and Instagram. 

Here's a Cool Tip.  Change Your Settings to Prevent This Sharing to Other Apps.

If you're not comfortable with this level of visibility, you can disable cross-app sharing on Meta Threads and regain control over your privacy.

Here's how to do it.
  • Launch the Meta Threads app
  • Ensure you're logged into the account you want to manage sharing settings for.
  • Tap on your profile picture to access your profile settings.
  • Scroll down to the "Privacy" section
  • Tap on the "Suggesting posts on other apps" option.
  • Toggle off the switches next to "Facebook" and "Instagram" to disable cross-app sharing for both platforms.

Change Sharing Settings on Meta Threads App

fig. 1 - Change Sharing Settings on Meta Threads App

With this simple change, you can prevent your posts from being shared to the other Meta apps.

That's it!

Enjoy.


Please LIKE and SHARE OneCoolTip.com!
Visit the OneCoolTip YouTube Channelhttps://www.youtube.com/@onecooltip


READ MORE


OneCoolTip.com
Cool Tech Tips for a Cooler Life


#Meta #Threads #MetaThreads #Facebook #Instagram #PrivacySettings #CrossAppSharing #SocialMediaTips #PrivacyControl #TechTips #OneCoolTip @OneCoolTip

Saturday, November 18, 2023

Unlock a Hidden Feature to Help You Find Your iPhone

Mobile Phone Ping
Have you ever misplaced your iPhone and frantically searched for it only to find it tucked away in a dark corner of your room? 

Fortunately, there's a hidden feature on your Apple Watch that can help you out in these situations.

We've already shown how to Ping your iPhone from your Apple Watch.

But here's an even Cooler, Cool Tip.   Long press and hold the Find My Phone button to also make the phone's LED light and flash.

Here's how to do it.
  • Swipe up from the watch face (or press the Side button if you're running watchOS 10 or later).
  • Press and hold the Find My iPhone button.
  • Your iPhone will both ping and the LED will flash.
Apple Watch - Find My Phone

fig. 1 - Apple Watch - Find My Phone


You'll find your iPhone even when you can't easily see it!

Enjoy!

Please LIKE and SHARE OneCoolTip.com!
Visit the OneCoolTip YouTube Channelhttps://www.youtube.com/@onecooltip
READ MORE


OneCoolTip.com
Cool Tech Tips for a Cooler Life

#Apple @Apple #Watch #applewatch #iphone #findmyiphone #flashlight #hiddenfeature #techtips #OneCoolTip @OneCoolTip

Friday, November 17, 2023

Test Your Art Knowledge with This Fun Game

Google Art & Culture
Have you ever wondered how well you know the world of art? 

Do you think you could identify a famous painting just from a close-up detail or a zoomed-in brushstroke? 

Here's a Friday Funday Cool Tip.  Check out the "Can You Guess the Artwork?" game from Google Arts & Culture.

This engaging game puts your art knowledge to the test by presenting you with a series of close-up images of famous artworks. 

Your task is to simply guess which artist created the work. 

Along the way, you'll learn more about the artists, their styles, and the significance of the artwork.

Here's how to play.
  • Visit the "Can You Guess the Artwork?" at the Google Arts & Culture website.
  • Read the instructions carefully and familiarize yourself with the game mechanics.
  • Start the game and begin guessing the artists behind the artworks.
  • Use the clues provided to narrow down your choices and make an informed guess.
  • Keep track of your score and see how well you perform in identifying the artworks.

Can You Guess the Artwork?

fig. 1 - Can You Guess the Artwork?


This Cool game enhances art knowledge and appreciation.

Enjoy!

Please LIKE and SHARE OneCoolTip.com!
Visit the OneCoolTip YouTube Channelhttps://www.youtube.com/@onecooltip


READ MORE

OneCoolTip.com
Cool Tech Tips for a Cooler Life

#Google @Google #GoogleArtsAndCulture #CanYouGuessTheArtwork #ArtGame #ArtEducation #ArtAppreciation #FridayFunday #TechTips #OneCoolTip @OneCoolTip 

Thursday, November 16, 2023

All Hail the New Copilot

Copilot
Have you ever wondered how much easier your life could be if you had a personal assistant? 

An assistant that could help you with everything from writing code to creating poems, or even generating graphic art? 

Here's a Cool Tip.  Check out the newly renamed Copilot, formerly known as Bing Chat.

Microsoft is going all-in on AI, and this new site provides AI chat in addition to the existing Bing Chat.

Here's how to use it.
  • Navigate to copilot.microsoft.com.
  • Type your prompt in the chatbox.
  • Whether you need help with writing, coding, or creating art, just ask!
  • Press Enter.
Copilot is a powerful tool that can save you time and inspire creativity. 

Copilot can generate content, assist with writing, and even create graphic art. 

Microsoft Copilot

fig. 1 - The Newly Renamed Copilot


Here are two examples:
  • Perhaps you’re a songwriter experiencing writer’s block. You could ask Copilot, “Can you help me write a song about friendship?” Copilot could then generate lyrics for you, potentially sparking your creativity and helping you overcome your writer’s block.
  • Or if you’re a coder and need help with a Python script, you can ask Copilot. Or if you’re an artist looking for inspiration, Copilot can generate a unique piece of graphic art based on your prompt.

However, it’s important to remember that it’s an AI, and while it’s intelligent, it doesn’t replace human creativity and intuition.

Copilot is designed to be user-friendly and doesn’t require any complex configuration. 

And with this new name and new website, you can access Copilot outside of the Bing search engine site.

You can simply start using it right away!

Enjoy!

Please LIKE and SHARE OneCoolTip.com!
Visit the OneCoolTip YouTube Channelhttps://www.youtube.com/@onecooltip


READ MORE

OneCoolTip.com
Cool Tech Tips for a Cooler Life

#Microsoft @Microsoft #CoPilot #Bing #BingChat #AI #Chatbot #TechNews #TechTips #OneCoolTip @OneCoolTIp

Wednesday, November 15, 2023

Use This Shortcut When Your Screen Blacks Out

Windows
Have you ever found yourself in the middle of an important task when your screen suddenly goes black? 

Or perhaps you’ve experienced graphical glitches that disrupt your workflow? 

What if there was a quick, easy solution right at your fingertips? 

Here's a Cool Tip.  Use the Windows keyboard shortcut Ctrl + Win + Shift + B.

The Ctrl + Win + Shift + B shortcut is designed to reset the graphics subsystem on your Windows machine. 

This can be particularly useful when you’re experiencing graphical issues or black screen problems.

Here's how to do it.
  • Press the Ctrl, Win, and Shift keys on your keyboard simultaneously, followed by the ‘B’ key. 
  • Your screen will go black for a split second and you’ll hear a beep, indicating that the graphics subsystem has been reset.

CTRL + WIN + SHIFT + B Shortcut

fig. 1 -  Use Ctrl + Win + Shift + B to Reset Graphics

This shortcut provides a quick and easy way to troubleshoot and resolve common graphical issues without needing to restart your computer or delve into complex settings.

While this shortcut can be a handy tool for temporary fixes, it’s not a permanent solution. 

If you’re working on a graphic-intensive project and start to notice visual glitches, this shortcut can help you quickly resolve the issue and continue with your work.

Enjoy!

Please LIKE and SHARE OneCoolTip.com!
Visit the OneCoolTip YouTube Channelhttps://www.youtube.com/@onecooltip

READ MORE

OneCoolTip.com
Cool Tech Tips for a Cooler Life


#Microsoft @Microsoft #WIndows #WindowsShortcuts #TechTips #PCMaster #Troubleshooting #TechTips #OneCoolTip @OneCoolTip

Tuesday, November 14, 2023

How to Use Cocreator AI in Microsoft Paint for Windows 11

Have you ever wondered how to transform your digital artistry with the power of AI? 

Or perhaps you’re curious about the latest features in Microsoft Paint for Windows 11? 

Here's a Cool Tip.  Use the New Cocreator AI feature in Paint for Windows 11.

Cocreator is a new feature in Microsoft Paint for Windows 11 that allows you to generate images from text descriptions using AI. 

It’s powered by a powerful AI model called DALL-E. 

It’s also a great tool for generating initial ideas or drafts that can be further refined manually.

Here’s how to use it:
  • Open Microsoft Paint.
  • Select the Cocreator icon on the toolbar to see the Cocreator side panel.
Microsoft Paint Cocreator Sidebar

fig. 1 - Microsoft Paint Cocreator Sidebar

  • In the text box, enter a description of the image you want to create. For example, you can type “a blue cat with a red hat” or “a landscape with mountains and a lake”. Be descriptive as possible to generate results matching your expectations.
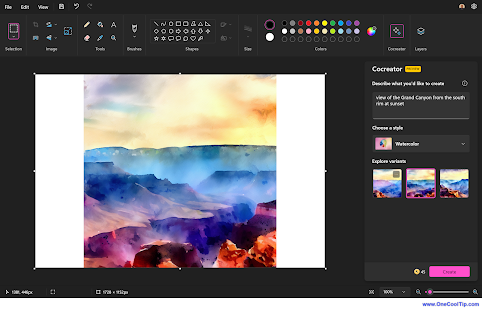
    • In my example, I used "view of the Grand Canyon from the south rim at sunset"
  • After you enter the text, choose a style in which you want to create your image and then select the Create button.
    • In my example, I selected "Watercolor".
  • Cocreator will generate three different variants of the image you requested, you can click on any of the variants to apply that image to Paint canvas and start creating.
Microsoft Paint Cocreator example

fig. 2 - Microsoft Paint Cocreator example

  • Select the image you want to use.
  • Edit and save your image.

Paint - Grand Canyon South Rim at Sunset

fig. 3 - Paint - Grand Canyon South Rim at Sunset

Please note that to use Cocreator, you need to sign in with your Microsoft account. 

Cocreator is rolling out to users and it may not be available to you now.

Cocreator uses a cloud-based service that requires authentication and authorization. 

Signing in with your Microsoft account also allows you to access your credits, which are needed to generate images with DALL-E. 

Each time you generate an image, you spend one credit. 

You will receive 50 credits to create images when you join Cocreator.

Enjoy!


Please LIKE and SHARE OneCoolTip.com!
Visit the OneCoolTip YouTube Channelhttps://www.youtube.com/@onecooltip


READ MORE

OneCoolTip.com
Cool Tech Tips for a Cooler Life


#Microsoft @Microsoft #Paint #MicrosoftPaint #AI #CoCreatorAI #DigitalArt #Windows #Windows11 #TechTips #OneCoolTip @OneCoolTip

Monday, November 13, 2023

How to Use Microsoft Excel's Geography Data Type Feature

Have you ever wondered how to make your Excel spreadsheets more dynamic and informative? 

Here's a Cool Tip.  Use Microsoft Excel's Geography Data Type feature.

Microsoft Excel’s geography data type feature is a powerful tool that allows you to access and integrate rich geographical data into your spreadsheets. 

But how does it work, and what can you do with it? 

Here's how to use it.
  • Start by typing geographic data into your cells. 
    • This could be country names, city names, or even postal codes.
  • Highlight the cells containing your geographic data.
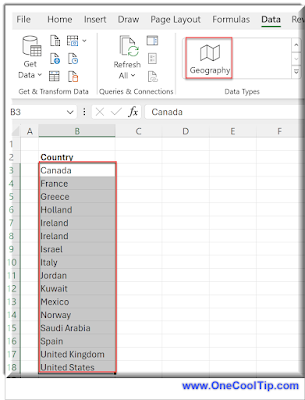
  • Navigate to the Data tab and select 'Geography’. 
    • Excel will automatically convert your data to the geography data type.
Microsoft Excel - Select Country Cells and Geography

fig. 1 - Select Country Cells and Geography

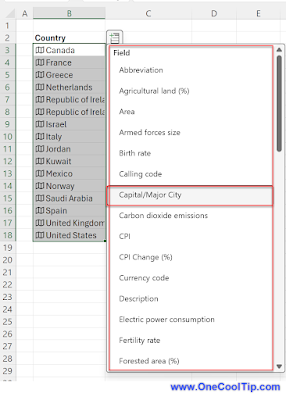
  • Click on the Insert Data button that appears when you select a cell with the geography data type. 
  • From here, you can choose what information you want to display in your spreadsheet.
Select Country Fields

fig. 2 - Select Fields

  • The geography data type feature in Excel offers  allows you to access a wealth of information about geographic locations.
  • After converting them to the geography data type, you can extract information such as capital and  population, and more. 
Excel Geography Fields

fig. 3 - Excel Geography Fields

This can be incredibly useful for a variety of applications, from creating informative tables to performing data analysis.

The information in Excel’s geography data type feature is linked to an online data source, which means it can be refreshed and updated. 

To get current data for your data types, you can right-click a cell with the linked data type and select Data Type > Refresh or Refresh All

This will refresh the cell you selected, plus any other cells that have that same data type. 

This ensures that your data is always up-to-date with the latest information from the online data source.

Excel also has Stocks and Currency data types which we'll cover in a future Cool Tip.

Enjoy!

Watch this Cool Tip video to learn more about using Microsoft Excel's Geography Data Type feature:


Please LIKE and SHARE OneCoolTip.com!
Visit the OneCoolTip YouTube Channelhttps://www.youtube.com/@onecooltip


READ MORE

OneCoolTip.com
Cool Tech Tips for a Cooler Life


#Microsoft @Microsoft #Excel #MicrosoftExcel #ExcelTips #DataScience #MicrosoftOffice #TechTips #BackToWorkMonday #YouTube @YouTube #OneCoolTip @OneCoolTip 

Sunday, November 12, 2023

How to Use the New NASA Plus Streaming Service

Have you ever dreamed of exploring the universe from the comfort of your own home? 

Here's a Cool Tip.  Now you can with NASA's new streaming service, NASA+. 

NASA+ offers a wide variety of content, including live coverage of launches, spacewalks, and mission events, as well as on-demand documentaries, educational programs, and other videos about NASA's work.

In this Cool Tip, let's walk you through how to use NASA+ on different devices and platforms. 

Here's how to do it.

To watch NASA+ on your computer:
  • Go to plus.nasa.gov
  • Click "Sign up" and create an account (or log in if you already have one)
  • Click the "Watch" button in the top navigation bar
  • Browse the content library and select the video you want to watch

NASA Plus

fig. 1 - NASA Plus Streaming Service


To watch NASA+ on your mobile device:
  • Download the NASA app from the App Store or Google Play
  • Open the app and sign in to your account (or create an account if you don't have one)
  • Tap the "NASA+" tab at the bottom of the screen
  • Browse the content library and select the video you want to watch

To watch NASA+ on your TV:
  • Download the NASA app on your streaming device (Roku, Apple TV, Amazon Fire TV, etc.)
  • Open the app and sign in to your account (or create an account if you don't have one)
  • Select the "NASA+" tab
  • Browse the content library and select the video you want to watch
NASA+ is a great new way to explore the universe and learn about NASA's work. 

It's free to use and has a wide variety of content to choose from, including live coverage of mission events, on-demand documentaries, educational programs, and more.

Enjoy!

Please LIKE and SHARE OneCoolTip.com!
Visit the OneCoolTip YouTube Channelhttps://www.youtube.com/@onecooltip


READ MORE

OneCoolTip.com
Cool Tech Tips for a Cooler Life

#NASA @NASA+ #NASASteaming #NASAPlus #ExploreTheUniverse #SpaceExploration #TechTips #OneCoolTip @OneCoolTip  

Saturday, November 11, 2023

How to Use the Sensitive Content Warning Feature in iOS 17

iOS17
Have you ever received an unexpected explicit photo or video on your iPhone or iPad?

Do you worry about your kids seeing inappropriate content online?

Here's a Cool Tip.  Use the new Sensitive Content Warning feature in iOS 17.

iOS 17 is the latest version of Apple's mobile operating system for the iPhone and iPad and it includes the Sensitive Content Warning feature.

The Sensitive Content Warning feature in iOS 17 is a new tool that can help you protect yourself and your family from unwanted explicit content. 

The new feature works by scanning incoming messages, photos, and videos for nudity and other sensitive content. 

If it finds anything, it will blur the content and show you a warning before you open it.

This feature can be especially helpful for parents who want to make sure their kids don't see inappropriate content. 

But it can also be useful for adults who don't want to be surprised by explicit content when they're checking their messages or photos.

Here's how to do it.
  • Open the Settings app on your iPhone or iPad.
  • Scroll down and tap Privacy & Security.
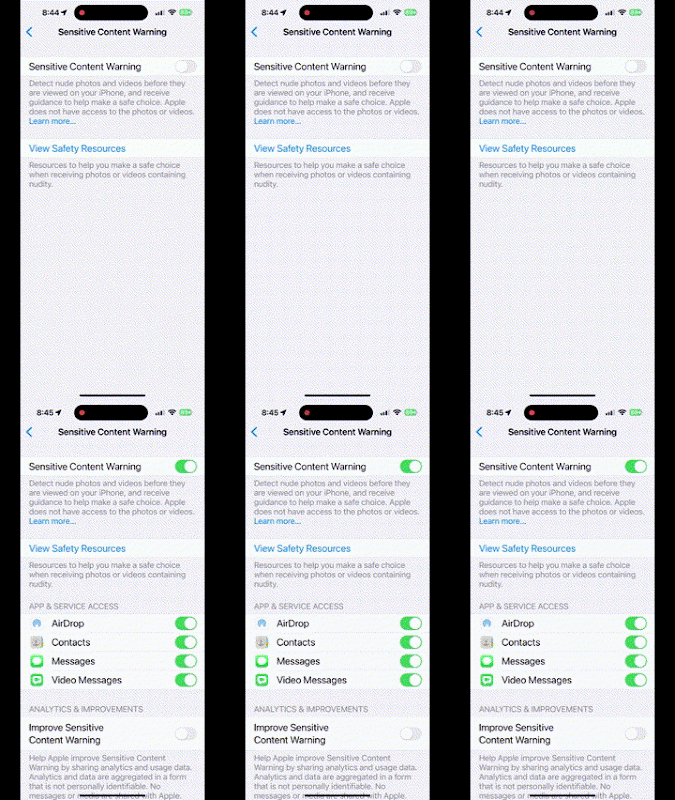
  • Scroll down and tap Sensitive Content Warning.
  • Toggle on the Sensitive Content Warning switch.
You can configure the Sensitive Content Warning feature to allow or block specific types of content. 

For example, you can allow the feature to blur nudity, but not other types of sensitive content.
  • Under App & Service Access, tap on the app or service that you want to configure.
  • Toggle on or off the switch for the types of content that you want to blur.

iOS17 iPhone Sensitive Content Warning Setting

fig. 1 - iOS17 iPhone Sensitive Content Warning Setting


The Sensitive Content Warning feature in iOS 17 is a powerful new tool that can help you protect yourself and your family from unwanted explicit content.

It's easy to use and configure, and it can be a valuable addition to your online safety toolkit.

Here are a few additional tips for protecting yourself and your family from unwanted explicit content online:
  • Talk to your kids about online safety and the dangers of explicit content.
  • Use parental controls on your devices to block access to inappropriate websites and apps.
  • Be careful about what information you share online.
  • Be aware of the risks of phishing scams and malware.
For more information on protecting kids online, check out the US FTC site.

By following these tips, you can help keep yourself and your family safe online.

Enjoy!

Please LIKE and SHARE OneCoolTip.com!
Visit the OneCoolTip YouTube Channelhttps://www.youtube.com/@onecooltip


READ MORE

OneCoolTip.com
Cool Tech Tips for a Cooler Life

#Apple @Apple #iPhone #iOS #iPad #iOS17 #SensitiveContentWarning #ChildSafety #OnlineSafety #FamilyTechnology #TechTips #OneCoolTip @OneCoolTip