Showing posts with label Windows 11. Show all posts

Tuesday, October 10, 2023

How to Use the New ‘End Task’ Feature in Windows 11

Have you ever found yourself in a situation where an application on your computer is not responding, and you’re scrambling to find a way to close it? 

Or perhaps you’re a power user looking for more efficient ways to manage your applications? 

Here's a Cool Tip.  Use the New End Task Feature on the Windows Taskbar.

The latest update of Windows 11, released on September 26, 2023, introduces a handy new feature that allows users to end tasks directly from the taskbar. 

But before you can use it, you need to enable it.

Here's how to do it.

Turning the End Task Feature On
  • Right-click on the Start menu and select Settings.
  • In the Settings window, select System from the left panel.
  • Scroll down and click on For developers.
  • Toggle the End Task button
  • You’ve now enabled the End Task feature. 
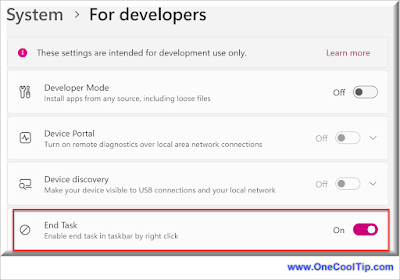
Windows 11 For Developers
fig.1 - Windows 11 For Developers - End Task

Using End Task
  • Right-click on any open app on your taskbar and select ‘End Task’ to kill its process. 
  • This is a much more efficient alternative to launching Task Manager and navigating to the Processes tab.
Windows End Task
fig. 2 - Windows End Task

The End Task feature is just one of many exciting updates introduced in the September 26, 2023 update of Windows 1115. 

Give this new feature a try and discover how it can streamline your Windows experience!

Enjoy!


Please LIKE and SHARE OneCoolTip.com!

READ MORE

OneCoolTip.com
Cool Tech Tips for a Cooler Life


#Microsoft @Microsoft #Windows11 #Windows #Windows11Update #EndTaskFeature #MicrosoftUpdates #TechTips #OneCoolTip @OneCoolTip  

Saturday, October 7, 2023

How to Use the New Windows 11 File Explorer Gallery

Windows 11 File Explorer
Ever wondered how to make the most out of your Windows 11 experience? 

Do you want to view and manage your stored photos?

Here's a Cool Tip.  Use the new Gallery view in File Explorer for Windows 11.


Windows 11 updated in September 2023 and File Explorer did too!

As part of the update, File Explorer has a new Gallery view of your images.

Here's how to do it.
  • Click on the folder icon on your taskbar or press Win + E on your keyboard to open File Explorer.
  • Select Gallery from the left-hand column.
Windows 11 File Explorer Gallery
fig. 1 - Windows 11 File Explorer Gallery

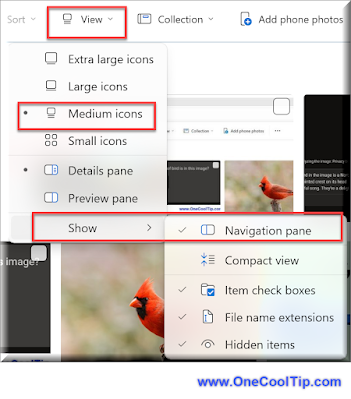
  • In the Gallery view, you can adjust how to view your images by changing the option under the View menu.

Windows 11 File Explorer View Options
fig. 2 - Windows 11 File Explorer View Options

  • To manage your files, right-click on a file or folder for options like Cut, Copy, Paste, Rename, and Delete. You can also drag and drop files into different folders.

With these steps, you can fully utilize the new File Explorer Gallery feature in Windows 11.

If you don't see the new Gallery feature, check that you have the latest version of File Explorer that was included in the September 26, 2023 update, 22H2.  Go to Start, search for Update and apply any update if needed.

Enjoy!


Please Like and Share OneCoolTip.com!


READ MORE


OneCoolTip.com
http://www.onecooltip.com
Cool Tech Tips for a Cooler Life!


#Microsoft @Microsoft #Windows11 #22H2 #FileExplorerGallery #TechTips #StepByStepGuide #OneCoolTip @OneCoolTip

Sunday, October 1, 2023

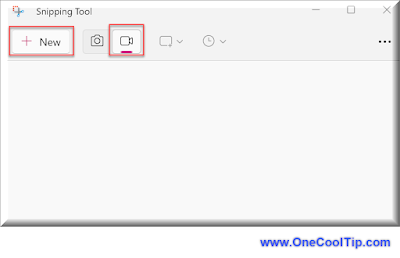
Unleash the Power of Windows 11 Snipping Tool’s New Video Capture Feature

Snipping Tool
Ever wondered how to capture a video of your screen without downloading any additional software? 

Have you been looking for a way to record your screen right from your Windows 11 device? 

Here's a Cool Tip.  Use the new Windows 11 Snipping Tool Video capture feature.

The new Windows 11 Snipping Tool comes with a built-in video capture feature that’s easy to use and incredibly handy. 

Here's how to do it.
  • Open the Snipping Tool.
  • Click on the 'Record' icon
  • Select '+ New'
  • Choose your Capture Area
  • Click and drag your cursor to create a rectangle around the area you want to capture.
  • Click the ‘Record’ button to start capturing video. 
    • Everything within your selected area will be recorded.
  • When you’re done, click the ‘Stop’ button. 
  • Your video will automatically be saved in your Videos folder.
  • Navigate to your Videos folder to view your recording. From here, you can rename it, move it, or share it with others.

Windows 11 Snipping Tool Video Capture
fig. 1 - Windows 11 Snipping Tool Video Capture


Remember to turn off any notifications or other potential interruptions before you start recording to ensure a clean video capture. 

Also, consider closing any unnecessary applications or browser tabs for smoother performance.

So, are you ready to become a screen recording pro with the new Windows 11 Snipping Tool? It’s time to explore this feature and see how it can enhance your productivity!

Enjoy!

Please LIKE and SHARE OneCoolTip.com!


READ MORE


OneCoolTip.com
Cool Tech Tips for a Cooler Life


 #Windows11 #SnippingTool #ScreenRecording #TechTips #Microsoft #Windows @Microsoft #TechTips #OneCoolTip @OneCoolTip 

Saturday, September 30, 2023

How to Master the Combine Taskbar Buttons Feature in Windows 11

Windows 11
Have you ever found yourself lost in a sea of open windows on your computer, struggling to find that one document you need? 

Or perhaps you’re a multitasker, juggling multiple applications at once and wishing for a more streamlined way to manage them all? 

Here's a Cool Tip.  Use the New Combine Taskbar Button setting in Windows 11.

Windows 11 has introduced a plethora of new features and improvements, one of which is the ability to customize how your taskbar buttons behave. 

This feature allows you to choose between always combining taskbar buttons or never combining them, giving you more control over your workspace. 

This means that multiple documents, such as Microsoft Word, will appear under one combined icon or not.

Here's how to do it.
  • Right-click on an empty space on your taskbar to open the context menu.
  • From the context menu, select Taskbar settings to open the Taskbar settings window.

Taskbar Settings Windows 11
fig. 1 - Taskbar Settings Windows 11
  • In the Taskbar settings window, select the section labeled Taskbar behaviors.
  • Click on the dropdown menu under Combine Taskbar buttons and hide labels
    • Select Always if you want all open windows from the same application to be combined into one taskbar button. 
    • Select Never if you want each open window to have its own separate taskbar button.
    • Select When Taskbar is full if you want to combine only when the taskbar is too full of icon.
Combine Taskbar Buttons - Windows 11
fig. 2 - Combine Taskbar Buttons - Windows 11


It’s as simple as that! 

With just a few clicks, you can customize your taskbar to suit your workflow.

Enjoy!

Please LIKE and SHARE OneCoolTip.com!

READ MORE

OneCoolTip.com
Cool Tech Tips for a Cooler Life

#Microsoft #Windows @Microsoft #Windows11 #TaskbarTips #ProductivityHacks #TechGuide #TechTips #OneCoolTip @OneCoolTip

Thursday, September 28, 2023

How to Use the New Windows 11 Copilot

Have you ever wished for a personal assistant that could help you navigate your PC effortlessly? 

Ever wondered how much more productive you could be if you had an AI-powered companion at your fingertips? 

Here's a Cool Tip: Use the new Windows Copilot.

Windows Copilot, a feature available only on Windows 11, is an AI-powered intelligent assistant designed to enhance your creativity and productivity. 

The update started rolling out to users September 26, 2023.

Here's how to use it.
  • Once you have updated to Windows 11, select the Copilot icon on the taskbar to open a chat window from the right-hand side of the screen.

fig. 1 - Windows Copilot icon


Windows CoPilot
fig. 2 - Windows Copilot

  • One of the key features of Copilot is its ability to adjust your PC’s settings. 
    • Whether you want to turn on dark mode or organize your windows with Snap Assist, Copilot can do it all.
  • Need a quick summary of a lengthy document? 
    • Copilot can summarize text in an image or document. 
    • This feature can be particularly useful for students and professionals who need to review large amounts of information quickly.
  • You can ask Copilot a range of questions. 
    • Whether you need answers for your next creative project or solutions for your to-do list, Copilot is ready to assist.
  • Windows Copilot allows you to choose your conversation style. 
    • This means you can customize how you interact with Copilot, making the experience more personal and enjoyable.

Like any tool, Windows Copilot is most effective when tailored to your specific needs. 

Don’t hesitate to explore its features and adjust its settings as needed.

Enjoy!

Please LIKE and SHARE OneCoolTip.com!


READ MORE

OneCoolTip.com
Cool Tech Tips for a Cooler Life


#Windows #CoPilot #WindowsCopilot #AI #Productivity #Windows11 #Microsoft @Microsoft #TechTips #OneCoolTip @OneCoolTip 

Saturday, September 16, 2023

Windows Super Secret Keyboard Shortcuts to Open Microsoft Applications

Microsoft Windows
Do you think you know Windows?

Do you know the super secret keyboard shortcuts to open Microsoft Applications?

There's even one to open the Microsoft-owned LinkedIn website.

Here's a Cool Tip:  Secret Microsoft Application Keyboard Shortcuts.

 
Here's how to do it.

  • Press and hold the Control + Shift + Alt + Windows + a letter from the list below for each application.
  • For example, L for LinkedIn.

Application

Windows Keyboard Shortcut

LinkedIn

CTRL + SHIFT + ALT + WIN + L

Word

CTRL + SHIFT + ALT + WIN + W

Excel

CTRL + SHIFT + ALT + WIN + X

PowerPoint

CTRL + SHIFT + ALT + WIN + P

Outlook

CTRL + SHIFT + ALT + WIN + O

Microsoft Teams

CTRL + SHIFT + ALT + WIN + T

OneDrive

CTRL + SHIFT + ALT + WIN + D

OneNote

CTRL + SHIFT + ALT + WIN + N


The keyboard shortcut to open LinkedIn on Windows is CTRL + SHIFT + ALT + WIN + L. 

This shortcut opens LinkedIn in your default browser. 

You can also use this shortcut to open other Office apps, including Word, Excel, PowerPoint, Outlook, Microsoft Teams, OneDrive and OneNote.

That's it!

Enjoy!


Please LIKE and SHARE OneCoolTip.com!

READ MORE


OneCoolTip.com
Cool Tech Tips for a Cooler Life


#Microsoft #keyboardshortcut #LinkedIn #Word #Excel #PowerPoint #Outlook #MicrosoftTeams #OneDrive #OneNote #techtips #OneCoolTip #Microsoft 

Saturday, September 9, 2023

How to Enable Dark Mode in Microsoft Paint

Microsoft Paint
Do you find yourself squinting at your screen at night while using Microsoft Paint? 

If so, you're not alone. 

The light-colored interface can be harsh on the eyes, especially in low-light conditions.

Here's a Cool Tip:  Set MS Paint to the New Dark Mode in Windows 11

This Cool Tip makes Paint easier on your eyes inverting the colors of the interface, making it much easier to see in the dark.

How to Enable Dark Mode in Microsoft Paint
fig. 1 - How to Enable Dark Mode in Microsoft Paint

Here's how to do it:
  • Ensure you have the latest version of Paint from the Microsoft App Store.
    • The version that supports dark mode is 11.2304.17.02 or greater. 
    • If you need the newer version, go to the Start Menu, and search for the Microsoft Store App.
  • Open Paint.
  • Click on the Settings gear icon in the top-right corner.
  • Select App theme.
  • Choose Dark.
  • Select the back arrow to return to the home screen.
Cool Tip:
  • You can also enable dark mode for all of your Windows apps, including Windows 10, by going to Settings > Personalization > Colors and selecting Dark under Choose your mode.

That's it! 

Enjoy!


Please LIKE and SHARE OneCoolTip.com!


READ MORE

OneCoolTip.com
Cool Tech Tips for a Cooler Life!


#Microsoft @Microsoft #microsoftpaint #darkmode #dark #mode #windows10 #windows11 #techtips #howto #TechTips #OneCoolTip @OneCoolTip 

Thursday, September 7, 2023

How to Unlock the Power of the Windows Character Map

Have you ever needed to type a special character, such as the British pound sign (£), but didn’t know how to do it on your keyboard? 

What about other special characters?

How to do you insert characters that don't appear on the regular keyboard?

Here's a Cool Tip:  Windows Character Map.

Here's how to do it.
  • Click on the Start menu and type Character Map in the search bar. 
  • Click on the Character Map app to open it.
  • Once the Character Map is open, you can browse through the available characters by scrolling through the list.
  • To copy a character, simply click on it to select it, then click the Select button. This will add the character to the Characters to copy field at the bottom of the window. 
  • Once you have selected all the characters you want to copy, click the Copy button to copy them to your clipboard.
  • Now you can switch to your document in Microsoft Word (or any other program) and paste the copied characters by pressing Ctrl + V or right-clicking and selecting Paste.
Windows Character Map
fig. 1 - Windows Character Map


Windows Character Map is a powerful tool that can help you find and insert special characters into your documents. 

By following these simple steps, you can unlock its full potential and make your writing more expressive and engaging.

Enjoy!


Please LIKE and SHARE OneCoolTip.com!


READ MORE

OneCoolTip.com
Cool Tech Tips for a Cooler Life!

#Microsoft #Windows #WindowsCharacterMap #SpecialCharacters #MicrosoftWord #WindowsTips #TechTips #OneCoolTip @OneCoolTip @Microsoft @Windows 
Monday, September 4, 2023

Try This Easter Egg in Windows 11 Notepad

Did you know that there's a hidden Easter egg in Windows 11 Notepad? 

Here's a Cool Tip:  Spin the gear icon in the top-right corner of the window. 

It's a fun little distraction.

The gear icon opens the Notepad settings, where you can change things like the font, the text size, and the line spacing.

Here's how to do it:
  • Open Notepad.
  • Click on the gear icon in the top-right corner of the window.
  • Hold down the mouse button and drag the gear icon around.

Gear Spin Notepad
fig. 1 - Spin The Gear - Windows 11 Notepad


You can also spin the gear icon by right-clicking on it.

If you want to spin the gear icon really fast, you can use the scroll wheel on your mouse.

Enjoy

Please LIKE and SHARE OneCoolTip.com!


READ MORE

OneCoolTip.com
Cool Tech Tips for a Cooler Life!

#Microsoft #Windows #windows11 #notepad #easteregg #fun #TechTips #OneCoolTip @OneCoolTip @Microsoft 

Tuesday, August 29, 2023

How to Use Windows Clipboard History

Windows 11
Have you ever copied something important, only to accidentally overwrite it with something else before pasting?

 Have you ever wished you could access your clipboard history and retrieve something you copied earlier? 

Here's a Cool Tip:  Use the Windows Clipboard History

With Windows 10 and Windows 11 you can use Windows Clipboard History and the keyboard shortcut Windows key + V on both operating systems to make your life easier.

Here's how to do it:

Windows 10 - Enable Clipboard History
  • Open the Settings app by clicking on the Start menu and selecting the gear icon.
  • Click on System, then select Clipboard from the left-hand menu.
  • Under Clipboard history, toggle the switch to On.
Windows 11 - Enable Clipboard History
  • Open the Settings app by clicking on the Start menu and selecting the gear icon.
  • Click on Bluetooth & devices, then select Clipboard from the left-hand menu.
  • Under Clipboard history, toggle the switch to On.

Windows System Clipboard Option Screen
fig. 1 - Windows System Clipboard Option Screen

If you want to sync your copies across devices, set that On as well.

Now that Clipboard History is enabled, you can access it by pressing the Windows key + V on your keyboard. 

Windows Clipboard History
fig. 2 - Windows Clipboard History


This will bring up a small window showing your clipboard history, with the most recent item at the top. 

You can scroll through the list and click on an item to paste it into your current application.


Enjoy!

Please LIKE and SHARE OneCoolTip.com!


READ MORE

OneCoolTip.com
Cool Tech Tips for a Cooler Life!

#Microsoft  #Windows10 #Windows11 #ClipboardHistory #KeyboardShortcut #WindowsKeyV #TechTips #OneCoolTip @Microsoft @OneCoolTip

Saturday, August 19, 2023

Stop Apps from Scrolling in Windows Task Manager with This Cool Tip

Windows 11
Are you tired of apps scrolling automatically in the Windows Task Manager? 

This can be a frustrating problem, especially if you're trying to troubleshoot a performance issue.

Here's a Cool Tip:  Use the Control Key.

The Windows Task Manager is a system monitor utility that allows you to manage all the processes running on your computer. 

You can use Task Manager to:
  • View performance: View the overall performance of the system, or the performance per package or process
  • Manage processes: Order processes by usage to see what's taking up your computer's resources
  • Turn off software: Turn off software that takes up excessive resources on your PC to improve the running speed
  • Restart or shut down system: Restart or shut down the system when it is busy or unresponsive
  • Terminate applications: Terminate applications and processes
And with this Cool Tip you can the Control key to pause the Task Manager screen.

This will stop apps from scrolling in the Windows Task Manager. 

Here's how to do it:
  • Open the Task Manager by pressing Ctrl+Shift+Escape.
  • Hold down the Control key while scrolling through the list of processes.
  • This will prevent the processes from scrolling automatically. You can release the Control key to resume scrolling.

Windows Task Manager
fig. 1 - Windows Task Manager


That's it!

Enjoy!

And Cool Tip Kudos to Jen Gentleman @Microsoft for sharing this Cool Tip this week.

Please LIKE and SHARE OneCoolTip.com!

READ MORE

OneCoolTip.com
Cool Tech Tips for a Cooler Life!


#windows #taskmanager #scrolling #controlkey #howto #techtips #troubleshooting #windows10 #windows11 #Microsoft @Microsoft #TechTips #OneCoolTip @OneCoolTip 
Saturday, August 12, 2023

How to Hide, View, and Unhide Folders in Windows 11

Windows 11
Do you have sensitive information on your computer that you want to keep private? 

Do you share a computer with others and want to keep some files or folders hidden from view? 

Here's a Cool Tip:  Hide Folders in Windows 11


How to Hide Folders in Windows 11

Hiding a folder in Windows 11 is a simple process. Here are the steps to follow:
  • Find the folder that you wish to hide and right-click it.
  • Click on Properties or press Alt + Enter.
  • At the bottom of the properties box, check the Hidden box and click OK.
  • You’ll be prompted to decide on how you’d like the changes to apply. Click Apply changes to the folder only or Apply changes to this folder, subfolders, and files based on preference.
  • Click OK to save your changes.
  • Your folder will now be hidden from view.
Windows 11 Folder Properties
fig. 1 - Windows 11 Folder Properties


How to View Hidden Folders in Windows 11

To view hidden folders in Windows 11, follow these steps:
  • Press WIN + E to launch the File Explorer.
  • Click on View and then select Show in the drop-down menu.
  • At the bottom of the menu, click on Hidden.
  • Your hidden folders will now be visible and accessible in their original location.
  • Uncheck Hidden before closing File Explorer.
Windows 11 File Explorer View Hidden Items
fig. 2 - Windows 11 File Explorer View Hidden Items


How to Unhide Folders in Windows 11

To unhide a folder in Windows 11, follow these steps:
  • Set File Explorer to show hidden files and folders again by going to View > Show > Hidden items from the toolbar.
  • Right-click the hidden file or folder (it will be grayed out) and select Properties.
  • When the item’s properties window comes up, select the General tab, uncheck the Hidden tab, and click OK.
  • Your folder will now be unhidden and visible again.

Hiding, viewing, and unhiding folders in Windows 11 is a simple process that can help you keep your sensitive information private and secure. 

It’s important to note that while hiding folders can help keep your sensitive information private, it is not a foolproof method of protection. Hidden folders can still be accessed by someone who knows how to view hidden files and folders. 

Enjoy!

Please LIKE and SHARE OneCoolTip.com!


READ MORE

OneCoolTip.com
Cool Tech Tips for a Cooler Life!


#Microsoft #Windows #Windows11 #TechTips #ComputerSecurity #Privacy #OneCoolTip @Microsoft