Showing posts with label microsoft365. Show all posts

Monday, August 21, 2023

How to Add Visual Flair to Your PowerPoint Presentations

Have you ever wanted to add some visual flair to your PowerPoint presentations? 

Do you want to make your slides more engaging and eye-catching? 

Here's a Back to Work Monday Cool Tip: Use the Insert Icons feature in Microsoft PowerPoint! 

Microsoft 365 doesn't have traditional clip art anymore, but as a subscriber you get several new kinds of high quality art in its place for free: high-resolution photographs, icons, cutout people, stickers, illustrations, and cartoon people.

Here's how to do it.
  • Open Microsoft PowerPoint and navigate to the slide where you want to insert an icon.
  • Click on the Insert tab in the ribbon menu at the top of the screen.
  • In the Illustrations group, click on Icons.
    • A window will pop up with a variety of icons to choose from. 
    • You can search for specific icons using the search bar at the top of the window, or browse through the categories on the left side of the window.
  • Once you’ve found an icon that you like, click on it to select it, and then click on the Insert button at the bottom of the window.
  • The icon will be inserted onto your slide, and you can use the formatting options in the ribbon menu to customize its size, color, and position.
  • If you want to insert other types of images, select another category such as Images.

Microsoft Power Point Insert Icons
fig. 1 - Microsoft PowerPoint Insert Icons Feature

With this feature, you can add visual interest to your presentations and make them more engaging for your audience.


That's it!

Enjoy!

Please LIKE and SHARE OneCoolTip.com!


READ MORE

OneCoolTip.com
Cool Tech Tips for a Cooler Life!

#PowerPoint #Microsoft #Icons #Presentations #Visuals #TechTips #OneCoolTip @OneCoolTip @Microsoft 

Monday, August 7, 2023

How to Customize Your Microsoft Word Status Bar for Increased Productivity

Microsoft Word
Are you tired of constantly scrolling through menus to find the information you need while working on a document in Microsoft Word? 

Did you know that you can customize Microsoft Word to display the information you need at a glance? 

Here's a Cool Tip: Customize the Status Bar in Microsoft Word to increase your productivity and make your work easier.

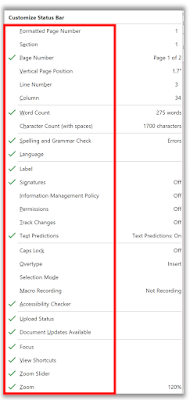
The Status Bar is located at the bottom of the document window and displays information about your document, such as what page you are currently viewing, how many words are in your document, and whether any proofing errors were found. 
Customize Status Bar - Microsoft Word
fig. 1 - Customize Status Bar - Microsoft Word

You can easily customize the Status Bar by adding or removing information from it.

Here’s how to customize the Status Bar in Microsoft Word:
  • Right-click anywhere on the Status Bar.
  • A “Customize Status Bar” menu will open.
  • Items that have check marks next to them display on the Status Bar.
  • Click the tick-box to select the items you want to see in the status bar.
  • Click to deselect the items you want to remove.
  • The status bar immediately reflects your choice.
Some useful options to consider adding to your Status Bar include:
  • Vertical Page Position: shows you precisely where the cursor is at any given moment.
  • Track Changes: shows whether Track Changes is On or Off.
  • Line Number: helps in some large documents, or when collaborating with someone who wants to direct your attention to a specific place in the document.
  • Collaborative tools: for those using later versions, or free versions of Word, which allow for synchronous or real-time editing among several authors.

Customizing the Status Bar can help you work more efficiently and effectively in Microsoft Word. 

Give it a try and see how it can improve your productivity!

Enjoy!

Please LIKE and SHARE OneCoolTip.com!


READ MORE

OneCoolTip.com
Cool Tech Tips for a Cooler Life!


#Microsoft #Word #MicrosoftWord #Productivity #StatusBar #Customization #TechTips #OneCoolTip @Microsoft 

Monday, July 17, 2023

Say Goodbye to Calibri - Hello Aptos!

Do you use Microsoft Office?

If so, there's a change coming with the default font.

Microsoft has announced that it is replacing its default font, Calibri. 

This change comes after 15 years of Calibri being the default font for Microsoft Office. 

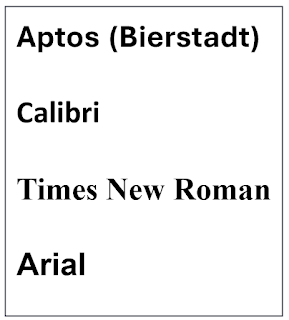
The new default font is called Aptos.

But here's a Cool Tip:  You can already ready use it since it's currently called Bierstadt

Microsoft Default Font Aptos
fig.1 - Microsoft New Default Font Aptos and Previous Fonts


The decision to choose Aptos as the new default font was based on user feedback, with Aptos striking a balance between professionalism and relatability.

The new font will gradually become the default across all Microsoft 365 apps and services for all users over the coming months. 

However, Calibri will still be pre-pinned at the top of a new font menu alongside its predecessors, Times New Roman and Arial.

Please Like and Share OneCoolTip.com!


READ MORE

OneCoolTip.com
http://www.onecooltip.com
Cool Tech Tips for a Cooler Life!


#Microsoft #Aptos #NewFont #DefaultFont #MicrosoftOffice #Office #Microsot365 #Word #Excel #PowerPoint #Outlook #TechTip #OneCoolTip @Microsoft 


Source: Microsoft Design

Monday, May 15, 2023

How to Save Time and Effort with Microsoft Quick Parts

Microsoft Word
Do you often find yourself typing the same text over and over again in your emails and documents? 

Do you wish there was a way to insert reusable pieces of content with just a few clicks? 

If so, try this Cool Tip: Microsoft Quick Parts.

Quick Parts is a feature that allows you to create, store, and insert snippets of text, graphics, fields, and document properties into your Microsoft Word and Microsoft Outlook files. 

Microsoft Outlook

Y
ou can use Quick Parts to speed up repetitive tasks, such as adding directions, signatures, meeting notes, and more.

There are different types of building blocks, such as AutoText, Document Property, Field, and Header

AutoText is the most common type of building block that stores text and graphics. 

For example, you can create an AutoText entry for your email signature and insert it into any email with a few clicks.

Quick Parts are not limited to text and graphics. 

You can also use them to insert fields that display dynamic information, such as dates, page numbers, document titles, and more. 

You can also use them to insert document properties that store metadata about your file, such as author name, company name, keywords, and more.

How to Create a Quick Part


  • Select the text or graphic that you want to save as a Quick Part. You can select any amount of content, from a single word to a whole paragraph or table.
Select Text
fig. 1 - Select Text to Save as Quick Parts

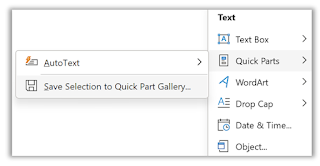
  • On the Insert tab, in the Text group, click Quick Parts.
  • Click Save Selection to Quick Part Gallery.
Save Selection to Quick Parts Gallery
fig. 2 - Save Selection to Quick Parts Gallery

  • In the Create New Building Block dialog box, give your Quick Part a name and choose a gallery where you want to store it. You can also add a description, category, and options for how you want it to be inserted.
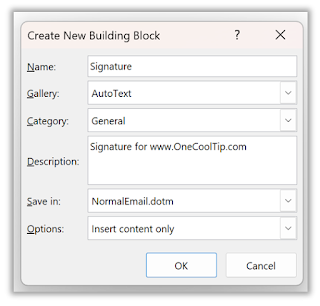
Save New Building Block
fig. 3 - Save New Building Block

  • Click OK.

Your Quick Part is now saved and ready to use.


How to Insert a Quick Part

Inserting a Quick Part is even easier than creating one. 

Just follow these steps:

  1. Place your cursor where you want to insert the Quick Part.
  2. On the Insert tab, in the Text group, click Quick Parts.
  3. Select the Quick Part that you want to insert from the gallery.

Alternatively, you can type the name of the Quick Part and press F3 to insert it automatically.


How to Modify a Quick Part

If you want to change the content or properties of a Quick Part, you can do so by following these steps:

  1. Insert the Quick Part that you want to modify into your file.
  2. Make the changes that you want to apply.
  3. Select the modified content.
  4. On the Insert tab, in the Text group, click Quick Parts.
  5. Click Save Selection to Quick Part Gallery.
  6. In the Create New Building Block dialog box, choose the same name and gallery as the original Quick Part.
  7. Click OK.

You will be asked if you want to overwrite the existing Quick Part. Click Yes.

Your Quick Part is now updated with the changes.


How to Delete a Quick Part

If you no longer need a Quick Part, you can delete it by following these steps:

  1. On the Insert tab, in the Text group, click Quick Parts.
  2. Click Building Blocks Organizer.
  3. In the Building Blocks Organizer dialog box, select the Quick Part that you want to delete from the list.
  4. Click Delete.
  5. Click Yes to confirm.

Your Quick Part is now deleted from the gallery.


Cool Tips for Using Quick Parts


  • Use descriptive names for your Quick Parts so that you can easily find them in the gallery or type them with F3.
  • Use categories to organize your Quick Parts by topic or purpose.
  • Use keyboard shortcuts to create and insert Quick Parts faster. 
  • For example:
    • Press Alt+F3 to create a new Quick Part from selected content.
    • Press Ctrl+F3 to copy selected content to the Spike (a special clipboard that stores multiple items).
    • Press Ctrl+Shift+F3 to paste all


That's it!

Enjoy.

Please LIKE and SHARE OneCoolTip.com!


READ MORE


OneCoolTip.com
Cool Tech Tips for a Cooler Life!


#QuickParts #MicrosoftWord #MicrosoftOutlook #Outlook #Microsoft @Microsoft #Word #TechTip #OneCoolTIp


Monday, April 3, 2023

How to Co-Author a File in Real Time in Microsoft 365: Collaborate with Ease

Microsoft 365
 Have you ever worked on a project with a group of people and found it difficult to coordinate everyone's contributions? 

Do you struggle with sending multiple versions of a document back and forth, trying to keep track of everyone's changes? 

If you answered yes to either of these questions, you're not alone. 

Collaborating on documents can be a headache but here's a Cool Tip: co-authoring

With co-authoring, multiple users can work on a document at the same time, seeing each other's changes in real-time. 

Here's how to use co-authoring in Microsoft 365 so you can collaborate more efficiently and get your projects done with ease.
  • Save the file in OneDrive.  
  • Share the file with others
    • To share the file with others, click the Share button in the top-right corner of the screen. 
    • Enter the email addresses of the people you want to share the file with. 
    • Set permissions to control who can view and edit the file.
  • Start co-authoring
    • You and your co-authors can see changes in real-time.
    • You can also communicate with your collaborators using the chat function, which is located on the right-hand side of the screen.
  • Save your changes
    • When you are finished, save and close the file.

The 
next time you have a project to collaborate on, try using co-authoring in Microsoft 365 and see how it can boost your productivity and teamwork.

Please Like and Share OneCoolTip.com!

READ MORE

OneCoolTip.com
Cool Tech Tips for a Cooler Life!

#Microsoft #OneCoolTip #Microsoft365 #Collaboration #RealTime #Productivity @Microsoft

Monday, March 13, 2023

How to Show or Hide the Ribbon in Office

Microsoft 365
Where's the ribbon?

That's often the question when using Microsoft Office.

The ribbon is a set of toolbars at the top of the window in Office programs, for example, Word, Excel, PowerPoint, designed to help you quickly find the commands that you need to complete a task. 

But a common problem that users encounter is that the ribbon can appear and seemingly disappear on a whim.

Office Ribbon Menu Bar
Microsoft Office Ribbon

Here is a Cool Tip on how to master the Office ribbon.

Expand or collapse the ribbon

You can toggle between having the ribbon expanded or collapsed in multiple ways.

If the ribbon is collapsed, expand it by doing do one of the following:

  • Double-click any of the ribbon tabs.

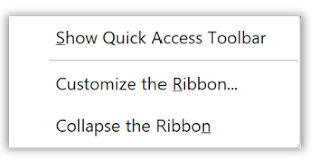
  • Right-click any of the ribbon tabs, and then select Collapse the ribbon.

Collapse the Ribbon
  • Press CTRL+F1.

If the ribbon is expanded, collapse it by doing do one of the following:

  • Double-click any of the ribbon tabs.
  • Right-click any of the ribbon tabs, and then select Collapse the ribbon
Collapse the Ribbon
Collapse the Ribbon

  • Right-click Ribbon display options in the lower right of the ribbon, and then select Collapse the ribbon.
  • Press CTRL+F1.

Show Ribbon options

  • When the ribbon is visible, in the lower-right corner of the ribbon, click the Ribbon Display Options icon or the down caret icon.
Ribbon Display Options
  • Choose a state for the ribbon:

    • Full-screen mode hides the ribbon for the best view of your document, and only shows the ribbon when you select More , or press the ALT key.
    • Show tabs only shows only the ribbon tabs, so you see more of your document, and you can still quickly switch among the tabs.
    • Always show Ribbon keeps all the tabs and commands on the ribbon visible all the time.

If the ribbon isn't visible at all

If the ribbon isn’t visible at all (no tabs are showing), the state is set to Full-screen mode

Select More  or the three dot icon at the top right of the screen. This will temporarily restore the ribbon.

When you return to the document, the ribbon will be hidden again. To keep the ribbon displayed, select a different state from the Ribbon Display Options menu.

That's it!

Please LIKE and SHARE OneCoolTip.com!

READ MORE


OneCoolTip.com
Cool Tech Tips for a Cooler Life!


#Microsoft #Office #OfficeTips #RibbonControl #OneCoolTip #HowTo #OfficeTricks  @Microsoft

Thursday, December 29, 2022

Dictate Your Masterpiece in Microsoft Word


Microsoft 365 Dictate Are you a poor typist or need extra assistance when typing?   

Microsoft 365 offers the ability to use your voice to type into its applications.
Here's how to do it in Microsoft Word:

  • Open Microsoft Word 365
  • Tap the Dictate icon from the Home menu
  • Wait for the Dictate function to be ready.

  • Start speaking!

Note: You need to use a mic-enabled device.  Headphones with a mic work best but even using the mic on a laptop brings good results.

Besides Word, you can dictate in other 365 apps.  Just look for the Dictate command.

Besides typing words, you can also issue commands for punctuation.  For example, you can say period (full stop), comma, question mark or similar other punctuation marks. 

You can also edit by saying backspace [1 - 100], delete [word or phrase], insert space or undo.

Finally, you can say Select word, characters, para, or select [phrase] to navigate and select.

READ MORE