Sunday, November 12, 2023

How to Use the New NASA Plus Streaming Service

Have you ever dreamed of exploring the universe from the comfort of your own home? 

Here's a Cool Tip.  Now you can with NASA's new streaming service, NASA+. 

NASA+ offers a wide variety of content, including live coverage of launches, spacewalks, and mission events, as well as on-demand documentaries, educational programs, and other videos about NASA's work.

In this Cool Tip, let's walk you through how to use NASA+ on different devices and platforms. 

Here's how to do it.

To watch NASA+ on your computer:
  • Go to plus.nasa.gov
  • Click "Sign up" and create an account (or log in if you already have one)
  • Click the "Watch" button in the top navigation bar
  • Browse the content library and select the video you want to watch

NASA Plus

fig. 1 - NASA Plus Streaming Service


To watch NASA+ on your mobile device:
  • Download the NASA app from the App Store or Google Play
  • Open the app and sign in to your account (or create an account if you don't have one)
  • Tap the "NASA+" tab at the bottom of the screen
  • Browse the content library and select the video you want to watch

To watch NASA+ on your TV:
  • Download the NASA app on your streaming device (Roku, Apple TV, Amazon Fire TV, etc.)
  • Open the app and sign in to your account (or create an account if you don't have one)
  • Select the "NASA+" tab
  • Browse the content library and select the video you want to watch
NASA+ is a great new way to explore the universe and learn about NASA's work. 

It's free to use and has a wide variety of content to choose from, including live coverage of mission events, on-demand documentaries, educational programs, and more.

Enjoy!

Please LIKE and SHARE OneCoolTip.com!
Visit the OneCoolTip YouTube Channelhttps://www.youtube.com/@onecooltip


READ MORE

OneCoolTip.com
Cool Tech Tips for a Cooler Life

#NASA @NASA+ #NASASteaming #NASAPlus #ExploreTheUniverse #SpaceExploration #TechTips #OneCoolTip @OneCoolTip  

Saturday, November 11, 2023

How to Use the Sensitive Content Warning Feature in iOS 17

iOS17
Have you ever received an unexpected explicit photo or video on your iPhone or iPad?

Do you worry about your kids seeing inappropriate content online?

Here's a Cool Tip.  Use the new Sensitive Content Warning feature in iOS 17.

iOS 17 is the latest version of Apple's mobile operating system for the iPhone and iPad and it includes the Sensitive Content Warning feature.

The Sensitive Content Warning feature in iOS 17 is a new tool that can help you protect yourself and your family from unwanted explicit content. 

The new feature works by scanning incoming messages, photos, and videos for nudity and other sensitive content. 

If it finds anything, it will blur the content and show you a warning before you open it.

This feature can be especially helpful for parents who want to make sure their kids don't see inappropriate content. 

But it can also be useful for adults who don't want to be surprised by explicit content when they're checking their messages or photos.

Here's how to do it.
  • Open the Settings app on your iPhone or iPad.
  • Scroll down and tap Privacy & Security.
  • Scroll down and tap Sensitive Content Warning.
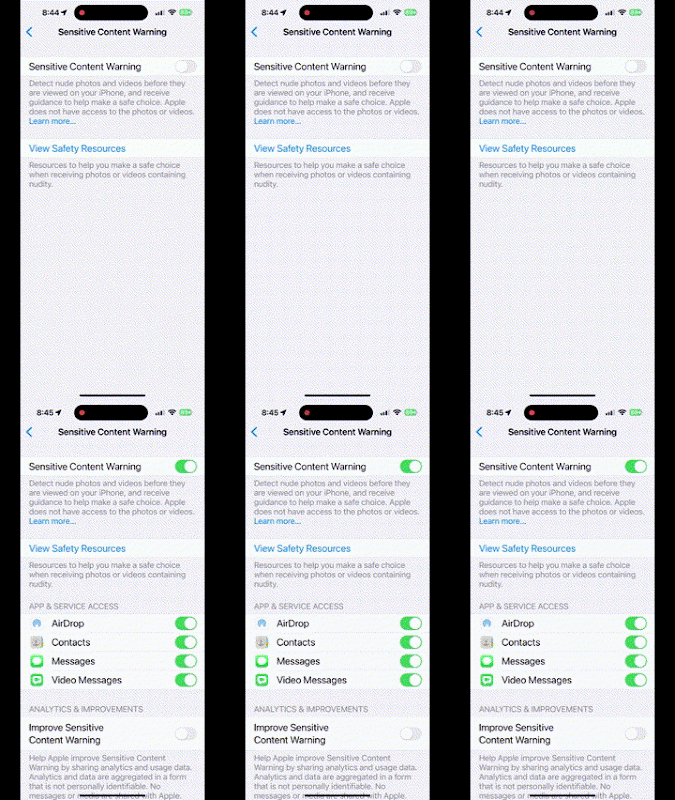
  • Toggle on the Sensitive Content Warning switch.
You can configure the Sensitive Content Warning feature to allow or block specific types of content. 

For example, you can allow the feature to blur nudity, but not other types of sensitive content.
  • Under App & Service Access, tap on the app or service that you want to configure.
  • Toggle on or off the switch for the types of content that you want to blur.

iOS17 iPhone Sensitive Content Warning Setting

fig. 1 - iOS17 iPhone Sensitive Content Warning Setting


The Sensitive Content Warning feature in iOS 17 is a powerful new tool that can help you protect yourself and your family from unwanted explicit content.

It's easy to use and configure, and it can be a valuable addition to your online safety toolkit.

Here are a few additional tips for protecting yourself and your family from unwanted explicit content online:
  • Talk to your kids about online safety and the dangers of explicit content.
  • Use parental controls on your devices to block access to inappropriate websites and apps.
  • Be careful about what information you share online.
  • Be aware of the risks of phishing scams and malware.
For more information on protecting kids online, check out the US FTC site.

By following these tips, you can help keep yourself and your family safe online.

Enjoy!

Please LIKE and SHARE OneCoolTip.com!
Visit the OneCoolTip YouTube Channelhttps://www.youtube.com/@onecooltip


READ MORE

OneCoolTip.com
Cool Tech Tips for a Cooler Life

#Apple @Apple #iPhone #iOS #iPad #iOS17 #SensitiveContentWarning #ChildSafety #OnlineSafety #FamilyTechnology #TechTips #OneCoolTip @OneCoolTip

Friday, November 10, 2023

How to Play Google's Interactive Loteria Game

Do you love playing games? 

Have you ever tried LoterĂ­a, a traditional Mexican bingo game? 

Here's a Friday Funday Cool Tip. Check out Google's interactive Loteria game! 

This immersive game lets you play with friends and family online, or against random players from around the globe.

Here's how to play.
  • Go to the Google Loteria page. https://doodles.google/doodle/celebrating-loteria/
  • Click on the "Play" button.
  • Choose to play a private match with friends or a random match with other players.
  • Receive your LoterĂ­a board.
  • The caller will start drawing cards and announcing the names of the images.
  • If you have the matching image on your board, place a marker on it.
  • The first player to cover all of the images on their board in a pre-determined pattern wins!

Google Loteria

fig. 1 - Google Loteria

For example:

The caller might draw the "El Gallo" card, which depicts a rooster. If you have the image of a rooster on your board, you would place a marker on it.

The first player to cover all of the images on their board in a pre-determined pattern wins. For example, you might need to cover all of the images in a row, column, or diagonal.

Enjoy!


Please LIKE and SHARE OneCoolTip.com!
Visit the OneCoolTip YouTube Channelhttps://www.youtube.com/@onecooltip


READ MORE

OneCoolTip.com
Cool Tech Tips for a Cooler Life

#Google @Google #GoogleDoodle #Loteria #MexicanBingo #Culture #Traditions #Fun #Games #TechTips #FridayFunDay #OneCoolTip @OneCoolTip 

Thursday, November 9, 2023

Drive Safer with the New Waze Crash History Feature

Waze
Are you a frequent Waze user?

Do you worry about encountering accidents on your daily commute?

Here's a Cool Tip. Waze Crash History.

Waze introduced a new feature, Waze Crash History, which is designed to enhance your driving experience and promote safer road conditions.

This innovative feature utilizes historical crash data and real-time reports from fellow Waze users to alert you about accident-prone areas along your route.

Here's how to use it.
  • Keep your Waze app updated to the latest version to access the Crash History feature.
  • Enable Crash History Alerts: Navigate to Settings Alerts & Reports > Reports > Enable "Alert while driving"
  • While driving, Waze will display alerts for roads with a history of crashes.


Waze Crash History Warning

fig. 1 - Waze Crash History Warning

A few notes:
  • Alerts may not appear for roads that you drive on frequently.
  • If your route has multiple roads with a history of crashes, Waze only alerts you of the most critical ones.
  • One alert may appear for multiple affected roads in the same area.

Check out Waze for your next driving adventure.

You can download Waze:  iPhone/iPad and Google Play.

You can also visit Waze.com.

Enjoy!


Please LIKE and SHARE OneCoolTip.com!
Visit the OneCoolTip YouTube Channelhttps://www.youtube.com/@onecooltip


READ MORE

OneCoolTip.com
Cool Tech Tips for a Cooler Life

#Google @Google #Waze #CrashHistory #DrivingSafety #RoadAwareness #InformedDriving #Navigation #TechTips #OneCoolTip @OneCoolTip

Wednesday, November 8, 2023

Master the New Bing Chat Excel Export Feature

Bing Chat
Have you ever wondered how to make your data analysis more efficient? 

Have you been looking for ways to seamlessly integrate your chat data into your spreadsheets? 

Here's a Cool Tip.  Use Microsoft Bing Chat’s new Excel export feature.

Microsoft recently add the ability to export tables from its AI tool, Bing Chat, directly to an Excel worksheet.

Here's how to do it.
  • Go to www.Bing.com
  • Select Chat from the menu.
  • Create a prompt for the information you want to see in a table.
    • For example, "Create a table of consumer inflation in the US from 2000 to 2020."
    • Select Enter
    • Bing Chat provides the answer.
  • Select ‘Edit in Excel’ icon.
Bing Chat Create Table - Select Edit in Excel

fig. 1 - Bing Chat Create Table - Select Edit in Excel

  • Your data will open in Excel 
    • You need to have Microsoft Excel installed.
Bing - Table Export to Excel

fig. 2 - Bing - Table Export to Excel


This feature allows for quick and easy transfer of chat data into a structured format.

Enjoy!

Please LIKE and SHARE OneCoolTip.com!
Visit the OneCoolTip YouTube Channelhttps://www.youtube.com/@onecooltip


READ MORE

OneCoolTip.com
Cool Tech Tips for a Cooler Life


 #Microsoft @Microsoft #Bing #BingChat #ExcelExport #DataAnalysis #MicrosoftOffice #Productivity #TechTips #OneCoolTip @OneCoolTip

Tuesday, November 7, 2023

How to Use Windows 11 Snipping Tool to Convert Pictures to Text with Ease

OneCoolTip Snipping Tool
Have you ever wondered how to extract text from an image without typing it all out? 

Or perhaps you’ve been looking for a way to digitize your handwritten notes? 

Here's a Cool Tip.  Use the new and improved Snipping Tool in Windows 11.

The new feature in the Windows 11 Snipping Tool is here to revolutionize your workflow.

But how does it work? 

And what can it do for you?

Here's how to do it.
  • Click on the Start button, type ‘Snipping Tool’ in the search bar, and select the app from the results.
  • Click on ‘New’ and select the area of the screen you want to capture.
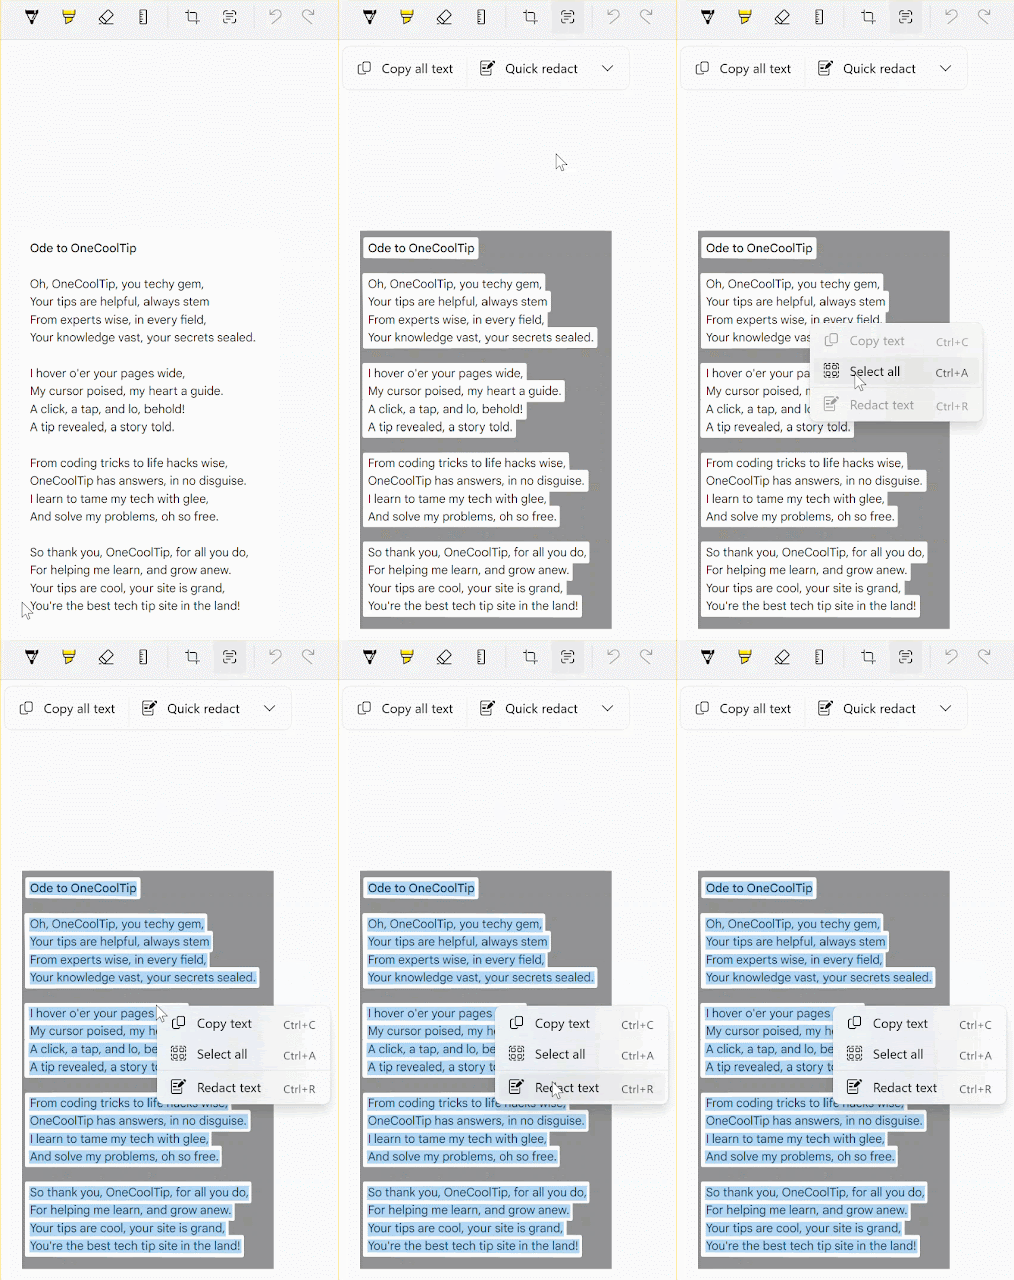
  • After capturing the snip, click on the ‘Text Actions’ button. This will convert the image in the snip to text.
OneCoolTip Snipping Tool Text Options

fig. 1 - Snipping Tool Text Options
  • You can now copy the text to your clipboard or edit it directly within the Snipping Tool.
    • Right Mouse click for copy options.

Snipping Tool Option Selections

fig. 2 - Snipping Tool Option Selections


Windows 11 Snipping Tool - Picture to Text

fig. 3 - Windows 11 Snipping Tool - Picture to Text


The ability to convert pictures to text can save you a significant amount of time, especially if you frequently work with images containing text. 

It’s also a great tool for digitizing handwritten notes or documents. 

However, the accuracy of the text conversion can vary depending on the quality of the image and the legibility of the text.

For instance, if you’ve taken a screenshot of a recipe from a cooking website, you can use the Snipping Tool to quickly convert the ingredients list into a text format that you can easily edit or share.

Enjoy!

Please LIKE and SHARE OneCoolTip.com!
Visit the OneCoolTip YouTube Channelhttps://www.youtube.com/@onecooltip


READ MORE


OneCoolTip.com
Cool Tech Tips for a Cooler Life


#Microsoft @Microsoft #Windows #Windows11 #SnippingTool #TextActions. #TechTips #OneCoolTip @OneCoolTip 

Monday, November 6, 2023

Boost Your Productivity with Microsoft Excel's Paste as Picture

Microsoft Excel
Have you ever wondered how to make your Excel reports more visually appealing? 

Or how to keep your data updated across multiple sheets without the hassle of manual updates?

Here's a Back-to-Work-Monday Cool Tip.  Use Microsoft Excel's Paste as Picture.

Microsoft Excel, a powerful tool in the Microsoft Office suite, offers two unique features: Paste as Picture and Paste as Linked Picture

While they may sound similar, they serve different purposes and can be used to achieve different outcomes.

Here's how to do it.

Paste as Picture
This feature allows you to take a snapshot of your selected cells and paste it as an image. 
  • Select the cells you want to copy.
Microsoft Excel - Select Table to Copy

fig. 1 - Select Table to Copy

  • Go to the Home tab, click on the Copy dropdown, and select Copy as Picture.
  • In the dialog box, choose “As shown on screen” and “Picture”, then click OK.
Microsoft Excel Copy as Picture
fig. 2 - Microsoft Excel Copy as Picture
  • Go to the location where you want to paste the picture and press Ctrl+V.

It’s a great way to preserve the look of your data, especially when sharing it with others.

The pasted picture won’t change even if the original data is modified.

Paste as Linked Picture
This feature creates a live snapshot of a range of cells. 
  • Select the cells you want to copy.
  • Copy the cells (Ctrl+C).
  • Go to the Home tab, click on the Paste dropdown, and select Linked Picture.

Microsoft Excel - Paste as Linked Picture

fig. 3 - Microsoft Excel - Paste as Linked Picture

The linked picture updates automatically when the original data changes.

It’s useful for creating dynamic dashboards and reports.

Here’s an example to illustrate the difference. 
  • Let’s say you have a cell A1 with the value 10. 
  • If you use Paste as Picture, you’ll get a picture of the cell displaying 10. 
  • If you change the value in A1 to 20, the picture remains the same. 
  • But if you use Paste as Linked Picture, the picture will update to display 20.
Be sure to check out this video that explains Paste as Picture and Paste as Linked Picture.


Enjoy!

Please LIKE and SHARE OneCoolTip.com!
Visit the OneCoolTip YouTube Channelhttps://www.youtube.com/@onecooltip

READ MORE

OneCoolTip.com
Cool Tech Tips for a Cooler Life

#Microsoft @Microsoft #Excel @Excel #ExcelTips, #DataVisualization, #ProductivityHacks, #MicrosoftExcel #TechTips #YouTube @YouTube @OneCoolTip @OneCoolTip