Friday, May 24, 2024

Unleash Your Inner Game Designer with Google's GenDino

Unleash Your Inner Game Designer with Google's GenDino

Tired of the classic Chrome dino? Google Labs' GenDino lets you create your own unique dino-runner with AI, customizing everything from the character to the obstacles. Check out this limited-time experiment and unleash your imagination!

By Rodger Mansfield
May 24, 2024


GenDino Cat
Remember that pixelated dinosaur you race when Chrome is offline? 

Do you wish you could make your own version?

Here's a Cool Tip.  Play GenDino (while you can!)

Google's GenDino takes that familiar concept to a whole new level. 

Powered by Imagen, Google's text-to-image AI, GenDino lets you design your own dinosaur, the obstacles it faces, and even the background scenery. 

It's a fun way to explore the creative potential of AI while enjoying a nostalgic game.


How to Play GenDino

Here's how to do it.
  1. Go to the GenDino website (labs.google/gendino).
  2. Log in with your Google account.
  3. In the text box, describe the dinosaur you want. Be creative! You can specify its species, appearance, accessories, and more.  Or even a cat!
  4. Next, describe the obstacles you want your dino to jump over or duck under. These could be cacti, aliens, flying pizzas... anything you can imagine!  Maybe a dog!
  5. Lastly, describe the background for your game. Think deserts, cityscapes, underwater worlds, or even outer space.  Or a couch.
  6.  Click the "Generate" button. GenDino's AI will bring your descriptions to life, creating a custom game you can play right away.
  7. Share (Optional): If you're proud of your creation, click "Share" to get a unique link to share your game with others.

Google GenDino Game
fig. 1 - Google GenDino Game


Unleash your imagination and design unique games. 

Experiment with AI and see how it interprets your prompts.

However, GenDino is a Google Labs experiment and may not be available indefinitely. (if it should stop working, try the Google Dino game).

Why GenDino is Dino-mite

GenDino is a delightful blend of creativity, nostalgia, and AI technology. 

Whether you're an aspiring game designer or just looking for a fun way to pass the time, GenDino offers a unique and engaging experience. 

Don't miss out on this opportunity to unleash your inner artist and create your own dino-tastic adventure!

Have you tried GenDino yet? 

Share your most imaginative dino creations and game designs in the comments below! 

Don't forget to spread the word and challenge your friends to create their own dino-mite games.


READ MORE

Please LIKE and SHARE OneCoolTip.com!
Never miss a Cool Tip: OneCoolTip Newsletter.

Do you have a Cool Tip or question? Email us at onecooltip.com@gmail.com


Rodger Mansfield, a seasoned tech expert, is the mastermind behind OneCoolTip.com, where he serves as both writer and editor. With a keen eye for simplifying complex tech, Rodger delivers practical advice that empowers readers to navigate the digital world with confidence. Dive into OneCoolTip.com for a treasure trove of savvy tips and tricks that keep you one step ahead in tech.


OneCoolTip.com
Cool Tech Tips for a Cooler Life!


#GenDino #GoogleLabs #ChromeDino #AIGaming #Imagen #FridayFunday #TechTips @OneCoolTip @OneCoolTip


Copyright © 2024 | www.OneCoolTip.com | All Rights Reserved

The Internet is Down Again

The Internet is Down Again - One Cool Tip

Don't you just hate it?  When the net does goes down, it's time to break out the jig saw puzzles!


READ MORE


Please LIKE and SHARE OneCoolTip.com!
Never miss a Cool Tip: OneCoolTip Newsletter.

Do you have a Cool Tip or question? Email us at onecooltip.com@gmail.com


Rodger Mansfield, a seasoned tech expert, is the mastermind behind OneCoolTip.com, where he serves as both writer and editor. With a keen eye for simplifying complex tech, Rodger delivers practical advice that empowers readers to navigate the digital world with confidence. Dive into OneCoolTip.com for a treasure trove of savvy tips and tricks that keep you one step ahead in tech.


OneCoolTip.com
Cool Tech Tips for a Cooler Life!


#CoolTipComics #Internet #Outage #net #TechTips #OneCoolTip @OneCoolTip


Copyright © 2024 | www.OneCoolTip.com | All Rights Reserved

Thursday, May 23, 2024

Turn Your Favorite Websites into Desktop and Mobile Apps

Turn Your Favorite Websites into Desktop and Mobile Apps

Tired of tab clutter? Learn how to transform your most-used websites into standalone apps in Chrome and Edge, streamlining your browsing experience and boosting productivity.

By Rodger Mansfield, Technology Editor
May 23, 2024


WPA
Ever wish your favorite websites felt more like native applications, unburdened by browser tabs and toolbars? 

Here's a Col Tip.  Install a web page as a standalone app!

Both Chrome and Edge on both desktop and mobile devices offer a simple solution: the ability to install web pages as standalone apps. 

This not only declutters your browsing but also can enhance performance and offer a more focused experience. 

Here's how to do it on desktop PCs.

Desktop - Chrome:
  1. Open the website you want to install.
  2. Click the three-dot menu in the upper-right corner.
  3. Hover over "More tools" and select "Save, share and cast"
  4. Select "Install page as app."
  5. Enter a name for the app, select "Install.""
  6. Select the option to "pin" to your taskbar.

Install WPA - Desktop Google Chrome

Desktop - Edge:
  1. Open the desired website.
  2. Click the three-dot menu and select "Apps."
  3. Click "Install this site as an app."
  4. Choose a name and click "Install."
  5. Select if you want to "pin to taskbar" or create a desktop icon.
  6. Your new app will be listed under the "Apps" listing.

Installing Desktop WPA Using Microsoft Edge
fig. 2 - Installing Desktop WPA Using Microsoft Edge


Here's how to install Progressive Web Apps (PWAs) on your Android phone.

Android - Chrome
  1. Launch the Chrome browser on your Android device.
  2. Visit the website you want to install as a PWA.
  3. Tap the three-dot menu in the top right corner.
  4. Select "Add to Home screen" (or sometimes it's labeled "Install app").
  5. A pop-up will appear, confirm the app's name and tap "Add" or "Install."
  6. The PWA icon will appear on your home screen like any other app.

Android - Edge
  1. Launch the Microsoft Edge browser.
  2. Go to the website you want to install as a PWA.
  3. Tap the three-dot menu in the top right corner.
  4. Tap on "Apps" in the menu.
  5. Select the option to install the site as an app.
  6. Confirm the app's name and tap "Install."
  7. The PWA will be added to your app list, accessible through the Edge Apps page (edge://apps).
Important Notes:
  • Not every website offers a PWA version. You'll typically see an "Add to Home Screen" prompt or a similar indication if it's available.
  • PWAs update automatically in the background, ensuring you always have the latest version.
  •  Some PWAs offer offline functionality, allowing you to use them even without an internet connection.

Here's how to install WPAs on an iPhone.

iPhone - Chrome
  1. Launch the Chrome browser on your iPhone.
  2. Visit the website you want to save as a pseudo-app.
  3. Tap the Share button at the bottom of the screen (it looks like a square with an arrow pointing up).
  4. Scroll through the options and tap "Add to Home Screen."
  5. You can edit the name of the app.
  6. "Add" in the top right corner.
  7. The website's icon will appear on your home screen, launching it in a standalone Chrome window when tapped.

iPhone - Edge
  1. Launch the Microsoft Edge browser.
  2. Go to the website you want to save.
  3. Tap the Share button at the bottom of the screen.
  4. Select "Add to Home Screen."
  5. Edit the name.
  6. Tap "Add" in the top right corner.
  7. The website icon will be added to your home screen, launching a standalone Edge window when tapped.
Important Notes:
  • These aren't technically full PWAs like on Android, but they offer a similar experience of opening a website in its own window without browser UI elements.
  • Limitations:
    • They may not offer offline capabilities or background syncing like true PWAs.
    • Some features of the website might be limited.
    • If a website offers a dedicated iOS app, that's usually a better option for a more integrated experience.

For desktop or mobile, find the icon where the app was saved and select to open.

Installing web pages as apps in Chrome and Edge is a powerful way to personalize your digital workspace and elevate your browsing experience. 

By taking a few simple steps, you can enjoy the benefits of both worlds – the convenience of the web and the streamlined focus of applications.

Have you tried installing web pages as apps? 

Which websites have you found most useful in this format? 

Share your experiences and tips in the comments below! 

Don't forget to share this guide with your fellow tech enthusiasts on social media.


READ MORE

Please LIKE and SHARE OneCoolTip.com!
Never miss a Cool Tip: OneCoolTip Newsletter.

Do you have a Cool Tip or question? Email us at onecooltip.com@gmail.com


Rodger Mansfield, a seasoned tech expert, is the mastermind behind OneCoolTip.com, where he serves as both writer and editor. With a keen eye for simplifying complex tech, Rodger delivers practical advice that empowers readers to navigate the digital world with confidence. Dive into OneCoolTip.com for a treasure trove of savvy tips and tricks that keep you one step ahead in tech.


OneCoolTip.com
Cool Tech Tips for a Cooler Life!


#Chrome #MicrosoftEdge #ChromeApps #EdgeApps #PWAs #ProductivityHacks #WebApps #TechTips #OneCoolTip @OneCoolTip


Copyright © 2024 | www.OneCoolTip.com | All Rights Reserved

Upgrade Your Garage, Upgrade Your Life: Introducing the Chamberlain C2405 myQ Smart Garage Door Opener

Upgrade Your Garage, Upgrade Your Life: Introducing the Chamberlain C2405 myQ Smart Garage Door Opener

Upgrade Your Garage, Upgrade Your Life: Introducing the Chamberlain C2405 myQ Smart Garage Door Opener
Chamberlain C2405 myQ Smart Garage Door Opener

Tired of wondering if you left the garage door open? 
Want to grant access to guests or deliveries without handing out keys? 

The Chamberlain C2405 myQ Smart Garage Door Opener is here to revolutionize your daily routine. 

It's more than a garage door opener; it's peace of mind, convenience, and a whole lot of extra time back in your day.

Wednesday, May 22, 2024

Unlock the Hidden Power of File Explorer with Alt+P

Unlock the Hidden Power of File Explorer with Alt+P.

Discover the transformative power of the Alt+P keyboard shortcut in Windows File Explorer and how it can streamline your file management for enhanced productivity.

By Rodger Mansfield, Technology Editor
May 22, 2024


Have you ever found yourself lost in the labyrinth of files and folders on your computer? 

Ever spend ages clicking through files just to see what's inside?

Do you crave a more efficient way to preview content without opening each file? 

Here's a Cool Tip.  Use the simple yet powerful shortcut: Alt+P.

In Windows, pressing Alt + P toggles the display of the preview pane in File Explorer. 


This allows you to view the contents of a selected file, such as an image or document, without having to open it in a separate application. 

It’s a handy shortcut for quickly viewing files and managing your documents more efficiently.

Here's how to do it.
  1. Open Windows File Explorer.
  2. Navigate to the folder containing your files.
  3. Select a file you wish to preview.
  4. Press Alt+P to toggle the Preview Pane.
  5. The selected file’s preview will appear on the right side of the window.
File Explorer Alt P
fig. 1 - File Explorer Alt P

This keyboard shortcut allows you to preview without opening files.

This saves time, enhances workflow and reduces the need for multiple windows.

Of course, you can always click the "Preview" in the top right of the screen too.

Found this tip helpful? 

Share your thoughts below and spread the word on social media to help others boost their productivity!


READ MORE

Please LIKE and SHARE OneCoolTip.com!
Never miss a Cool Tip: OneCoolTip Newsletter.

Do you have a Cool Tip or question? Email us at onecooltip.com@gmail.com


Rodger Mansfield, a seasoned tech expert, is the mastermind behind OneCoolTip.com, where he serves as both writer and editor. With a keen eye for simplifying complex tech, Rodger delivers practical advice that empowers readers to navigate the digital world with confidence. Dive into OneCoolTip.com for a treasure trove of savvy tips and tricks that keep you one step ahead in tech.


OneCoolTip.com
Cool Tech Tips for a Cooler Life!


#WindowsTips #FileExplorer #KeyboardShortcuts #ProductivityHacks #TechSavvy #WindowsWednesday #TechTips #OneCoolTip @OneCoolTip


Copyright © 2024 | www.OneCoolTip.com | All Rights Reserved

Tuesday, May 21, 2024

Never Miss an Update Again: How Microsoft Edge’s New Notifications Keep You Ahead

Never Miss an Update Again: How Microsoft Edge’s New Notifications Keep You Ahead

Embrace the simplicity of staying current with Microsoft Edge’s new update notifications, ensuring your browser is always at its best.

By Rodger Mansfield, Technology Editor
May 21, 2024


Are you tired of manually checking for browser updates? 

Did you know that the latest Microsoft Edge update can now alert you before you even think to check? 

Here's a Cool Tip.  Use the new Browser Essential Update icon.

Microsoft Edge version 124 and after simplifies the update process with a new :Red Alert" Browser Essential update icon. 

When an update is available, this red alert will appear on the Browser Essentials icon in your toolbar. 

By selecting the Browser Essentials icon, a side panel will open, displaying a Recommended action at the top right, alerting you that a new update is ready for your browser. 

This feature is designed to make it easy for you to keep your browser up-to-date with the latest features and security enhancements.

Here's how to do it.
  1. Open Microsoft Edge browser.
  2. Look at the upper-right hand corner of the screen for the "Browser Essential" icon.
  3. A Red Alert notification appears on the Browser Essentials icon, signaling an update.
  4. Select the Browser Essentials icon to open a side panel with a Recommended action alert for updating.
  5. Select Restart Now.

Microsoft Edge Browser Essential Update Alert
fig. 1 - Microsoft Edge Browser Essential Update Alert


fig. 2 - Restart Now


Stay protected against spyware, malware, and viruses, and benefit from performance improvements and bug fixes with updates to Microsoft Edge.

With Microsoft Edge version 124 and later, updating is a breeze. 

The new notification system is a game-changer, ensuring you’re always equipped with the latest advancements in browser technology.

Don’t wait and let pending updates linger. 

Update your Microsoft Edge when you get the notification. 

Just open Browser Essentials and select Restart now.

Share your thoughts on Microsoft Edge’s new update notifications and join the conversation!


READ MORE


Please LIKE and SHARE OneCoolTip.com!
Never miss a Cool Tip: OneCoolTip Newsletter.

Do you have a Cool Tip or question? Email us at onecooltip.com@gmail.com


Rodger Mansfield, a seasoned tech expert, is the mastermind behind OneCoolTip.com, where he serves as both writer and editor. With a keen eye for simplifying complex tech, Rodger delivers practical advice that empowers readers to navigate the digital world with confidence. Dive into OneCoolTip.com for a treasure trove of savvy tips and tricks that keep you one step ahead in tech.


OneCoolTip.com
Cool Tech Tips for a Cooler Life!


#MicrosoftEdgeUpdate #BrowserEssentials #StaySecure #UpdateAlert #TechTips @OneCoolTip @OneCoolTip 

Copyright © 2024 | www.OneCoolTip.com | All Rights Reserved

Monday, May 20, 2024

Essential Keyboard Shortcuts for Word, Excel, and PowerPoint

Essential Keyboard Shortcuts for Word, Excel, and PowerPoint

Elevate your Microsoft 365 experience with our expert guide to the most essential keyboard shortcuts for Word, Excel, and PowerPoint.

By Rodger Mansfield, Technology Editor
May 20, 2024


Are you ready to streamline your workflow and enhance productivity? 

Have you considered the untapped potential of keyboard shortcuts at your fingertips?

Here's a Cool Tip.  Use these popular keyboard shortcuts when using Microsoft Word, Excel or PowerPoint.

Microsoft 365, formerly known as Office 365, is a comprehensive suite of productivity applications designed to cater to various personal, business, and educational needs. 

It includes familiar applications such as Word, Excel, and PowerPoint, which are now bolstered with innovative features and cloud services for enhanced collaboration and security.

Learning keyboard shortcuts can boost your productivity.


Here's how to do it.

Microsoft Word:
  • Ctrl + C / Ctrl + V / Ctrl + X - Copy selected text or graphics to the clipboard with Ctrl + C. Use Ctrl + V to insert or Ctrl + X to remove the content, optimizing your document editing flow.
  • Ctrl + Z / Ctrl + Y - Made a mistake? Hit Ctrl + Z to undo it. Want to reverse the undo? Ctrl + Y is your go-to command for redoing actions.
  • Ctrl + S - Never worry about losing your progress again. Press Ctrl + S frequently to save your document, securing your hard work in seconds.

Microsoft Excel:
  • Ctrl + Arrow Keys - Navigate through your spreadsheet with precision using Ctrl + Arrow Keys, jumping to the edge of data regions effortlessly.
  • Ctrl + Shift + L - Manage large datasets like a pro. Activate filters with Ctrl + Shift + L and analyze your data with just a few keystrokes.
  • Alt + E, S, V - Take control of how you paste your data. Alt + E, S, V opens the Paste Special dialog, giving you options to paste exactly what you need.

Top Keyboard Shortcuts - Word, Excel PowerPoint


Microsoft PowerPoint:
  • F5 - Launch into your presentation seamlessly with F5, starting from the very first slide.
  • Ctrl + M - Need a new slide? Ctrl + M adds a fresh one to your deck instantly, keeping your creative flow uninterrupted.
  • Ctrl + Shift + C / Ctrl + Shift + V - Ensure visual consistency across your slides. Use Ctrl + Shift + C to copy formatting and Ctrl + Shift + V to paste it elsewhere.

Keyboard shortcuts are a boon for efficiency, offering quick access to functions without the mouse. 

 Mastering these keyboard shortcuts is a game-changer for anyone looking to optimize their Microsoft 365 usage, making every task quicker and more intuitive.

Maximize your Microsoft 365 efficiency with these shortcuts and share your success stories in the comments below. 

Don’t forget to spread the word with our hashtags!


READ MORE


Please LIKE and SHARE OneCoolTip.com!
Never miss a Cool Tip: OneCoolTip Newsletter.

Do you have a Cool Tip or question? Email us at onecooltip.com@gmail.com


Rodger Mansfield, a seasoned tech expert, is the mastermind behind OneCoolTip.com, where he serves as both writer and editor. With a keen eye for simplifying complex tech, Rodger delivers practical advice that empowers readers to navigate the digital world with confidence. Dive into OneCoolTip.com for a treasure trove of savvy tips and tricks that keep you one step ahead in tech.


OneCoolTip.com
Cool Tech Tips for a Cooler Life!


#Microsoft365Tips #ShortcutMastery #ProductivityBoost #WorkflowWizard #OfficeEfficiency #TechTips #OneCoolTip @OneCoolTip 


Copyright © 2024 | www.OneCoolTip.com | All Rights Reserved

Sunday, May 19, 2024

How to Silence Annoying iMessage Threads on Your iPhone

How to Silence Annoying iMessage Threads on Your iPhone

Drowning in notifications from a chatty group text?  Learn how to quickly mute iMessage threads on your iPhone and enjoy some peace and quiet without leaving the conversation.

By Rodger Mansfield, Technology Editor
May 19, 2024


iMessage
Is your iPhone buzzing non-stop with notifications from a group chat gone wild? 

Does your iPhone sound like it's hosting a rave every 5 minutes?

Maybe it's a family thread with endless GIFs, a work group that won't quit, or that friend who just discovered emojis.  

Don't worry, you don't have to resort to silencing your entire phone – there's a better way! 

iMessage allows you to mute specific threads, giving you control over which conversations demand your immediate attention.

Here's how to do it.
  1. Open the Messages app.
  2. Locate and tap the conversation you want to mute.
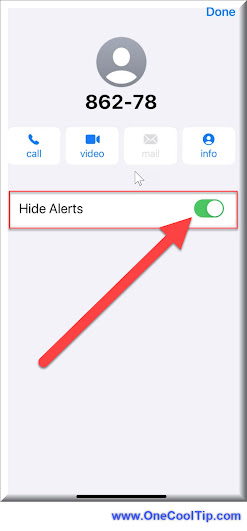
  3. Tap the contact names or group name to open the details screen for the conversation.
  4. Toggle "Hide Alerts" to the "on" position.
 
Mute iMessage Thread
fig. 1 - Mute iMessage Thread


Mute those conversations that aren't urgent so you can focus on what matters.

You won't miss out on important messages in the long run – they'll still be there when you're ready.

Have you tried muting iMessage threads? 

What's your go-to strategy for dealing with chatty group texts?

Share your thoughts and experiences in the comments below!  

And don't forget to share this article with your friends who need a little more digital peace in their lives.


READ MORE

Please LIKE and SHARE OneCoolTip.com!
Never miss a Cool Tip: OneCoolTip Newsletter.

Do you have a Cool Tip or question? Email us at onecooltip.com@gmail.com


Rodger Mansfield, a seasoned tech expert, is the mastermind behind OneCoolTip.com, where he serves as both writer and editor. With a keen eye for simplifying complex tech, Rodger delivers practical advice that empowers readers to navigate the digital world with confidence. Dive into OneCoolTip.com for a treasure trove of savvy tips and tricks that keep you one step ahead in tech.


OneCoolTip.com
Cool Tech Tips for a Cooler Life!


 #iMessage #Notifications #DigitalDetox #TechTips @OneCoolTip @OneCoolTip


Copyright © 2024 | www.OneCoolTip.com | All Rights Reserved

Saturday, May 18, 2024

Embrace the Dark Side: Google Drive Gets a Sleek Makeover with Dark Mode

Embrace the Dark Side: Google Drive Gets a Sleek Makeover with Dark Mode

Google Drive's new Dark Mode is here to save your eyes and boost your productivity. Learn how to enable it on web and mobile.

By Rodger Mansfield, Technology Editor
May 18, 2024


Google Drive
Are your eyes tired of staring at bright screens all day? 

Do you find yourself squinting at Google Drive in low-light conditions? 

Here's a Cool Tip.  Change your Google Drive settings.

The wait is over! 

Google Drive's highly anticipated Dark Mode is now available on both web and mobile apps, offering a more comfortable and visually appealing experience.

Google Drive is a cloud storage and synchronization service developed by Google. It allows users to:
  • Store files: You can upload and store various types of files, including documents, photos, videos, and more, in the cloud.
  • Access files from anywhere: You can access your files from any device with an internet connection, whether it's a computer, smartphone, or tablet.
  • Share files: You can easily share files and folders with others, giving them permission to view, edit, or comment.
  • Collaborate in real-time: Multiple people can work on the same document simultaneously, seeing each other's changes in real-time.
  • Create and edit documents: Google Drive includes a suite of productivity tools (Google Docs, Sheets, Slides) for creating and editing documents, spreadsheets, and presentations directly in the cloud.
Essentially, Google Drive provides a convenient and accessible way to store, manage, and collaborate on your files, regardless of your location or device.

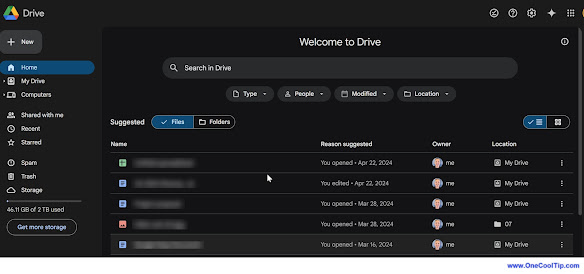
And now you can use it in "Dark Mode".

Google Drive Dark Mode
fig. 1 - Google Drive - Dark Mode


Here's how to do it.

Web:

  1. Go to drive.google.com.
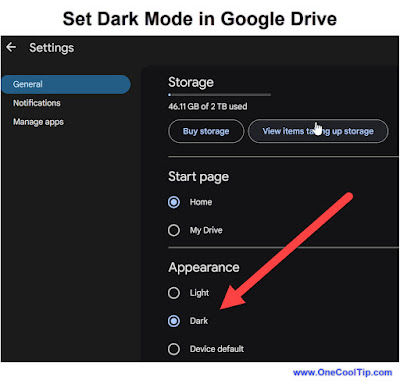
  2. Click on the gear icon (Settings) in the upper right corner.
  3. Select "Theme."
  4. Choose "Dark" from the options.
Set Dark Mode in Google Drive
fig. 2 - Set Dark Mode in Google Drive


iOS:
  1. Dark Mode in the iOS app is linked to your device's system-wide settings.
  2. Go to Settings, then tap Display & Brightness.
  3. Select Dark to turn on Dark Mode.

Android:
  1. Dark Mode in the Android app is linked to your device's system-wide settings.
  2. Go to your device's Settings app.
  3. Find "Display" or "Theme" (the exact location may vary depending on your device).
  4. Enable Dark Mode.

Darker interfaces can be easier on the eyes, especially in low-light environments.

Whether you're a night owl, a power user, or simply looking for a visual refresh, Google Drive's Dark Mode is a welcome addition. 

While it may not be perfect for everyone, its benefits in terms of eye strain reduction and potential battery savings make it worth trying out. 

Give Google Drive's Dark Mode a try and see if it improves your workflow and reduces eye strain. 

Your eyes will thank you!


READ MORE

Please LIKE and SHARE OneCoolTip.com!
Never miss a Cool Tip: OneCoolTip Newsletter.

Do you have a Cool Tip or question? Email us at onecooltip.com@gmail.com


Rodger Mansfield, a seasoned tech expert, is the mastermind behind OneCoolTip.com, where he serves as both writer and editor. With a keen eye for simplifying complex tech, Rodger delivers practical advice that empowers readers to navigate the digital world with confidence. Dive into OneCoolTip.com for a treasure trove of savvy tips and tricks that keep you one step ahead in tech.


OneCoolTip.com
Cool Tech Tips for a Cooler Life!


#GoogleDrive #DarkMode #Productivity #TechTips #EyeHealth #OneCoolTip @OneCoolTip


Copyright © 2024 | www.OneCoolTip.com | All Rights Reserved