Showing posts with label iPhone. Show all posts

Saturday, November 18, 2023

Unlock a Hidden Feature to Help You Find Your iPhone

Mobile Phone Ping
Have you ever misplaced your iPhone and frantically searched for it only to find it tucked away in a dark corner of your room? 

Fortunately, there's a hidden feature on your Apple Watch that can help you out in these situations.

We've already shown how to Ping your iPhone from your Apple Watch.

But here's an even Cooler, Cool Tip.   Long press and hold the Find My Phone button to also make the phone's LED light and flash.

Here's how to do it.
  • Swipe up from the watch face (or press the Side button if you're running watchOS 10 or later).
  • Press and hold the Find My iPhone button.
  • Your iPhone will both ping and the LED will flash.
Apple Watch - Find My Phone

fig. 1 - Apple Watch - Find My Phone


You'll find your iPhone even when you can't easily see it!

Enjoy!

Please LIKE and SHARE OneCoolTip.com!
Visit the OneCoolTip YouTube Channelhttps://www.youtube.com/@onecooltip
READ MORE


OneCoolTip.com
Cool Tech Tips for a Cooler Life

#Apple @Apple #Watch #applewatch #iphone #findmyiphone #flashlight #hiddenfeature #techtips #OneCoolTip @OneCoolTip

Saturday, November 11, 2023

How to Use the Sensitive Content Warning Feature in iOS 17

iOS17
Have you ever received an unexpected explicit photo or video on your iPhone or iPad?

Do you worry about your kids seeing inappropriate content online?

Here's a Cool Tip.  Use the new Sensitive Content Warning feature in iOS 17.

iOS 17 is the latest version of Apple's mobile operating system for the iPhone and iPad and it includes the Sensitive Content Warning feature.

The Sensitive Content Warning feature in iOS 17 is a new tool that can help you protect yourself and your family from unwanted explicit content. 

The new feature works by scanning incoming messages, photos, and videos for nudity and other sensitive content. 

If it finds anything, it will blur the content and show you a warning before you open it.

This feature can be especially helpful for parents who want to make sure their kids don't see inappropriate content. 

But it can also be useful for adults who don't want to be surprised by explicit content when they're checking their messages or photos.

Here's how to do it.
  • Open the Settings app on your iPhone or iPad.
  • Scroll down and tap Privacy & Security.
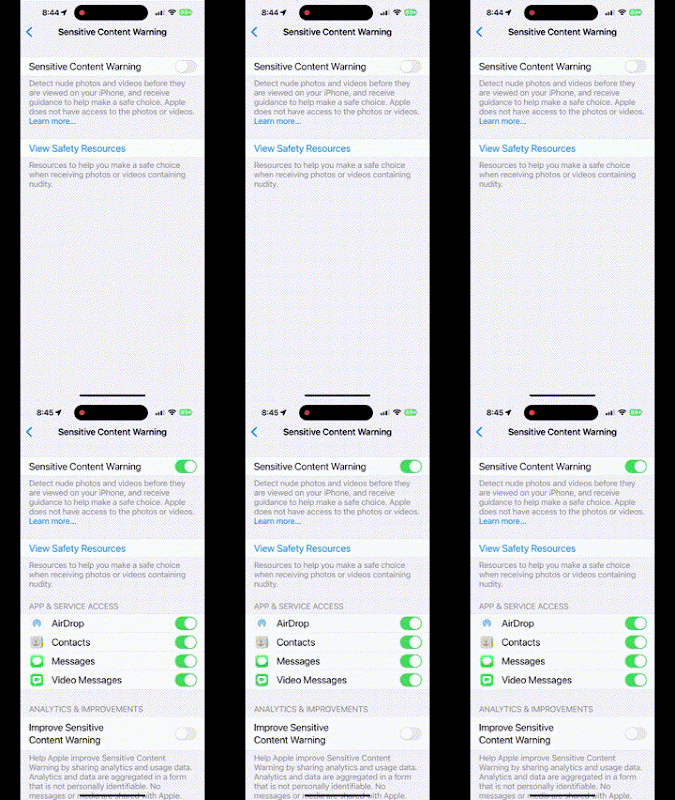
  • Scroll down and tap Sensitive Content Warning.
  • Toggle on the Sensitive Content Warning switch.
You can configure the Sensitive Content Warning feature to allow or block specific types of content. 

For example, you can allow the feature to blur nudity, but not other types of sensitive content.
  • Under App & Service Access, tap on the app or service that you want to configure.
  • Toggle on or off the switch for the types of content that you want to blur.

iOS17 iPhone Sensitive Content Warning Setting

fig. 1 - iOS17 iPhone Sensitive Content Warning Setting


The Sensitive Content Warning feature in iOS 17 is a powerful new tool that can help you protect yourself and your family from unwanted explicit content.

It's easy to use and configure, and it can be a valuable addition to your online safety toolkit.

Here are a few additional tips for protecting yourself and your family from unwanted explicit content online:
  • Talk to your kids about online safety and the dangers of explicit content.
  • Use parental controls on your devices to block access to inappropriate websites and apps.
  • Be careful about what information you share online.
  • Be aware of the risks of phishing scams and malware.
For more information on protecting kids online, check out the US FTC site.

By following these tips, you can help keep yourself and your family safe online.

Enjoy!

Please LIKE and SHARE OneCoolTip.com!
Visit the OneCoolTip YouTube Channelhttps://www.youtube.com/@onecooltip


READ MORE

OneCoolTip.com
Cool Tech Tips for a Cooler Life

#Apple @Apple #iPhone #iOS #iPad #iOS17 #SensitiveContentWarning #ChildSafety #OnlineSafety #FamilyTechnology #TechTips #OneCoolTip @OneCoolTip

Saturday, November 4, 2023

New iOS 17 Feature Makes iMessage Apps More Customizable Than Ever

iOS17
Do you find yourself constantly scrolling through your iMessage apps to find the one you're looking for? 

If so, you're not alone. 

Here's a Cool Tip.   Customize the order of your iMessage apps.

With iOS 17, Apple has introduced a new feature that makes it easier than ever to customize your iMessage app drawer.

You can rearrange your iMessage apps to put your most-used apps at the top of the list. 

You can even add more apps to the top row, so you can have all of your favorite apps within easy reach.

Here's how to do it.
  1. Open the iMessage app and start any conversation.
  2. Tap the "+" button next to the text input field.
  3. Swipe up to see all of your iMessage apps.
  4. Tap and hold on the app you want to move, and then drag it to the desired location.
  5. Release your finger to drop the app in its new location.
Rearrange iMessage Apps

fig. 1 - Rearrange iMessage Apps


The main benefit of rearranging your iMessage apps is that it makes it easier to find the apps you use the most. 

This can save you time and frustration, especially if you have a lot of iMessage apps installed.

Enjoy!

Please LIKE and SHARE OneCoolTip.com!
Visit the OneCoolTip YouTube Channelhttps://www.youtube.com/@onecooltip

READ MORE

OneCoolTip.com
Cool Tech Tips for a Cooler Life


#Apple @Apple #iPhone #iOS #iOS17 #iMessage #iMessageApps #TechnologyTips #ProductivityTips #TechTips #OneCoolTip @OneCoolTip 

Thursday, November 2, 2023

How to Move the Address Bar in Chrome for iPhone

Chrome Logo for iPhone
Do you have difficulty reaching the address bar at the top of the screen when using Chrome on your iPhone? 

You're not alone. 

Here's a Cool Tip.  Move the address bar to the bottom of the screen, where it would be easier to reach with one thumb.

Google has finally released a new Chrome feature for iOS that allows you to move the address bar to the bottom of the screen, or back to the top if you prefer.

Sorry Android users.

The main benefit of moving the address bar to the bottom of the screen is that it makes it easier to reach with one thumb. 

This is especially useful for people with larger iPhones, or for people with limited mobility in their hands.

Here's how to do it.
  1. Open Chrome on your iPhone.
  2. Long-press on the address bar.
  3. Tap "Move address bar to bottom."
  4. To move the address bar back to the top of the screen, follow the same steps, but tap "Move address bar to top" instead.

Move Chrome Address bar on iPhone

fig. 1 - Move Chrome Address Bar on iPhone


You can configure the new Chrome feature to move the address bar to the bottom of the screen in the Chrome settings app. 
  1. Open the Chrome settings app.
  2. Tap "Address bar."
  3. Under "Position," tap "Bottom."
  4. You can also move the address bar to the top of the screen from this menu.
Chrome Address bar Setting iPhone

fig. 2 - Chrome Address Bar Setting iPhone


The new Chrome feature to move the address bar to the bottom of the screen is a welcome addition for iOS users. 

It makes Chrome easier to use for people with larger iPhones, or for people with limited mobility in their hands. 

That's it!

Enjoy!


Please LIKE and SHARE OneCoolTip.com!
Visit the OneCoolTip YouTube Channelhttps://www.youtube.com/@onecooltip


READ MORE

OneCoolTip.com
Cool Tech Tips for a Cooler Life


#Google @Google #Chrome #iOS #iPhone #Apple @Apple #AddressBar #Bottom #Top #NewFeature #HowTo #TechTips #OneCoolTip @OneCoolTip

Wednesday, October 25, 2023

How to Use Apple's New Adaptive Audio and Conversation Awareness for AirPods Pro

Air Pods
Are you tired of having to adjust your AirPods' noise cancellation settings every time you want to talk to someone? 

Or maybe you're worried about missing important announcements because your AirPods are blocking out the world around you?

Here's a Cool Tip.  AirPod Adaptive Audio.

Apple's new Adaptive Audio and Conversation Awareness features for AirPods Pro (2nd Generation) are here to help. 

These features automatically adjust your AirPods' noise cancellation and transparency settings based on your environment and what you're doing.

Adaptive Audio
Adaptive Audio uses machine learning to automatically adjust the noise cancellation and transparency levels of your AirPods based on the ambient noise around you. 

For example, if you're in a quiet room, your AirPods will use more transparency to let you hear your surroundings. 

But if you're in a noisy environment, your AirPods will use more noise cancellation to block out the noise.

Conversation Awareness
Conversation Awareness is a sub-feature of Adaptive Audio that automatically lowers your media volume and enhances voices in front of you when you start talking. 

This makes it easy to have conversations without having to remove your AirPods or adjust the settings manually.

Here's how to do it.

To enable Adaptive Audio and Conversation Awareness, follow these steps:
  • Make sure your AirPods Pro (2nd Generation) are connected to your iPhone.
  • Open the Settings app.
  • Tap on AirPods Pro.
  • Under Noise Control, toggle on Adaptive.
  • To enable Conversation Awareness, toggle on the switch next to Conversation Awareness.
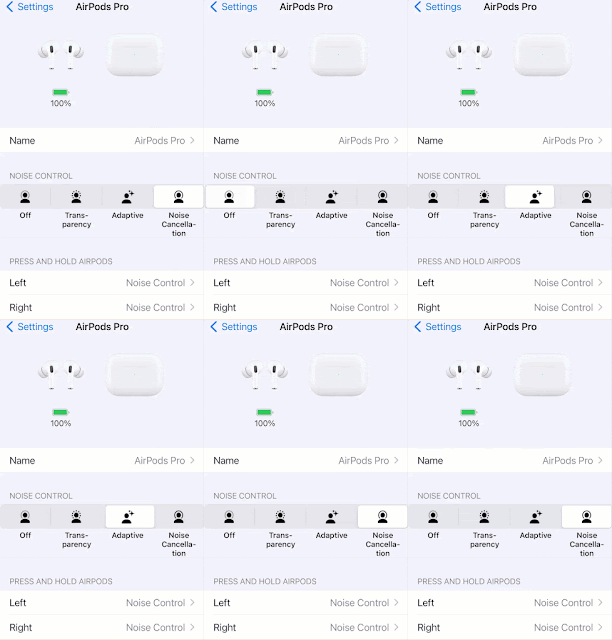
Air Pods Mode Selection
fig. 1 - Air Pods Mode Selection - Adaptive


Apple Air Pods Audio Setting
fig. 2 - Apple Air Pods Audio Setting

Additionally, Conversation Awareness can help you to stay connected to your environment and avoid missing important announcements.

Looking for other iOS15 updates?  Check out these iOS 17 Cool Tips:

Please LIKE and SHARE OneCoolTip.com!
Visit the OneCoolTip YouTube Channelhttps://www.youtube.com/@onecooltip


READ MORE

OneCoolTip.com
Cool Tech Tips for a Cooler Life

#Apple @Apple #AirPods #AdaptiveAudio #ConversationAwareness #AirPodsPro #iOS17 #NoiseCancellation #Transparency #TechTips #OneCoolTip @OneCoolTip


Wednesday, October 18, 2023

How to Use the New iPhone Camera Level in iOS 17 to Take Straighter Photos

iOS17
Have you ever taken a photo that looked crooked, even though you thought you were holding your iPhone level? 

Here's a Cool Tip.  Use the new iOS1 17 camera level.

The new camera level feature in iOS 17 is a simple and effective way to take straighter photos.

When the line is yellow, your phone is level. 

This can be helpful for taking straighter photos of landscapes, buildings, and other objects.

Here's how to do it:
  1. Open the Settings app.
  2. Scroll down and tap Camera.
  3. Under Composition, toggle on the switch next to Level.

iOS17 Camera Level Settings
fig. 1 - iOS17 Camera Settings

4. Open the Camera app.
5. Point your phone at the object you want to photograph.

fig. 2 - iOS17 Camera Level Broken Line

        6. Tilt your phone until the horizontal line turns yellow.


        7. Take your photo!

That's it.


Enjoy!

Please LIKE and SHARE OneCoolTip.com!

READ MORE

OneCoolTip.com
Cool Tech Tips for a Cooler Life


#Apple @Apple #iOS17 #camera #cameralevel #iPhonephotography #straightphotos #composition #Technology, #Tech, #Gadgets, #Innovation, #TechNews #Digital, #AI #IoT #FutureTech #TechLife4 #TechTips #OneCoolTip @OneCoolTip 

Sunday, October 15, 2023

How to Use the New iOS17 iPhone Auto Delete Verification Codes Feature

iOS 17
Do you ever forget to delete your verification codes after you use them? 

This can be a security risk, as anyone who has access to your phone could potentially use them to log into your accounts.

Here's a Cool iPhone tip.  Use the new Auto Delete Verification feature in iOS17.

With iOS17, Apple has introduced a new feature that allows you to automatically delete verification codes after you use them. 

This is a great way to improve your security and keep your accounts safe.

Here's how to do it.
  • Go to Settings.
  • Tap Passwords.
  • Tap Password Options.
  • Toggle on Clean Up Automatically.
  • This will automatically delete verification codes after you use them in the Messages and Mail apps.
iOS17 Auto Delete Verification Codes


Here's an example of how this works.
  • You are trying to log into your bank account
  • You receive a verification code via SMS
  • You enter the code into the bank's website and log in.
  • If you have enabled the auto delete verification codes feature, your iPhone will automatically delete the verification code from the Messages app after you use it.
The new auto delete verification codes feature in iOS17 is a great way to improve your security and keep your accounts safe. Be sure to enable this feature to help protect your privacy and data.

iOS 17 has many new and exciting features.

Check out these iOS 17 Cool Tips:


Enjoy!


Please LIKE and SHARE OneCoolTip.com!


READ MORE

OneCoolTip.com
Cool Tech Tips for a Cooler Life


#Apple @Apple #iOS17 #verificationcodes #autodelete #iphone #technology #TechTips #OneCoolTip @OneCoolTip 
Sunday, October 8, 2023

How to Set Search Engines for iPhone iOS17

What is your favorite search Engine?

Google?   Duck, Duck, Go?   YAHOO?

Do you want to use a different search engine on your iPhone, or set a different search engine for private browsing? 

Here's a Cool Tip.  Change your search engine setting in iOS 17.

This is a great way to improve your privacy and have more control over your search experience.

Here's how to do it.
  • Open the Settings app.
  • Scroll down and tap Safari.

iPhone Safari Search Settings
fig. 1 - iPhone Safari Search Settings

  • Under the Search section, tap Search Engine.
  • Choose a search engine from the list.
iPhone Search Engine
fig. 2 - iPhone Search Engine

  • Choose Safari to return.
  • To set a different search engine for private browsing, tap Private Search Engine.
  • Choose a search engine from the list.
iPhone Private Search Engine
Fig.3 - iPhone Private Search Engine

  • Use Default Search Engine (under Private Search Engine): This will use the same search engine for private browsing as you set for regular browsing.
You can choose from five different search engines: Google, Yahoo, Bing, DuckDuckGo, and Ecosia.

If you're concerned about your privacy, you may want to consider using a search engine like DuckDuckGo, which doesn't track your searches.

You can also change your search engine at any time by following the steps above.

Setting a search engine and private search engine for iPhone iOS17 is a great way to improve your privacy and have more control over your search experience. 


Enjoy!

Please LIKE and SHARE OneCoolTip.com!


READ MORE

OneCoolTip.com
Cool Tech Tips for a Cooler Life


#Apple #iPhone #iOS #iOS17 #SearchEngine #Privacy #iPhone #Technology #TechTips #OneCoolTip @OneCoolTip 

Thursday, October 5, 2023

How to Ping Your Apple Watch from Your iPhone

iOS17
Have you ever misplaced your Apple Watch and couldn't find it? 

Did you set it down upstairs or downstairs?

Where is it?

Here's a Cool Tip.  Ping it.

iOS 17 includes a new feature that allows you to ping your Apple Watch from your iPhone.

This new feature is very simple to use. 

Here's how to do it.
  • Open the Control Center on your iPhone.
  • Tap on the Ping My Watch button.
  • Your Apple Watch will then emit a loud beep, making it easy to find.
iOS17 Ping My Watch
fig. 1 - iOS17 Ping My Watch


By default, the Ping My Watch button is not included in the Control Center. 

To add it, follow these steps:
  • Open the Settings app on your iPhone.
  • Tap on Control Center.
  • Under More Controls, tap on the + button next to Ping My Watch.

Control Center Settings
fig.2 - iOS17 Ping My Watch Setting

The new Ping My Watch feature in iOS 17 is a great way to quickly find your Apple Watch if you misplace it. 

OneCoolTip recommends adding the Ping My Watch button to your Control Center so that you can easily access it when you need it.


Enjoy!


Please LIKE and SHARE OneCoolTip.com!

READ MORE

OneCoolTip.com
Cool Tech Tips for a Cooler Life

#Apple @Apple #iPhone #iOS17 #AppleWatch #PingMyWatch #TechTips #OneCoolTip @OneCoolTip 

Wednesday, September 27, 2023

How to Use Standby Mode in iOS 17

Do you wake up in the middle of the night to check the time on your iPhone, only to be blinded by the bright screen? 

Here's a Cool Tip.  Use the new Standby Mode.

Standby Mode is a new feature in iOS 17 that turns your iPhone into a bedside alarm clock or status board. 

It displays the time, date, and other important information in a large, easy-to-read format, with a dimmed screen that's less disruptive to sleep.

Here's how to use Standby Mode:
  1. Ensure you are on the new iOS 17 for your iPhone.
  2. Plug your iPhone into a charger and place it on a nightstand or other flat surface in landscape mode.
  3. Your phone will automatically switch to Standby Mode. 
    • If it doesn't, you can manually enable it by going to Settings > Standby  and toggling on the switch.
  4. Once Standby Mode is enabled, you'll see a large clock display on your screen. 
  5. You can also see other information, such as the date, weather, and upcoming calendar events.
  6. To turn off Standby Mode, simply pick up your phone or press any button.
iOS 17 Nightstand Mode
fig. 1 - iOS 17 Standby Mode

To customize,
  • Long-press either the clock or calendar
  • Unlock your phone if required
  • Customize one or both sides of the display 
  • Tap the plus icon in the upper left of the screen to add a widget 
  • Remove a widget by tapping the minus icons. 
Enjoy!

Please LIKE and SHARE OneCoolTip.com!


READ MORE

OneCoolTip.com
Cool Tech Tips for a Cooler Life


#Apple @Apple #iOS17 #iPhone #Nightstand #Mode #NightstandMode #Apple #SleepTech #Technology #Gadgets #TechTips #OneCoolTip @OneCoolTip

Saturday, September 23, 2023

How to Set Multiple Timers in iOS 17

iOS 17
Do you ever need to use multiple timers at the same time? 

Maybe you're cooking a meal, doing laundry, and working on a project. 

Here's a Cool Tip: Try the new Multiple Timers Feature in iOS 17.


Here's how to do it.

iPhone
  • Open the Clock app.
  • Tap on the Timers tab.
  • Tap on the + (plus) button to create a new timer.
  • Set the duration of the timer and tap on Start.
  • Press the + (plus) sign to create a new timer.
  • You can have up to five timers running at the same time.

iOS Multiple Timers
fig. 1 - iOS Multiple Timers


Apple Watch
  • Open the Timers app.
  • Create and start a timer.
  • Press the + (plus) sign to create a new timer.
  • You can have up to five timers running at the same time.
Siri


To use Siri to set multiple timers in iOS 17, you can say something like:
  • "Hey Siri, set a timer for 10 minutes."
  • "Hey Siri, set a timer for 20 minutes called 'laundry.'"
  • "Hey Siri, set a timer for 30 minutes called 'cooking.'"
  • You can continue to give Siri instructions to set multiple timers. 
  • Siri will keep track of all of the timers that you set and will notify you when each timer expires.

Here are some examples of how to use Siri to control multiple timers:
  • "Hey Siri, pause the cooking timer."
  • "Hey Siri, resume the laundry timer."
  • "Hey Siri, how much time is left on the laundry timer?"
  • "Hey Siri, stop all timers."
  • You can also use Siri to view a list of all of your active timers. To do this, say "Hey Siri, show me my timers."

Multiple timers is a great new feature in iOS 17 that can help you boost your productivity.

Enjoy!

Please LIKE and SHARE OneCoolTip.com!


READ MORE

OneCoolTip.com
Cool Tech Tips for a Cooler Life


#Apple @Apple #iPhone #iOS #MultipleTimers #iOS17 #ClockApp #Productivity #TechTips #OneCoolTip @OneCoolTip