Showing posts with label Microsoft Outlook. Show all posts

Monday, April 10, 2023

How to Attach Documents to Microsoft Outlook Messages Inside the Message

Microsoft Outlook
Do you struggle with attaching documents to your Outlook messages? 

Do you want to include the message INSIDE the message body rather than at the top?

You may have noticed that sometimes attachments in your Outlook email are at the top of the message while other times the documents are attached inside the message body itself.

Here's how to do it either way.

To attach a file from your computer in Outlook, follow these steps:

  • Reply, Forward or create a new email message.
  • Select InsertAttach File then Browse This PC.
  • Choose the file you want to attach and select Open.
  • To attach more than one file, hold CTRL (or Command in Mac) while selecting multiple files.
  • Select the file to attach to your message.
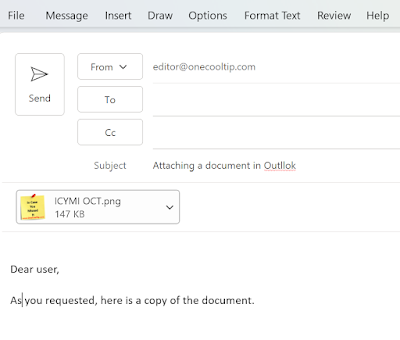
    • The file will be attached at the top of your message (under the subject line).
    • This is because your message format is most likely set as HTML
Microsoft Outlook Attachment
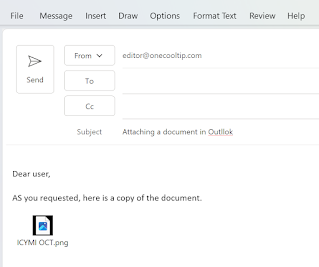
  • If you want to insert a document as an file icon inside the message body, select the Format Text  tab in the ribbon, then Format, Message Format, select Rich Text.
Microsoft Outlook Format Message
    • The file will be included inside your message.
Microsoft Outlook Attachment Rich Text

  • This can be useful when you want to each file or ensure the recipient knows what is different about each file you've attached.
  • The Message format determines where the attachment is located:
    • HTML and Plain Text formats will put the attachment at the top in the header.
    • Rich Text format will put the attachment INSIDE the message body.

That's it!

Please Like and Share OneCoolTip.com!

READ MORE
#Microsoft @Microsoft #MicrosoftOutlook, #EmailTips, #ProductivityHacks, #TechBlog #HowTo #OneCoolTip

Friday, October 23, 2015

How to Insert a Screenshot in Microsoft Power Point, Excel, Word or Outlook

We've told you before how the Windows Snipping app is great for adding screenshots to a document.

And the Windows 10 version is even better with a delayed timer.

But Microsoft Office products, Power Point, Excel, Word and Outlook, also have a built-in tool to insert screenshots.

Here's how to do it.

  1. Click the "Insert" menu on the Office Ribbon.  Then select "Screenshot".
  2. To add the entire window, click the thumbnail view of the available windows.
  3. To add part of a window, click "Screen Clipping".  Press and hold the left mouse button to select the screen area to capture.


That's it.  It's easy to add an entire screen or just a part into your presentation, document, spreadsheet or email.

Enjoy!


Tuesday, October 6, 2015

New Smart Lookup in Microsoft Office 2016

Quickly Find What You Need to Know Without Leaving Word, Excel, Power Point or Outlook

Microsoft Office 2016 products have a great new search option, Smart Lookup.

Smart Lookup is a new feature that brings the power of Bing to users within the four Office 2016 applications.  Highlight search keywords and right-click to select Smart Lookup to display results in an "Insight" window within the application.

Office 2016 Smart Lookup

You can also select the keywords and then select the "Smart Lookup" in the Review menu on the Office Ribbon.

Smart Lookup Insights

Smart Lookup is also a part of the new Tell Me feature that we shared earlier.  Just enter keywords into the Tell Me box and select "Smart Lookup" from the dropdown list  to display information as well.


READ MORE

OneCoolTip.com
Cool Tech Tips for a Cooler Life!

#Microsoft #Word #SmartLookup #Smart #Lookup #Office2016

Monday, August 31, 2015

Use This Keyboard Shortcut to Access The Ribbon Menu Bar in Word, Excel, Power Point and Outlook

Microsoft Office logo
When using Microsoft Office products such as Excel, Word, Power Point and Outlook, you can save time with a very cool keyboard shortcut.

Press the ALT key to access any Ribbon command.

Block letters will appear next to each command on the Ribbon bar.

ALT keyboard shortcut Microsoft Office Word - One Cool Tip www.onecooltip.com

Pressing a subsequent letter such as H will display will display the Home submenu.

ALT keyboard shortcut Microsoft Office Word H - One Cool Tip www.onecooltip.com

Select the command you want by pressing the desired letter key.

To go back one level, press the ESC key.  And press ALT key to turn off this function.

Enjoy!


READ MORE

One Cool Tip.com
Cool Tech Tips for a Cooler Life!

#Microsoft #Excel #Word #PowerPoint #ALT #keyboard #shortcut

Tuesday, August 18, 2015

Tell Outlook Where to Search

Can't find something in Outlook?

You may not be looking in the right place.

Outlook is the default email software used in most companies and usually connects to a company's Exchange server to provide access to email, calendar, contacts and To-Do lists.

Users can also connect to other mailservers, mailboxes and accounts.

But after a while, it can become terribly difficult to find an item within all of these connected sources.

There are several ways to tell Outlook where to search for an email.

By default, Outlook will search the current mailbox.  

But you can change that.  

Go to File -> Options -> Search to display the search options.


Microsoft Outlook Search Options

You can now change the default search location to the Current folder, remain as the Current folder but also search the mailbox when search from the Inbox, the current mailbox or All Mailboxes.

Select an option and then click OK to change the default search option.

You can also change the search on a search-by-search basis.  Select the dropdown option to the right of the search box.


Microsoft Outlook Search

Finally, you can change the search location, access the advanced search screen and display the Search Options screen from the Search Tools link on the File ribbon menu bar.


Happy Searching!


READ MORE


One Cool Tip.com
Cool Tech Tips for a Cooler Life!

#Microsoft #Outlook #search