Thursday, December 21, 2023

How to Paste Text Without Formatting in Microsoft Word

Microsoft Word
Have you ever found yourself frustrated when pasting text from one Microsoft Word document to another, only to have the formatting completely disrupt your work? 

Ever wished for a simple way to paste plain, non-formatted text in Microsoft Word? 

Here's a Cool Tip.  Use the NEW Ctrl + Shift + V (Command + Shift + V on a Mac) shortcut.

What is the Ctrl + Shift + V Shortcut?

The Ctrl + Shift + V shortcut is a powerful tool that allows you to paste text without any formatting. 

It is also called “keep text only” or “paste plain text” and it is used in many other applications like Microsoft Teams, Google Docs, and Gmail. 

This can save you time and ensure consistency in your documents. 

Here's how to use it.
  • Copy the text you want to paste1.
  • Open your Microsoft Word document.
  • Position your cursor where you want the text to appear.
  • Press Ctrl + Shift + V (Command + Shift + V on a Mac).

Paste as Plain Text in Microsoft Word

fig. 1 - Paste as Plain Text in Microsoft Word


The Paste Text Only shortcut is now available in Word for Windows and Word Mac.

Now that you know how to paste text without formatting in Microsoft Word, why not give it a try? 

You’ll be amazed at how much time and hassle you can save with this simple trick.

And if you found this tip helpful, please share it with your friends and colleagues. 

You can also leave a comment below and let us know what you think. 

We’d love to hear from you!

Enjoy!

Please LIKE and SHARE OneCoolTip.com!
Visit the OneCoolTip YouTube Channelhttps://www.youtube.com/@onecooltip

For more Microsoft Word tips and tricks, check out these Cool Tips.

READ MORE

OneCoolTip.com
Cool Tech Tips for a Cooler Life


#Microsoft @Microsoft #Word #MicrosoftWord #WordTips #Productivity #TechTips #OneCoolTip @OneCoolTip 

Wednesday, December 20, 2023

How to Check-In on an iPhone

iOS17
Have you ever wondered how to keep your loved ones informed about your whereabouts without the hassle of constant updates? 

Or perhaps you’ve been concerned about a friend traveling alone late at night? 

Here's a Cool Tip.  Use the new iOS 17 iMessage Check-In feature. 


The Check-In feature provides peace of mind by automatically notifying your contacts when you’ve arrived somewhere safely. 

It’s particularly useful when you’re traveling alone or returning home late at night.

Here's how to do it.
  • Open the Messages app and choose or start a conversation with someone you want to Check In with.
  • Tap the plus sign, then More (if needed), then Check In.
  • Tap Edit and choose to send your Check In after a certain time or when you arrive at a location.
    • If you choose the location option, tap Change and search for the place you want to Check In at.
  • Choose how you’ll be traveling and how much information you want to share if you don’t Check In.
  • Tap Done and send your Check In message.
  • You can cancel the Check In if you want to.

iPhone Check In


Add time to your Check In
You can add time to your Check In.
  • Open the Messages app.
  • Open the conversation that contains Check In.
  • On the Check In message, tap Details, tap Add Time, then select an option.
Cancel a Check In
You can cancel your Check In.
  • Open the Messages app  on your iPhone.
  • Open the conversation with the friend you sent a Check In to.
  • On the Check In message, tap Details, then tap Cancel Check In and confirm.

This new feature only works if both parties have iOS 17. 

Be safe out there!

Enjoy!


#Apple @Apple #iPhone #iOS #iOS17 #iMessage #CheckIn #iPhoneSafety #AppleUpdate #TechTips #OneCoolTip @OneCoolTip 

Tuesday, December 19, 2023

Use This Shortcut to Hide Your Browsing

Have you ever wondered how to browse the web without leaving a trace? 

Have you ever needed to log into multiple accounts at once? 

Or maybe you just want to surprise someone with a gift without spoiling the surprise through your browser history. 

Here's a Cool Tip.  Open a new browser session in Incognito (Chrome), InPrivate (Edge) or Private (Safari) mode with this keyboard shortcut: Control + Shift + N (Windows) and Command + Shift + N (Mac)

Here's how to do it.
  • Open your favorite browser such as  Google ChromeMicrosoft Edge or Apple Safari.
  • Hold down the Ctrl and Shift keys on your keyboard, then press N
    • For Mac, hold Command + Shift + N keys.
  • You’ve just opened an Incognito or InPrivate browser session.

Incognito mode, also known as private browsing, is a feature in most web browsers that allows you to browse the internet without saving your browsing history, cookies, or temporary files. 

This means that once you close the incognito window, your activity on those websites won't be tracked by your browser or saved for future reference.

Using Incognito mode has several benefits including that your browsing history, cookies, and site data, and information entered in forms are not stored on your device.

You can also log into multiple accounts on the same website simultaneously.

Chrome Incognito Mode

However, it’s important to note that your activity might still be visible to the websites you visit, your employer or school, and your internet service provider.

Adding a reputable VPN offers additional privacy protection.

That's it.

Enjoy!

Please LIKE and SHARE OneCoolTip.com!
Visit the OneCoolTip YouTube Channelhttps://www.youtube.com/@onecooltip


READ MORE


OneCoolTip.com
Cool Tech Tips for a Cooler Life

#Chrome #Edge #Safari #Google #Microsoft #Apple #TechTips #BrowserShortcuts #IncognitoMode #Privacy #InternetPrivacy #OneCoolTip @OneCoolTip 

Monday, December 18, 2023

How to Sign Your Name in Microsoft Word

Microsoft Word
Have you ever found yourself needing to sign a document in Microsoft Word but didn’t know how? 

Have you ever wondered if there’s a way to do it digitally? 

Here's a Cool Tip.  Add your signature to any Word document.


OneCoolTip - BackToWorkMonday


There are several techniques to do this.

Here's how to do it.

Drawing Your Name
  • Open your Word document.
  • Click on the “Insert” tab in the toolbar.
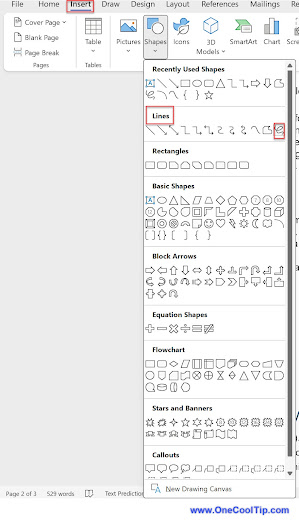
  • Select “Shapes”, then choose the “Scribble” tool under “Lines”.
  • Use your mouse or touchpad to draw your signature.
  • Adjust the size and position of the signature as needed.

Microsoft Word - Insert Scribble

fig. 1 - Microsoft Word - Insert Scribble

Adding a digital signature to your Word documents has several benefits. 

It’s quick, easy, and saves you the hassle of printing, signing, and scanning the document. 

However, it might not be as legally binding as a handwritten signature in some jurisdictions. 

Always check the legal requirements in your area.

Microsoft Word - Add Signature Example

fig. 2 - Microsoft Word - Add Signature Example


Of course, your signature can look better if you use a touch screen or stylus to write your name.

Another technique is to add a digital image of your signature to your document.

Adding a Signature Image
  • Write your signature using a black pen on a white piece of paper.
  • Scan or take a photo of the image.
    • Crop as needed.
    • Save your signature image as a .JPG or .PNG file.
  • Copy and paste the image into Word or use the Insert, PictureThis Device command from Word to add your image to your document.

John Hancock Signature

fig. 3 - John Hancock Signature


This "scribble" approach and digital image are quick and easy solutions to adding your signature to documents and email.

But what if you need someone else to sign your document?   

We'll cover how to insert a signature line or add a digital service to your document in a future Cool Tip.

That's it.

Enjoy!


Please LIKE and SHARE OneCoolTip.com!
Visit the OneCoolTip YouTube Channelhttps://www.youtube.com/@onecooltip


READ MORE
 
OneCoolTip.com
Cool Tech Tips for a Cooler Life

#Microsoft @Microsoft #Word #MicrosoftWord #DigitalSignature #TechTips #ProductivityHacks #BackToWorkMonday #OneCoolTip @OneCoolTip 

Sunday, December 17, 2023

Unleash the Power of Shared Tracking With iOS 17’s AirTag Sharing Feature

Apple AirTag
Remember that frantic dash around the house searching for your keys... again? 

Or the sinking feeling when your luggage doesn't appear on the carousel? 

We've told you about Apple's amazing AirTags before as a "must have" accessory.

But iOS17 has brought yet another great feature.

Here's a Cool Tip.  Use the new Air Tag sharing feature in iOS 17.

An Apple AirTag is a small, Bluetooth-enabled tracking device designed to help you find lost or misplaced items. 

It connects to your Apple device's Find My network, allowing you to see its location on a map, play a sound to locate it nearby, and even get directions to it.

Sharing an AirTag in iOS 17 adds a whole new layer of convenience and security to this already helpful tool.

Here's how to do it.
  • Open the Find My app on your iPhone.
  • Tap Items.
  • Select the AirTag you want to share.
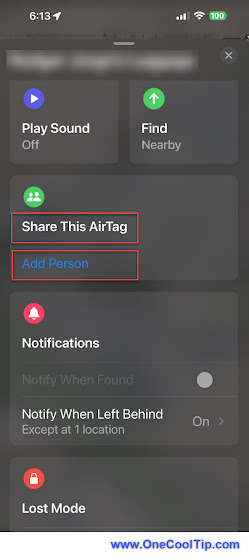
  • Tap Share This AirTag.
  • Choose Add Person.
  • Select the contacts with whom you want to share it with. 
    • You can select up to 5 people.
  • Tap Send.

Share Apple AirTag

fig. 1 - Share Apple AirTag

  • Your chosen contact now has access to that AirTag's location on their Find My app. 
  • They can see its last known location on a map, receive notifications when it's nearby, and even play a sound to help them find it.

So check out this great new feature of iOS 17!

That's it.

Enjoy!


Please LIKE and SHARE OneCoolTip.com!
Visit the OneCoolTip YouTube Channelhttps://www.youtube.com/@onecooltip


READ MORE

OneCoolTip.com
Cool Tech Tips for a Cooler Life


#iPhone #iOS #LostAndFoundNoMore #iOS17 #AirTag, #Apple @Apple #FindMy  #SharedTracking #TechTips #OneCoolTip @OneCoolTip 

Saturday, December 16, 2023

Forget Flashcards, Meet Your AI Brain Buddy: How to Master Google NotebookLM

NotebookLM
Have you ever wondered how you could streamline your notetaking process with the power of AI? 

Are you drowning in research papers? 

Buried in PDFs? 

Say goodbye to information overload and hello to your personalized AI learning assistant.

Here's a Cool Tip.   Use the new Google NotebookLM!

Google NotebookLM is an experimental AI-powered note-taking app that aims to revolutionize how we process and retain information. 

It uses the power of Google's Gemini Pro language model to analyze your uploaded documents (PDFs, research papers, even textbooks) and create a personalized understanding of their content.

Here's how to do it.
  • Go to the notebooklm.google.com website.
    • Be sure you are logged into your Google account.
    • Select "New Notebook".
  • Add your first source:
    • Upload up to 10 documents, which may include Google Docs, PDFs from your computer, or any text content that is less than 50,000 words.
  • Once your sources are uploaded, you can ask questions about the documents you’ve uploaded.
    • Ask questions about your source to explain, summarize and provide insight.
    • Save answers to your notebook.

Here's an example where I loaded a copy of President Abraham Lincoln's famous Gettysburg Address as a PDF into NotebookLM.

Lincoln Gettysburg Address
fig. 1 - Lincoln Gettysburg Address


Once the data is loaded into your NotebookLM notebook, you can then ask questions about your material.

For example, I asked "How does Lincoln use historical context to support his argument in the Gettysburg Address?"

NotebookLM provided the following:

  • He starts the speech by referencing the "four score and seven years ago" when U.S. was founded on the ideals of Liberty and equality.
  • He connects the Civil War to these founding principles by posing the question of whether any nation based on these principles can endure.
  • He reminds the audience of the sacrifices made by the soldiers at Gettysburg to uphold these principles.
  • He urges the living to rededicate themselves to these ideals and ensure that the sacrifices of the soldiers were not in vain.

By clicking the pin icon, I can save that answer into the notebook.

NotebookLM can provide personalized learning with tailored summaries, questions, and even writing styles based on your uploaded materials.

It is a great example of the power and usefulness of AI.

Are you ready to unleash the power of AI learning?

Remember, this is a Google experiment and feature can change.

And, as with any AI, triple check all answers and do not upload sensitive or proprietary information.


Enjoy!

Please LIKE and SHARE OneCoolTip.com!
Visit the OneCoolTip YouTube Channelhttps://www.youtube.com/@onecooltip


READ MORE

OneCoolTip.com
Cool Tech Tips for a Cooler Life

#Google @Google #AI #GoogleNotebookLM #AIforlearning #ResearchRevolution #AIWritingAssistant #TechTips #OneCoolTip @OneCoolTip 

Friday, December 15, 2023

Game On, Typist! Master the Keyboard Jump Typing Game

Have you ever feel like your fingers are stuck in molasses while typing? 

Wish you could level up your keyboard skills and have a blast doing it? 

Here's a Cool Tip.  Play the Keyboard Jump Game.

This free, addictive game is not just fun, it's a stealthy way to boost your typing speed and accuracy. 

So, ditch the spreadsheets and join the pixelated platforming party!

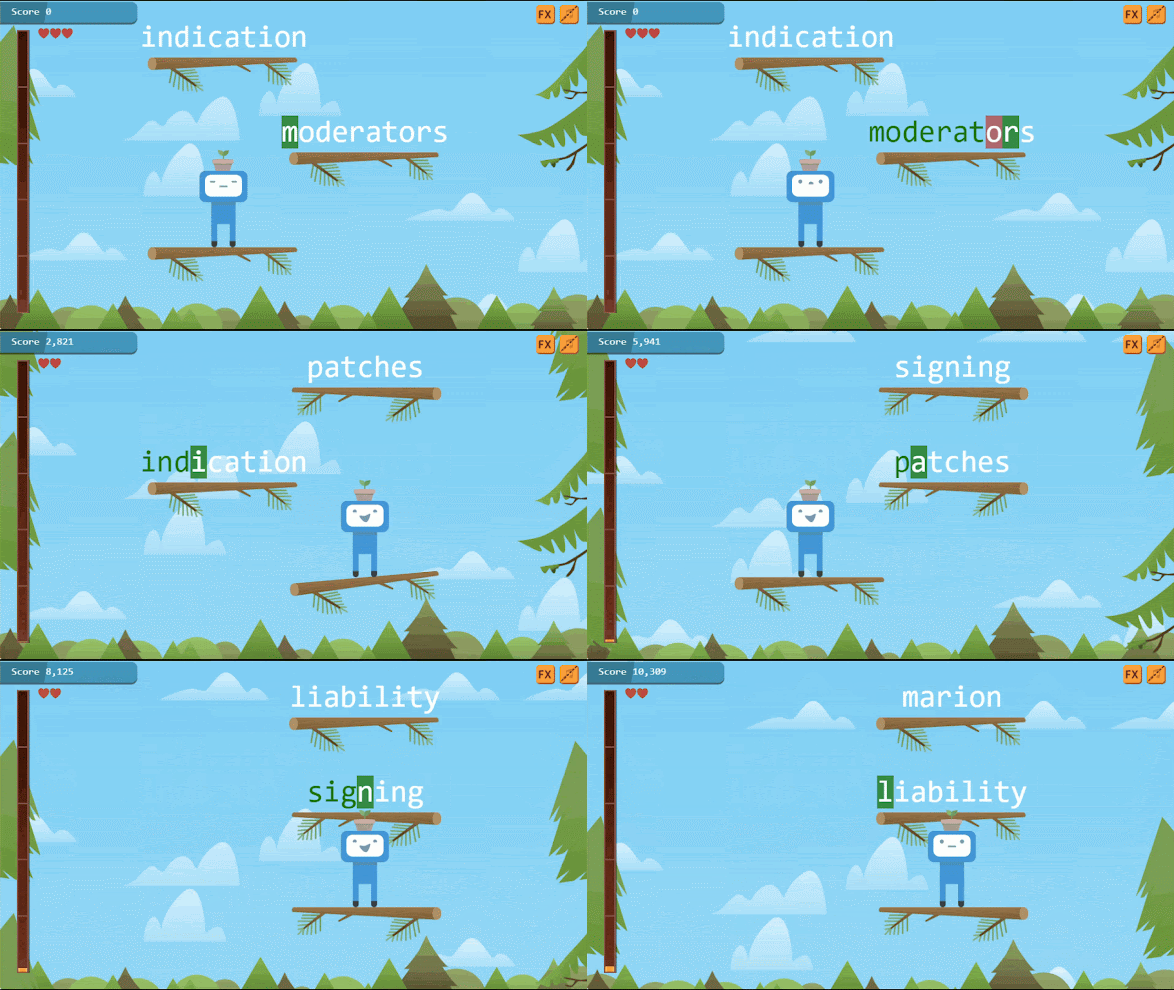
Imagine this: you're hurtling across a vibrant landscape, dodging obstacles and collecting coins, all while typing words that appear on the screen. 

Friday Funday OneCoolTip


Sounds thrilling, right? 

That's the magic of Keyboard Jump

It gamifies the learning process, making practice engaging and rewarding.

Typing Jump Game - Typing.com
fig. 1 - Keyboard Jump Game - Typing.com

Here's how to do it.
  • From a PC, navigate to Typing.com.
  • Create an account or log in if you already have one.
  • Select "Games" from the menu.
  • Find the Keyboard Jump icon.
  • Click "Play."
  • Choose your level: Start with Beginner if you're new or jump straight into Intermediate or Advanced for a challenge.
  • Type away! Words will appear on the screen. Type them correctly to propel your character forward and avoid hazards.
  • Collect coins and power-ups.
  • Level up and unlock new worlds

Please LIKE and SHARE OneCoolTip.com!
Visit the OneCoolTip YouTube Channelhttps://www.youtube.com/@onecooltip


READ MORE

OneCoolTip.com
Cool Tech Tips for a Cooler Life

#keyboardjump #typingcom #gamifiedlearning #typingfun #keyboardskills #levelupyourtyping #FridayFunday #TechTips #OneCoolTip @OneCoolTip