Sunday, April 16, 2023

How to Group Tabs in Google Chrome to Boost Your Productivity

Google Chrome Logo

With so many systems and services moving to the internet, it can be easy to have too many tabs open in Google Chrome. 

This can make it difficult to stay organized and productive.

We've already shared the Cool Tip to name Chrome Windows but there's even more ways to keep Chrome Tabs organized. 

Fortunately, Chrome offers a feature called tab groups that can help you keep your tabs organized and easily accessible.

Here's how to Group, Add, Remove and Search Tabs in Google Chrome:

Group Tabs.

  • On your computer, open Chrome Chrome.
  • Click New tab New tab.
  • Right-click a tab and select Add tab to new group.
Add tab to new group

Add Tab to New Group

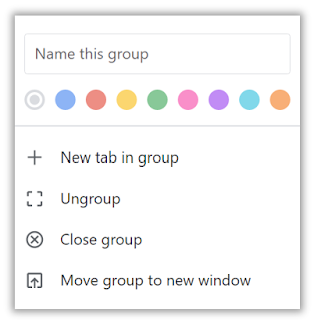
Add tab to new group - Choices

  • Name this Group
  • Select Color for this Group
  • New Tab in Group 
  • Ungroup
  • Close Group
  • Move Group to New Window


Add a Tab to Existing Group
  • Drag the tab into the group.

Remove a Tab from a Group
  • Right-click the tab, then select Remove from group.

Finally, don't forget that you can Search Tabs as well.

Search Tabs 
  • Type @tabs in the address bar and then type a few characters of the tab title to see matching suggestions. 


That's it!

Please LIKE and SHARE OneCoolTip.com!

READ MORE

OneCoolTip.com
Cool Tech Tips for a Cooler Life!


#GoogleChrome OrganizeTabs #GroupTabs #ProductivityTips #OneCoolTip #Google #Chrome @Google


Saturday, April 15, 2023

One Simple Cool Tip to Boost Your Productivity with Chrome Windows

Google Chrome
Google Chrome is one of the most popular web browsers in the world, and for good reason. 

It's fast, secure, and packed with features. 

One of those features, a Cool Tip, is the ability to name your Chrome windows. 

Why do this?

You can organize your chrome windows and tabs logically.

And give each window its own unique name.

Each Chrome window can contain many tabs and you can move tabs from window to window to keep them organized.

This can be a great way to keep track of different windows, especially if you have a lot of them open at the same time.

To name a Chrome window, follow these steps:

  • Right-click on the title bar of the window you want to name.
  • Select Name Window from the menu.
  • Enter a name for the window in the text box that appears.
  • Click OK.
Name Chrome Window
Name Chrome Windows


The name of the windows will now appear in the taskbar and in the Alt+Tab menu.

View Chrome Window Name
View Chrome Window Names

Here are a few tips for naming your Chrome windows:

  • Be descriptive. The name of the window should give you a good idea of what's inside it.
  • Use short names. Long names can be difficult to read, especially when you're switching between windows quickly.
  • Use consistent naming conventions. This will make it easier to find the windows you're looking for.
Please LIKE and SHARE OneCoolTip.com!

READ MORE

OneCoolTip.com
Cool Tech Tips for a Cooler Life!

#GoogleChrome #WindowNaming #Taskbar #AltTab #OrganizeTabs #ProductivityTips

#OneCoolTip #Google #Chrome @Google

Friday, April 14, 2023

A Staggering Beauty Useless Website to Enjoy!

 Do you need to play with some staggering beauty?

Then you are in luck.

Take a Friday Funday visit to StaggeringBeauty

staggeringbeauty.com

Staggering Beauty is a great website for anyone who loves art, animation, and music. 

Use your mouse to move the character.  

Shake rapidly and watch what happens!

Happy Friday Funday!

Warning: StaggeringBeauty contains flashing images that may affect some people.

Please LIKE and SHARE OneCoolTip.com!

READ MORE


OneCoolTip.com
Cool Tech Tips for a Cooler Life!


#StaggeringBeauty #FridayFunday #OneCoolTip

Thursday, April 13, 2023

Create a QR Code in Seconds Using This Cool Tip!

QR Code www.onecooltip.com
Do you want to create a QR code for a website you own or manage?

Are you publicizing a community or local event and want users to be able to scan a QR code to see your information?

Here's a Cool Tip: create QR codes from your Google Chrome browser.

A QR code is a two-dimensional barcode that can be read by smartphones and other mobile devices.

They are a great way to share information quickly and easily such as websites, contact information, social media profiles, and more. 

Here's how to do it:

  • Open Chrome Chrome.
  • Go to the web page you want to create a QR for.  
    • For example, http://www.OneCoolTip.com
  • Find the address bar:
    • Windows computers: To the right of the address bar, click Share icon
Chrome Share Icon
    • Select Create QR Code.
Chrome Create QR Code

  • Your new QR appears.

Chrome QR Code Download
  • Click Download to download the QR code to your PC or Mac.
  • Share your QR code far and wide.
    • Add the QR code to printed materials!
  • Others can scan the QR code to go to your website.
    • Use the Google App camera to scan the QR code.
    • Users can visit the website that the QR code promotes.
  • Mac computers: To the right of the address bar, click Share icon and then QR code .


The Google Chrome Dino is prominently located in the center of the QR code so you may want to find another option for your brand.

But for a quick and easy solution, this is a good way to create a QR code.

Enjoy!

Please Like and Share OneCoolTip.com!

READ MORE

OneCoolTip.com
Cool Tech Tips for a Cooler Life!

#QRcode #GoogleChrome #bloggingtips #techtips #Google #Chrome #OneCoolTip

Wednesday, April 12, 2023

FBI Warns Against Using Public USB Charging Stations

Did you use free USB charging ports when you are out in public?

Your phone may be at risk.

Here's why.

The concern in that cables and USB ports can be modified to introduce malware into phones that connect to the charging port.

The FBI's Denver office issued this specific warning to the public to avoid using free charging stations that are commonly found in public spaces such as airports, hotels or shopping centers.

Twitter

Avoid using free charging stations in airports, hotels or shopping centers. Bad actors have figured out ways to use public USB ports to introduce malware and monitoring software onto devices. Carry your own charger and USB cord and use an electrical outlet instead.

FBI Charger Warning

So what can you do to prevent this?
  • Keep your phone charged before you leave your home.
  • Bring your own USB charging cables and plug your phone directly into standard electrical outlets to charge it.  
  • You can also use your own mobile battery charger to recharge your phone between charging using secure electrical outlets.
Criminals are always looking for ways to commit fraud.

Stay informed and aware.


Please Like and Share OneCoolTip.com!

READ MORE

OneCoolTip.com
Cool Tech Tips for a Cooler Life!

#FBI #PhoneSecurity #PublicChargingStations #USBMalware #FBIWarning #StayAware #StayInformed #PhoneSafety #AvoidPublicChargers #ChargeSafe #MobileSecurity #OneCoolTip

Tuesday, April 11, 2023

How to Set Siri's Pause Length

Apple iOS Siri
Looking to get more out of your Siri experience? 

You're not alone! Siri, Apple's virtual assistant, has become a game-changing feature for many of us, allowing us to do everything from sending texts to setting appointments with ease. 

However, for individuals with disabilities or those who may have difficulty speaking clearly, 
Siri's default settings may not be enough. 

Here's a Cool Tip: Change Siri's Pause Time.

The Siri Accessibility setting for Siri pause length allows you to adjust the time required between the user's spoken words before Siri stops listening. 

This can be incredibly helpful for those who need more time to gather their thoughts, speak clearly, or those who may have difficulty speaking due to a disability.

To access this setting, navigate to Settings > Accessibility > Siri, and then select Longer or Longest.

Settings -> Siri

You'll need to try each setting to see what works best for you.

The Siri Accessibility setting for Siri pause length is a powerful tool that can improve the experience for many users.  

So, go ahead and give it a try – you might be surprised at how much it can improve your Siri experience.

Enjoy!

Please Like and Share OneCoolTip.com!

READ MORE

OneCoolTip.com
Cool Tech Tips for a Cooler Life!

#Apple @Apple #iOS #Siri #SiriAccessibility #VirtualAssistant #AppleSiri #AccessibilityTip #DisabilityFriendly #InclusiveTechnology #VoiceAssistant #SiriPauseLength #SpeechAssistance #TechnologyForAll 

Monday, April 10, 2023

How to Attach Documents to Microsoft Outlook Messages Inside the Message

Microsoft Outlook
Do you struggle with attaching documents to your Outlook messages? 

Do you want to include the message INSIDE the message body rather than at the top?

You may have noticed that sometimes attachments in your Outlook email are at the top of the message while other times the documents are attached inside the message body itself.

Here's how to do it either way.

To attach a file from your computer in Outlook, follow these steps:

  • Reply, Forward or create a new email message.
  • Select InsertAttach File then Browse This PC.
  • Choose the file you want to attach and select Open.
  • To attach more than one file, hold CTRL (or Command in Mac) while selecting multiple files.
  • Select the file to attach to your message.
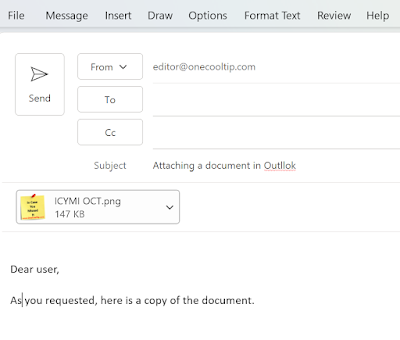
    • The file will be attached at the top of your message (under the subject line).
    • This is because your message format is most likely set as HTML
Microsoft Outlook Attachment
  • If you want to insert a document as an file icon inside the message body, select the Format Text  tab in the ribbon, then Format, Message Format, select Rich Text.
Microsoft Outlook Format Message
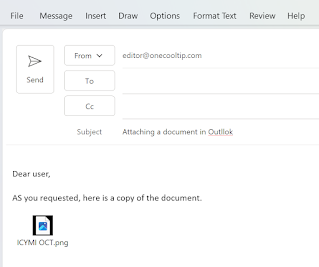
    • The file will be included inside your message.
Microsoft Outlook Attachment Rich Text

  • This can be useful when you want to each file or ensure the recipient knows what is different about each file you've attached.
  • The Message format determines where the attachment is located:
    • HTML and Plain Text formats will put the attachment at the top in the header.
    • Rich Text format will put the attachment INSIDE the message body.

That's it!

Please Like and Share OneCoolTip.com!

READ MORE
#Microsoft @Microsoft #MicrosoftOutlook, #EmailTips, #ProductivityHacks, #TechBlog #HowTo #OneCoolTip