Showing posts with label Windows 11. Show all posts

Tuesday, January 16, 2024

Shake Away Desktop Chaos with Windows 11's Hidden Multitasking Hack

Windows 11 Logo
Ever found your desktop cluttered with numerous open windows? 

Ever wished for a magic wand to instantly minimize all but one? 

Here's a Cool Tip.  Use the Window Shake.

Windows 11 introduces a nifty feature called the “Title Bar Window Shake” that does exactly that.

The Title Bar Window Shake feature is a boon for multitaskers.

It allows you to quickly declutter your workspace and focus on one window without having to manually minimize each window. 

Just grab and hold a windows title bar to minimize all other windows.

But first, you need to enable the feature.

Here's how to do it.
  1. Press the Windows + I key on your keyboard to open the settings application.
  2. Under the system settings, scroll down and click on "System".
  3. Click on the “Multitasking” option.
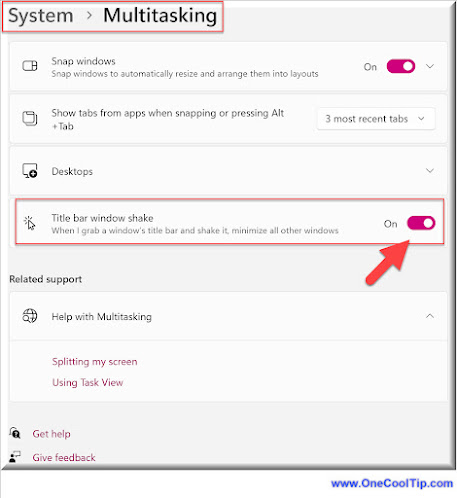
  4. Toggle On the “Title Bar Window Shake” option to enable this feature.

Windows 11 Title Bar Shake Setting
fig. 1 - Windows 11 Title Bar Shake Setting

Imagine you’re working on a report in Word, with multiple reference documents open. 

Your desktop is a sea of windows. 

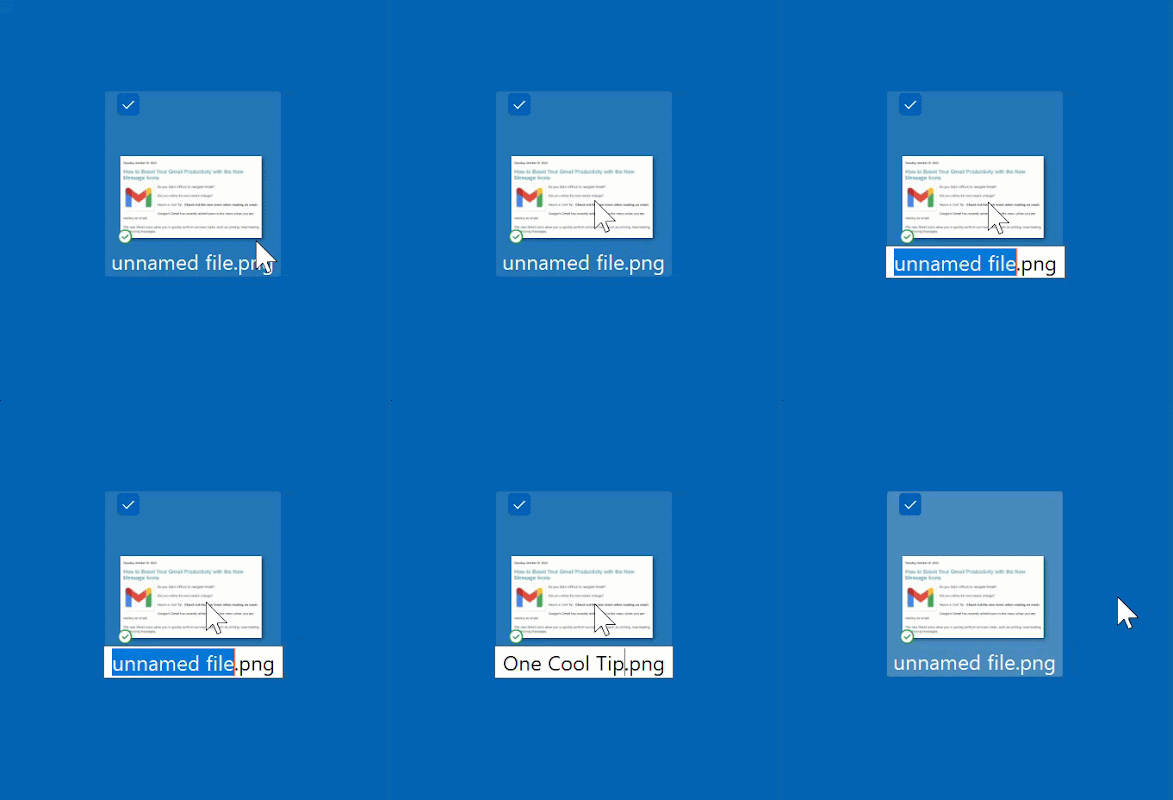
With the Title Bar Window Shake feature, just grab the title bar of your Word document, give it a shake, and voila! 


Shake it Up!

fig. 2 - Shake it up!

All other windows are minimized, leaving you to focus on your report.

This feature is disabled by default in Windows 11, but can be easily enabled following the steps above.

The Title Bar Window Shake feature is a powerful tool in Windows 11 that enhances your multitasking efficiency. 

So why wait? 

Give your desktop a shake-up today!

Did you try it?

Let us know in the comments below.

Enjoy!


Please LIKE and SHARE OneCoolTip.com!
Visit the OneCoolTip YouTube Channelhttps://www.youtube.com/@onecooltip


READ MORE


OneCoolTip.com
Cool Tech Tips for a Cooler Life!

#Microsoft @Microsoft #Windows11 #TitleBarWindowShake #Aero  #productivityhacks #remoteworktips #windows11life #Windows11Features #Windows11Tutorial #TechTips @TechTips 

Thursday, January 4, 2024

Unlock Windows 11's Hidden Power: Master the Almighty God Mode

Windows 11 God Mode
Have you ever get tired of navigating through endless Windows menus and folders? 

Wish you had a single portal to access all your system settings at once? 

Here's a Cool Tip. Use Windows 11 God Mode.

In Windows 11, God Mode is a hidden control panel that grants you one-click access to almost all of the system's settings and administrative tools. 

This means you can bypass the normal Windows menus and folders that can be frustratingly deep and tedious to navigate.

We first told you about God Mode for Windows 10, way back when.

The core experience and functionality of God Mode remain remarkably similar between Windows 10 and Windows 11. 

Most users won't encounter significant differences beyond the updated visual aesthetics. 

Here's how to do it.
  • Right-click on any empty space on your desktop.
  • Select New > Folder.
  • Rename the folder to GodMode.{ED7BA470-8E54-465E-825C-99712043E01C} 
    • (don't forget the curly braces!).
  • Press Enter.
  • Your folder icon transforms into the familiar Control Panel symbol, but with a hidden world revealed – hundreds of system settings, from administrative tools to network configurations, all neatly organized for your exploration.
Say goodbye to tedious menu diving. God Mode offers a one-stop shop for all your system tweaks.

Boost your productivity by finding tools and settings faster than ever before.

With great power comes with great responsibility: Modifying certain settings can impact your system stability. 

Caution - OneCoolTip

Proceed with caution and research tweaks before applying them.

Example: Need to quickly manage your network connections? 

God Mode provides one-click access to adapters, properties, and advanced settings. No more digging through multiple network menus!

Windows 11 God Mode - Change Setting Example
fig. 1 - Windows 11 God Mode - Change Setting Example


You can customize God Mode by rearranging folders and removing unwanted shortcuts. 

Right-click within the folder, select "Personalize," and play around to create your own ultimate control center.

Unlike a real god, God Mode in Windows 11 is completely reversible and doesn't require any complex rituals or sacrifices. 

Here's how you can easily undo it:

Option 1: Delete the folder:
  • Locate the God Mode folder on your desktop (it will have the Control Panel icon).
  • Right-click on the folder and select "Delete."

Option 2: Rename the folder:
  • Right-click on the God Mode folder.
  • Select "Rename."
  • Change the folder name by removing the curly braces from "{ED7BA470-8E54-465E-825C-99712043E01C}".

Both of these options remove the God Mode functionality, essentially reverting your system to the standard Control Panel access.

Ready to unleash the God Mode within? Share your experiences and favorite hidden settings in the comments below!

Please LIKE and SHARE OneCoolTip.com!
Visit the OneCoolTip YouTube Channelhttps://www.youtube.com/@onecooltip


READ MORE


OneCoolTip.com
Cool Tech Tips for a Cooler Life!


#Microsoft @Microsoft #Windows #Windows11 #GodMode #HiddenFeatures #TechTips #PowerUser #ControlPanel #ProductivityHacks #WindowsSecrets #TechTips #OneCoolTIp @OneCoolTip 

Wednesday, December 27, 2023

Ditch the Mouse, Master the F Keys: Productivity Hacks for Windows

Have you ever wondered what those F keys at the top of your keyboard do? 

Want to boost your productivity by making full use of your keyboard? 

Do you get tired of endless clicking?

Here's a Cool Tip.  Use the Function Keys (F Keys) to Boost Productivity.

The F keys, also known as function keys, are a row of keys at the top of your keyboard labeled F1 through F12. 

Use them to quickly access a variety of functions (pun intended!).

F keys improve your productivity by offering easy access to help, searches, spelling and grammar checks and more.

Here's how to use them in Microsoft Windows.

F1: Opens the help menu in almost every application.  

Stuck on a task? Press F1 for instant context-sensitive help in most programs. 


F2: Renames a selected file or folder.  

Selected a file and itching to change its name? Forget right-clicking! Press F2 for instant editing.


F3: Opens the search feature in most applications.  

 Lost in a document or webpage? Unleash F3, the ultimate search bar summoner. 


F4: Closes the current window in most applications when combined with Alt.  

This one's a double-edged sword. Alt + F4 closes the current window, but be careful – it can close programs too! Use wisely!


F5: Refreshes the page in web browsers and other applications.  

Refresh, Refresh, Refresh!: Need a website or document update? F5 is your digital refresh button, bringing you the latest.


F6: Moves the cursor to the address bar in most internet browsers. 

Juggling multiple windows? F6 cycles through them like a seasoned juggler, saving you clicks and precious time.


Master Function Keys - OneCoolTip.com

F7: Varies by program, but often checks spelling and grammar in word processors.

In most word processors and text editors, F7 activates the spell checker, ensuring your writing is polished and error-free.

In some programs with multiple panes, like Windows Explorer, F7 shifts focus between them for efficient navigation.

F8: Used to enter the Windows startup menu (only works during boot-up).

Press F8 repeatedly during computer startup to access the Advanced Boot Options menu, where you can troubleshoot issues or start in Safe Mode.

In certain text editors, F8 enables extended text selection for advanced editing tasks.

F9: Varies by program.

In Microsoft Outlook, F9 sends and receives emails, syncing your inbox with the latest updates.

In Excel, F9 recalculates all open workbooks, ensuring your formulas are up-to-date and accurate.


F10: Activates the menu bar in many applications.

In most programs, F10 highlights the menu bar, allowing you to navigate menus using the arrow keys or letters, often without a mouse.

In Windows Explorer, F10 acts as a right-click, opening context menus for files and folders.


F11: Enters or exits full-screen mode in most browsers.

In most web browsers, F11 immerses you in full-screen mode, hiding toolbars and distractions for a focused viewing experience.

On some computers, pressing F11 during startup can lead to a hidden recovery partition for troubleshooting or system restoration.


F12: Opens the ‘Save As’ dialog in Microsoft Word.

In many programs, F12 opens the "Save As" dialog box, allowing you to save your work with a specific filename and location.

 In web browsers, F12 usually launches developer tools, giving you insights into website code and functionality for debugging or customization.

***

The F keys can greatly increase your productivity by providing quick access to commonly used functions.

Experimentation and exploration are key to discovering the full potential of your F keys!

What is your favorite F key?

How do you use it?

Let us know in the comments below.

Enjoy!


Please LIKE and SHARE OneCoolTip.com!
Visit the OneCoolTip YouTube Channelhttps://www.youtube.com/@onecooltip


READ MORE

OneCoolTip.com
Cool Tech Tips for a Cooler Life!

#Microsoft @Microsoft #Windows #Windows10 #Windows11 #WindowsTips, #FKeys #ProductivityHacks #TechTips #OneCoolTip @OneCoolTip

Thursday, November 30, 2023

Don't Be a Victim: Update Chrome Immediately to Patch Zero-Day Exploit

In today's interconnected world, our online security is paramount.
With the ever-evolving threat landscape, staying vigilant and keeping our software up to date is crucial.
On November 28. 2023, Google warns that a  recent zero-day exploit requires Chrome to be updated. 
Chrome needs to be updated to updated to Chrome version 119.0.6045.199/.200 for Windows and version 119.0.6045.199 for Mac and Linux.
Google Chrome, one of the most popular web browsers, regularly releases security updates to address vulnerabilities and protect users from potential exploits.
Here's how to do it.
  • Launch Chrome and click on the three-dot menu in the top right corner.
  • Select "Help" from the dropdown menu.
  • Choose "About Google Chrome."
  • Chrome will automatically check for updates.
    • If an update is available, it will start downloading.
  • Once the download is complete, Chrome will prompt you to restart the browser to apply the update.
  • Click "Relaunch" to complete the process.

Update Google Chrome - Zero Day Exploit
fig. 1 - Update Google Chrome - Zero Day Exploit

That's it!

Enjoy!

Please LIKE and SHARE OneCoolTip.com!
Visit the OneCoolTip YouTube Channelhttps://www.youtube.com/@onecooltip


READ MORE


OneCoolTip.com
Cool Tech Tips for a Cooler Life


#Google @Google #Chrome #ChromeUpdate #ZeroDayExploit #SecurityPatch #OnlineSafety #TechTips #OneCoolTip @OneCoolTip

Wednesday, November 15, 2023

Use This Shortcut When Your Screen Blacks Out

Windows
Have you ever found yourself in the middle of an important task when your screen suddenly goes black? 

Or perhaps you’ve experienced graphical glitches that disrupt your workflow? 

What if there was a quick, easy solution right at your fingertips? 

Here's a Cool Tip.  Use the Windows keyboard shortcut Ctrl + Win + Shift + B.

The Ctrl + Win + Shift + B shortcut is designed to reset the graphics subsystem on your Windows machine. 

This can be particularly useful when you’re experiencing graphical issues or black screen problems.

Here's how to do it.
  • Press the Ctrl, Win, and Shift keys on your keyboard simultaneously, followed by the ‘B’ key. 
  • Your screen will go black for a split second and you’ll hear a beep, indicating that the graphics subsystem has been reset.

CTRL + WIN + SHIFT + B Shortcut

fig. 1 -  Use Ctrl + Win + Shift + B to Reset Graphics

This shortcut provides a quick and easy way to troubleshoot and resolve common graphical issues without needing to restart your computer or delve into complex settings.

While this shortcut can be a handy tool for temporary fixes, it’s not a permanent solution. 

If you’re working on a graphic-intensive project and start to notice visual glitches, this shortcut can help you quickly resolve the issue and continue with your work.

Enjoy!

Please LIKE and SHARE OneCoolTip.com!
Visit the OneCoolTip YouTube Channelhttps://www.youtube.com/@onecooltip

READ MORE

OneCoolTip.com
Cool Tech Tips for a Cooler Life


#Microsoft @Microsoft #WIndows #WindowsShortcuts #TechTips #PCMaster #Troubleshooting #TechTips #OneCoolTip @OneCoolTip

Tuesday, November 7, 2023

How to Use Windows 11 Snipping Tool to Convert Pictures to Text with Ease

OneCoolTip Snipping Tool
Have you ever wondered how to extract text from an image without typing it all out? 

Or perhaps you’ve been looking for a way to digitize your handwritten notes? 

Here's a Cool Tip.  Use the new and improved Snipping Tool in Windows 11.

The new feature in the Windows 11 Snipping Tool is here to revolutionize your workflow.

But how does it work? 

And what can it do for you?

Here's how to do it.
  • Click on the Start button, type ‘Snipping Tool’ in the search bar, and select the app from the results.
  • Click on ‘New’ and select the area of the screen you want to capture.
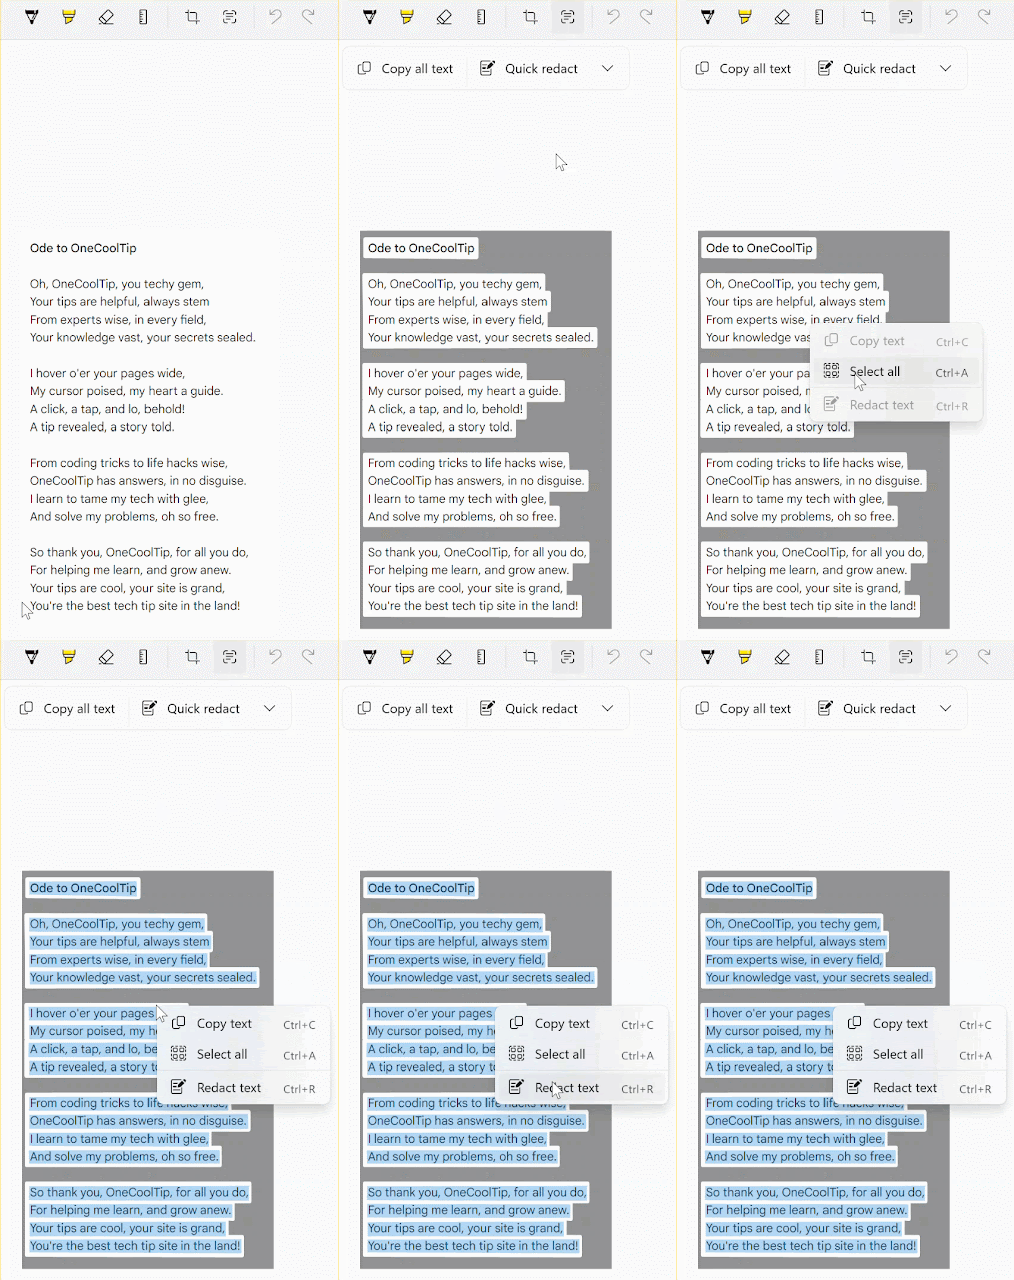
  • After capturing the snip, click on the ‘Text Actions’ button. This will convert the image in the snip to text.
OneCoolTip Snipping Tool Text Options

fig. 1 - Snipping Tool Text Options
  • You can now copy the text to your clipboard or edit it directly within the Snipping Tool.
    • Right Mouse click for copy options.

Snipping Tool Option Selections

fig. 2 - Snipping Tool Option Selections


Windows 11 Snipping Tool - Picture to Text

fig. 3 - Windows 11 Snipping Tool - Picture to Text


The ability to convert pictures to text can save you a significant amount of time, especially if you frequently work with images containing text. 

It’s also a great tool for digitizing handwritten notes or documents. 

However, the accuracy of the text conversion can vary depending on the quality of the image and the legibility of the text.

For instance, if you’ve taken a screenshot of a recipe from a cooking website, you can use the Snipping Tool to quickly convert the ingredients list into a text format that you can easily edit or share.

Enjoy!

Please LIKE and SHARE OneCoolTip.com!
Visit the OneCoolTip YouTube Channelhttps://www.youtube.com/@onecooltip


READ MORE


OneCoolTip.com
Cool Tech Tips for a Cooler Life


#Microsoft @Microsoft #Windows #Windows11 #SnippingTool #TextActions. #TechTips #OneCoolTip @OneCoolTip 

Sunday, November 5, 2023

How to Use Layers in Microsoft Paint

Microsoft Windows 11 Paint
Have you ever wished for a simple tool that could help you create complex designs? 

Have you ever wanted to experiment with layers without having to navigate the intricacies of professional software like Photoshop? 

Here's a Cool Tip.  Check out the new layers feature in  Microsoft Paint for Windows 11.

Microsoft has recently introduced a layers feature in its Paint application for Windows 11.

This feature, typically found in more complex software like Photoshop and Gimp, allows users to stack multiple images, text, and graphics on top of each other, which can then be manipulated individually1.

Here's how to do it.

  • Open Paint on Windows 11.
  • Click the Layers button in the command bar.
Microsoft Paint
fig. 1 - Microsoft Paint Layers

  • Click the Plus (+) button (Ctrl + Shift + N) to create a new layer.
  • Insert an image or create a shape with the tools available in Paint.
  • Drag the layers to change their order and bring a layer forward or backward.
  • Right-click the layer and choose the “Delete layer” option to remove it from the file.
  • Right-click the layer from the right pane and choose the “Duplicate layer” to create another instance of the same element.
  • Right-click the layer and select the “Hide layer” to work on another layer.
  • Right-click the layer and choose the “Merge down” option to combine the layer with the layer immediately below it.
Microsoft Windows 11 Paint Options

fig. 2 - Microsoft Windows 11 Paint Options


  • Each layer can have it's own paint object(s).
  • For example, in this example, each layer has its own object: background, Person and Text.

Microsoft Paint - Each Layer Has Its Own Object

fig. 3 - Microsoft Paint - Each Layer Has Its Own Object
  • Click the Save button.


Microsoft Paint with Layers Example

fig. 4 - Microsoft Paint with Layers Example


Enjoy!


Please LIKE and SHARE OneCoolTip.com!
Visit the OneCoolTip YouTube Channelhttps://www.youtube.com/@onecooltip

READ MORE


OneCoolTip.com
Cool Tech Tips for a Cooler Life!

#Microsoft @Microsoft #Windows @Microsoft #technology #tech #innovation #technews #gadgets #Windows11 #MicrosoftPaint #layers #digitalart #TechTips #OneCoolTip @OneCoolTip 


Wednesday, November 1, 2023

How to Rename Files on Windows and Macs

Have you ever found yourself lost in a sea of ambiguously named files on your computer? 

Ever wished there was a quick and easy way to rename them without going through a series of clicks? 

Here's a Cool Tip for Windows.  Use the F2 key.

Here's how to do it.


On Windows:
  1. Navigate to the file you want to rename.
  2. Click on the file to select it.
  3. Press the F2 key.
  4. Type the new name for your file.
  5. Press Enter to save the new name.
Renaming files using these methods is quick and efficient, saving you valuable time. 


Rename Windows File F2

fig. 1 - Rename Windows with File F2


On Mac:
  1. Navigate to the file you want to rename.
  2. Click on the file to select it.
  3. Press the Return key.
  4. Type the new name for your file.
  5. Press Enter to save the new name.
That's it.

Enjoy.

Please LIKE and SHARE OneCoolTip.com!
Visit the OneCoolTip YouTube Channelhttps://www.youtube.com/@onecooltip

READ MORE

#Microsoft @Microsoft #Apple @Apple #Mac #Macintosh #TechTips, #FileManagement, #WindowsGuide, #MacGuide #OneCoolTip @OneCoolTip 

Tuesday, October 24, 2023

How to Master Snap Layouts in Windows 11

Windows 11
Have you ever found yourself struggling to manage multiple windows on your screen? 

Have you ever wished for a more organized workspace on your computer? 

Here's a Cool Tip.  Windows 11 Snap Layouts.

Windows 11 introduces a feature that might just revolutionize your multitasking experience: Snap Layouts.

Snap layouts are a new feature introduced to improve productivity by allowing you to easily organize and manage your open windows.

Here's how to do it.

Using Snap Layouts
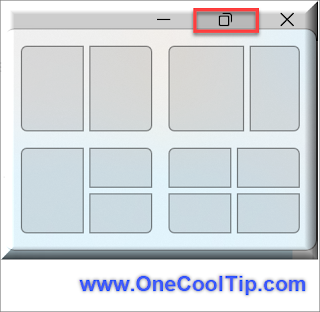
  • Hover over the Maximize Button: Move your cursor over the maximize button of the window you want to snap.
  • Select a Layout: A box will appear showing different layouts. Choose the one that suits your needs.

  • Snap Your Window: Click on a zone in the layout where you want to snap your window. 
  • Complete Your Layout: Use Snap Assist to add more windows to other zones in your chosen layout.

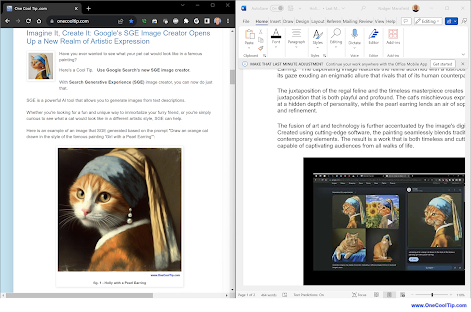
fig. 2 - Windows 11 Snap Layout - Side-by-Side Example
fig. 2 - Windows 11 Snap Layout - Side-by-Side Example


With Snap Layouts, you can view and work on multiple apps simultaneously.

You can choose from various layouts depending on your screen size and orientation.

For instance, if you’re working on a project that requires research and writing, you can have your web browser and word processor app open side by side. 

You can easily switch between apps without having to minimize or maximize windows.

Windows 10 also has a similar feature known as Snap Assist.

Here’s how you can use Snap Assist in Windows 10:
  • Drag to Snap: Left-click the title bar on a window and drag it to the corners or left or right edges. You’ll see a transparent overlay indicate how the window will snap.
  • Keyboard Shortcuts: Use Windows Key + Left arrow or Windows Key + Right arrow to snap an app to the left or right halves of your screen. For the smaller quadrants, use Windows Key + Right / Left, and then Windows Key + Up / Down.
  • Unfortunately, Windows 10 doesn’t support vertical snapping. 
  • You can’t use Snap Assist to put one window on the top half and another on the bottom half. You have to do it manually.

That's it.

Start exploring Snap Layouts today and take a step towards a more organized and productive digital workspace!


Enjoy!

Please LIKE and SHARE OneCoolTip.com!
Visit the OneCoolTip YouTube Channelhttps://www.youtube.com/@onecooltip

READ MORE

OneCoolTip.com
Cool Tech Tips for a Cooler Life


#Microsoft @Microsoft #Windows11 #SnapLayouts #ProductivityHacks, #TechTips #TechTrends #OneCoolTip @OneCoolTip 

Thursday, October 19, 2023

How to Adjust Windows 11 Sound Volume With This Cool Tip

Windows 11
Ever found yourself fumbling with the volume slider while trying to enjoy your favorite song or video?

Wish you could adjust the volume with a simple flick of your mouse wheel? 

Here's a Cool Tip.  With Windows 11, you can! 

This new feature allows you to change the volume by simply scrolling your mouse over the volume icon in the taskbar. 

Windows 11 Mouse Scroll
fig. 1 - Scroll Mouse Button To Adjust Sound Volume

Here’s how to use this feature:
  1. Move your cursor over the sound icon on the Windows 11 taskbar.
  2. Roll the mouse wheel up to increase the volume and down to decrease it.
  3. You’ll see the volume increase or decrease when you do.
  4. For example, imagine you’re listening to a song and it’s a bit too loud. Instead of clicking on the volume icon and dragging the slider, you can simply hover your mouse over the icon and scroll down to lower the volume. 
That's it!

Enjoy!

Please LIKE and SHARE OneCoolTip.com!

READ MORE

OneCoolTip.com
Cool Tech Tips for a Cooler Life


#Microsoft @Microsoft #Windwos #Windows11 #Tech, #Gadgets, #Innovation, #TechNews, #Digital, #AI, #IoT, #FutureTech, #TechLife #TechTip #OneCoolTip @OneCoolTip
Thursday, October 12, 2023

Mastering the New Quick Settings Sound Mixer in Windows 11

Windows 11
Ever found yourself struggling to balance the audio levels between different applications on your computer? 

Have you wished for a more intuitive way to control the sound output of each app individually? 

Here's a Cool Tip.  Use the new Quick Settings Volume Mixer in Windows 11.

Microsoft has introduced an enhanced volume mixer in the September 2023 update. 

This new feature allows you to adjust audio levels for each app separately. 

Here's how to do it.
  • Open Through Keyboard Shortcut:
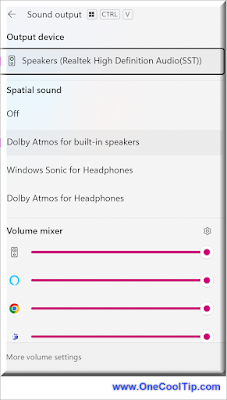
    • WIN + CTRL + V to open the new Quick Settings mixer.

Windows 11 Volume Mixer Quick Setting
fig. 1 - Windows 11 Volume Mixer Quick Setting

From here, you can change volume for system sounds and specific applications.

  • Click More Volume Settings to open the System Sound window.
  • Click the Settings icon for More Mixer Settings.
You also can bring up the full Volume Mixer settings:
  • Open Through the Taskbar
    • Right-click on the volume icon in your taskbar and select Open Volume mixer.
  • Open Through Settings: 
    • Navigate to Settings> System > Sound > Volume mixer.

Enjoy!

Please LIKE and SHARE OneCoolTip.com!


READ MORE

OneCoolTip.com
Cool Tech Tips for a Cooler Life


#Microsoft @Microsoft #Windows11 #Windows11Update #SoundMixer #TechTutorial #WindowsTips #TechNews #TechTips #OneCoolTip @OneCoolTip