Monday, September 29, 2025
Microsoft’s Red Gets a Makeover. Here’s Why It Matters for Accessibility
Monday, May 19, 2025
How to Take Control of Your Inbox with Scheduled Emails in Outlook
Monday, March 24, 2025
Boost Productivity in Style by Adding Icons in Microsoft 365 Apps
Monday, November 4, 2024
How to Use the Accessibility Checker in Microsoft 365 to Create Inclusive Content
- Open your document in Word, Excel, PowerPoint or OneNote.
- Go to the Review tab.
- Click on Check Accessibility. This will open the Accessibility Checker pane on the right side of the screen.
- Review the findings under Inspection Results. The checker lists any errors and warnings, along with recommendations on how to fix them.
- Apply the recommended actions to address each issue. Select an issue, view the recommended actions, and apply the fix directly from the pane.
 |
fig. 1 - Check Accessibility |
 |
fig. 2 - Check Accessibility Best Practices |
- Go to File > Options > Accessibility
- Select the option to show "Keep accessibility checker running while I work."
Monday, October 21, 2024
Streamline Your Day with Outlook's New Meeting Setup Option
Monday, March 4, 2024
Create Like a Pro with Copilot Pro in Outlook
- Ensure you have an active subscription to Microsoft 365 that includes Copilot Pro.
- Once the purchase is confirmed, Copilot Pro will be added to your Outlook.
- Find the Copilot Pro icon in the Outlook ribbon to start using its features.
- Use the ‘Draft’ feature to compose emails with AI-powered assistance, enhancing your writing efficiency.
- Try the ‘Coaching’ feature for real-time suggestions to improve your email communication style.
 |
| fig. 1 - Copilot Pro in Outlook - Prompt |
 |
| fig. 2 - Copilot Pro in Outlook - Draft Response |
onecooltip.com@gmail.com
Monday, January 22, 2024
Unleash the Hidden Power of Outlook Shortcuts
onecooltip.com@gmail.com
Monday, November 27, 2023
How to Master Microsoft Outlook Search
- Open Microsoft Outlook.
- Navigate to the Search Box, located at the top of the Outlook window.
- Type in the specific search operator you wish to use.
- For example, from:(sender) will show all emails from a specific sender.
- Press Enter to display all emails that match your search operator.
- Press and Hold the Filter icon to display search screen.
- Use the screen to enter your search criteria in one or more fields.
- Then press Search to see the results.
Saturday, September 16, 2023
Windows Super Secret Keyboard Shortcuts to Open Microsoft Applications
- Press and hold the Control + Shift + Alt + Windows + a letter from the list below for each application.
- For example, L for LinkedIn.
Application
Windows Keyboard Shortcut
CTRL + SHIFT + ALT + WIN + L
Word
CTRL + SHIFT + ALT + WIN + W
Excel
CTRL + SHIFT + ALT + WIN + X
PowerPoint
CTRL + SHIFT + ALT + WIN + P
Outlook
CTRL + SHIFT + ALT + WIN + O
Microsoft Teams
CTRL + SHIFT + ALT + WIN + T
OneDrive
CTRL + SHIFT + ALT + WIN + D
OneNote
CTRL + SHIFT + ALT + WIN + N
Tuesday, September 5, 2023
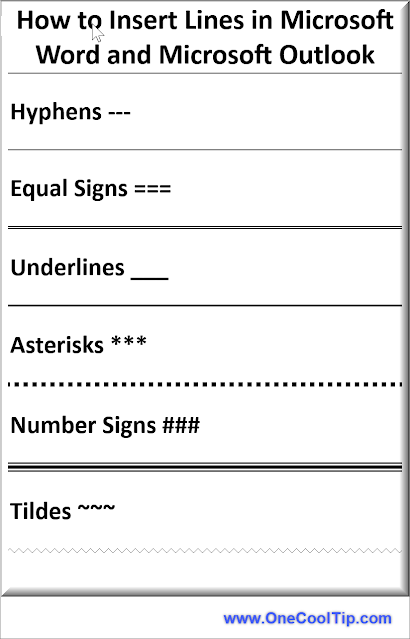
How to Quickly Create Different Types of Lines in Microsoft Word
- Three hyphens (—) create a plain single line
- Three equal signs (===) create a plain double line
- Three underline symbols (___) create a bold single line
- Three asterisks (***) create a broken or dotted line
- Three number signs (###) create a triple line with a thick center
- Three tildes (~~~) create a wavy line
Monday, July 17, 2023
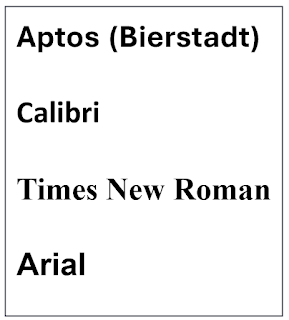
Say Goodbye to Calibri - Hello Aptos!
The new font will gradually become the default across all Microsoft 365 apps and services for all users over the coming months.
Please Like and Share OneCoolTip.com!
READ MORE
http://www.onecooltip.com
Cool Tech Tips for a Cooler Life!
#Microsoft #Aptos #NewFont #DefaultFont #MicrosoftOffice #Office #Microsot365 #Word #Excel #PowerPoint #Outlook #TechTip #OneCoolTip @Microsoft
Source: Microsoft Design
Monday, May 15, 2023
How to Save Time and Effort with Microsoft Quick Parts
Do you often find yourself typing the same text over and over again in your emails and documents?
Do you wish there was a way to insert reusable pieces of content with just a few clicks?
If so, try this Cool Tip: Microsoft Quick Parts.
Quick Parts is a feature that allows you to create, store, and insert snippets of text, graphics, fields, and document properties into your Microsoft Word and Microsoft Outlook files.
You can use Quick Parts to speed up repetitive tasks, such as adding directions, signatures, meeting notes, and more.
There are different types of building blocks, such as AutoText, Document Property, Field, and Header.
AutoText is the most common type of building block that stores text and graphics.
For example, you can create an AutoText entry for your email signature and insert it into any email with a few clicks.
Quick Parts are not limited to text and graphics.
You can also use them to insert fields that display dynamic information, such as dates, page numbers, document titles, and more.
You can also use them to insert document properties that store metadata about your file, such as author name, company name, keywords, and more.
How to Create a Quick Part
- Select the text or graphic that you want to save as a Quick Part. You can select any amount of content, from a single word to a whole paragraph or table.
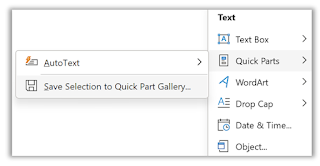
- On the Insert tab, in the Text group, click Quick Parts.
- Click Save Selection to Quick Part Gallery.
- In the Create New Building Block dialog box, give your Quick Part a name and choose a gallery where you want to store it. You can also add a description, category, and options for how you want it to be inserted.
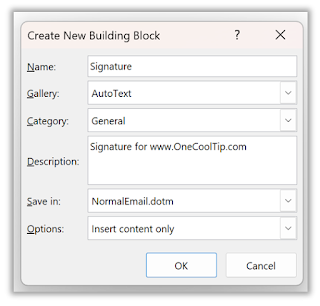 |
| fig. 3 - Save New Building Block |
- Click OK.
Your Quick Part is now saved and ready to use.
How to Insert a Quick Part
Inserting a Quick Part is even easier than creating one.
Just follow these steps:
- Place your cursor where you want to insert the Quick Part.
- On the Insert tab, in the Text group, click Quick Parts.
- Select the Quick Part that you want to insert from the gallery.
Alternatively, you can type the name of the Quick Part and press F3 to insert it automatically.
How to Modify a Quick Part
If you want to change the content or properties of a Quick Part, you can do so by following these steps:
- Insert the Quick Part that you want to modify into your file.
- Make the changes that you want to apply.
- Select the modified content.
- On the Insert tab, in the Text group, click Quick Parts.
- Click Save Selection to Quick Part Gallery.
- In the Create New Building Block dialog box, choose the same name and gallery as the original Quick Part.
- Click OK.
You will be asked if you want to overwrite the existing Quick Part. Click Yes.
Your Quick Part is now updated with the changes.
How to Delete a Quick Part
If you no longer need a Quick Part, you can delete it by following these steps:
- On the Insert tab, in the Text group, click Quick Parts.
- Click Building Blocks Organizer.
- In the Building Blocks Organizer dialog box, select the Quick Part that you want to delete from the list.
- Click Delete.
- Click Yes to confirm.
Your Quick Part is now deleted from the gallery.
Cool Tips for Using Quick Parts
- Use descriptive names for your Quick Parts so that you can easily find them in the gallery or type them with F3.
- Use categories to organize your Quick Parts by topic or purpose.
- Use keyboard shortcuts to create and insert Quick Parts faster.
- For example:
- Press Alt+F3 to create a new Quick Part from selected content.
- Press Ctrl+F3 to copy selected content to the Spike (a special clipboard that stores multiple items).
- Press Ctrl+Shift+F3 to paste all
Please LIKE and SHARE OneCoolTip.com!


