Showing posts with label Microsoft Paint. Show all posts

Wednesday, November 12, 2025

New “Save as Project” in Windows 11 Paint

New “Save as Project” in Windows 11 Paint

Microsoft Paint just got a big upgrade.  You can now save your artwork as editable project files, not just flat images. This means you can reopen and tweak your creations later, just like you would in Photoshop.

By Rodger Mansfield, Technology Editor
November 12, 2025


Microsoft Paint
Have you ever closed Paint and realized you forgot to fix a line or change a color? 

Until now, you were out of luck. 

Here's a Cool Tip:  Use the New 'Save as Project' feature.

The new Save as Project feature lets you preserve layers and edits for later. 

Windows 11 users can now treat Paint like a true image editor, not just a pixel sketchpad.

Save as Project in Paint


Feature Explanation

The new “Save as Project” option turns Paint into a non-destructive editor. 

Instead of flattening everything into a .PNG or .JPEG, you can save your file in a new .paint (Microsoft Paint Project) format. 

When you reopen the file, every layer and adjustment remains intact, ready for more editing.

This brings Paint closer to Photoshop or GIMP in workflow but keeps its clean, simple interface. 

You can now start a project one day, save your progress, and come back to refine it later without losing any layers, selections, or effects.

Here’s what’s new:
  • New File Type: .paint (Paint Project).
  • Layer Preservation: Keeps text, shapes, and images separate.
  • Quick Reopen: Resume editing exactly where you left off.
  • Seamless Export: Convert to .PNG, .JPEG, or .BMP anytime.

What You’ll Gain
  • Save and return to your artwork later.
  • Keep your edits and layers intact.
  • Work more efficiently across sessions.
  • Enjoy Paint’s simplicity with pro-style control.

Step-by-Step Instructions

Here's how to do it.

Windows 11 Desktop (Paint v11.2509 or later)
  1. Open Paint. Launch from the Start menu or search bar.
  2. Create or edit your image. Add text, shapes, or layers as usual.
  3. Go to File menu, then Save As Project.
  4. Choose “Paint Project (*.paint)” from the format dropdown.
  5. Name your file and choose a save location.
  6. To continue editing later, open the .paint file instead of a .png.
  7. When finished, export your project to a standard image format.

fig. 1 - “Save As” dialog showing the Paint Project (.paint) format.

Pros and Cons

Pros
  • Enables non-destructive editing for the first time.
  • Perfect for creative users and educators.
  • Integrates with Windows 11’s modern save dialog.

Cons
  • Files can be larger than PNGs.
  • Not compatible with older Paint versions.
  • Limited layer effects compared to pro tools.

Real-World Examples
  • Business users: Save branded image templates or diagrams as editable projects for future updates.
  • Educators: Create visual lesson materials and revise them semester to semester.
  • Home users: Perfect for personal art projects or meme creation without starting from scratch each time.

Configuration Guide
  • Enablement: No manual toggle required; available by default after the latest Windows 11 Paint update (v11.2509+).
  • File Association: Windows automatically recognizes .paint files and opens them in Paint.
  • Optional Settings: None; save, reopen, and export work seamlessly.
Subscribe to One Cool Tip Newsletter

Feature Access
  • Platform: Windows 11 only.
  • Availability: Rolling out via Microsoft Store Paint app update (version 11.2509 or later).
  • Subscription: Free for all Windows 11 users.

Score

Criterion | Score (0–10) | Justification

Value 9
Adds a professional-grade workflow to a free app.

Usability 8
Intuitive and automatic; fits existing habits.

Wow Factor 7
Layers in Paint surprise long-time Windows users.

Total: 24/30 👍 Good
Paint’s new project files transform it from a throwaway doodle tool into a legitimate creative workspace, finally worthy of daily use. 

Windows Wednesday
Key Takeaways

Paint’s “Save as Project” mode is a quiet revolution for Windows users. 

You can now work like a pro without paying for Photoshop or risking lost edits. 

It’s simple, fast, and integrated right where you already create.

Cool Tip Snapshot
  • Feature Name: Save as Project.
  • Platform(s): Windows 11.
  • Quick Benefit: Save layered Paint files to edit later.
  • Access Type: Free update.

Try It Yourself

Update Paint from the Microsoft Store, open a project, and try saving it as .paint. 

Experiment with shapes and text, close it, then reopen.  

Your layers will still be there. 

Share this Cool Tip with a friend who still screenshots everything!


READ MORE

Stay Connected with One Cool Tip

👍 Like and Share: Help others discover OneCoolTip.com!
📬 Subscribe: Get the FREE OneCoolTip Newsletter delivered straight to your inbox.
💡 Support the Site: Chip in through TIPJAR to keep the Cool Tips coming.

Explore More

X (Twitter): @OneCoolTip
Threads: @onecooltip

Have a great tip or tech question?

Rodger Mansfield
a seasoned technology expert and editor of OneCoolTip.com, transforms complex tech into practical advice for everyday users. His Cool Tips empower readers to stay productive, secure, and one step ahead in the digital world.


One Cool Tip
Cool Tech Tips for a Cooler Life!


#Windows11 #MicrosoftPaint #Productivity #Creativity  @Windows #WindowsWednesday 
#TechTips #OneCoolTip @onecooltip


Copyright © 2008-2025 | www.OneCoolTip.com | All Rights Reserved

Wednesday, March 12, 2025

Microsoft Paint Adds Copilot Remove Background Feature: A Game-Changer for Image Editing

Microsoft Paint Adds Copilot Remove Background Feature: A Game-Changer for Image Editing

Microsoft Paint's new Copilot Remove Background feature revolutionizes image editing by simplifying the process of isolating subjects from their backgrounds. This Cool Tip explores the feature's key functions, benefits, and step-by-step instructions for users.

By Rodger Mansfield, Technology Editor 
March 12, 2025


Microsoft Paint
Have you ever struggled with removing the background from an image, only to end up with jagged edges and unsatisfactory results? 

Here's a Cool Tip:  Try the New "Remove Background" Feature in Microsoft Paint.

Microsoft Paint's latest update introduces the Copilot Remove Background feature, promising to make this task a breeze. 

But what exactly does this feature offer, and how can it benefit users?

The Copilot Remove Background Feature

Microsoft Paint, a staple of Windows for decades, has received a significant upgrade with the introduction of the Copilot button. 

This button consolidates various AI-powered tools, including the new Remove Background feature. 

The Remove Background tool allows users to effortlessly isolate subjects from their backgrounds, making image editing more accessible and efficient.

Windows Wednesday

Tuesday, November 14, 2023

How to Use Cocreator AI in Microsoft Paint for Windows 11

Note: Cocreator is now Copilot in Microsoft Paint.

Have you ever wondered how to transform your digital artistry with the power of AI? 

Or perhaps you’re curious about the latest features in Microsoft Paint for Windows 11? 

Here's a Cool Tip.  Use the New Cocreator AI feature in Paint for Windows 11.

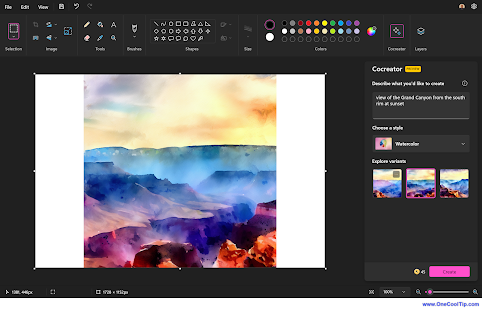
Cocreator is a new feature in Microsoft Paint for Windows 11 that allows you to generate images from text descriptions using AI. 

It’s powered by a powerful AI model called DALL-E. 

It’s also a great tool for generating initial ideas or drafts that can be further refined manually.

Here’s how to use it:
  • Open Microsoft Paint.
  • Select the Cocreator icon on the toolbar to see the Cocreator side panel.
Microsoft Paint Cocreator Sidebar

fig. 1 - Microsoft Paint Cocreator Sidebar

  • In the text box, enter a description of the image you want to create. For example, you can type “a blue cat with a red hat” or “a landscape with mountains and a lake”. Be descriptive as possible to generate results matching your expectations.
    • In my example, I used "view of the Grand Canyon from the south rim at sunset"
  • After you enter the text, choose a style in which you want to create your image and then select the Create button.
    • In my example, I selected "Watercolor".
  • Cocreator will generate three different variants of the image you requested, you can click on any of the variants to apply that image to Paint canvas and start creating.
Microsoft Paint Cocreator example

fig. 2 - Microsoft Paint Cocreator example

  • Select the image you want to use.
  • Edit and save your image.

Paint - Grand Canyon South Rim at Sunset

fig. 3 - Paint - Grand Canyon South Rim at Sunset

Please note that to use Cocreator, you need to sign in with your Microsoft account. 

Cocreator is rolling out to users and it may not be available to you now.

Cocreator uses a cloud-based service that requires authentication and authorization. 

Signing in with your Microsoft account also allows you to access your credits, which are needed to generate images with DALL-E. 

Each time you generate an image, you spend one credit. 

You will receive 50 credits to create images when you join Cocreator.

Enjoy!


Please LIKE and SHARE OneCoolTip.com!
Visit the OneCoolTip YouTube Channelhttps://www.youtube.com/@onecooltip


READ MORE

OneCoolTip.com
Cool Tech Tips for a Cooler Life


#Microsoft @Microsoft #Paint #MicrosoftPaint #AI #CoCreatorAI #DigitalArt #Windows #Windows11 #TechTips #OneCoolTip @OneCoolTip

Sunday, November 5, 2023

How to Use Layers in Microsoft Paint

Microsoft Windows 11 Paint
Have you ever wished for a simple tool that could help you create complex designs? 

Have you ever wanted to experiment with layers without having to navigate the intricacies of professional software like Photoshop? 

Here's a Cool Tip.  Check out the new layers feature in  Microsoft Paint for Windows 11.

Microsoft has recently introduced a layers feature in its Paint application for Windows 11.

This feature, typically found in more complex software like Photoshop and Gimp, allows users to stack multiple images, text, and graphics on top of each other, which can then be manipulated individually.

Here's how to do it.

  • Open Paint on Windows 11.
  • Click the Layers button in the command bar.
Microsoft Paint
fig. 1 - Microsoft Paint Layers

  • Click the Plus (+) button (Ctrl + Shift + N) to create a new layer.
  • Insert an image or create a shape with the tools available in Paint.
  • Drag the layers to change their order and bring a layer forward or backward.
  • Right-click the layer and choose the “Delete layer” option to remove it from the file.
  • Right-click the layer from the right pane and choose the “Duplicate layer” to create another instance of the same element.
  • Right-click the layer and select the “Hide layer” to work on another layer.
  • Right-click the layer and choose the “Merge down” option to combine the layer with the layer immediately below it.
Microsoft Windows 11 Paint Options

fig. 2 - Microsoft Windows 11 Paint Options


  • Each layer can have its own paint object(s).
  • For example, in this example, each layer has its own object: background, Person and Text.
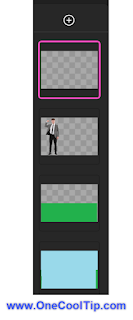
Microsoft Paint - Each Layer Has Its Own Object

fig. 3 - Microsoft Paint - Each Layer Has Its Own Object
  • Click the Save button.


Microsoft Paint with Layers Example

fig. 4 - Microsoft Paint with Layers Example


Enjoy!


Please LIKE and SHARE OneCoolTip.com!
Visit the OneCoolTip YouTube Channelhttps://www.youtube.com/@onecooltip

READ MORE


OneCoolTip.com
Cool Tech Tips for a Cooler Life!

#Microsoft @Microsoft #Windows @Microsoft #technology #tech #innovation #technews #gadgets #Windows11 #MicrosoftPaint #layers #digitalart #TechTips #OneCoolTip @OneCoolTip 


Saturday, September 9, 2023

How to Enable Dark Mode in Microsoft Paint

Microsoft Paint
Do you find yourself squinting at your screen at night while using Microsoft Paint? 

If so, you're not alone. 

The light-colored interface can be harsh on the eyes, especially in low-light conditions.

Here's a Cool Tip:  Set MS Paint to the New Dark Mode in Windows 11

This Cool Tip makes Paint easier on your eyes inverting the colors of the interface, making it much easier to see in the dark.

How to Enable Dark Mode in Microsoft Paint
fig. 1 - How to Enable Dark Mode in Microsoft Paint

Here's how to do it:
  • Ensure you have the latest version of Paint from the Microsoft App Store.
    • The version that supports dark mode is 11.2304.17.02 or greater. 
    • If you need the newer version, go to the Start Menu, and search for the Microsoft Store App.
  • Open Paint.
  • Click on the Settings gear icon in the top-right corner.
  • Select App theme.
  • Choose Dark.
  • Select the back arrow to return to the home screen.
Cool Tip:
  • You can also enable dark mode for all of your Windows apps, including Windows 10, by going to Settings > Personalization > Colors and selecting Dark under Choose your mode.

That's it! 


Enjoy!


Please LIKE and SHARE OneCoolTip.com!


READ MORE

OneCoolTip.com
Cool Tech Tips for a Cooler Life!


#Microsoft @Microsoft #microsoftpaint #darkmode #dark #mode #windows10 #windows11 #techtips #howto #TechTips #OneCoolTip @OneCoolTip